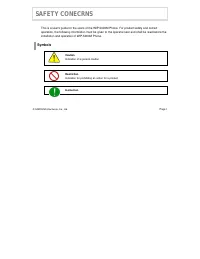
Page 5 - SAFETY CONECRNS; Symbols
© SAMSUNG Electronics Co., Ltd. Page I SAFETY CONECRNS This is a user's guide for the users of the WIP-5000M Phone. For product safety and correct operation, the following information must be given to the operator/user and shall be read before the installation and operation of WIP-5000M Phone. Symbo...
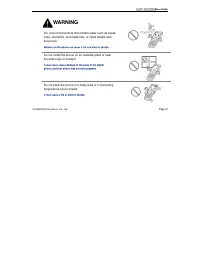
Page 7 - Do not put instruments that contain water such as vases,; WARNING
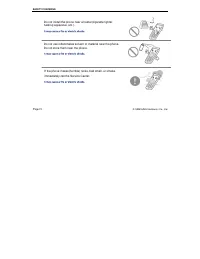
User Guide © SAMSUNG Electronics Co., Ltd. Page III WARNING Do not put instruments that contain water such as vases, cups, cosmetics, and medicines, or small metals near the phone. Moisture in the phone can cause a fire and electric shocks. Do not install the phone on an unstable place or near the d...
Page 8 - immediately call the Service Center.
SAFETY CONCERNS Page IV © SAMSUNG Electronics Co., Ltd. Do not install the phone near a heater(cigarette lighter, heating apparatus, etc.). It may cause a fire or electric shocks. Do not use inflammable solvent or material near the phone. Do not store them near the phone. It may cause a fire or elec...
Page 9 - Do not place heavy things on the phone.; Do not separate, repair nor remodel the phone arbitrarily.; CAUTION
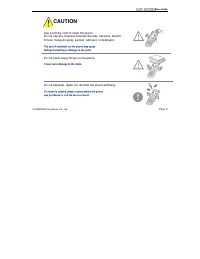
User Guide © SAMSUNG Electronics Co., Ltd. Page V CAUTION Use a soft dry cloth to clean the phone. Do not use any chemical solvents like wax, benzene, alcohol, thinner, mosquito spray, aerosol, lubricant, or detergent. The use of chemicals on the phone may cause fading/discoloring or damage to the p...
Page 11 - ABOUT THIS GUIDE; instructions for infrequently used features.
© SAMSUNG Electronics Co., Ltd. Page VII ABOUT THIS GUIDE This user guide provides instructions for the use of Samsung’s latest WIP-5000M wireless IP phone Mobile type that can be used in connection with the Samsung’s Enterprise IP Solutions OfficeServ System. Please take the time to study this guid...
Page 12 - Conventions
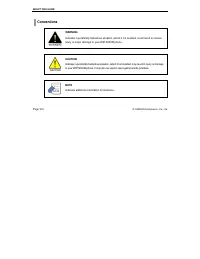
ABOUT THIS GUIDE Page VIII © SAMSUNG Electronics Co., Ltd. Conventions WARNING Indicates a potentially hazardous situation, which if not avoided, could result in serious injury or major damage to your WIP-5000M phone. CAUTION Indicates a potentially hazardous situation, which if not avoided, may res...
Page 13 - TABLE OF CONTENTS; SAFETY CONCERNS
© SAMSUNG Electronics Co., Ltd. Page IX TABLE OF CONTENTS SAFETY CONCERNS Symbols ..........................................................................................................................................................I Warning .........................................................
Page 14 - BASIC FEATURES
TABLE OF CONTENTS Page X © SAMSUNG Electronics Co., Ltd. Inserting / Removing the Battery ................................................................................................. 7 To Insert the Battery ...........................................................................................
Page 15 - APPLICATION MENUS
User Guide Setting / Disabling the Automatic Key Lock ............................................................................. 17 To Set up the Automatic Key Lock ...............................................................................................................18 To Disable the Aut...
Page 18 - ANNEX
TABLE OF CONTENTS Page XIV © SAMSUNG Electronics Co., Ltd. ANNEX Entering Characters.................................................................................................................... 87 Buttons Used for Entering Characters ..............................................................
Page 19 - PREPATATION; Introduction to the WIP-5000M
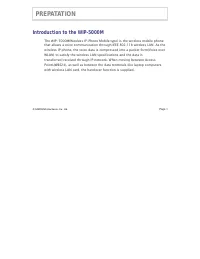
© SAMSUNG Electronics Co., Ltd. Page 1 PREPATATION Introduction to the WIP-5000M The WIP-5000M(Wireless IP-Phone Mobile type) is the wireless mobile phone that allows a voice communication through IEEE 802.11b wireless LAN. As the wireless IP phone, the voice data is compressed into a packet form(Vo...
Page 20 - Checking the Parts in the Package
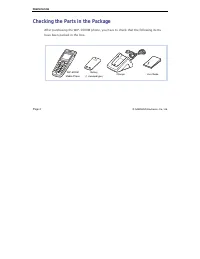
PREPATATION Page 2 © SAMSUNG Electronics Co., Ltd. Checking the Parts in the Package After purchasing the WIP-5000M phone, you have to check that the following items have been packed in the box. WIP-5000M Mobile Phone Battery (1 standard type) Charger User Guide
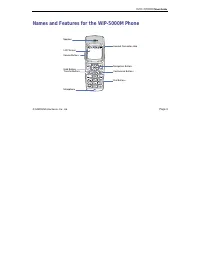
Page 21 - Names and Features for the WIP-5000M Phone
User Guide © SAMSUNG Electronics Co., Ltd. Page 3 Names and Features for the WIP-5000M Phone Speaker LCD Screen Volume Buttons Navigation Buttons Headset Connection Hole Transfer Buttons Conference Buttons Hold Buttons Dial Buttons Microphone
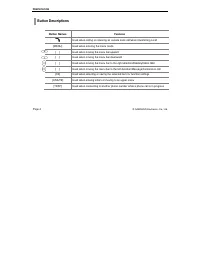
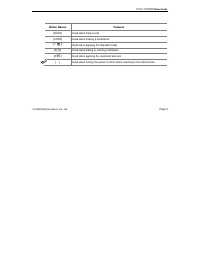
Page 22 - Button Descriptions
PREPATATION Page 4 © SAMSUNG Electronics Co., Ltd. Button Descriptions Button Names Features [ ] Used when calling or receiving an outside trunk call/when transferring a call [MENU] Used when entering the menu mode [ ] Used when moving the menu bar upward [ ] Used when moving the menu bar downward [...
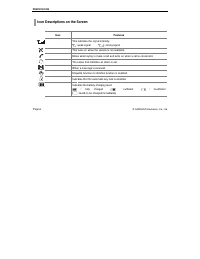
Page 24 - Icon Descriptions on the Screen
PREPATATION Page 6 © SAMSUNG Electronics Co., Ltd. Icon Descriptions on the Screen Icon Features This indicates the signal intensity. : weak signal : strong signal This turns on when the service is not available. Blinks when trying to make a call and turns on when a call is connected. The status tha...
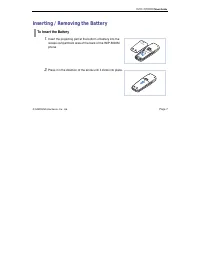
Page 25 - Inserting / Removing the Battery; To Insert the Battery; . Insert the projecting part at the bottom of battery into the
User Guide © SAMSUNG Electronics Co., Ltd. Page 7 Inserting / Removing the Battery To Insert the Battery 1 . Insert the projecting part at the bottom of battery into the recess compartment area of the back of the WIP-5000M phone. 2 . Press it in the direction of the arrow until it clicks into place.
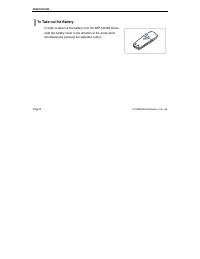
Page 26 - To Take out the Battery; In order to take out the battery from the WIP-5000M phone,
PREPATATION Page 8 © SAMSUNG Electronics Co., Ltd. To Take out the Battery In order to take out the battery from the WIP-5000M phone, slide the battery cover in the direction of the arrow while simultaneously pressing the separator button.
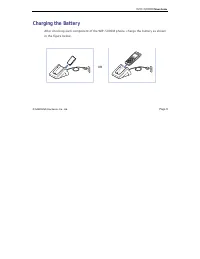
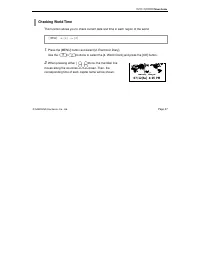
Page 27 - Charging the Battery; OR
User Guide © SAMSUNG Electronics Co., Ltd. Page 9 Charging the Battery After checking each component of the WIP-5000M phone, charge the battery as shown in the figure below. OR
Page 28 - Checking the Battery Status; Low Battery Indication
PREPATATION Page 10 © SAMSUNG Electronics Co., Ltd. Checking the Battery Status The battery status can be checked by looking at the battery status icons given below that appear on the LCD panel of the WIP-5000M phone. Low Battery Indication When the battery energy is almost discharged, the phone mak...
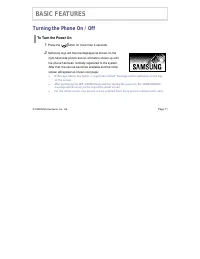
Page 29 - Turning the Phone On / Off; To Turn the Power On; . Samsung logo will then be displayed as shown on the
© SAMSUNG Electronics Co., Ltd. Page 11 BASIC FEATURES Turning the Phone On / Off To Turn the Power On 1 . Press the [ ] button for more than 2 seconds. 2 . Samsung logo will then be displayed as shown on the right-hand side picture and an animation shows up until the phone has been normally registe...
Page 30 - To Turn the Power Off; Samsung Logo
BASIC FEATURES Page 12 © SAMSUNG Electronics Co., Ltd. page. Refer to ‘Selecting the background picture’ section in ‘Application Menus’ of this guide for selecting the initial screen. To Turn the Power Off Press the [ ] button for more than 2 seconds. NOTE 07/12[Sa] 4 : 05 PM 07/12[Sa] 4 : 05 PM 12 ...
Page 31 - The short animation is displayed on the screen
User Guide © SAMSUNG Electronics Co., Ltd. Page 13 The short animation is displayed on the screen and then the phone automatically turns off.
Page 32 - Making a call; basic function will be introduced in this guide.; Making a Call by Pressing the Phone Numbers
BASIC FEATURES Page 14 © SAMSUNG Electronics Co., Ltd. Making a call There are several ways to make a call for the convenience of you. However, only the basic function will be introduced in this guide. Refer to ‘Using the Directory’ section in ‘Application Menus’ of this guide for how to use the lat...
Page 33 - ] button. When the animation appears on; Answering a call
User Guide © SAMSUNG Electronics Co., Ltd. Page 15 2 . Press the [ ] button. When the animation appears on the screen, the call is being connected. 3 . After the phone conversation, press the [ ] button to hang up and end the connection. Answering a call If the right-hand side ‘receiving a call’ ani...
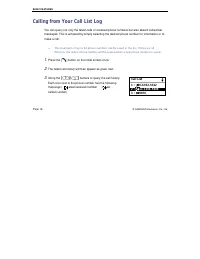
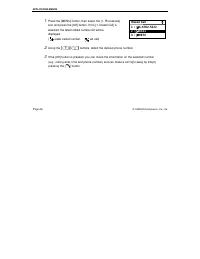
Page 34 - Calling from Your Call List Log; . The latest call history will then appear as given next.; Call List
BASIC FEATURES Page 16 © SAMSUNG Electronics Co., Ltd. Calling from Your Call List Log You can query not only the latest calls or received phone numbers but also absent subscriber messages. This is achieved by simply selecting the desired phone number for information or to make a call. z The maximum...
Page 35 - . Select the desired phone number and press the [; Voice Volume Adjustment
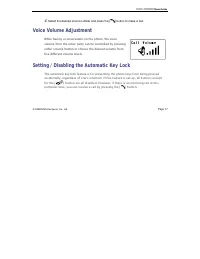
User Guide © SAMSUNG Electronics Co., Ltd. Page 17 4 . Select the desired phone number and press the [ ] button to make a call. Voice Volume Adjustment While having a conversation on the phone, the voice volume from the other party can be controlled by pressing either volume button to choose the des...
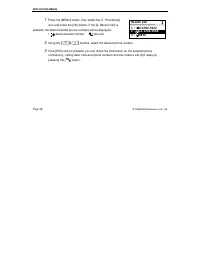
Page 36 - To Set up the Automatic Key Lock; initial screen. Then, the screen will display the automatic key; To Disable the Automatic Key Lock; and the automatic key lock function is disabled.
BASIC FEATURES Page 18 © SAMSUNG Electronics Co., Ltd. To Set up the Automatic Key Lock Press the [#/ ] button for more than 2 seconds on the initial screen. Then, the screen will display the automatic key lock icon( ). To Disable the Automatic Key Lock At the automatic key lock status, press the [#...
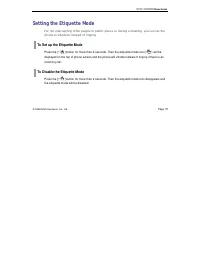
Page 37 - Setting the Etiquette Mode; phone to vibration instead of ringing.; To Set up the Etiquette Mode; To Disable the Etiquette Mode; Press the
User Guide © SAMSUNG Electronics Co., Ltd. Page 19 Setting the Etiquette Mode For not interrupting other people in public places or during a meeting, you can set the phone to vibration instead of ringing. To Set up the Etiquette Mode Press the [*/ ] button for more than 2 seconds. Then the etiquette...
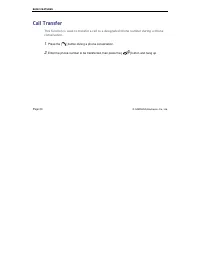
Page 38 - Call Transfer; . Enter the phone number to be transferred, then press the [
BASIC FEATURES Page 20 © SAMSUNG Electronics Co., Ltd. Call Transfer This function is used to transfer a call to a designated phone number during a phone conversation. 1 . Press the [ ] button during a phone conversation. 2 . Enter the phone number to be transferred, then press the [ ] button and ha...
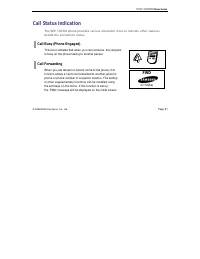
Page 39 - Call Status Indication; beside the connection status.; Call Forwarding; FWD
User Guide © SAMSUNG Electronics Co., Ltd. Page 21 Call Status Indication The WIP-5000M phone provides various animation icons to indicate other statuses beside the connection status. Call Busy (Phone Engaged) This icon indicates that when you call someone, the recipient is busy on the phone talking...
Page 40 - Call Camp on
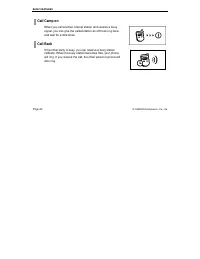
BASIC FEATURES Page 22 © SAMSUNG Electronics Co., Ltd. Call Camp on When you call another internal station and receive a busy signal, you can give the called station an off-hook ring tone and wait for a little while. Call Back If the other party is busy, you can reserve a busy station callback. When...
Page 41 - Entering the Application Menus
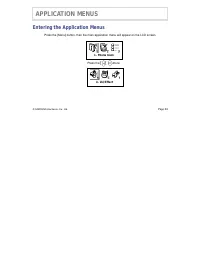
© SAMSUNG Electronics Co., Ltd. Page 23 APPLICATION MENUS Entering the Application Menus Press the [Menu] button, then the main application menu will appear on the LCD screen. Press the [ ] / [ ] buttons 1. Phone book 4. Vol/Effect
Page 42 - Phone book; to find out various methods to make a call
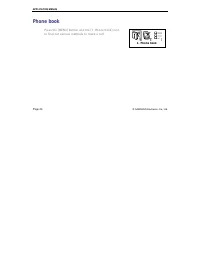
APPLICATION MENUS Page 24 © SAMSUNG Electronics Co., Ltd. Phone book Press the [MENU] button and the [1. Phone book] icon to find out various methods to make a call . 1. Phone book
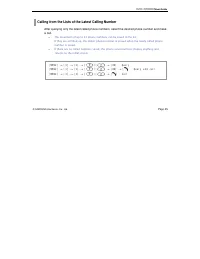
Page 43 - Calling from the Lists of the Latest Calling Number
User Guide © SAMSUNG Electronics Co., Ltd. Page 25 Calling from the Lists of the Latest Calling Number After querying only the latest called phone numbers, select the desired phone number and make a call. z The maximum of up to 32 phone numbers can be saved in the list. If they are all filled up, th...
Page 44 - selected, the latest called number list will be; Dialed Call
APPLICATION MENUS Page 26 © SAMSUNG Electronics Co., Ltd. 1 . Press the [MENU] button, then select the [1. Phonebook] icon and press the [OK] button. If the [1. Dialed Call] is selected, the latest called number list will be displayed. ( : Latest called number, : Failed call) 2 . Using the [ ] / [ ]...
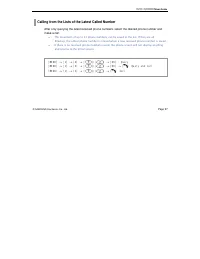
Page 45 - Calling from the Lists of the Latest Called Number
User Guide © SAMSUNG Electronics Co., Ltd. Page 27 Calling from the Lists of the Latest Called Number After only querying the latest received phone numbers, select the desired phone number and make a call. z The maximum of up to 32 phone numbers can be saved in the list. If they are all filled up, t...
Page 46 - selected, the latest received phone numbers will be displayed.; Recent Call
APPLICATION MENUS Page 28 © SAMSUNG Electronics Co., Ltd. 1 . Press the [MENU] button, then select the [1. Phonebook] icon and press the [OK] button. If the [2. Recent Call] is selected, the latest received phone numbers will be displayed. ( : Latest received number, : Failed call) 2 . Using the [ ]...
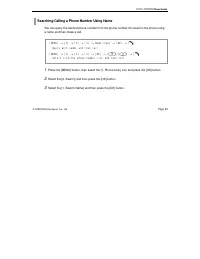
Page 47 - Searching/Calling a Phone Number Using Name; a name and then make a call.
User Guide © SAMSUNG Electronics Co., Ltd. Page 29 Searching/Calling a Phone Number Using Name You can query the desired phone number from the phone number list saved in the phone using a name and then make a call. 1 . Press the [MENU] button, then select the [1. Phone book] icon and press the [OK] ...
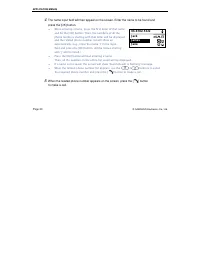
Page 48 - . When the related phone number appears on the screen, press the [; Jack
APPLICATION MENUS Page 30 © SAMSUNG Electronics Co., Ltd. 4 . The name input field will then appear on the screen. Enter the name to be found and press the [OK] button. z When entering a name, press the first letter of that name and hit the [OK] button. Then, the numbers of all the phone numbers sta...
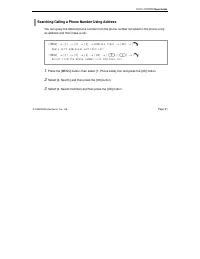
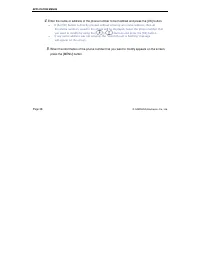
Page 49 - Searching/Calling a Phone Number Using Address; an address and then make a call.
User Guide © SAMSUNG Electronics Co., Ltd. Page 31 Searching/Calling a Phone Number Using Address You can query the desired phone number from the phone number list saved in the phone using an address and then make a call. 1 . Press the [MENU] button, then select [1. Phone book] icon and press the [O...
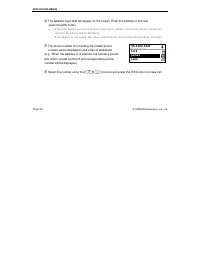
Page 50 - . The phone number list including the related phone
APPLICATION MENUS Page 32 © SAMSUNG Electronics Co., Ltd. 4 . The address input field will appear on the screen. Enter the address to find and press the [OK] button. z If the [OK] button is pressed without entering an address, the entire phone number list saved in the phone will be displayed. If an ...
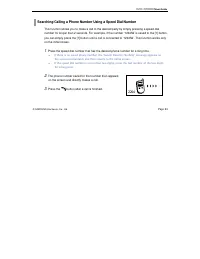
Page 51 - Searching/Calling a Phone Number Using a Speed Dial Number; on the initial screen.; . The phone number saved for that number then appears
User Guide © SAMSUNG Electronics Co., Ltd. Page 33 Searching/Calling a Phone Number Using a Speed Dial Number This function allows you to make a call to the desired party by simply pressing a speed dial number for longer than 2 seconds. For example, if the number ‘123456’ is saved to the [1] button,...
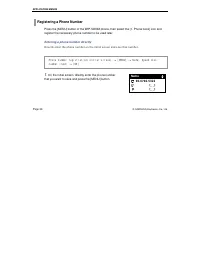
Page 52 - Registering a Phone Number; register the necessary phone number to be used later.; Name
APPLICATION MENUS Page 34 © SAMSUNG Electronics Co., Ltd. Registering a Phone Number Press the [MENU] button of the WIP-5000M phone, then select the [1. Phone book] icon and register the necessary phone number to be used later. Entering a phone number directly Directly enter the phone number on the ...
Page 53 - be used). Refer to the ‘Annex’ for how to enter the characters.
User Guide © SAMSUNG Electronics Co., Ltd. Page 35 2 . Enter the name that you want to save by using the dial buttons(up to 12 characters can be used). Refer to the ‘Annex’ for how to enter the characters. 3 . Assign the speed dial number for that name and enter it. 4 . Press the [OK] button to save...
Page 54 - Using the menu to save
APPLICATION MENUS Page 36 © SAMSUNG Electronics Co., Ltd. Using the menu to save This function allows you to save the phone number by using the menu function. 1. Press the [MENU] button, then select the [1. Phone book] icon and press the [OK] button. 2 . Select [4. New Entry] and press the [OK] butt...
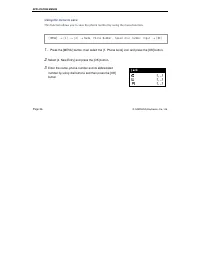
Page 55 - Modifying the Saved Phone Number; This is the method to modify the saved phone number.
User Guide © SAMSUNG Electronics Co., Ltd. Page 37 Modifying the Saved Phone Number This is the method to modify the saved phone number. 1 . Press the [MENU] button, then select the [1. Phone book] icon and [3. Search], and then press the [OK] button. 2 . Select [1. Search Name] or [2. Search Number...
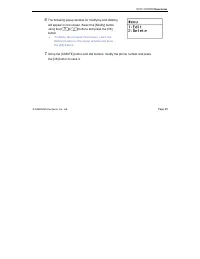
Page 57 - . The following popup window for modifying and deleting
User Guide © SAMSUNG Electronics Co., Ltd. Page 39 6 . The following popup window for modifying and deleting will appear on the screen. Select the [Modify] button using the [ ]/[ ] buttons and press the [OK] button. z To delete the retrieved information, select the [Delete] button on the popup windo...
Page 58 - Utilities
APPLICATION MENUS Page 40 © SAMSUNG Electronics Co., Ltd. Utilities Press the [MENU] button and select the [2. Utilities] icon. 2. Utilities
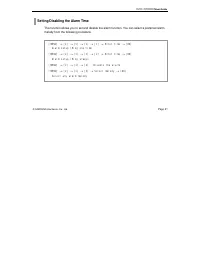
Page 59 - Setting/Disabling the Alarm Time; melody from the following procedure.
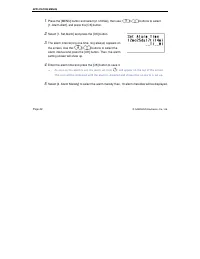
User Guide © SAMSUNG Electronics Co., Ltd. Page 41 Setting/Disabling the Alarm Time This function allows you to set and disable the alarm function. You can select a preferred alarm melody from the following procedure. [MENU] → [2] → [1] → [1] → [1] → Enter time → [OK] : Alarm setup /Ring one time [M...
Page 60 - ] buttons to select the
APPLICATION MENUS Page 42 © SAMSUNG Electronics Co., Ltd. 1 . Press the [MENU] button and select [2. Utilities], then use [ ]/[ ] buttons to select [1. Alarm Alert], and press the [OK] button. 2 . Select [1. Set Alarm] and press the [OK] button. 3 . The alarm interval(ring one time, ring always) app...
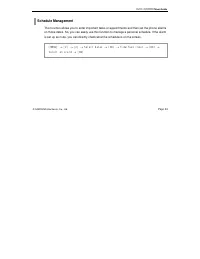
Page 61 - Schedule Management
User Guide © SAMSUNG Electronics Co., Ltd. Page 43 Schedule Management This function allows you to enter important tasks or appointments and then set the phone alarms on those dates. So, you can easily use this function to manage a personal schedule. If the alarm is set up as mute, you can directly ...
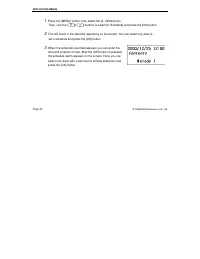
Page 62 - . When the schedule input field appears you can enter the
APPLICATION MENUS Page 44 © SAMSUNG Electronics Co., Ltd. 1 . Press the [MENU] button, then select the [2. Utilities] icon. Then, use the [ ]/[ ] buttons to select [2. Schedule] and press the [OK] button. 2 . This will result in the calendar appearing on the screen. You can select any date to set a ...
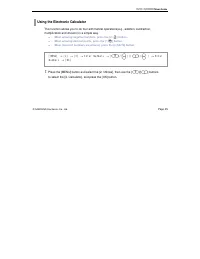
Page 63 - Using the Electronic Calculator; multiplication and division) in a simple way.
User Guide © SAMSUNG Electronics Co., Ltd. Page 45 Using the Electronic Calculator This function allows you to do four arithmetical operations(e.g., addition, subtraction, multiplication and division) in a simple way. z When entering negative numbers, press the [#/ ] button. z When entering decimal ...
Page 64 - . This will result in the electronic calculator appearing on
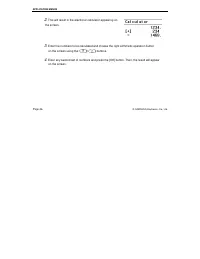
APPLICATION MENUS Page 46 © SAMSUNG Electronics Co., Ltd. 2 . This will result in the electronic calculator appearing on the screen. 3 . Enter the numbers to be calculated and choose the right arithmetic operation button on the screen using the [ ]/[ ] buttons. 4 . Enter any second set of numbers an...
Page 65 - Checking World Time; moves along the countries on the screen. Then, the
User Guide © SAMSUNG Electronics Co., Ltd. Page 47 Checking World Time This function allows you to check current date and time in each region of the world. 1 . Press the [MENU] button and select [2. Electronic Diary]. Use the [ ]/[ ] buttons to select the [4. World Clock] and press the [OK] button. ...
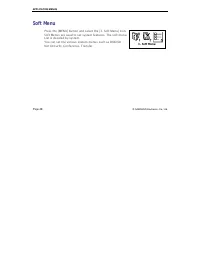
Page 66 - Soft Menu; Soft Menus are used to set system features. The soft menu
APPLICATION MENUS Page 48 © SAMSUNG Electronics Co., Ltd. Soft Menu Press the [MENU] button and select the [3. Soft Menu] Icon. Soft Menus are used to set system features. The soft menu List is decided by system. You can set the various system menus such as DND(Do Not Disturb), Conference, Transfer....
Page 67 - Volume Adjustment
User Guide © SAMSUNG Electronics Co., Ltd. Page 49 Volume Adjustment Press the [MENU] button and select the [4. Vol/Effect] icon. 4. Vol/Effect
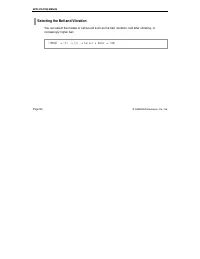
Page 68 - Selecting the Bell and Vibration; increasingly higher bell.
APPLICATION MENUS Page 50 © SAMSUNG Electronics Co., Ltd. Selecting the Bell and Vibration You can select the modes of call sound such as the bell, vibration, bell after vibrating, or increasingly higher bell. [MENU] → [4] → [1] → Select a Mode → [OK]
Page 69 - Otherwise, press the
User Guide © SAMSUNG Electronics Co., Ltd. Page 51 1 . Press the [MENU] button and select [4. Vol/Effect], then press the [OK] button. 2 . Select [1. Ring/Vibrate] and press the [OK] button. 3 . Press the [ ]/[ ] button and select a desired mode(bell/ vibration/ bell after vibrating/ increasingly hi...
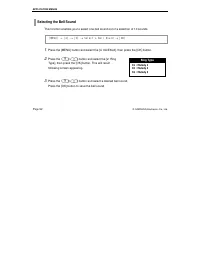
Page 70 - Selecting the Bell Sound; following screen appearing.; Ring Type
APPLICATION MENUS Page 52 © SAMSUNG Electronics Co., Ltd. Selecting the Bell Sound This function enables you to select one bell sound out of a selection of 10 sounds. 1 . Press the [MENU] button and select the [4. Vol/Effect], then press the [OK] button. 2 . Press the [ ]/[ ] button and select the [...
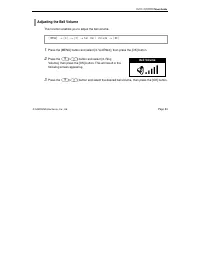
Page 71 - Adjusting the Bell Volume; This function enables you to adjust the bell volume.; Bell Volume
User Guide © SAMSUNG Electronics Co., Ltd. Page 53 Adjusting the Bell Volume This function enables you to adjust the bell volume. 1 . Press the [MENU] button and select [4. Vol/Effect], then press the [OK] button. 2 . Press the [ ]/[ ] button and select [3. Ring Volume], then press the [OK] button. ...
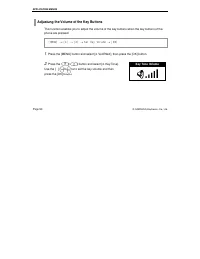
Page 72 - Adjustung the Volume of the Key Buttons; Key Tone Volume
APPLICATION MENUS Page 54 © SAMSUNG Electronics Co., Ltd. Adjustung the Volume of the Key Buttons This function enables you to adjust the volume of the key buttons when the key buttons of the phone are pressed. 1 . Press the [MENU] button and select [4. Vol/Effect], then press the [OK] button. 2 . P...
Page 73 - Setting My Phone
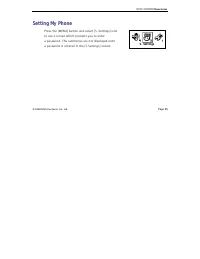
User Guide © SAMSUNG Electronics Co., Ltd. Page 55 Setting My Phone Press the [MENU] button and select [5. Settings] icon to see a screen which prompts you to enter a password. The submenus are not displayed until a password is entered in the [5.Settings] screen. 5. Settings
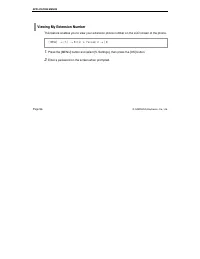
Page 74 - Viewing My Extension Number; . Enter a password on the screen when prompted.
APPLICATION MENUS Page 56 © SAMSUNG Electronics Co., Ltd. Viewing My Extension Number This feature enables you to view your extension phone number on the LCD screen of the phone. 1 . Press the [MENU] button and select [5. Settings], then press the [OK] button. 2 . Enter a password on the screen when...
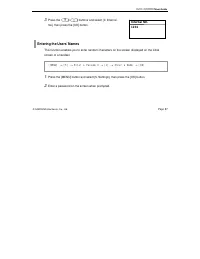
Page 75 - Entering the Users’ Names; screen of a handset.
User Guide © SAMSUNG Electronics Co., Ltd. Page 57 3 . Press the [ ]/[ ] buttons and select [0. Internal No], then press the [OK] button. Entering the Users’ Names This function enables you to enter random characters on the screen displayed on the initial screen of a handset. 1 . Press the [MENU] bu...
Page 76 - . A screen prompting you to enter a user’s name then
APPLICATION MENUS Page 58 © SAMSUNG Electronics Co., Ltd. 3 . Select [1: Name Edit]. 4 . A screen prompting you to enter a user’s name then appears. Enter the desired characters and press the [OK] button. For information about how to enter the characters, refer to ‘Annex’ section. NOTE
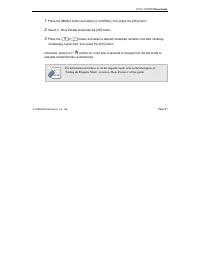
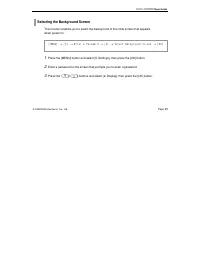
Page 77 - Selecting the Background Screen; . Enter a password on the screen that prompts you to enter a password.
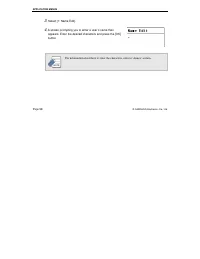
User Guide © SAMSUNG Electronics Co., Ltd. Page 59 Selecting the Background Screen This function enables you to select the background of the initial screen that appears when power on. 1 . Press the [MENU] button and select [5. Settings], then press the [OK] button. 2 . Enter a password on the screen...
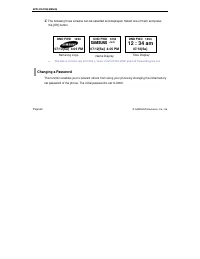
Page 78 - Changing a Password; set password of the phone. The initial password is set to 0000.
APPLICATION MENUS Page 60 © SAMSUNG Electronics Co., Ltd. 4 . The following three screens can be selected and displayed. Select one of them and press the [OK] button. z The above screens are all initial screens in which the DND and call forwarding are set. Changing a Password This function enables y...
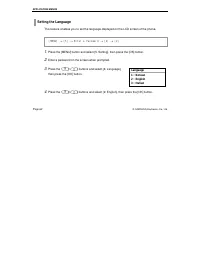
Page 80 - Setting the Language; Language
APPLICATION MENUS Page 62 © SAMSUNG Electronics Co., Ltd. Setting the Language This feature enables you to set the language displayed on the LCD screen of the phone. 1 . Press the [MENU] button and select [5. Setting], then press the [OK] button. 2 . Enter a password on the screen when prompted. 3 ....
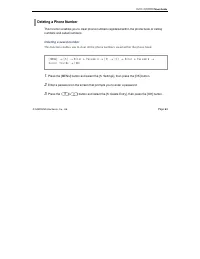
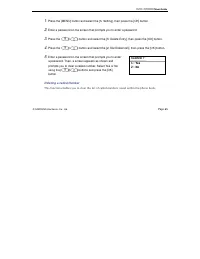
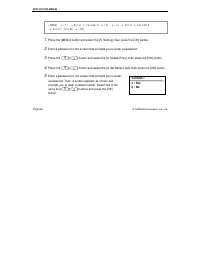
Page 81 - Deleting a Phone Number; numbers and called numbers.
User Guide © SAMSUNG Electronics Co., Ltd. Page 63 Deleting a Phone Number This function enables you to clear phone numbers registered within the phone book or calling numbers and called numbers. Deleting a saved number This function enables you to clear all the phone numbers saved within the phone ...
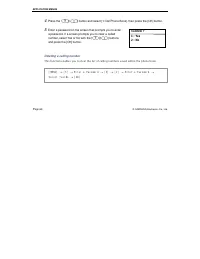
Page 82 - . Enter a password on the screen that prompts you to enter
APPLICATION MENUS Page 64 © SAMSUNG Electronics Co., Ltd. 4 . Press the [ ]/[ ] button and select [1: Del Phone Book], then press the [OK] button. 5 . Enter a password on the screen that prompts you to enter a password. If a screen prompts you to clear a called number, select Yes or No with the [ ]/...
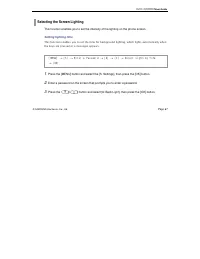
Page 85 - Selecting the Screen Lighting; Setting lighting time
User Guide © SAMSUNG Electronics Co., Ltd. Page 67 Selecting the Screen Lighting This function enables you to set the intensity of the lighting on the phone screen. Setting lighting time This function enables you to set the time for background lighting, which lights automatically when the keys are p...
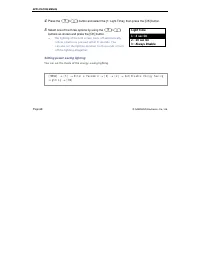
Page 86 - . Select one of the three options by using the [; Setting power saving lighting; Light Time
APPLICATION MENUS Page 68 © SAMSUNG Electronics Co., Ltd. 4 . Press the [ ]/[ ] button and select the [1: Light Time], then press the [OK] button. 5 . Select one of the three options by using the [ ]/[ ] buttons as shown and press the [OK] button. z The lighting of the LCD screen turns off automatic...
Page 87 - Power Saving
User Guide © SAMSUNG Electronics Co., Ltd. Page 69 1 . Press the [MENU] button and select the [5. Settings], then press the [OK] button. 2 . Enter a password on the screen that prompts you to enter a password. 3 . Press the [ ]/[ ] button and select the [6: Back Light], then press the [OK] button. 4...
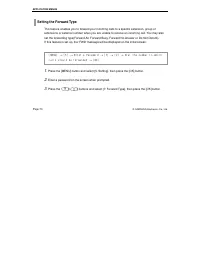
Page 88 - Setting the Forward Type
APPLICATION MENUS Page 70 © SAMSUNG Electronics Co., Ltd. Setting the Forward Type This feature enables you to forward your incoming calls to a specific extension, group of extensions or external number when you are unable to receive an incoming call. You may also set the forwarding type(Forward All...
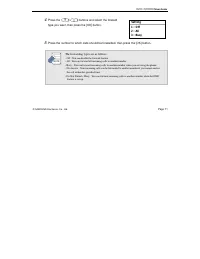
Page 89 - ] buttons and select the forward; Setting
User Guide © SAMSUNG Electronics Co., Ltd. Page 71 4 . Press the [ ]/[ ] buttons and select the forward type you want, then press the [OK] button. 5 . Press the number to which calls should be forwarded, then press the [OK] button. The forwarding types are as follows. - Off : You can disable the for...
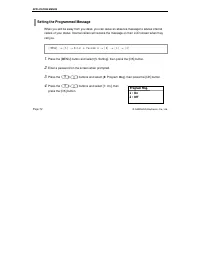
Page 90 - Setting the Programmed Message
APPLICATION MENUS Page 72 © SAMSUNG Electronics Co., Ltd. Setting the Programmed Message When you will be away from you desk, you can leave an absence message to advise internal callers of your status. Internal callers will receive the message on their LCD screen when they call you. 1 . Press the [M...
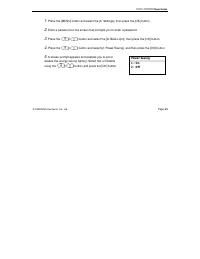
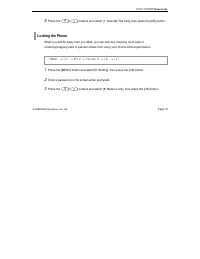
Page 91 - Locking the Phone
User Guide © SAMSUNG Electronics Co., Ltd. Page 73 5 . Press the [ ]/[ ] buttons and select [1. Give Me The Call], then press the [OK] button. Locking the Phone When you will be away from you desk, you can lock any outgoing trunk calls or incoming/outgoing calls to prevent others from using your pho...
Page 92 - Initialization; Initializing all; Station Lock
APPLICATION MENUS Page 74 © SAMSUNG Electronics Co., Ltd. 4 . Press the [ ]/[ ] buttons and select [1: On], then press the [OK] button. Initialization This function enables you to initialize all the functions and status of a phone. Initializing all This function enables you to initialize the status ...
Page 93 - Reset All
User Guide © SAMSUNG Electronics Co., Ltd. Page 75 1 . Press the [MENU] button and select the [5. Settings], then press the [OK] button. 2 . Enter a password on the screen that prompts you to enter a password. 3 . Press the [ ]/[ ] button and select the [ * , Reset], then press the [OK] button. 4 . ...
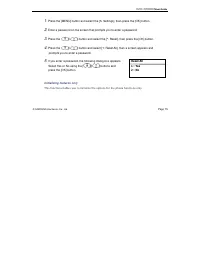
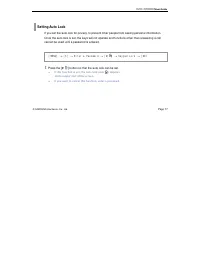
Page 95 - Setting Auto Lock; cannot be used until a password is entered.
User Guide © SAMSUNG Electronics Co., Ltd. Page 77 Setting Auto Lock If you set the auto lock for privacy, to prevent other people from seeing personal information. Once the auto lock is set, the keys will not operate and functions other than answering a call cannot be used until a password is enter...
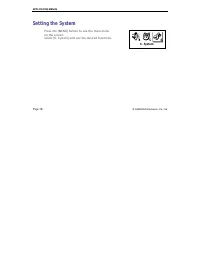
Page 96 - Setting the System; Press the [MENU] button to see the main menu
APPLICATION MENUS Page 78 © SAMSUNG Electronics Co., Ltd. Setting the System Press the [MENU] button to see the main menu on the screen. Select [6. System] and use the desired functions. 6. System
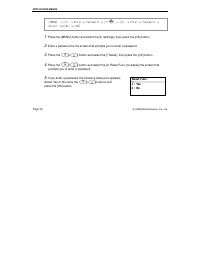
Page 97 - Registering a Phone; This function enables you to register a phone via the sytem.
User Guide © SAMSUNG Electronics Co., Ltd. Page 79 Registering a Phone This function enables you to register a phone via the sytem. [MENU] → [6] → [1] → Select System → [OK] → Enter a System ID → [OK] → Enter a User ID → [OK] → Enter a Password → [OK]
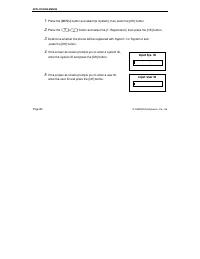
Page 98 - . If the screen as shown prompts you to enter a system ID,; Input User ID
APPLICATION MENUS Page 80 © SAMSUNG Electronics Co., Ltd. 1 . Press the [MENU] button and select [6. System], then press the [OK] button. 2 . Press the [ ]/[ ] button and select the [1: Registration], then press the [OK] button. 3 . Determine whether the phone will be registered with System 1 or Sys...
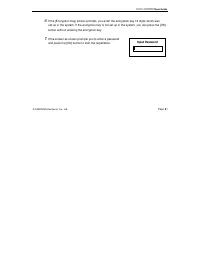
Page 99 - button without entering the encryption key.; Input Password
User Guide © SAMSUNG Electronics Co., Ltd. Page 81 6 . If the [Encryption Key] screen prompts, you enter the encryption key 13 digits which was set up in the system. If the encryption key is not set up in the system, you can press the [OK] button without entering the encryption key. 7 . If the scree...
Page 100 - Selecting a System; button to register the selected one.; System Setting
APPLICATION MENUS Page 82 © SAMSUNG Electronics Co., Ltd. Selecting a System This function easily enables you to register the two systems being used. 1 . Press the [MENU] button and select [6. System], then press the [OK] button. 2 . Press the [ ]/[ ] button and select the [2: System Setting], then ...
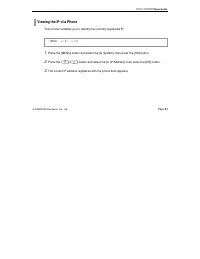
Page 101 - Viewing the IP of a Phone; . The current IP address registered with the phone then appears.
User Guide © SAMSUNG Electronics Co., Ltd. Page 83 Viewing the IP of a Phone This function enables you to identify the currently registered IP. 1 . Press the [MENU] button and select the [6. System], then press the [OK] button. 2 . Press the [ ]/[ ] button and select the [3: IP Address], then press ...
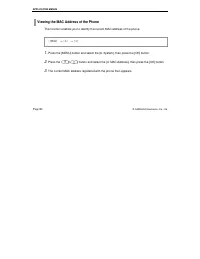
Page 102 - Viewing the MAC Address of the Phone; . The current MAC address registered with the phone then appears.
APPLICATION MENUS Page 84 © SAMSUNG Electronics Co., Ltd. Viewing the MAC Address of the Phone This function enables you to identify the current MAC address of the phone. 1 . Press the [MENU] button and select the [6. System], then press the [OK] button. 2 . Press the [ ]/[ ] button and select the [...
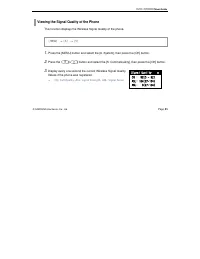
Page 103 - Viewing the Signal Quality of the Phone; This function displays the Wireless Signal Quality of the phone.
User Guide © SAMSUNG Electronics Co., Ltd. Page 85 Viewing the Signal Quality of the Phone This function displays the Wireless Signal Quality of the phone. 1 . Press the [MENU] button and select the [6. System], then press the [OK] button. 2 . Press the [ ]/[ ] button and select the [5: CommsQuality...
Page 104 - Setting LCD Contrast of the Phone
APPLICATION MENUS Page 86 © SAMSUNG Electronics Co., Ltd. Setting LCD Contrast of the Phone This feature support to set the LCD contrast if you want to change it. 1 . Press the [MENU] button and select the [6. System], then press the [OK] button. 2 . Press the [ ]/[ ] button and select the [6. LCD C...
Page 105 - Buttons Used for Entering Characters; The buttons used for entering the characters are as follows.; Entering Characters
© SAMSUNG Electronics Co., Ltd. Page 87 ANNEX Entering Characters Buttons Used for Entering Characters The buttons used for entering the characters are as follows. z [MENU] button : Screen for entering [English Uppercase] appears first and a menu bar prompting you to select [English Lowercase/Specia...
Page 106 - character types will appear on the menu bar.
ANNEX Annex 88 © SAMSUNG Electronics Co., Ltd. Then, the screen will provide an input field for the character type you selected and the other two character types will appear on the menu bar. For example, if [English Lowercase] is selected, [English Uppercase/Special Characters] will appear on the me...
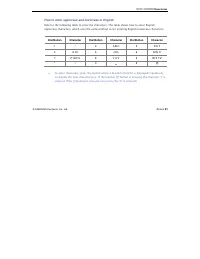
Page 107 - How to enter uppercase and lowercase in English
User Guide © SAMSUNG Electronics Co., Ltd. Annex 89 How to enter uppercase and lowercase in English Refer to the following table to enter the characters. The table shows how to enter English uppercase characters, which uses the same method as for entering English lowercase characters. Dial Button Ch...
Page 108 - How to enter special characters
ANNEX Annex 90 © SAMSUNG Electronics Co., Ltd. How to enter special characters Press the [MENU] button and select [Special Characters] from the menu bar on the lower part of the screen. Then the special characters are displayed in the same order. Select desired special characters using the [ ]/[ ] b...
Page 109 - OfficeServ
OfficeServ User Guide ©2003 Samsung Electronics Co., Ltd. All rights reserved. Information in this document is proprietary to SAMSUNG Electronics Co., Ltd No information contained here may be copied, translated, transcribed or duplicated by any form without the prior written consent of SAMSUNG. Info...