Page 2 - Contents
2 English C ontents Contents Contents Important safety instructions 3 Introducing your new oven 15 Overview 15What’s included with your oven 15 Before you begin 15 Energy saving tips 15 Operating the oven 16 The oven control panel 16 Setting the clock 17 Setting the kitchen timer 17 Control Lockout ...
Page 3 - SAVE THESE INSTRUCTIONS; CAUTION; Important safety instructions; This guide does not cover all possible; Important safety symbols and precautions; What the icons and signs in this user manual mean:
English 3 Impor tant saf ety ins truc tions SAVE THESE INSTRUCTIONS SAVE THESE INSTRUCTIONS CAUTION To reduce the risk of fire, explosion, electric shock, or personal injury when using your oven, follow these basic safety precautions. Do NOT attempt.Do NOT disassemble.Do NOT touch.Follow directions ...
Page 5 - Use only dry potholders.
English 5 Impor tant saf ety ins truc tions SAVE THESE INSTRUCTIONS SAVE THESE INSTRUCTIONS • Use only dry potholders. Placing moist or damp potholders on hot surfaces may result in burns from steam. Do not let the potholder touch hot heating elements. Do not use a towel or other bulky cloth instead...
Page 6 - WARNING
6 English Impor tant saf ety ins truc tions Important safety instructions SAVE THESE INSTRUCTIONS SAVE THESE INSTRUCTIONS WARNING • Ensure that the appliance is switched off before replacing the lamp to avoid the possibility of electric shock. CHILD SAFETY WARNING • This appliance is not intended fo...
Page 9 - CRITICAL INSTALLATION WARNINGS
English 9 Impor tant saf ety ins truc tions SAVE THESE INSTRUCTIONS SAVE THESE INSTRUCTIONS • Do not cut or remove the ground prong from the power cord under any circumstances. • Connect the oven to a circuit that provides the correct amperage. • Do not install this appliance in a humid, oily or dus...
Page 10 - Failing to do so may result in electric shock or fire.
10 English Impor tant saf ety ins truc tions Important safety instructions SAVE THESE INSTRUCTIONS SAVE THESE INSTRUCTIONS • Always observe safety precautions when using your oven. Never try to repair the oven on your own - there is dangerous voltage inside. If the oven needs to be repaired, contact...
Page 12 - USAGE CAUTIONS
12 English Impor tant saf ety ins truc tions Important safety instructions SAVE THESE INSTRUCTIONS SAVE THESE INSTRUCTIONS USAGE CAUTIONS CAUTION • If the surface is cracked, turn the appliance off. • Failing to do so may result in electric shock. • Dishes and containers can become hot. Handle with ...
Page 14 - CRITICAL CLEANING WARNINGS
14 English Impor tant saf ety ins truc tions Important safety instructions SAVE THESE INSTRUCTIONS SAVE THESE INSTRUCTIONS CRITICAL CLEANING WARNINGS CAUTION • Do not clean the appliance by spraying water directly on to it. • Do not use benzene, thinner, or alcohol to clean the appliance. • This may...
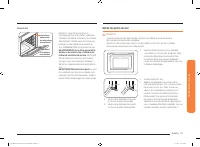
Page 15 - Before you begin; Energy saving tips; Introducing your new oven; Overview
English 15 Intr oducing y our ne w ov en / Be for e you begin Before you begin Clean the oven thoroughly before using it for the first time. Then, remove the accessories, set the oven to Bake, and then run the oven at 400 °F for 1 hour. There will be a distinctive odor. This is normal.Ensure your ki...
Page 16 - Operating the oven; The oven control panel
16 English Oper ating the o v en Operating the oven Operating the oven The oven control panel READ THE INSTRUCTIONS CAREFULLY BEFORE USING THE OVEN. For satisfactory use of your oven, become familiar with the various features and functions of the oven as described below. Detailed instructions for ea...
Page 17 - Setting the clock
English 17 Oper ating the o v en Setting the clock The clock must be set to the correct time of day for the automatic oven timing functions to work properly. • The time of day cannot be changed during timed cooking, delay-timed cooking, or a self-cleaning cycle. • You can choose between a 12-hour or...
Page 18 - Timed Cooking; Delay Start
18 English Oper ating the o v en Operating the oven Timed Cooking In Timed Cooking mode, the oven turns on immediately and cooks for the length of time you select. At the end of the cooking time, the oven turns off automatically. • You can use Timed Cooking only with the Bake cooking operation. How ...
Page 19 - Minimum and maximum settings; Using the oven racks
English 19 Oper ating the o v en Minimum and maximum settings All the features listed in the table below have minimum and maximum time or temperature settings. A beep will sound each time a pad on the control panel is pressed and the entry is accepted. An error tone will sound in the form of a long ...
Page 21 - Baking; Broiling
English 21 Oper ating the o v en Baking The oven can be programmed to bake at any temperature from 175 °F to 550 °F.Baking temperature and time will vary depending on the ingredients and the size and shape of the baking pan used. Dark or nonstick coatings may cook faster with more browning. How to s...
Page 22 - Using Bread Proof
22 English Oper ating the o v en Operating the oven Broiling recommendation guide The size, weight, thickness, starting temperature, and your doneness preference will affect broiling times. This guide is based on meat at refrigerator temperature.Always use a broiler pan and its grid when broiling. A...
Page 23 - Using Settings
English 23 Oper ating the o v en Using Settings This function lets you control various electronic control settings. These settings include Temp Adjust, Temp Unit, Time of Day, 12 hour energy saving, Sound On/Off, and Demo mode. The setting menu is only available when the oven is not being used (not ...
Page 25 - Using the Sabbath feature
English 25 Oper ating the o v en Using the Sabbath feature (For use on the Jewish Sabbath & Holidays) K For further assistance, guidelines for proper usage, and a complete list of models with the Sabbath feature, please visit http:\\www.star-k.org. You can use the Sabbath feature with baking onl...
Page 26 - Using Smart Control
26 English Oper ating the o v en Operating the oven Using Smart Control To use the oven’s Smart Control, you must download the SmartThings app to a mobile device. Functions that can be operated using the SmartThings app may not work smoothly if communication conditions are poor or the oven is instal...
Page 27 - Maintaining your appliance
English 27 Maint aining y our applianc e Maintaining your appliance Self-cleaning This self-cleaning oven uses high temperatures (well above cooking temperatures) to burn off leftover grease and residue completely or reduce them to a finely powdered ash that you can wipe away with a damp cloth. CAUT...
Page 30 - Care and cleaning of the oven
30 English Maint aining y our applianc e Maintaining your appliance Care and cleaning of the oven Cleaning painted parts and decorative trim • For general cleaning, use a cloth with hot, soapy water. • For more difficult residue and built-up grease, apply a liquid detergent directly onto the area an...
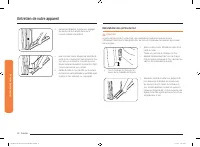
Page 31 - Removing the oven doors
English 31 Maint aining y our applianc e Oven door Don’t hand clean the oven door gasket. You may hand clean the door. • Use soap and water to thoroughly clean the top, sides, and front of the oven door. Rinse well. You may use a glass cleaner on the outside glass of the oven door. DO NOT immerse th...
Page 32 - Replacing the oven doors
32 English Maint aining y our applianc e Maintaining your appliance 4. Partially close the door to engage the door latch locks. The door will stop at this point. 5. Using two hands, grasp the edges of the oven door. Lift and pull the oven door toward you and remove. You may need to gently shift the ...
Page 33 - Changing the oven light
English 33 Maint aining y our applianc e Changing the oven light The oven light is a standard 40-watt appliance halogen bulb. It comes on when the oven door is open. When the oven door is closed, touch to turn the light on or off. It will not work during a self-cleaning cycle. CAUTION Before changin...
Page 34 - Troubleshooting
34 English Tr ouble shoo ting Maintaining your appliance 2. While holding the glass cover with one hand, insert a flat-sharp tool such as a table knife between the glass and the frame to remove the glass cover. 3. Turn the bulb cap counterclockwise to remove. NOTE If necessary, remove the metal ring...
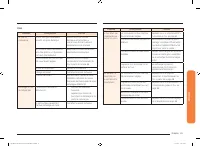
Page 37 - Information codes
English 37 Tr ouble shoo ting Problem Possible cause Solution Strong odor. An odor coming from the insulation around the inside of the oven is normal for the first few times the oven is used. Operate the oven empty on the bake setting at 400 °F for 1 hour. The oven racks are difficult to slide. The ...
Page 38 - Warranty
38 English W arranty Warranty Displayed Code Possible cause Solution C-21 This code occurs if the internal temperature rises abnormally high. Touch OVEN OFF , and then restart the oven. If the problem persists, disconnect all power to the oven for at least 30 seconds and then reconnect the power. If...
Page 41 - Open Source Announcement
English 41 W arranty EXCEPT AS SET FORTH HEREIN THERE ARE NO WARRANTIES ON THIS PRODUCT EITHER EXPRESS OR IMPLIED AND SAMSUNG DISCLAIMS ALL WARRANTIES INCLUDING, BUT NOT LIMITED TO, ANY IMPLIED WARRANTIES OF MERCHANTABILITY, INFRINGEMENT OR FITNESS FOR A PARTICULAR PURPOSE. NO WARRANTY OR GUARANTY G...
Page 42 - Memo
Memo NV51R5511S_AA_DG68-01125A-02_EN+MES+CFR.indb 42 11/5/2019 10:24:36 AM
Page 45 - Horno eléctrico empotrado en pared; Manual del usuario
Horno eléctrico empotrado en pared Manual del usuario NV51*5***S* NV51R5511S_AA_DG68-01125A-02_EN+MES+CFR.indb 1 11/5/2019 10:24:44 AM
Page 46 - Contenido
2 Español Contenido Contenido Contenido Instrucciones de seguridad importantes 3 Introducción a su nuevo horno 15 Descripción general 15 Elementos incluidos con su horno 15 Antes de comenzar 15 Sugerencias para ahorrar energía 15 Funcionamiento del horno 16 Panel de control del horno 16 Ajuste del r...
Page 47 - CONSERVE ESTAS INSTRUCCIONES; PRECAUCIÓN; Instrucciones de seguridad importantes; Esta guía no cubre todas; Símbolos y precauciones de seguridad importantes; Significado de iconos y símbolos en este manual del usuario:
Español 3 Ins truccione s de seg uridad impor tantes CONSERVE ESTAS INSTRUCCIONES CONSERVE ESTAS INSTRUCCIONES PRECAUCIÓN Para reducir el riesgo de incendio, explosión, descarga eléctrica o lesiones personales cuando utilice el horno, siga estas instrucciones básicas de seguridad. NO intentar.NO des...
Page 49 - Utilice solamente agarradores aislantes secos.
Español 5 Ins truccione s de seg uridad impor tantes CONSERVE ESTAS INSTRUCCIONES CONSERVE ESTAS INSTRUCCIONES • Utilice solamente agarradores aislantes secos. Colocar agarradores aislantes mojados o húmedos sobre superficies calientes podría producir quemaduras por vapor. No permita que el agarrado...
Page 50 - ADVERTENCIA
6 Español Ins truccione s de seg uridad impor tantes Instrucciones de seguridad importantes CONSERVE ESTAS INSTRUCCIONES CONSERVE ESTAS INSTRUCCIONES ADVERTENCIA • Asegúrese de que el electrodoméstico esté apagado antes de reemplazar la bombilla de luz para evitar la posibilidad de una descarga eléc...
Page 53 - ADVERTENCIAS FUNDAMENTALES PARA LA INSTALACIÓN
Español 9 Ins truccione s de seg uridad impor tantes CONSERVE ESTAS INSTRUCCIONES CONSERVE ESTAS INSTRUCCIONES • No corte ni retire el pin de conexión a tierra del cable de alimentación bajo ninguna circunstancia. • Conecte el horno a un circuito que proporcione el amperaje correcto. • No instale es...
Page 54 - No intente reparar, desarmar ni modificar el electrodoméstico.
10 Español Ins truccione s de seg uridad impor tantes Instrucciones de seguridad importantes CONSERVE ESTAS INSTRUCCIONES CONSERVE ESTAS INSTRUCCIONES • Siempre respete las precauciones de seguridad cuando utilice su horno. Nunca intente reparar el horno: contiene voltaje peligroso en el interior. S...
Page 56 - PRECAUCIONES PARA EL USO
12 Español Ins truccione s de seg uridad impor tantes Instrucciones de seguridad importantes CONSERVE ESTAS INSTRUCCIONES CONSERVE ESTAS INSTRUCCIONES PRECAUCIONES PARA EL USO PRECAUCIÓN • Si la superficie está rajada, apague el electrodoméstico. • No hacerlo puede provocar una descarga eléctrica. •...
Page 58 - ADVERTENCIAS FUNDAMENTALES PARA LA LIMPIEZA
14 Español Ins truccione s de seg uridad impor tantes Instrucciones de seguridad importantes CONSERVE ESTAS INSTRUCCIONES CONSERVE ESTAS INSTRUCCIONES ADVERTENCIAS FUNDAMENTALES PARA LA LIMPIEZA PRECAUCIÓN • No rocíe agua directamente sobre el electrodoméstico para limpiarlo. • No utilice benceno, d...
Page 59 - Antes de comenzar; Sugerencias para ahorrar energía; Introducción a su nuevo horno; Descripción general; Elementos incluidos con su horno
Español 15 Introduc ción a su nue vo horno / Ant es de c omenz ar Antes de comenzar Limpie el horno a fondo antes de utilizarlo por primera vez. Luego, retire los accesorios, programe el horno en Hornear y luego haga funcionar el horno a 400 °F durante una hora. Se notará un olor característico. Est...
Page 60 - Funcionamiento del horno; Panel de control del horno
16 Español Funcionamient o del horno Funcionamiento del horno Funcionamiento del horno Panel de control del horno LEA LAS INSTRUCCIONES CON ATENCIÓN ANTES DE UTILIZAR EL HORNO. Para obtener un funcionamiento satisfactorio del horno, familiarícese con las diversas características y funciones que se d...
Page 61 - Ajuste del reloj
Español 17 Funcionamient o del horno Ajuste del reloj El reloj debe ajustarse para mostrar la hora correcta para permitir el buen funcionamiento de las opciones de temporizador del horno. • La hora del día no se puede cambiar mientras estén en proceso una cocción con temporizador, una cocción diferi...
Page 62 - Cocción con temporizador; Inicio retardado
18 Español Funcionamient o del horno Funcionamiento del horno Cocción con temporizador En el modo Cocción con temporizador, el horno se enciende inmediatamente y cocina durante el tiempo que usted fije. Una vez completado ese tiempo de cocción, el horno se apaga automáticamente. • Puede utilizar Coc...
Page 63 - Ajustes mínimos y máximos
Español 19 Funcionamient o del horno Ajustes mínimos y máximos Todas las funciones enumeradas en la siguiente tabla tienen ajustes de tiempo o temperatura mínimos y máximos. Se oirá una señal sonora cada vez que se presione una tecla del panel de control y el dato ingresado haya sido aceptado. Si la...
Page 65 - Horneado; Asado a la parrilla
Español 21 Funcionamient o del horno Horneado El horno puede programarse para hornear a cualquier temperatura en el rango de 175 °F a 550 °F.La temperatura y el tiempo de horneado varían según los ingredientes y el tamaño y la forma de la bandeja de hornear utilizada. Los recubrimientos oscuros y an...
Page 66 - Uso de Levantamiento del pan.
22 Español Funcionamient o del horno Funcionamiento del horno Guía de recomendaciones para asar a la parrilla Los tiempos necesarios para asar a la parrilla dependerán del tamaño, peso, espesor, temperatura inicial y su preferencia en cuanto al grado de cocción. Esta guía está basada en carnes a tem...
Page 67 - Uso de Configuración
Español 23 Funcionamient o del horno Uso de Configuración Esta función le permite controlar diversos parámetros de control electrónico. Estos parámetros incluyen Ajuste de temperatura, Unidad de temperatura, Hora del día, Ahorro de energía transcurridas 12 horas, Activar/Desactivar sonido y Modo dem...
Page 69 - Uso de la función Shabat
Español 25 Funcionamient o del horno Uso de la función Shabat (Para uso en el Shabat y otras fechas sagradas judías) K Para obtener asistencia adicional, pautas para el uso adecuado y una lista completa de modelos con la función Shabat, visite http:\\www.star-k.org. Puede usar la función Shabat solo...
Page 70 - Uso de Smart Control
26 Español Funcionamient o del horno Funcionamiento del horno Uso de Smart Control Para usar el Smart Control del horno, debe descargar la aplicación SmartThings a un dispositivo móvil. Las funciones disponibles con la aplicación SmartThings pueden no funcionar adecuadamente si las condiciones de co...
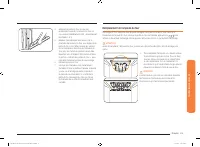
Page 71 - Mantenimiento de su electrodoméstico
Español 27 Mant enimient o de su elec tr odomé stic o Mantenimiento de su electrodoméstico Auto-limpieza Este horno auto-limpiante utiliza altas temperaturas (mucho más altas que las temperaturas de cocción) para eliminar por incineración los restos de grasa y otros residuos o reducirlas a fino polv...
Page 73 - Limpieza al vapor
Español 29 Mant enimient o de su elec tr odomé stic o Limpieza al vapor Cómo programar el horno para limpiar con vapor Para limpieza liviana, la función de limpieza con vapor ahorra tiempo y energía.Si se requiere un trabajo de limpieza más intenso, use la función de autolimpieza. 1. Retire del horn...
Page 74 - Cuidado y limpieza del horno
30 Español Mant enimient o de su elec tr odomé stic o Mantenimiento de su electrodoméstico Cuidado y limpieza del horno Limpieza de las partes pintadas y las terminaciones decorativas • Para su limpieza general, utilice un paño con agua jabonosa caliente. • Para residuos más resistentes o grasa acum...
Page 75 - Cómo retirar las puertas del horno
Español 31 Mant enimient o de su elec tr odomé stic o Puerta del horno No limpie manualmente la junta selladora de la puerta del horno. La puerta se puede limpiar manualmente. • Utilice agua y jabón para limpiar a fondo la parte superior, los lados y el frente de la puerta del horno. Enjuague bien. ...
Page 76 - Reemplazo de las puertas del horno
32 Español Mant enimient o de su elec tr odomé stic o Mantenimiento de su electrodoméstico 4. Cierre parcialmente la puerta para enganchar las trabas de las bisagras de la puerta. La puerta se detiene en ese punto. 5. Sujete con las dos manos los bordes de la puerta del horno. Levante y jale la puer...
Page 77 - Recambio de la luz del horno
Español 33 Mant enimient o de su elec tr odomé stic o Recambio de la luz del horno La luz del horno es una bombilla halógena estándar de 40 vatios para electrodomésticos. Se enciende cuando se abre la puerta del horno. Cuando la puerta del horno se encuentre cerrada, toque para encender o apagar la ...
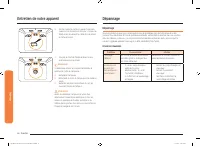
Page 78 - Resolución de problemas
34 Español Re solución de pr oblemas Mantenimiento de su electrodoméstico 2. Mientras sostiene la tapa de vidrio con una mano, inserte una herramienta plana afilada como un cuchillo de mesa entre el vidrio y el marco para quitar la tapa de vidrio. 3. Gire la bombilla en el sentido contrario a las ag...
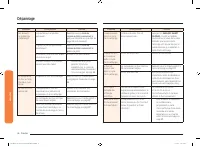
Page 81 - Códigos de información
Español 37 Re solución de pr oblemas Problema Causa posible Solución Olor fuerte. Las primeras veces que se usa el horno, es normal que emane olor del material aislante que envuelve al horno. Opere el horno vacío en el ajuste de horneado a 400 °F durante una hora. Resulta difícil deslizar las rejill...
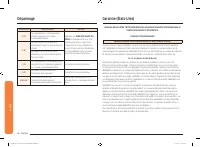
Page 82 - Garantía
38 Español Garantía Garantía Código mostrado Causa posible Solución C-21 Este código se muestra si la temperatura interna es anormalmente alta. Toque OVEN OFF (APAGAR HORNO) y reinicie el horno. Si el problema persiste, desconecte toda alimentación eléctrica al horno durante por lo menos 30 segundos...
Page 85 - Anuncio de código abierto
Español 41 Garantía SALVO LO ESTABLECIDO EN ESTE DOCUMENTO, NO EXISTEN GARANTÍAS RESPECTO DE ESTE PRODUCTO NI EXPRESAS NI TÁCITAS Y SAMSUNG DESCONOCE Y RECHAZA TODA GARANTÍA INCLUIDAS, AUNQUE NO TAXATIVAMENTE ENUMERADAS, TODA GARANTÍA TÁCITA DE COMERCIABILIDAD, INFRACCIÓN O APTITUD PARA UN PROPÓSITO...
Page 86 - Notas
Notas NV51R5511S_AA_DG68-01125A-02_EN+MES+CFR.indb 42 11/5/2019 10:24:50 AM
Page 89 - Four mural électrique encastrable; Manuel d’utilisation
Four mural électrique encastrable Manuel d’utilisation NV51*5***S* NV51R5511S_AA_DG68-01125A-02_EN+MES+CFR.indb 1 11/5/2019 10:24:59 AM
Page 90 - Table des matières; Consignes de sécurité importantes
2 Français Table de s matièr es Table des matières Table des matières Consignes de sécurité importantes 3 Présentation de votre nouveau four 15 Présentation 15Accessoires fournis 15 Avant de commencer 15 Conseils pour économiser de l'énergie 15 Utilisation du four 16 Panneau de commande du four 16 R...
Page 91 - CONSERVEZ PRÉCIEUSEMENT CES INSTRUCTIONS; ATTENTION; Le présent guide; Symboles de sécurité importants et précautions; Signification des icônes et des symboles utilisés dans ce manuel :
Français 3 Consigne s de sécurit é impor tantes CONSERVEZ PRÉCIEUSEMENT CES INSTRUCTIONS CONSERVEZ PRÉCIEUSEMENT CES INSTRUCTIONS ATTENTION Afin de réduire les risques d'incendie, d'explosion, d'électrocution ou de blessures lors de l'utilisation du four, vous devez respecter ces règles de sécurité ...
Page 92 - CALIFORNIA PROPOSITION 65 AVERTISSEMENT
4 Français Consigne s de sécurit é impor tantes Consignes de sécurité importantes CONSERVEZ PRÉCIEUSEMENT CES INSTRUCTIONS CONSERVEZ PRÉCIEUSEMENT CES INSTRUCTIONS CALIFORNIA PROPOSITION 65 AVERTISSEMENT AVERTISSEMENT Cancer et Troubles de l’appareil reproducteur – www.P65Warnings.ca.gov POUR VOTRE ...
Page 93 - Utilisez uniquement des maniques sèches.
Français 5 Consigne s de sécurit é impor tantes CONSERVEZ PRÉCIEUSEMENT CES INSTRUCTIONS CONSERVEZ PRÉCIEUSEMENT CES INSTRUCTIONS • Utilisez uniquement des maniques sèches. L'utilisation de maniques humides ou mouillées sur les surfaces chaudes peut entraîner des brûlures en raison de la vapeur qui ...
Page 94 - AVERTISSEMENT
6 Français Consigne s de sécurit é impor tantes Consignes de sécurité importantes CONSERVEZ PRÉCIEUSEMENT CES INSTRUCTIONS CONSERVEZ PRÉCIEUSEMENT CES INSTRUCTIONS AVERTISSEMENT • Afin d'éviter tout risque d'électrocution, veillez à ce que l'appareil soit hors tension avant de procéder au remplaceme...
Page 97 - Cela pourrait entraîner un risque d'électrocution ou d'incendie.
Français 9 Consigne s de sécurit é impor tantes CONSERVEZ PRÉCIEUSEMENT CES INSTRUCTIONS CONSERVEZ PRÉCIEUSEMENT CES INSTRUCTIONS • Ne coupez ni ne retirez JAMAIS la broche de mise à la terre de la fiche du cordon d'alimentation. • Assurez-vous que l'ampérage de la prise sur laquelle est branché l'a...
Page 98 - AVERTISSEMENTS IMPORTANTS RELATIFS À L'UTILISATION
10 Français Consigne s de sécurit é impor tantes Consignes de sécurité importantes CONSERVEZ PRÉCIEUSEMENT CES INSTRUCTIONS CONSERVEZ PRÉCIEUSEMENT CES INSTRUCTIONS • Respectez systématiquement les consignes de sécurité lorsque vous utilisez votre four. Ne tentez jamais de réparer vous-même l'appare...
Page 99 - Cela pourrait entraîner un risque d'électrocution.
Français 11 Consigne s de sécurit é impor tantes CONSERVEZ PRÉCIEUSEMENT CES INSTRUCTIONS CONSERVEZ PRÉCIEUSEMENT CES INSTRUCTIONS • N'insérez pas vos doigts, de substances étrangères ou d'objets métalliques tels que des épingles ou des aiguilles dans l'entrée, la sortie et les orifices de l'apparei...
Page 100 - AVERTISSEMENTS RELATIFS À L'UTILISATION
12 Français Consigne s de sécurit é impor tantes Consignes de sécurité importantes CONSERVEZ PRÉCIEUSEMENT CES INSTRUCTIONS CONSERVEZ PRÉCIEUSEMENT CES INSTRUCTIONS AVERTISSEMENTS RELATIFS À L'UTILISATION ATTENTION • Si la surface du four est fissurée, n'utilisez pas l'appareil. • Le non-respect de ...
Page 101 - Veillez à remuer pendant ou après la cuisson.
Français 13 Consigne s de sécurit é impor tantes CONSERVEZ PRÉCIEUSEMENT CES INSTRUCTIONS CONSERVEZ PRÉCIEUSEMENT CES INSTRUCTIONS • N'approchez pas votre visage ou votre corps de l'appareil pendant la cuisson ou lors de l'ouverture de la porte juste après la cuisson. • Veillez à ce que les enfants ...
Page 102 - AVERTISSEMENTS IMPORTANTS RELATIFS AU NETTOYAGE
14 Français Consigne s de sécurit é impor tantes Consignes de sécurité importantes CONSERVEZ PRÉCIEUSEMENT CES INSTRUCTIONS CONSERVEZ PRÉCIEUSEMENT CES INSTRUCTIONS AVERTISSEMENTS IMPORTANTS RELATIFS AU NETTOYAGE ATTENTION • Ne nettoyez pas l'appareil en pulvérisant directement de l'eau dessus. • N'...
Page 103 - Avant de commencer; Conseils pour économiser de l'énergie; Présentation de votre nouveau four; Présentation; Accessoires fournis
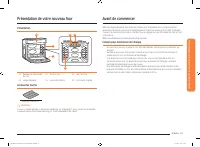
Français 15 Pr ésentation de v otr e nouv eau f our / A vant de c ommenc er Avant de commencer Nettoyez soigneusement le four avant de l'utiliser pour la première fois. Ensuite, retirez les accessoires, lancez un cycle Cuisson traditionnelle et faites fonctionner le four à 400° F pendant 1 heure. Il...
Page 104 - Utilisation du four; Panneau de commande du four
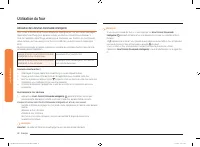
16 Français Utilisation du f our Utilisation du four Utilisation du four Panneau de commande du four LISEZ ATTENTIVEMENT LES CONSIGNES D'UTILISATION AVANT DE VOUS SERVIR DU FOUR. Afin de profiter au mieux de votre four, familiarisez-vous avec les fonctionnalités décrites ci-dessous. Vous trouverez u...
Page 105 - Réglage de la minuterie
Français 17 Utilisation du f our Réglage de l'horloge L'horloge doit être réglée sur l'heure correcte afin que la minuterie automatique du four fonctionne correctement. • L'heure ne peut pas être modifiée durant la cuisson minutée, la cuisson minutée différée ou le cycle d'auto-nettoyage. • Vous pou...
Page 106 - Cuisson minutée; Départ différé
18 Français Utilisation du f our Utilisation du four Cuisson minutée En mode Cuisson minutée, le four s'allume immédiatement et effectue la cuisson pendant la durée que vous avez sélectionnée. À la fin du temps de cuisson, le four s'éteint automatiquement. • Vous pouvez utiliser le mode Cuisson minu...
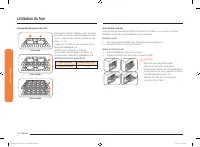
Page 107 - Réglages minimum et maximum; Utilisation des grilles du four
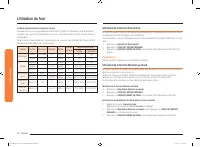
Français 19 Utilisation du f our Réglages minimum et maximum Toutes les fonctions listées dans le tableau ci-dessous ont un réglage minimum et un réglage maximum de la durée ou de la température. Un signal sonore retentit chaque fois que vous appuyez sur une touche et que la saisie est validée. Un s...
Page 109 - Cuisson traditionnelle; Cuisson au gril
Français 21 Utilisation du f our Cuisson traditionnelle Le four peut être programmé pour cuire à toute température comprise entre 175 °F et 550 °F.La température et le temps de cuisson varient en fonction des ingrédients, ainsi que de la taille et de la forme du plat de cuisson utilisé. Les revêteme...
Page 110 - Utilisation de la fonction Pain précuit.
22 Français Utilisation du f our Utilisation du four Guide de recommandations concernant le gril Les temps de cuisson au gril dépendent de la taille, du poids, de l'épaisseur, de la température de départ ainsi que de vos préférences de cuisson. Ce guide se base sur de la viande sortant du réfrigérat...
Page 111 - Utilisation de la fonction Paramètres
Français 23 Utilisation du f our Utilisation de la fonction Paramètres Cette fonction vous permet de contrôler plusieurs paramètres de commande électronique. Ces paramètres incluent Réglage de la température, Unité de température, Heure actuelle, Économie d’énergie après 12 heures, Activation/Désact...
Page 113 - Utilisation de la fonction Shabbat
Français 25 Utilisation du f our Utilisation de la fonction Shabbat (Utilisée pour les fêtes et le Shabbat juifs) K Pour en savoir plus et obtenir des instructions d'utilisation et une liste complète des modèles avec la fonction Shabbat, veuillez visiter le site Web sur http:\\www.star-k.org. Vous p...
Page 114 - Utilisation de la fonction Commande intelligente
26 Français Utilisation du f our Utilisation du four Utilisation de la fonction Commande intelligente Pour utiliser la fonction Smart Control (Commande intelligente) du four, vous devez télécharger l’application SmartThings pour appareils mobiles. Les fonctions pouvant être actionnées à l’aide de l’...
Page 115 - Entretien de votre appareil
Français 27 Entretien de v otr e appar eil Entretien de votre appareil Auto-nettoyage Ce four auto-nettoyant utilise des températures élevées (bien supérieures aux températures de cuisson) pour brûler complètement les résidus de graisse ou les réduire en fine poudre qu'il vous suffit d'essuyer à l'a...
Page 117 - Nettoyage vapeur
Français 29 Entretien de v otr e appar eil Nettoyage vapeur Comment régler le four pour le nettoyage vapeur ? La fonction de nettoyage vapeur permet d'effectuer un nettoyage superficiel en économisant du temps et de l'énergie.Pour un nettoyage plus efficace, utilisez la fonction d'auto-nettoyage. 1....
Page 118 - Entretien et nettoyage du four
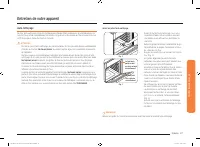
30 Français Entretien de v otr e appar eil Entretien de votre appareil Entretien et nettoyage du four Nettoyage des parties peintes et ornements décoratifs • Pour le nettoyage sommaire, utilisez un torchon imbibé d'eau chaude savonneuse. • Pour ôter les résidus incrustés et la graisse accumulée, ver...
Page 119 - Retrait des portes du four
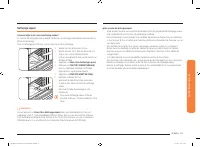
Français 31 Entretien de v otr e appar eil Porte du four Le joint de la porte ne doit pas être nettoyé manuellement. La porte peut être nettoyée manuellement. • Utilisez du savon et de l'eau pour un nettoyage minutieux des parties supérieure, latérale et frontale de la porte du four. Rincez abondamm...
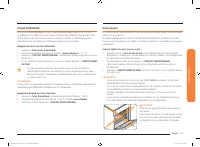
Page 120 - Réinstallation des portes du four
32 Français Entretien de v otr e appar eil Entretien de votre appareil 4. Fermez partiellement la porte pour engager les verrous de la charnière de la porte. La porte s'arrête à cet endroit. 5. Avec vos deux mains, attrapez les bords de la porte du four. Soulevez et tirez la porte du four vers vous,...
Page 121 - Remplacement de l'ampoule du four
Français 33 Entretien de v otr e appar eil Remplacement de l'ampoule du four L'éclairage du four nécessite une ampoule halogène standard de 40 watts. Elle s'allume à l'ouverture de la porte du four. Lorsque la porte du four est fermée, appuyez sur pour activer ou désactiver l'éclairage. L'éclairage ...
Page 122 - Dépannage
34 Français Dépannag e Entretien de votre appareil 2. Tout en tenant le cache en verre d'une main, insérez un outil pointu et plat (ex. : couteau de table) entre le verre et le cadre afin de retirer le cache en verre. 3. Tournez le culot de l'ampoule dans le sens antihoraire pour le retirer. REMARQU...
Page 126 - Garantie
38 Français Garantie Garantie Code affiché Cause possible Solution C-21 Ce code apparaît si la température interne augmente à un niveau anormalement élevé. Appuyez sur OVEN OFF (ARRÊT DU FOUR) et redémarrez le four. Si le problème persiste, coupez toute l'alimentation du four pendant au moins 30 sec...
Page 129 - Annonce de contenu libre
Français 41 Garantie SAUF EXCEPTION MENTIONNÉE DANS LE PRÉSENT DOCUMENT, SAMSUNG NE FOURNIT AUCUNE GARANTIE SUR CET APPAREIL, EXPRESSE OU IMPLICITE, Y COMPRIS, MAIS SANS S'Y LIMITER, LES GARANTIES IMPLICITES DE QUALITÉ COMMERCIALE, DE CONTREFAÇON, OU D'APTITUDE À UN USAGE PARTICULIER. AUCUNE GARANTI...
Page 130 - Notes
Notes NV51R5511S_AA_DG68-01125A-02_EN+MES+CFR.indb 42 11/5/2019 10:25:05 AM