Page 2 - Contents
2 English C ontents Contents Regulatory Notice PRECAUTIONS TO AVOID POSSIBLE EXPOSURE TO EXCESSIVE MICROWAVE ENERGY A. Do not attempt to operate this microwave oven with the door open since open-door operation can result in harmful exposure to microwave energy. It is important not to defeat or tampe...
Page 3 - SAVE THESE INSTRUCTIONS; This guide does not cover all possible conditions
English 3 Impor tant saf ety ins truc tions SAVE THESE INSTRUCTIONS SAVE THESE INSTRUCTIONS Oven (Lower Oven) 33 Timed Cooking 33 Delay Start 34 Turning the light on and off 34 Using the oven racks 34 Baking 36Broiling 36Using Bread Proof 37 Using Keep Warm 37 Using Settings 38 Using the Sabbath fea...
Page 4 - Important safety symbols and precautions; What the icons and signs in this user manual mean:
4 English Impor tant saf ety ins truc tions Important safety instructions SAVE THESE INSTRUCTIONS SAVE THESE INSTRUCTIONS Do NOT attempt.Do NOT disassemble.Do NOT touch.Follow directions explicitly.Unplug the power plug from the wall socket.Make sure the machine is grounded to prevent electric shock...
Page 5 - Important safety instructions (Microwave Oven); WARNING
English 5 Impor tant saf ety ins truc tions SAVE THESE INSTRUCTIONS SAVE THESE INSTRUCTIONS Important safety instructions (Microwave Oven) WARNING To reduce risk of burns, electric shock, fire, personal injury or exposure to excessive microwave energy: 1. Read all safety instructions before using th...
Page 6 - USE OF EXTENSION CORDS
6 English Impor tant saf ety ins truc tions SAVE THESE INSTRUCTIONS SAVE THESE INSTRUCTIONS Important safety instructions USE OF EXTENSION CORDS A short power-supply cord is provided to reduce the risk of your becoming entangled in or tripping over a longer cord. Longer cord sets or extension cords ...
Page 7 - Do not enter the oven.
English 7 Impor tant saf ety ins truc tions SAVE THESE INSTRUCTIONS SAVE THESE INSTRUCTIONS • Do not enter the oven. • Do not leave children alone. Never leave children alone or unattended in an area where this appliance is in use. They should never be allowed to sit or stand on any part of the appl...
Page 8 - Use only dry potholders.
8 English Impor tant saf ety ins truc tions SAVE THESE INSTRUCTIONS SAVE THESE INSTRUCTIONS Important safety instructions • Use only dry potholders. Placing moist or damp potholders on hot surfaces may result in burns from steam. Do not let the potholder touch hot heating elements. Do not use a towe...
Page 11 - CAUTION
English 11 Impor tant saf ety ins truc tions SAVE THESE INSTRUCTIONS SAVE THESE INSTRUCTIONS • Before operating the self-clean cycle, wipe grease and food soils from the oven. Excessive amounts of grease may ignite, leading to smoke damage to your home. • Do not use any commercial oven cleaner or ov...
Page 12 - CRITICAL INSTALLATION WARNINGS
12 English Impor tant saf ety ins truc tions Important safety instructions SAVE THESE INSTRUCTIONS SAVE THESE INSTRUCTIONS • Do not cut or remove the ground prong from the power cord under any circumstances. • Connect the oven to a circuit that provides the correct amperage. • Do not install this ap...
Page 13 - CRITICAL USAGE WARNING
English 13 Impor tant saf ety ins truc tions SAVE THESE INSTRUCTIONS SAVE THESE INSTRUCTIONS • If materials inside the oven should ignite, keep the oven door closed, turn the oven off and disconnect the power cord, or shut off power at the fuse or circuit breaker panel. If the door is opened, the fi...
Page 14 - Failing to do so may result in burns.
14 English Impor tant saf ety ins truc tions Important safety instructions SAVE THESE INSTRUCTIONS SAVE THESE INSTRUCTIONS • Make sure that the appliance’s controls and cooking areas are out of the reach of children. • Failing to do so may result in electric shock, burns, or injury. • Do not touch t...
Page 16 - Make sure to stir during or after cooking.
16 English Impor tant saf ety ins truc tions Important safety instructions SAVE THESE INSTRUCTIONS SAVE THESE INSTRUCTIONS • Take care when heating liquids such as water or other beverages. • Make sure to stir during or after cooking. • Avoid using a slippery container with a narrow neck. • Wait at ...
Page 17 - Do not operate the appliance with wet hands.
English 17 Impor tant saf ety ins truc tions SAVE THESE INSTRUCTIONS SAVE THESE INSTRUCTIONS • Do not stand on top of the appliance or place objects (such as laundry, an oven cover, lighted candles, lighted cigarettes, dishes, chemicals, metal objects, etc.) on the appliance. • Items, such as a clot...
Page 18 - This may result in the glass being damaged or broken.
18 English Impor tant saf ety ins truc tions Important safety instructions SAVE THESE INSTRUCTIONS SAVE THESE INSTRUCTIONS • Do not scratch the glass of the oven door with a sharp object. • This may result in the glass being damaged or broken. • Do not store anything directly on top of the oven when...
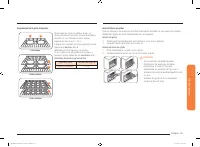
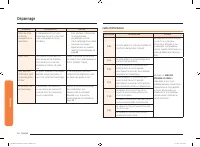
Page 19 - What’s included with your oven; Introducing your new oven; Overview
English 19 Intr oducing y our ne w ov en What’s included with your oven This oven ships with different kinds of accessories that help you cook what you want. Accessories for oven Wire racks (2) * Wire racks Use these racks in the oven when baking and broiling. Introducing your new oven Overview 05 0...
Page 20 - Before you begin; Energy saving tips
20 English Befor e you begin Before you begin Before using the top and bottom ovens for the first time, remove all the accessories, and then clean the ovens thoroughly. Then, set the lower oven to Bake, and run it at 400 °F for 1 hour. Next, set the microwave (top) oven to Broil for 1 hour. There wi...
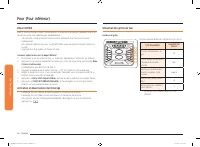
Page 21 - Basic operations; Control panel
English 21 Basic oper ations Basic operations Control panel READ THE INSTRUCTIONS CAREFULLY BEFORE USING THE OVEN. For satisfactory use of your oven, become familiar with the various features and functions of the oven as described below. Detailed instructions for each feature and function follow lat...
Page 22 - Setting the clock
22 English Basic oper ations Basic operations Setting the clock The clock must be set to the correct time of day for the automatic oven timing functions to work properly. • The time of day cannot be changed during timed cooking, delay-timed cooking, or a self-cleaning cycle. • You can choose between...
Page 23 - Control Lockout; Setting the power level
English 23 Basic oper ations Control Lockout Control Lockout lets you lock the buttons on the touch pad so they cannot be activated accidently. Control Lockout also locks the lower oven door only so it cannot be opened. You can only activate Control Lockout when the oven is in standby mode. How to a...
Page 24 - Minimum and maximum settings; Microwave
24 English Micr o w ave Ov en (Upper O v en) Minimum and maximum settings All the features listed in the table below have minimum and maximum times, temperatures, and power level settings. A beep will sound each time a pad on the control panel is pressed and the entry is accepted. An error tone will...
Page 25 - Broil
English 25 Micr o w ave Ov en (Upper O v en) Popcorn You do not need to set either the cooking time or the power level. Once you have selected Popcorn and touched START/SET , the oven automatically sets the cooking time and starts to cook. The gas sensing animation effect shows the status of the sen...
Page 33 - Timed Cooking
English 33 O v en (L o w er O v en) Oven (Lower Oven) Timed Cooking In Timed Cooking mode, the oven turns on immediately and cooks for the length of time you select. At the end of the cooking time, the oven turns off automatically. • You can use Timed Cooking only with the Bake cooking operation. Ho...
Page 34 - Delay Start; Turning the light on and off
34 English O v en (L o w er O v en) Oven (Lower Oven) Delay Start With Delay Start, the oven’s timer turns the oven on and off at times you select in advance. • You can use Timed Cooking only with the Bake cooking operation. • You can set the oven for a delay start before setting other cooking opera...
Page 36 - Baking; Broiling
36 English O v en (L o w er O v en) Oven (Lower Oven) Baking The oven can be programmed to bake at any temperature from 175 °F to 550 °F.Baking temperature and time will vary depending on the ingredients and the size and shape of the baking pan used. Dark or nonstick coatings may cook faster with mo...
Page 37 - Using Bread Proof; Using Keep Warm
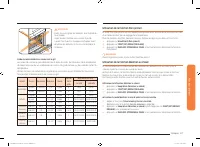
English 37 O v en (L o w er O v en) CAUTION Always broil with the oven door closed.Use care when opening the door. Let hot air or steam escape before you remove food from or put food into the oven. Broiling recommendation guide The size, weight, thickness, starting temperature, and your doneness pre...
Page 38 - Using Settings
38 English O v en (L o w er O v en) Oven (Lower Oven) Using Settings This function lets you control various electronic control settings. These settings include Temp Adjust, Temp Unit, Time of Day, 12 hour energy saving, Sound On/Off, and Demo mode. The setting menu is only available when the oven is...
Page 40 - Using the Sabbath feature
40 English O v en (L o w er O v en) Oven (Lower Oven) Using the Sabbath feature (For use on the Jewish Sabbath & Holidays) K For further assistance, guidelines for proper usage, and a complete list of models with the Sabbath feature, please visit http:\\www.star-k.org. You can use the Sabbath fe...
Page 44 - Wall Oven Steam Clean
44 English Maint aining y our applianc e Maintaining your appliance Wall Oven Steam Clean How to set the oven for steam-cleaning For light cleaning, the Steam-cleaning function saves time and energy.For heavier duty cleaning, use the self-cleaning function. 1. Remove all accessories from the oven. 2...
Page 45 - Care and cleaning of the oven
English 45 Maint aining y our applianc e Care and cleaning of the oven Cleaning painted parts and decorative trim • For general cleaning, use a cloth with hot, soapy water. • For more difficult residue and built-up grease, apply a liquid detergent directly onto the area and leave for 30 to 60 minute...
Page 47 - Replacing the oven door (Lower oven only)
English 47 Maint aining y our applianc e Replacing the oven door (Lower oven only) CAUTION The door is very heavy. You may need help lifting the door high enough to slide it into the hinge slots. Do not lift the door by the handle. WARNING You can’t replace the upper oven door for safety reasons. A ...
Page 48 - Changing the oven light (Lower oven only)
48 English Maint aining y our applianc e Maintaining your appliance Changing the oven light (Lower oven only) The oven light is a standard 40-watt appliance halogen bulb. It comes on when the oven door is open. When the oven door is closed, touch to turn the light on or off. It will not work during ...
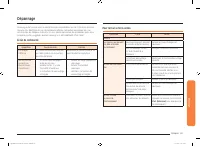
Page 49 - Troubleshooting; Control Display
English 49 Tr ouble shoo ting Troubleshooting Samsung works hard to ensure that you don’t have problems with your new electric oven. If you run into unexpected trouble, look first for a solution in the tables starting below. If you’re still having trouble after trying the suggested solution, call Sa...
Page 52 - For the Lower Oven
52 English Tr ouble shoo ting Troubleshooting For the Lower Oven Symptom Possible cause Solution The oven will not turn on. The oven is not completely plugged into the electrical outlet. Make sure the electrical plug is inserted into a live, properly grounded outlet. A fuse in your home may be blown...
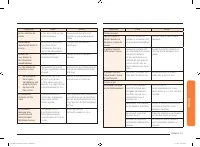
Page 54 - Information codes
54 English Tr ouble shoo ting Troubleshooting Symptom Possible cause Solution A burning or oily odor is coming from the vent. This is normal for a new oven and will disappear in time. • To speed the process, set a self-cleaning cycle for a minimum of 3 hours. • See the section on Self-cleaning on pa...
Page 56 - Warranty
56 English W arranty Warranty During the applicable warranty period, a product will be repaired, replaced, or the purchase price refunded, at the sole option of SAMSUNG. SAMSUNG may use new or reconditioned parts in repairing a product, or replace the product with a new or reconditioned product. Rep...
Page 58 - Open Source Announcement
58 English W arranty Open Source Announcement The software included in this product contains open source software. You may obtain the complete corresponding source code for a period of three years after the last shipment of this product by sending an email to mailto:[email protected] is als...
Page 59 - Memo
Memo NQ70R5510DG_AA_DG68-01148A-02_EN.indd 59 11/11/2019 5:51:15 PM
Page 61 - Horno con microondas; Manual del usuario
Horno con microondas Manual del usuario NQ70*5***D* NQ70R5510DG_AA_DG68-01148A-02_MES.indd 1 11/11/2019 5:56:21 PM
Page 62 - Contenido
2 Español Contenido Contenido Aviso sobre regulaciones PRECAUCIONES PARA EVITAR LA POSIBLE EXPOSICIÓN A ENERGÍA DE MICROONDAS EXCESIVA A. No intente hacer funcionar este horno de microondas con la puerta abierta dado que el funcionamiento con la puerta abierta puede conducir a una exposición nociva ...
Page 63 - CONSERVE ESTAS INSTRUCCIONES; Esta guía no cubre todas
Español 3 Ins truccione s de seg uridad impor tantes CONSERVE ESTAS INSTRUCCIONES CONSERVE ESTAS INSTRUCCIONES Horno (Horno inferior) 33 Cocción con temporizador 33 Inicio retardado 34 Cómo encender y apagar la luz 34 Uso de las parrillas del horno 34 Hornear 36Asado a la parrilla 36 Uso de Entibiar...
Page 64 - Símbolos y precauciones de seguridad importantes; Significado de iconos y símbolos en este manual del usuario:
4 Español Ins truccione s de seg uridad impor tantes Instrucciones de seguridad importantes CONSERVE ESTAS INSTRUCCIONES CONSERVE ESTAS INSTRUCCIONES NO intentar.NO desensamblar.NO tocar.Siga las instrucciones explícitamente.Desenchufe la alimentación eléctrica del tomacorriente de la pared.Asegúres...
Page 65 - Instrucciones de seguridad importantes (Horno de microondas); ADVERTENCIA
Español 5 Ins truccione s de seg uridad impor tantes CONSERVE ESTAS INSTRUCCIONES CONSERVE ESTAS INSTRUCCIONES Instrucciones de seguridad importantes (Horno de microondas) ADVERTENCIA Para reducir el riesgo de quemaduras, descargas eléctricas, incendios, lesiones personales o exposición a energía de...
Page 66 - USO DE LOS CABLES PROLONGADORES
6 Español Ins truccione s de seg uridad impor tantes CONSERVE ESTAS INSTRUCCIONES CONSERVE ESTAS INSTRUCCIONES Instrucciones de seguridad importantes USO DE LOS CABLES PROLONGADORES Se suministra un cable de alimentación corto para reducir el riesgo de enredarse o tropezar con un cable más largo y c...
Page 67 - No se introduzca en el horno.; Instrucciones de seguridad importantes (Horno); PRECAUCIÓN
Español 7 Ins truccione s de seg uridad impor tantes CONSERVE ESTAS INSTRUCCIONES CONSERVE ESTAS INSTRUCCIONES • No se introduzca en el horno. • No deje solos a los niños. Los niños nunca deben quedar solos o sin vigilancia en el lugar donde se utiliza este electrodoméstico. Nunca se les debe permit...
Page 68 - Utilice solamente agarradores aislantes secos.
8 Español Ins truccione s de seg uridad impor tantes CONSERVE ESTAS INSTRUCCIONES CONSERVE ESTAS INSTRUCCIONES Instrucciones de seguridad importantes • Utilice solamente agarradores aislantes secos. Colocar agarradores aislantes mojados o húmedos sobre superficies calientes podría producir quemadura...
Page 72 - ADVERTENCIAS FUNDAMENTALES PARA LA INSTALACIÓN
12 Español Ins truccione s de seg uridad impor tantes Instrucciones de seguridad importantes CONSERVE ESTAS INSTRUCCIONES CONSERVE ESTAS INSTRUCCIONES • No corte ni retire el pin de conexión a tierra del cable de alimentación bajo ninguna circunstancia. • Conecte el horno a un circuito que proporcio...
Page 73 - ADVERTENCIA FUNDAMENTAL PARA EL USO
Español 13 Ins truccione s de seg uridad impor tantes CONSERVE ESTAS INSTRUCCIONES CONSERVE ESTAS INSTRUCCIONES • Si los materiales en el interior del horno se encendieran, mantenga la puerta cerrada, apague el horno y desconecte el cable de alimentación o corte la alimentación en el panel del disyu...
Page 74 - No hacerlo puede provocar quemaduras.
14 Español Ins truccione s de seg uridad impor tantes Instrucciones de seguridad importantes CONSERVE ESTAS INSTRUCCIONES CONSERVE ESTAS INSTRUCCIONES • Asegúrese de que los controles del electrodoméstico y las áreas de cocción estén fuera del alcance de los niños. • No hacerlo puede provocar una de...
Page 75 - No almacene ni utilice el horno al aire libre.
Español 15 Ins truccione s de seg uridad impor tantes CONSERVE ESTAS INSTRUCCIONES CONSERVE ESTAS INSTRUCCIONES • No abra la puerta cuando los alimentos en el horno se están quemando. • Si lo hace, esto provoca una entrada de oxígeno que puede causar que los alimentos se prendan fuego. • No aplique ...
Page 76 - Asegúrese de revolver durante o después de cocinar.
16 Español Ins truccione s de seg uridad impor tantes Instrucciones de seguridad importantes CONSERVE ESTAS INSTRUCCIONES CONSERVE ESTAS INSTRUCCIONES • Tenga cuidado al calentar líquidos como, por ejemplo, agua u otras bebidas. • Asegúrese de revolver durante o después de cocinar. • Evite utilizar ...
Page 77 - Se puede producir una descarga eléctrica.
Español 17 Ins truccione s de seg uridad impor tantes CONSERVE ESTAS INSTRUCCIONES CONSERVE ESTAS INSTRUCCIONES • No se pare sobre el electrodoméstico ni coloque sobre él objetos (como ropa sucia, fundas para hornos, velas encendidas, cigarrillos encendidos, platos, productos químicos, objetos metál...
Page 78 - ADVERTENCIAS FUNDAMENTALES PARA LA LIMPIEZA
18 Español Ins truccione s de seg uridad impor tantes Instrucciones de seguridad importantes CONSERVE ESTAS INSTRUCCIONES CONSERVE ESTAS INSTRUCCIONES • No raye el vidrio de la puerta del horno con un objeto puntiagudo. • Esto puede provocar que el vidrio se dañe o se rompa. • No almacene nada direc...
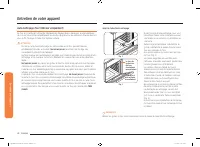
Page 79 - Elementos incluidos con su horno; Introducción a su nuevo horno; Descripción general
Español 19 Introduc ción a su nue vo horno Elementos incluidos con su horno Este horno incluye distintos tipos de accesorios que lo ayudan a cocinar lo que desea. Accesorios para el horno Rejillas de alambre (2) * Rejillas de alambre Utilice estas parrillas en el horno para hornear y asar a la parri...
Page 80 - Antes de comenzar; Sugerencias para ahorrar energía; Plato giratorio (para horno de microondas)
20 Español Antes de c omenz ar Antes de comenzar Antes de utilizar el horno superior y el inferior por primera vez, retire todos los accesorios y limpie los hornos a fondo. Luego, retire los accesorios, programe el horno inferior para hornear y hágalo funcionar a 400 °F durante 1 hora. Después, prog...
Page 81 - Operaciones básicas; Panel de control
Español 21 Oper acione s básic as Operaciones básicas Panel de control LEA LAS INSTRUCCIONES CON ATENCIÓN ANTES DE UTILIZAR EL HORNO. Para obtener un funcionamiento satisfactorio del horno, familiarícese con las diversas características y funciones que se describen a continuación. Encontrará instruc...
Page 82 - Ajuste del reloj; Cómo programar el temporizador de cocina
22 Español Oper acione s básic as Operaciones básicas Ajuste del reloj El reloj debe ajustarse para mostrar la hora correcta para permitir el buen funcionamiento de las opciones de temporizador del horno. • La hora del día no se puede cambiar mientras estén en proceso una cocción con temporizador, u...
Page 83 - Traba de controles; Ajuste del nivel de potencia
Español 23 Oper acione s básic as Traba de controles La traba de controles permite bloquear los botones del panel táctil de modo que no puedan activarse accidentalmente. La traba de controles también bloquea la puerta del horno inferior de modo que no pueda abrirse. Solo puede activar la traba de co...
Page 84 - Ajustes mínimos y máximos; Microondas
24 Español Horno de micr oondas (Horno superior) Ajustes mínimos y máximos Todas las funciones enumeradas en la siguiente tabla tienen ajustes de tiempo mínimo y máximo, temperatura y nivel de potencia. Se oirá una señal sonora cada vez que se presione una tecla del panel de control y el dato ingres...
Page 85 - Palomitas; Asar a la parrilla
Español 25 Horno de micr oondas (Horno superior) Palomitas No es necesario ajustar el tiempo de cocción ni el nivel de potencia. Después de seleccionar Palomitas y tocar START/SET (INICIO/CONFIGURAR) , el horno establece automáticamente el tiempo de cocción y comienza la cocción. El efecto animado d...
Page 86 - Descongelar
26 Español Horno de micr oondas (Horno superior) Horno de microondas (Horno superior) Código/Alimento Cantidad Instrucciones 3Pescado 0,1-3,5 libras Proteger la cola de un pescado entero con papel de aluminio. Dar vuelta el pescado cuando el horno emita la señal sonora. Este programa es apropiado pa...
Page 87 - Cocción con sensor
Español 27 Horno de micr oondas (Horno superior) Código/Alimento Cantidad Instrucciones 3Bebidas 6 a 8 oz (½ taza a 1 taza) Utilizar una taza o un jarro para medir y no cubrir. Colocar la bebida en el horno. Después de calentar, revolver bien. Dejar que el horno se enfríe por al menos 5 minutos ante...
Page 90 - Cocción automática
30 Español Horno de micr oondas (Horno superior) Horno de microondas (Horno superior) Cocción automática No es necesario ajustar el tiempo de cocción ni el nivel de potencia. Puede ajustar el tamaño de la porción. 1. Coloque los alimentos en el centro del plato giratorio y cierre la puerta. 2. Toque...
Page 93 - Cocción con temporizador
Español 33 Horno (Horno inf erior) Horno (Horno inferior) Cocción con temporizador En el modo Cocción con temporizador, el horno se enciende inmediatamente y cocina durante el tiempo que usted fije. Una vez completado ese tiempo de cocción, el horno se apaga automáticamente. • Puede utilizar Cocción...
Page 94 - Inicio retardado; Cómo encender y apagar la luz
34 Español Horno (Horno inf erior) Horno (Horno inferior) Inicio retardado Con Inicio retardado, el temporizador enciende y apaga el horno a las horas que usted seleccione con anticipación. • Puede utilizar Cocción por temporizador únicamente con la operación de cocción Hornear. • Se puede programar...
Page 96 - Hornear; Asado a la parrilla
36 Español Horno (Horno inf erior) Horno (Horno inferior) Hornear El horno puede programarse para hornear a cualquier temperatura en el rango de 175 °F a 550 °F.La temperatura y el tiempo de horneado varían según los ingredientes y el tamaño y la forma de la bandeja de hornear utilizada. Los recubri...
Page 97 - Uso de Entibiar pan para leudado.; Uso de Mantener temperatura
Español 37 Horno (Horno inf erior) PRECAUCIÓN Siempre se debe asar a la parrilla con la puerta del horno cerrada.Cuando abra la puerta, hágalo con precaución. Permita la salida del vapor o aire caliente antes de retirar o volver a colocar los alimentos en el horno. Guía de recomendaciones para asar ...
Page 98 - Uso de Configuración
38 Español Horno (Horno inf erior) Horno (Horno inferior) Uso de Configuración Esta función le permite controlar diversos parámetros de control electrónico. Estos parámetros incluyen Ajuste de temperatura, Unidad de temperatura, Hora del día, Ahorro de energía transcurridas 12 horas, Activar/Desacti...
Page 100 - Uso de la función Shabat
40 Español Horno (Horno inf erior) Horno (Horno inferior) Uso de la función Shabat (Para uso en el Shabat y otras fechas sagradas judías) K Para obtener asistencia adicional, pautas para el uso adecuado y una lista completa de modelos con la función Shabat, visite http:\\www.star-k.org. Puede usar l...
Page 101 - Uso de Smart Control (solo horno inferior)
Español 41 Horno (Horno inf erior) Uso de Smart Control (solo horno inferior) Para usar el Smart Control del horno, debe descargar la aplicación SmartThings a un dispositivo móvil. Las funciones disponibles con la aplicación SmartThings pueden no funcionar adecuadamente si las condiciones de comunic...
Page 104 - Limpieza con vapor del horno de pared
44 Español Mant enimient o de su elec tr odomé stic o Mantenimiento de su electrodoméstico Limpieza con vapor del horno de pared Cómo programar el horno para limpiar con vapor Para limpieza liviana, la función de limpieza con vapor ahorra tiempo y energía.Si se requiere un trabajo de limpieza más in...
Page 105 - Cuidado y limpieza del horno
Español 45 Mant enimient o de su elec tr odomé stic o Cuidado y limpieza del horno Limpieza de las partes pintadas y las terminaciones decorativas • Para su limpieza general, utilice un paño con agua jabonosa caliente. • Para residuos más resistentes o grasa acumulada, aplique un detergente líquido ...
Page 106 - Cómo retirar la puerta del horno (solo horno inferior)
46 Español Mant enimient o de su elec tr odomé stic o Mantenimiento de su electrodoméstico Cómo retirar la puerta del horno (solo horno inferior) PRECAUCIÓN • La puerta es muy pesada. Tenga cuidado al retirarla y levantarla. • No levante la puerta por la manija. Retire la puerta del horno con las do...
Page 107 - Cómo reemplazar la puerta del horno (solo horno inferior)
Español 47 Mant enimient o de su elec tr odomé stic o Cómo reemplazar la puerta del horno (solo horno inferior) PRECAUCIÓN La puerta es muy pesada. Es posible que necesite ayuda para levantarla a una altura suficiente que permita encajarla en las ranuras de las bisagras. No levante la puerta por la ...
Page 108 - Reemplazo de la luz del horno (solo horno inferior)
48 Español Mant enimient o de su elec tr odomé stic o Mantenimiento de su electrodoméstico Reemplazo de la luz del horno (solo horno inferior) La luz del horno es una bombilla halógena estándar de 40 vatios para electrodomésticos. Se enciende cuando se abre la puerta del horno. Cuando la puerta del ...
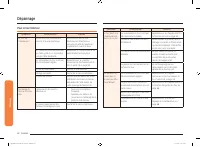
Page 109 - Resolución de problemas; Pantalla de control
Español 49 Re solución de pr oblemas Resolución de problemas Samsung hace grandes esfuerzos para asegurar que usted no experimente problemas con su nuevo horno eléctrico. Si se encuentra con problemas inesperados, como primera medida busque la solución en las siguientes tablas. Si aún experimenta pr...
Page 112 - Para el horno inferior
52 Español Re solución de pr oblemas Resolución de problemas Para el horno inferior Síntoma Causa posible Solución El horno no se enciende. El horno no está bien enchufado al tomacorriente. Asegúrese de que el enchufe se encuentre insertado en un tomacorriente alimentado con corriente y bien conecta...
Page 114 - Códigos de información
54 Español Re solución de pr oblemas Resolución de problemas Síntoma Causa posible Solución Sale olor a quemado o a aceite de la abertura de ventilación. Esto es normal cuando el horno es nuevo y desaparecerá con el tiempo. • Para acelerar este proceso, programe un ciclo de autolimpieza de por lo me...
Page 116 - Garantía
56 Español Garantía Garantía Durante el periodo de garantía aplicable, el producto se reparará o se reemplazará, o se devolverá el importe de compra, a la entera discreción de SAMSUNG. SAMSUNG podrá usar piezas nuevas o reacondicionadas para la reparación del producto, o reemplazar el producto por u...
Page 118 - Anuncio de código abierto
58 Español Garantía Anuncio de código abierto El software incluido en este producto contiene software de código abierto. Puede obtener el código fuente correspondiente completo por un período de tres años a partir del último envío de este producto mandando un correo electrónico a mailto:[email prote...
Page 119 - Notas
Notas NQ70R5510DG_AA_DG68-01148A-02_MES.indd 59 11/11/2019 5:56:35 PM
Page 121 - Four avec fonction micro-ondes; Manuel d’utilisation
Four avec fonction micro-ondes Manuel d’utilisation NQ70*5***D* NQ70R5510DG_AA_DG68-01148A-02_CFR.indd 1 11/11/2019 6:02:11 PM
Page 122 - Table des matières
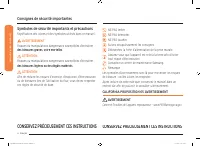
2 Français Table de s matièr es Table des matières Informations relatives à la réglementation CONSIGNES PERMETTANT D'ÉVITER UNE EXPOSITION EXCESSIVE AUX MICRO-ONDES A. Ne faites jamais fonctionner le four alors que la porte est ouverte ; vous risqueriez d'être exposé à une quantité nocive de micro-o...
Page 123 - CONSERVEZ PRÉCIEUSEMENT CES INSTRUCTIONS; Le présent guide
Français 3 Consigne s de sécurit é impor tantes CONSERVEZ PRÉCIEUSEMENT CES INSTRUCTIONS CONSERVEZ PRÉCIEUSEMENT CES INSTRUCTIONS Four (Four inférieur) 33 Cuisson minutée 33 Départ différé 34 Activation et désactivation de l'éclairage 34 Utilisation des grilles du four 34 Cuisson traditionnelle 36 C...
Page 124 - CALIFORNIA PROPOSITION 65 AVERTISSEMENT; Symboles de sécurité importants et précautions; Signification des icônes et des symboles utilisés dans ce manuel :
4 Français Consigne s de sécurit é impor tantes Consignes de sécurité importantes CONSERVEZ PRÉCIEUSEMENT CES INSTRUCTIONS CONSERVEZ PRÉCIEUSEMENT CES INSTRUCTIONS NE PAS tenter.NE PAS démonter.NE PAS toucher.Suivez scrupuleusement les consignes.Débranchez la fiche d'alimentation de la prise murale....
Page 125 - AVERTISSEMENT
Français 5 Consigne s de sécurit é impor tantes CONSERVEZ PRÉCIEUSEMENT CES INSTRUCTIONS CONSERVEZ PRÉCIEUSEMENT CES INSTRUCTIONS Consignes de sécurité importantes (Four à micro-ondes) AVERTISSEMENT Consignes visant à réduire les risques de brûlure, d'électrocution, d'incendie, de blessure ou d'expo...
Page 126 - UTILISATION DE RALLONGES
6 Français Consigne s de sécurit é impor tantes CONSERVEZ PRÉCIEUSEMENT CES INSTRUCTIONS CONSERVEZ PRÉCIEUSEMENT CES INSTRUCTIONS Consignes de sécurité importantes UTILISATION DE RALLONGES Le four est fourni avec un cordon d'alimentation court afin de limiter les risques d'entravement. Des cordons p...
Page 127 - Ne laissez pas les enfants seuls.
Français 7 Consigne s de sécurit é impor tantes CONSERVEZ PRÉCIEUSEMENT CES INSTRUCTIONS CONSERVEZ PRÉCIEUSEMENT CES INSTRUCTIONS • Ne pénétrez pas à l'intérieur du four. • Ne laissez pas les enfants seuls. Ne laissez jamais un enfant sans surveillance dans la pièce où est installé l'appareil. Ne le...
Page 128 - Utilisez uniquement des maniques sèches.
8 Français Consigne s de sécurit é impor tantes CONSERVEZ PRÉCIEUSEMENT CES INSTRUCTIONS CONSERVEZ PRÉCIEUSEMENT CES INSTRUCTIONS Consignes de sécurité importantes • Utilisez uniquement des maniques sèches. L'utilisation de maniques humides ou mouillées sur les surfaces chaudes peut entraîner des br...
Page 131 - ATTENTION
Français 11 Consigne s de sécurit é impor tantes CONSERVEZ PRÉCIEUSEMENT CES INSTRUCTIONS CONSERVEZ PRÉCIEUSEMENT CES INSTRUCTIONS • Avant d'actionner le cycle d'auto-nettoyage, essuyez la graisse et les résidus alimentaires dans le four. Une quantité excessive de graisse peut s'enflammer, provoquan...
Page 132 - Ne vrillez et ne serrez pas le cordon d'alimentation.
12 Français Consigne s de sécurit é impor tantes Consignes de sécurité importantes CONSERVEZ PRÉCIEUSEMENT CES INSTRUCTIONS CONSERVEZ PRÉCIEUSEMENT CES INSTRUCTIONS • Ne coupez ni ne retirez JAMAIS la broche de mise à la terre de la fiche du cordon d'alimentation. • Assurez-vous que l'ampérage de la...
Page 133 - AVERTISSEMENTS IMPORTANTS RELATIFS À L'UTILISATION
Français 13 Consigne s de sécurit é impor tantes CONSERVEZ PRÉCIEUSEMENT CES INSTRUCTIONS CONSERVEZ PRÉCIEUSEMENT CES INSTRUCTIONS • En cas de départ de feu à l'intérieur du four, laissez sa porte fermée, éteignez l'appareil et débranchez la prise ou coupez l'alimentation au niveau du tableau de fus...
Page 134 - Cela pourrait entraîner un risque d'électrocution.
14 Français Consigne s de sécurit é impor tantes Consignes de sécurité importantes CONSERVEZ PRÉCIEUSEMENT CES INSTRUCTIONS CONSERVEZ PRÉCIEUSEMENT CES INSTRUCTIONS • Veillez à ce que les commandes et les zones de cuisson du four soient hors de portée des enfants. • Le non-respect de cette consigne ...
Page 135 - Utilisez des maniques afin d'éviter toute brûlure.
Français 15 Consigne s de sécurit é impor tantes CONSERVEZ PRÉCIEUSEMENT CES INSTRUCTIONS CONSERVEZ PRÉCIEUSEMENT CES INSTRUCTIONS • N'ouvrez pas la porte si les aliments à l'intérieur du compartiment de cuisson sont en flammes. • Si vous ouvrez la porte, de l’oxygène pénétrera à l’intérieur et cela...
Page 136 - AVERTISSEMENTS RELATIFS À L'UTILISATION
16 Français Consigne s de sécurit é impor tantes Consignes de sécurité importantes CONSERVEZ PRÉCIEUSEMENT CES INSTRUCTIONS CONSERVEZ PRÉCIEUSEMENT CES INSTRUCTIONS • Montrez-vous particulièrement vigilant lorsque vous faites chauffer des liquides (ex. : eau ou autres boissons). • Veillez à remuer p...
Page 137 - Des articles peuvent rester coincés dans la porte.
Français 17 Consigne s de sécurit é impor tantes CONSERVEZ PRÉCIEUSEMENT CES INSTRUCTIONS CONSERVEZ PRÉCIEUSEMENT CES INSTRUCTIONS • Ne montez pas sur l'appareil et ne placez pas d'objets (ex. : linge, couvercle de four, bougies allumées, cigarettes allumées, plats, produits chimiques, objets métall...
Page 138 - AVERTISSEMENTS IMPORTANTS RELATIFS AU NETTOYAGE
18 Français Consigne s de sécurit é impor tantes Consignes de sécurité importantes CONSERVEZ PRÉCIEUSEMENT CES INSTRUCTIONS CONSERVEZ PRÉCIEUSEMENT CES INSTRUCTIONS • Ne rayez pas la surface vitrée de la porte du four à l'aide d'un objet tranchant. • Cela pourrait endommager, voire briser la vitre. ...
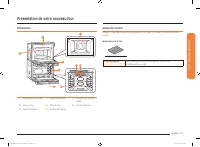
Page 139 - Accessoires fournis; Présentation de votre nouveau four; Présentation
Français 19 Pr ésentation de v otr e nouv eau f our Accessoires fournis Différents types d'accessoires accompagnent ce four pour vous aider à cuisiner ce que vous voulez. Accessoires pour le four Grilles de cuisson (2) * Grilles métalliques Utilisez ces grilles dans le four pendant une cuisson tradi...
Page 140 - Avant de commencer; Conseils pour économiser de l'énergie
20 Français Av ant de c ommenc er Avant de commencer Avant d'utiliser le four inférieur et le four supérieur, retirez tous les accessoires puis nettoyez les fours de manière approfondie. Ensuite, réglez le four inférieur en cuisson traditionnelle et faites fonctionner le four à 400 °F pendant 1 heur...
Page 141 - Fonctionnement de base; Panneau de commande
Français 21 Fonctionnement de base Fonctionnement de base Panneau de commande LISEZ ATTENTIVEMENT LES CONSIGNES D'UTILISATION AVANT DE VOUS SERVIR DU FOUR. Afin de profiter au mieux de votre four, familiarisez-vous avec les fonctionnalités décrites ci-dessous. Vous trouverez un descriptif détaillé d...
Page 142 - Réglage de la minuterie
22 Français Fonctionnement de base Fonctionnement de base Réglage de l'horloge L'horloge doit être réglée sur l'heure correcte afin que la minuterie automatique du four fonctionne correctement. • L'heure ne peut pas être modifiée durant la cuisson minutée, la cuisson minutée différée ou le cycle d'a...
Page 143 - Verrouillage des commandes; Réglage de la puissance
Français 23 Fonctionnement de base Verrouillage des commandes La fonction Verrouillage des commandes vous permet de verrouiller les boutons du pavé tactile afin qu'ils ne puissent pas être actionnés par accident. La fonction Verrouillage des commandes vous permet également de verrouiller la porte du...
Page 144 - Réglages minimum et maximum
24 Français Four à micr o-onde s (four supérieur) Réglages minimum et maximum Toutes les fonctions listées dans le tableau ci-dessous ont un réglage minimum et un réglage maximum de la durée ou de la température ainsi qu'un réglage du niveau de puissance. Un signal sonore retentit chaque fois que vo...
Page 145 - Maïs soufflé; Cuisson au gril
Français 25 Four à micr o-onde s (four supérieur) Maïs soufflé Vous n'avez donc besoin de régler ni la durée de cuisson, ni la puissance. Après avoir sélectionné Maïs soufflé et appuyé sur START/SET (DÉPART/RÉGLAGE) , le four règle automatiquement le temps de cuisson et lance la cuisson. L'effet d'a...
Page 146 - Décongélation
26 Français Four à micr o-onde s (four supérieur) Four à micro-ondes (four supérieur) Code/Aliment Quantité Consignes 3Poisson 0,1 à 3,5 lb Protégez la queue d'un poisson entier avec du papier d'aluminium. Retournez le poisson lorsque le signal sonore retentit. Ce programme convient aussi bien à la ...
Page 147 - Cuisson par capteur
Français 27 Four à micr o-onde s (four supérieur) Code/Aliment Quantité Consignes 3Boissons 6 à 8 oz (½ tasse à 1 tasse) Versez le liquide dans une tasse graduée ou un verre mesureur. Ne couvrez pas le récipient. Placez la boisson dans le four. Une fois le temps de chauffe écoulé, remuez bien. Laiss...
Page 150 - Cuisson automatique
30 Français Four à micr o-onde s (four supérieur) Four à micro-ondes (four supérieur) Cuisson automatique Vous n'avez donc besoin de régler ni la durée de cuisson, ni la puissance. Vous pouvez définir la quantité des portions. 1. Placez les aliments au centre du plateau tournant, puis fermez la port...
Page 152 - Faire ramollir/fondre
32 Français Four à micr o-onde s (four supérieur) Four à micro-ondes (four supérieur) Faire ramollir/fondre Vous n'avez donc besoin de régler ni la durée de cuisson, ni la puissance. 1. Placez les aliments au centre du plateau tournant, puis fermez la porte. 2. Appuyez sur Soften/Melt (Faire ramolli...
Page 153 - Cuisson minutée
Français 33 Four (F our inf érieur) Four (Four inférieur) Cuisson minutée En mode Cuisson minutée, le four s'allume immédiatement et effectue la cuisson pendant la durée que vous avez sélectionnée. À la fin du temps de cuisson, le four s'éteint automatiquement. • Vous pouvez utiliser le mode Cuisson...
Page 154 - Départ différé; Activation et désactivation de l'éclairage
34 Français Four (F our inf érieur) Four (Four inférieur) Départ différé Avec la fonction Départ différé, la minuterie du four permet d'allumer et d'éteindre le four aux heures que vous avez sélectionnées préalablement. • Vous pouvez utiliser le mode Cuisson minutée seulement avec la cuisson Cuisson...
Page 156 - Cuisson traditionnelle
36 Français Four (F our inf érieur) Four (Four inférieur) Cuisson traditionnelle Le four peut être programmé pour cuire à toute température comprise entre 175 °F et 550 °F.La température et le temps de cuisson varient en fonction des ingrédients, ainsi que de la taille et de la forme du plat de cuis...
Page 157 - Utilisation de la fonction Pain précuit.
Français 37 Four (F our inf érieur) ATTENTION Faites toujours griller les aliments avec la porte du four fermée.Soyez prudent lorsque vous ouvrez la porte. Laissez l'air chaud ou la vapeur s'échapper avant de retirer les aliments du four ou de les placer à l'intérieur. Guide de recommandations conce...
Page 158 - Utilisation de la fonction Paramètres
38 Français Four (F our inf érieur) Four (Four inférieur) Utilisation de la fonction Paramètres Cette fonction vous permet de contrôler plusieurs paramètres de commande électronique. Ces paramètres incluent Réglage de la température, Unité de température, Heure actuelle, Économie d'énergie après 12 ...
Page 160 - Utilisation de la fonction Shabbat
40 Français Four (F our inf érieur) Four (Four inférieur) Utilisation de la fonction Shabbat (Utilisée pour les fêtes et le Shabbat juifs) K Pour en savoir plus et obtenir des instructions d'utilisation et une liste complète des modèles avec la fonction Shabbat, veuillez visiter le site Web sur http...
Page 164 - Nettoyage vapeur de l'intérieur du four
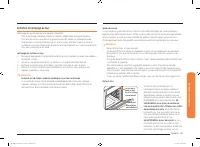
44 Français Entretien de v otr e appar eil Entretien de votre appareil Nettoyage vapeur de l'intérieur du four Comment régler le four pour le nettoyage vapeur ? La fonction de nettoyage vapeur permet d'effectuer un nettoyage superficiel en économisant du temps et de l'énergie.Pour un nettoyage plus ...
Page 165 - Entretien et nettoyage du four
Français 45 Entretien de v otr e appar eil Entretien et nettoyage du four Nettoyage des parties peintes et ornements décoratifs • Pour le nettoyage sommaire, utilisez un torchon imbibé d'eau chaude savonneuse. • Pour ôter les résidus incrustés et la graisse accumulée, versez un nettoyant liquide dir...
Page 166 - Retrait de la porte du four (four inférieur uniquement)
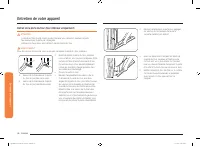
46 Français Entretien de v otr e appar eil Entretien de votre appareil Retrait de la porte du four (four inférieur uniquement) ATTENTION • La porte est très lourde. Soyez prudent lorsque vous retirez et soulevez la porte. • Ne soulevez pas la porte par la poignée. Utilisez vos deux mains pour retire...
Page 167 - Réinstallation de la porte du four (four inférieur uniquement)
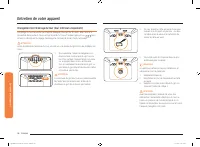
Français 47 Entretien de v otr e appar eil Réinstallation de la porte du four (four inférieur uniquement) ATTENTION La porte est très lourde. Il se peut que vous ayez besoin d'aide pour soulever la porte suffisamment haut pour la faire glisser dans les trous de la charnière. Ne soulevez pas la porte...
Page 168 - Changement de l'éclairage du four (four inférieur uniquement)
48 Français Entretien de v otr e appar eil Entretien de votre appareil Changement de l'éclairage du four (four inférieur uniquement) L'éclairage du four nécessite une ampoule halogène standard de 40 watts. Elle s'allume à l'ouverture de la porte du four. Lorsque la porte du four est fermée, appuyez ...
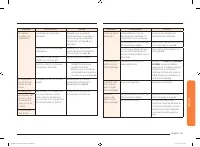
Page 169 - Dépannage; Écran de commande
Français 49 Dépannag e Dépannage Samsung veille à ce que vous ne rencontriez pas de problèmes lors de l'utilisation de votre nouveau four électrique. En cas de problème inattendu, recherchez en premier lieu une solution dans les tableaux ci-dessous. Si vous rencontrez encore des problèmes après avoi...
Page 172 - Pour le four inférieur
52 Français Dépannag e Dépannage Pour le four inférieur Symptôme Cause possible Solution Le four ne s'allume pas. Le four n'est pas correctement branché à la prise électrique. Assurez-vous que la fiche électrique est branchée sur une prise en état de marche et correctement mise à la terre. Un fusibl...
Page 176 - Garantie
56 Français Garantie Garantie Pendant la période de garantie applicable, le produit sera réparé, remplacé ou remboursé à la valeur de son prix d’achat, à la seule discrétion de SAMSUNG. SAMSUNG peut être amenée à utiliser des pièces neuves ou reconditionnées lors de la réparation du produit, ou à re...
Page 178 - Annonce de contenu libre
58 Français Garantie Annonce de contenu libre Le présent produit contient un logiciel libre. Vous pouvez obtenir l’intégralité du code source correspondant durant une période de trois ans après la dernière livraison de ce produit en envoyant un e-mail à l’adresse suivante : mailto:[email protected]....
Page 179 - Notes
Notes NQ70R5510DG_AA_DG68-01148A-02_CFR.indd 59 11/11/2019 6:02:25 PM


 Samsung NE63T8951SS
User Manual
Samsung NE63T8951SS
User Manual
 Samsung NQ50J5530BS
User Manual
Samsung NQ50J5530BS
User Manual
 Samsung NQ50J9530BS
User Manual
Samsung NQ50J9530BS
User Manual
 Samsung NQ70CB700D12
User Manual
Samsung NQ70CB700D12
User Manual
 Samsung NQ70CG600DMT
User Manual
Samsung NQ70CG600DMT
User Manual
 Samsung NQ70CG600DSR
User Manual
Samsung NQ70CG600DSR
User Manual
 Samsung NQ70CG700DMT
User Manual
Samsung NQ70CG700DMT
User Manual
 Samsung NQ70CG700DSR
User Manual
Samsung NQ70CG700DSR
User Manual
 Samsung NV51CB700D12
User Manual
Samsung NV51CB700D12
User Manual
 Samsung NV51CB700S12
User Manual
Samsung NV51CB700S12
User Manual
 Samsung NV51CG600DMT
User Manual
Samsung NV51CG600DMT
User Manual
 Samsung NV51CG600DSR
User Manual
Samsung NV51CG600DSR
User Manual
 Samsung NV51CG600SMT
User Manual
Samsung NV51CG600SMT
User Manual
 Samsung NV51CG600SSR
User Manual
Samsung NV51CG600SSR
User Manual
 Samsung NV51CG700DMT
User Manual
Samsung NV51CG700DMT
User Manual
 Samsung NV51CG700DSR
User Manual
Samsung NV51CG700DSR
User Manual
 Samsung NV51CG700SMT
User Manual
Samsung NV51CG700SMT
User Manual
 Samsung NV51CG700SSR
User Manual
Samsung NV51CG700SSR
User Manual
 Samsung NV51K6650DG
User Manual
Samsung NV51K6650DG
User Manual