Page 2 - Important Safety Instructions; Table of Contents
2 English Important Safety Instructions 3 Installation Requirements 5 Electrical Requirements 5 Venting Requirements 5 Venting Methods 5 Tools and Parts 6 Dimensions and Clearances 6 Installation 7 Prepare Location 7 Installing the Range Hood 8 Connect Vent System 9 Electrical Connection 10 Complete...
Page 3 - FCC CAUTION: Any changes or modifications not expressly approved; • Reorienting or relocating the receiving antenna
English 3 APPROVED FOR RESIDENTIAL APPLIANCES FOR RESIDENTIAL USE ONLY READ AND SAVE THESE INSTRUCTIONS PLEASE READ ENTIRE INSTALLATION GUIDE BEFORE PROCEEDING. INSTALLATION MUST COMPLY WITH ALL LOCAL CODES. IMPORTANT: Save these Instructions for the Local Electrical Inspector’s use. INSTALLER: Plea...
Page 5 - Electrical Requirements; IMPORTANT; To contact a qualified electrical installer.; Venting Requirements (ducted models only); be kept to a minimum to provide efficient performance.; For the most efficient and quiet operation:; Venting Methods; NOTE; Installation Requirements
English 5 Electrical Requirements IMPORTANT Observe all governing codes and ordinances. It is the customer’s responsibility: To contact a qualified electrical installer. To assure that the electrical installation is adequate and in conformance with National Electrical Code, ANSI/NFPA 70 — latest edi...
Page 6 - Tools and Parts; CAUTION; Dimensions and Clearances
6 English Tools and Parts Removing the packaging CAUTION Remove the carton carefully. Wear gloves to protect against sharp edges. WARNING Remove the protective film covering the product before putting into operation. Parts supplied • Hood assembly with blower and LED lamps already installed. • Hardw...
Page 7 - Installation; Installation Clearances; lation clearances specified for the product.; Preparing the location; the ceiling or wall for vent fittings.; WARNING; If the cabinet has a recessed bottom, add wood filler strips on each; Determine the wiring hole location
English 7 Installation Installation Clearances C B A E D A. 18” (45.7 cm) min. clearance - upper cabinet to countertop B. 24” (61.0 cm) min. for electric cooking surfaces 27” (68.6 cm) min. for gas cooking surfaces 36” (91.4 cm) suggested max. - bottom of range hood to cooking surface C. 30” (76.2 c...
Page 8 - To make a circular vent opening on the underside of the cabinet top:; Measure and mark the centerline of the cabinet to the soffit above.; Install vent system; Installing the Range Hood; Remove the baffle filters. See the “Range Hood Care” section.
8 English STYLE 1 - CUT OPENINGS FOR 3¼” X 10” (8.3 CM X 25.4 CM) RECTANGULAR VENT SYSTEMWall venting To make a 4” x 10½” (10.2 cm x 26.7 cm) rectangle in the wall: 1. Draw one line 2 3 ⁄ 4 ” (7.0 cm) and a second line 6 3 ⁄ 4 ” (17.1 cm) below the underside of the cabinet. Extend these lines throug...
Page 9 - Connect Vent System; Vent connector installation; Remove the baffle filters. See the “Range hood care” section.
English 9 Installation Connect Vent System Vent connector installation The range hood is factory set for use the top vent outlet. Determine whether the range hood will be installed using either a top or rear vent connection. Rear vent connector installation NOTE For rear venting, the blower motor po...
Page 10 - Mounting the Range Hood on a Cabinet; Top vent transition installation; Remove the tape from the damper flap.; Mounting the Range Hood on the Wall; Electrical Connection
10 English Installation Mounting the Range Hood on a Cabinet 1. Using 2 people, lift the range hood into it’s final location. Feed enough electrical wire through the strain relief to make connections in the termi- nal box. Tighten the strain relief screws. 2. Position the range hood so that the larg...
Page 11 - Range Hood Use; Complete the Installation; Replace the baffle filters. See the “Range Hood Care” section.; Range Hood Description
English 11 Range Hood Use Range Hood Use 3. Remove the knockout in the terminal box cover, and then install a UL listed or CSA approved 1 ⁄ 2 ” strain relief. E F A B C D A. White wires B. Black wires C. UL listed wire connectors D. Green (or bare) and yellow-green ground wire E. Home power supply c...
Page 12 - with the installation clearances specified for the product.
12 English G. Timer Setting the timer ON • Press the Timer button to set the working time. • Each time you press the Timer, you add 10 minutes to the displayed time, up to a maximum of 99 minutes. The hood will stay on for the amount of time you have set. • After the Timer counts down to zero, the T...
Page 13 - Cleaning; Clean the hood and grease filters frequently according to; Stainless steel baffle filter:; Remove the filter by pulling the spring release handle, and then; Accessories; Charcoal filter replacement:; To replace charcoal filter:; Turn the charcoal filter clockwise to lock it.; Range Hood Care
English 13 Range Hood Care Cleaning IMPORTANT: Clean the hood and grease filters frequently according to the following instructions. Replace baffle filters before operating the hood. Exterior surfaces: • To avoid damage to the exterior surface, do not use steel wool or soap-filled scouring pads. • A...
Page 14 - SAMSUNG RANGE HOOD; Limited warranty to original purchaser
warranty (USA) SAMSUNG RANGE HOOD Limited warranty to original purchaser This SAMSUNG brand product, as supplied and distributed by Samsung Electronics America, Inc. (SAMSUNG) and delivered new, in the original carton to the original consumer purchaser, is warranted by SAMSUNG against manufacturing ...
Page 16 - Importantes Consignes de Sécurité; Spécifications Électriques; Installation de la Hotte; Connexion Électrique; Utilisation de la Hotte; Sommaire
16 Français Importantes Consignes de Sécurité 17 Exigences d’Installation 19 Spécifications Électriques 19 Exigences Concernant l’évacuation 19 Méthodes d’évacuation 19 Outils et Pièces 20 Dimensions et Espaces 20 Installation de la Hotte 22 Préparation de l’emplacement 22 Installation de la Hotte 2...
Page 17 - Conservez ces instructions afin de pouvoir les
Français 17 APPROUVÉ POUR LES APPAREILS DE TYPE RÉSIDENTIEL POUR UNE UTILISATION RÉSIDENTIELLE SEULEMENT LISEZ CES INSTRUCTIONS ET CONSERVEZ-LES VEUILLEZ LIRE CES INSTRUCTIONS AU COMPLET AVANT DE COMMENCER. L’INSTALLATION DE L’APPAREIL DOIT RESPECTER TOUS LES CODES EN VIGUEUR. IMPORTANT: INSTALLATEU...
Page 19 - conçus et homologués UL pour fixer le cuivre à l’aluminium.; Exigences Concernant l’évacuation; Pour un fonctionnement efficace et silencieux:; Le circuit d’évacuation doit comporter un clapet antireflux.; Méthodes d’évacuation; REMARQUE; Exigences d’Installation
Français 19 Spécifications Électriques IMPORTANT Observer les dispositions de tous les codes et règlements en vigueur. Le client a la responsabilité de: Contacter un électricien-installateur. Vérifier que l’installation électrique est adéquate et conforme avec le Code national de l’électricité, ANSI...
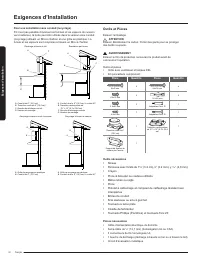
Page 20 - Outils et Pièces; ATTENTION; Enlever le film de protection recouvrant le produit avant de; Pièce; connecteurs de fils homologués UL; fumée et les vapeurs sont recyclées à travers un filtre à charbon.
20 Français Outils et Pièces Enlever l’emballage ATTENTION Enlever délicatement le carton. Porter des gants pour se protéger des bords coupants. AVERTISSEMENT Enlever le film de protection recouvrant le produit avant de commencer l’opération. Outils et pièces • Hotte avec ventilateur et lampes DEL •...
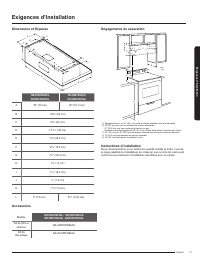
Page 21 - Dimensions et Espaces; Modèle; Dégagements de séparation
Français 21 Dimensions et Espaces A B L K H E G F C I D J NK30N7000US NK30N7000UG NK36N7000US NK36N7000UG A 30″ (76 cm) 36″ (91.2 cm) B 19 6 ⁄ 8 ″ (50 cm) C 9 3 ⁄ 4 ″ (25 cm) D 13 13 ⁄ 16 ″ (35 cm) E 12″ (30.5 cm) F 2 3 ⁄ 16 ″ (5.5 cm) G 7 1 ⁄ 4 ″ (18.4 cm) H 1 3 ⁄ 16 ″ (3 cm) I 1 1 ⁄ 16 ″ (2.6 cm) ...
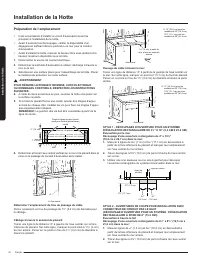
Page 22 - Préparation de l’emplacement; Avant d’exécuter les découpages, vérifier la disponibilité d’un
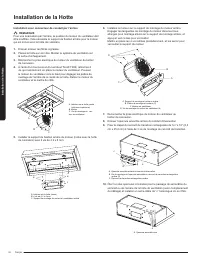
22 Français A Axe central 1 9 ⁄ 16 ” (4 cm) à partir du mur, et non du cadre du placard A. 12” (30,5 cm) pour les modèles de 30” (76,2 cm) 12¼” (31,1 cm) pour les modèles de 36” (91,4 cm) Passage du câble à travers le mur: Tracer une ligne de distance “A” à partir de la gauche de l’axe central sur l...
Page 23 - Découpage d’une ouverture circulaire sur la face inférieure; Retirer les filtres à graisse. Voir la section “Entretien”.; Connectez le système de ventilation; Installation avec connecteur de conduit
Français 23 3. Utiliser une scie sauteuse ou une scie à guichet pour découper l’ouverture rectangulaire du système d’évacuation dans le mur. 4 1 ⁄ 4 ” (10,8 cm) *7” (17,8 cm) ) * 1 ⁄ 2 ” (1,3 cm) 4 1 ⁄ 4 ” (10,8 cm) *À partir du mur, et non du cadre du placard 7 11 ⁄ 64 ” (18,5 cm) Découpage d’une o...
Page 24 - Installation avec connecteur de conduit par l’arrière; Enlever enlever les filtres à graisse.
24 Français Installation de la Hotte Installation de la Hotte Installation avec connecteur de conduit par l’arrière REMARQUE Pour une évacuation par l’arrière, la position du moteur du ventilateur doit être modifiée. Cela nécessite le support de fixation arrière pour le moteur qui est inclus avec la...
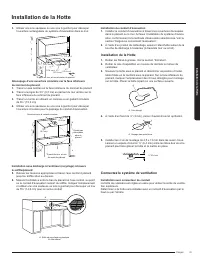
Page 25 - Montage de la hotte sur l’armoire; Installation avec connecteur de conduit par le haut; Montage de la hotte sur le mur
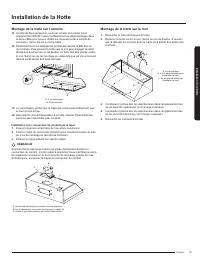
Français 25 Montage de la hotte sur l’armoire 11. À l’aide de deux personnes, soulever la hotte et la placer à son emplacement définitif. Insérer suffisamment de câble électrique dans le serre-câble pour pouvoir établir les connexions dans la boîte de connexion. Serrer les vis du serre-câble. 12. Po...
Page 26 - À l’aide des connecteurs de fils (homologation UL), connecter; Achever l’installation; Mettez en place le filtre à graisse.; Description de la hotte
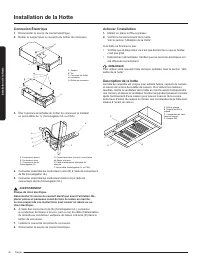
26 Français Connexion Électrique 1. Déconnecter la source de courant électrique. 2. Retirer le support puis le couvercle du boîtier de connexion. A B D C B A. Support B. Vis C. Couvercle du boîtier de connexion D. Boîtier de connexion 3. Ôter l’opercule arrachable du boîtier de connexion et installe...
Page 27 - Commandes de la Hotte; F. Affichage du minuteur; Affiche les réglages de la minuterie
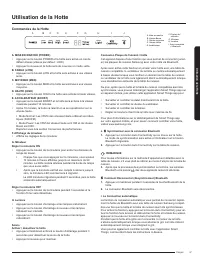
Français 27 Utilisation de la Hotte Commandes de la Hotte A B C D E G F H I J A. Mise en marche B. Vitesse Basse C. Vitesse moyenne D. Vitesse Haute E. Accélérateur F. Display del minuteur G. Minuteur H. Lumière I. Auto connectivité J. Bluetooth A. MISE EN MARCHE (POWER) • Appuyez sur le bouton POWE...
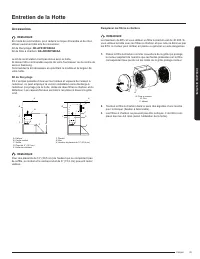
Page 28 - Réinitialiser l’alarme du filtre; Nettoyage; Filtre déflecteur d’acier inoxydable:
28 Français Utilisation de la Hotte La hotte s’allume à la vitesse suivante: • Vitesse Automatique (si le bouton Auto était précédemment activé) • Vitesse Basse (si le bouton Auto était précédemment désactivé) 1. Appuyez sur le bouton Auto Connectivity pour activer la fonction. 2. La hotte fonctionn...
Page 29 - Accessoires; utilisez seulement des kits de conversion:; Kit de Recyclage; S’il n’est pas possible d’évacuer les fumées et vapeurs de cuisson à; Pour des placards de 12” (30,5 cm) de hauteur qui ne comportent pas; les BTU, le moteur peut tomber en panne ou générer un acte dangereux.; Entretien de la Hotte
Français 29 Accessoires REMARQUE En mode de recirculation, pour réduire le risque d’incendie et de choc, utilisez seulement des kits de conversion: Kit de Recyclage: NK-AF030FNB/AA Kit de filtre à charbon: NK-AR050FNB/AA Le kit de recirculation n’est pas inclus avec le hotte. Ils doivent être comman...
Page 30 - HOTTE SAMSUNG; Garantie limitée à l’acheteur d’origine
garantie (USA) HOTTE SAMSUNG Garantie limitée à l’acheteur d’origine Ce produit de la marque SAMSUNG, qui est fourni et distribué par la société Samsung Electronics America, Inc. (SAMSUNG) et livré neuf, dans son carton d’origine à l’acheteur d’origine, est garanti par Samsung contre les défauts de ...
Page 32 - Instrucciones Importantes de Seguridad; Índice; índice
32 Español Instrucciones Importantes de Seguridad 33 Requisitos de Instalación 35 Requisitos Eléctricos 35 Requisitos de Ventilación 35 Métodos de Ventilación 35 Herramientas y Piezas 36 Dimensiones y Espacios Libres 37 Instalación de la Campana 38 Preparación de la Ubicación 37 Instalación del Sist...
Page 33 - • Cambiar la orientación o ubicación de la antena de recepción
Español 33 APROBADO PARA APARATOS DE USO DOMÉSTICO SÓLO PARA USO DOMÉSTICO LEA Y GUARDE ESTAS INSTRUCCIONES ANTES DE CONTINUAR, LEA LAS INSTRUCCIONES POR COMPLETO. LA INSTALACIÓN DEBE CUMPLIR CON TODA LA NORMATIVA LOCAL. IMPORTANTE: INSTALADOR: PROPIETARIO: Guarde estas instrucciones para su uso por...
Page 34 - PARA REDUCIR EL RIESGO DE INCENDIOS, CHOQUE ELÉCTRICO O
34 Español Instrucciones Importantes de Seguridad ADVERTENCIA PARA REDUCIR EL RIESGO DE INCENDIOS, CHOQUE ELÉCTRICO O LESIONES A PERSONAS, OBSERVE LO SIGUIENTE: ■ Use esta unidad sólo de la manera para la que fue diseñada por el fabricante. Si tiene preguntas, póngase en contacto con el fabricante. ...
Page 35 - Requisitos Eléctricos; IMPORTANTE; Contactar un instalador eléctrico calificado.; Requisitos de Ventilación; mantener al mínimo para proveer un funcionamiento eficaz.; Métodos de Ventilación; NOTA; No se recomienda el uso de ductos de escape flexibles. Los ductos de; Altura de Montaje; superficie de cocción a gas y un máximo sugerido de 36” (91.4 cm) por; Descarga Posterior; Requisitos de Instalación
Español 35 Requisitos Eléctricos IMPORTANTE Observe todos los códigos y reglamentos aplicables. Es la responsabilidad del propietario: Contactar un instalador eléctrico calificado. Asegurarse de que la instalación eléctrica es adecuada y en conformidad con National Electrical Code, ANSI/NFPA 70 — úl...
Page 36 - Instalaciones Recirculantes; Herramientas y Piezas; PRECAUCIÓN
36 Español Instalaciones Recirculantes Si no es posible expulsar los humos y vapores al exterior, la campana puede ser usada en su versión recirculante, adaptando un filtro de car - bón y una rejilla plástica. El humo y los vapores son filtrados y recircula - dos a través de la rejilla plástica. Sal...
Page 37 - Instalación de la Campana; Dimensiones y Espacios Libres; Se recomienda que un técnico cualificado instale la campana. Es re; Prepare la Ubicación; Seleccione una superficie plana para ensamblar la campana; ADVERTENCIA; colóquela en la superficie cubierta.
Español 37 Instalación de la Campana Dimensiones y Espacios Libres A B L K H E G F C I D J NK30N7000US NK30N7000UG NK36N7000US NK36N7000UG A 30″ (76 cm) 36″ (91.2 cm) B 19 6 ⁄ 8 ″ (50 cm) C 9 3 ⁄ 4 ″ (25 cm) D 13 13 ⁄ 16 ″ (35 cm) E 12″ (30.5 cm) F 2 3 ⁄ 16 ″ (5.5 cm) G 7 1 ⁄ 4 ″ (18.4 cm) H 1 3 ⁄ 1...
Page 38 - Determine a ubicación del orificio para cableado; Corte un orificio de acceso para el cableado de 1; Para hacer el cableado desde la parte superior:; desde el borde superior del gabinete. Taladre un orifi; ESTILO 1 - CORTES PARA UN SISTEMA DE VENTILACIÓN RECTAN-
38 Español Instalación de la Campana Instalación de la Campana Tiras de madera (para gabinetes con fondo ahuecado Fondo del Gabinete Pared 3” (7.6 cm) LC modelo 30”: 13 13 ⁄ 16 ” (35 cm) modelo 36”: 16 6 ⁄ 8 ” (42,5 cm) modelo 30”: 13 13 ⁄ 16 ” (35 cm) modelo 36”: 16 6 ⁄ 8 ” (42,5 cm) 3” (7.6 cm) 6....
Page 39 - Montaje de la campana; Instale los 4 tornillos de montaje de 4,5 mm x 13 mm en los
Español 39 Instalación de la Campana Instalación de la Campana ESTILO 2 - CORTES EN LA PARTE SUPERIOR DEL GABINETE PARA EL DUCTO DE ESCAPE (CORTE RECTANGULAR A REDONDO DE 6” [15.2 CM]) Ventilación a través de techo Para hacer un recorte rectangular de 61⁄2” x 8½” (16.5 cm x 21.6 cm) en el lado de ab...
Page 40 - Retire los filtros de grasa.
40 Español Instalación de la Campana Montaje de la Transición de Aire Esta campana está configurada para utilizar la salida superior de aire. Determine el modo de ventilación en el que será instalada la campa- na; Expulsando el aire por la parte superior o por la parte trasera de la campana. Instala...
Page 41 - Montaje de la campana al gabinete; Instalación de la transición para la ventilación superior; Instalación de la campana a la pared
Español 41 Instalación de la Campana Montaje de la campana al gabinete 1. Con la ayuda de 2 ó más personas, levante la campana en la posición final. Alimentar suficiente cable eléctrico a través de la ½“ UL o aproba - do por CSA para realizar las conexiones en la caja de terminales. Apriete los torn...
Page 42 - Uso de la Campana; Conexión Eléctrica; Vuelva a colocar los filtros de grasa.; Descripción de la Campana
42 Español Uso de la Campana Conexión Eléctrica 1. Desconecte el suministro de energía. 2. Remueva la estafa y seguido de esto la cubierta de la caja de termi- nales. A B D C B A. Estafa B. Tornillos de la caja de terminales C. Cubierta de la caja de terminales D. Caja de terminales 3. Quite el prec...
Page 43 - Controles de la Campana; Muestra la configuración del Timer.
Español 43 Uso de la Campana Controles de la Campana A B C D E G F H I J A. Encendido B. Velocidad baja C. Velocidad media D. Velocidad alta E. Aumentar velocidad F. Monitor del Temporizador G. Temporizador H. Luces I. Auto Conectividad J. Bluetooth A. Encendido (POWER) • Presione el botón power y l...
Page 44 - Reiniciar la alarma de filtro; Limpieza; Superficies Exteriores:
44 Español Uso de la Campana 1. Presione el botón de Auto Conectividad para activar la función. 2. La campana operará automáticamente cuando encienda la parrilla. 3. Presione una vez más para desactivar la función. Imagen Control Remoto de Smart Things App Auto Connectividad Función de la campana X ...
Page 45 - Accessorios; Kit de Filtro de Carbón:; Kit Recirculante; Los gabinetes con una altura de 12” (30.5 cm) sin sofito permiten que la; puede fallar o provocar un acto inseguro.; Cuidado de la Campana
Español 45 Cuidado de la Campana Accessorios NOTA Cuando la campana sea utilizada en modo recirculante, para reducir el riesgo de incendio y choque eléctrico use solo los accesorios con los modelos: Kit Recirculante: NK-AF030FNB/AA Kit de Filtro de Carbón: NK-AR050FNB/AA El kit recirculante no está ...
Page 46 - CAMPANA SAMSUNG; Garantía limitada al comprador original
garantía (USA) CAMPANA SAMSUNG Garantía limitada al comprador original Este producto de la marca SAMSUNG, suministrado y distri-buido por Samsung Electronics America, Inc. (SAMSUNG) y entregado nuevo, en su empaque original al comprador original, está garantizado por SAMSUNG contra defectos de manuf...
Page 48 - Printed in Mexico