Page 2 - Important Safety Instructions; Table of Contents
2 English Important Safety Instructions 3 Installation Requirements 5 Electrical Requirements 5 Venting Requirements 5 Venting Methods 5 Cold Weather Installations 5 Makeup Air 5 Tools and Parts 6 Dimensions and Clearances 6 Installation Instructions 7 Installation Instructions 7 Venting Methods 7 P...
Page 3 - FCC CAUTION: Any changes or modifications not expressly approved; The term “IC” before the radio certification number only signifies
English 3 APPROVED FOR RESIDENTIAL APPLIANCES FOR RESIDENTIAL USE ONLY READ AND SAVE THESE INSTRUCTIONS PLEASE READ ENTIRE INSTALLATION GUIDE BEFORE PROCEEDING. INSTALLATION MUST COMPLY WITH ALL LOCAL CODES. IMPORTANT: Save these Instructions for the Local Electrical Inspector’s use. INSTALLER: Plea...
Page 5 - Electrical Requirements; IMPORTANT; To contact a qualified electrical installer.; Venting Requirements (ducted models only); be kept to a minimum to provide efficient performance.; For the most efficient and quiet operation:; Venting Methods; NOTE; Mount the hood no less than 24” (61.0 cm) above an electric cooking; Horizontal discharge; Cold Weather Installations; cold air flow and a thermal break should be installed to minimize; Makeup Air; makeup air systems. Consult a HVAC professional for specific; Installation Requirements
English 5 Electrical Requirements IMPORTANT Observe all governing codes and ordinances. It is the customer’s responsibility: To contact a qualified electrical installer. If codes permit and a separate ground wire is used, it is recommended that a qualified electrician determine that the ground path ...
Page 6 - Tools and Parts; CAUTION; Tools/Materials required; Dimensions and Clearances
6 English Tools and Parts Removing the packaging CAUTION Remove the carton carefully. Wear gloves to protect against sharp edges. WARNING Remove the protective film covering the product before putting into operation. Parts supplied • Hood assembly with blower and LED lamps already installed. • Hardw...
Page 7 - Installation Instructions; installation clearances specified for the product.; Outside Top exhaust; Rear Installation Diagram; Installation Instructions
English 7 Installation Instructions Installation Instructions We recommend that a qualified technician install the range hood. It is the installer’s responsibility to ensure the range hood complies with the installation clearances specified for the product. • It is recommended that the vent system b...
Page 8 - WARNING; Prepare the location; If cabinet has recessed bottom, add wood filler strips on each side.; qualified contractor determine the anchoring method.; Prepare Range Hood
8 English WARNING USE TWO OR MORE PEOPLE TO MOVE AND INSTALL THE RANGE HOOD. FAILURE TO DO SO CAN RESULT IN BACK OR OTHER INJURY. NOTE Mark the Range Hood knockouts on the wall and make the necessary cutouts before installing the hood. Prepare the location Wood filler strips (recessed cabinet bottom...
Page 9 - Mark Hole Locations; Roof Venting; Wall Venting
English 9 Mark Hole Locations 1. Determine and clearly mark a vertical centerline on the wall and cabinet bottom. A To wire through top: 1. Mark a line distance (A) from the right of the centerline on the under- side of the wall. Mark the point on this line that is 2” (5.08 cm) from the underside of...
Page 10 - Drill Electrical Opening; Install Strain Relief; Attach Vent Damper or Transition; damper, remove the rectangular damper flap.
10 English 4. Use saber or keyhole saw to cut the circular vent opening. Repeat steps 1-3 for the underside of the top of the cabinet. C abinet cutouts *From wall, not cabinet frame *5” (12.8 cm) Centerline Drill Electrical Opening 1. Using a 1¼" (3 cm) drill bit, drill the hole in the dot marke...
Page 11 - Mounting the Hood; Connect Vent System; Electrical Code and local codes and ordinances, in 1⁄2′′ conduit from; Completing the installation; Replace the filters and check the operation of the hood.; • For vented installations:; Install a metal filter.; If the range hood does not operate:; Confirm that the circuit breaker is not tripped or the house fuse
English 11 Installation Instructions Mounting the Hood 1. Using 2 or more people, lift the hood into final position. Feed enough electrical wire through the ½” UL listed or CSA approved strain relief to make connections in the terminal box. Tighten the strain relief screws. 2. Position the range hoo...
Page 12 - Range Hood Use and Care; Range Hood Description; Operating the light; Cleaning; Replacing the LED Lamp
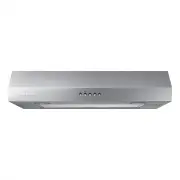
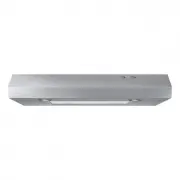
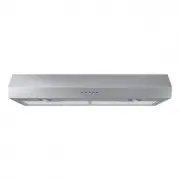
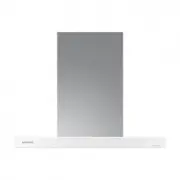
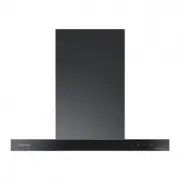
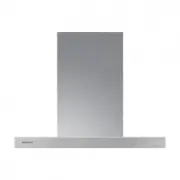
12 English Range Hood Use and Care Range Hood Use and Care Range Hood Description 1 2 3 4 1. LED lamps 2. Filter handle 3. Filter 4. Control Range Hood Controls A B C D E A. Light Power B. Blower Off button C. Low Speed D. Medium Speed E. Maximum Speed Operating the light 1. The Light On/Off button ...
Page 13 - SAMSUNG RANGE HOOD; Limited warranty to original purchaser
English 13 warranty (USA) SAMSUNG RANGE HOOD Limited warranty to original purchaser This SAMSUNG brand product, as supplied and distributed by Samsung Electronics America, Inc. (SAMSUNG) and delivered new, in the original carton to the original consumer purchaser, is warranted by SAMSUNG against man...
Page 16 - Sommaire; Importantes Consignes de Sécurité
16 Français Sommaire Sommaire Importantes Consignes de Sécurité 17 Exigences d’Installation 19 Exigences Électriques 19 Exigences Relatives a la ventilation 19 Méthodes d’ ventilation 19 Installations par temps froid 20 Air d' Appoint 20 Outils et Pièces 20 Dimensions et Dégagements 20 Installation ...
Page 17 - Conservez ces instructions afin de pouvoir les
Français 17 APPROUVÉ POUR LES APPAREILS DE TYPE RÉSIDENTIEL POUR UNE UTILISATION RÉSIDENTIELLE SEULEMENT LISEZ CES INSTRUCTIONS ET CONSERVEZ-LES VEUILLEZ LIRE CES INSTRUCTIONS AU COMPLET AVANT DE COMMENCER. L’INSTALLATION DE L’APPAREIL DOIT RESPECTER TOUS LES CODES EN VIGUEUR. IMPORTANT: INSTALLATEU...
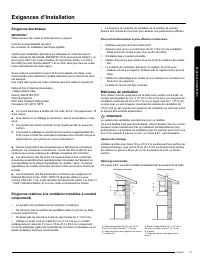
Page 19 - Exigences électriques; De contacter un installateur électrique qualifié.; Exigences relatives à la ventilation (modèles à conduit; Pour un fonctionnement le plus efficace et silencieux:; Méthodes de ventilation; REMARQUE; Exigences d’Installation
Français 19 Exigences électriques IMPORTANT Observez tous les codes et ordonnances en vigueur. Il est de la responsabilité du client: De contacter un installateur électrique qualifié. Vérifier que l’installation électrique est adéquate et conforme avec le Code national de l’électricité, ANSI/NFPA 70...
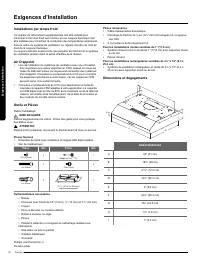
Page 20 - Outils et Pièces; MISE EN GARDE; Outils/matériaux nécessaires; connecteurs de fils répertoriés UL; Dimensions et dégagements; d'air supérieure à la valeur spécifiée en CFM, passez en revue les
20 Français Outils et Pièces Retirer l'emballage MISE EN GARDE Retirez soigneusement le carton. Portez des gants pour vous protéger des arêtes vives. ATTENTION Retirez le film protecteur recouvrant le produit avant sa mise en service. Pièces fournies • Ensemble de hotte avec ventilateur et lampes LE...
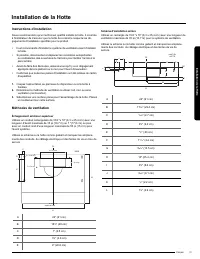
Page 21 - Instructions d'installation; gagements d'installation spécifiés pour le produit.; Échappement extérieur supérieur; Schéma d'installation arrière; Installation de la Hotte
Français 21 Installation de la Hotte Instructions d'installation Nous recommandons qu'un technicien qualifié installe la hotte. Il incombe à l'installateur de s'assurer que la hotte de cuisinière respecte les dé- gagements d'installation spécifiés pour le produit. • Il est recommandé d'installer le ...
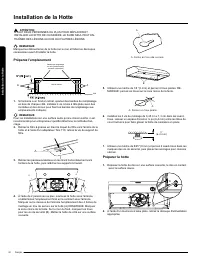
Page 22 - ATTENTION; Préparez l'emplacement; rondelles et des écrous pour fixer les bandes de remplissage aux; recommandé qu'un entrepreneur qualifié détermine la méthode d'an; Utilisez une mèche de 1⁄8 ”(3 mm) et percez 4 trous pilotes. RE; Préparer la hotte
22 Français ATTENTION IL FAUT DEUX PERSONNES OU PLUS POUR DÉPLACER ET INSTALLER LA HOTTE DE CUISINIÈRE. LE FAIRE SEUL PEUT EN- TRAÎNER DES LÉSIONS AU DOS OU D'AUTRES LÉSIONS. REMARQUE Marquez les débouchures de la hotte sur le mur et faites les découpes nécessaires avant d'installer la hotte. Prépar...
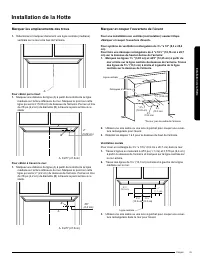
Page 23 - Marquer les emplacements des trous; Pour câbler par le haut:; Ventilation murale
Français 23 Marquer les emplacements des trous 1. Déterminez et marquez clairement une ligne centrale (mediane) verticale sur le mur et le bas de l'armoire. A Pour câbler par le haut: 1. Marquez une distance de ligne (A) à partir de la droite de la ligne médiane sur la face inférieure du mur. Marque...
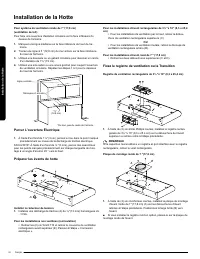
Page 24 - Percer L'ouverture Électrique; Installer le réducteur de tension; Fixez le registre de ventilation ou la Transition
24 Français Pour système de ventilation ronde de 7 "(17,8 cm)(ventilation de toit) Pour faire une ouverture d'aération circulaire sur la face inférieure du dessus de l'armoire: 1. Marquez une ligne médiane sur la face inférieure du haut de l'ar- moire. 2. Tracez une ligne à 5 ”(12,8 cm) du mur a...
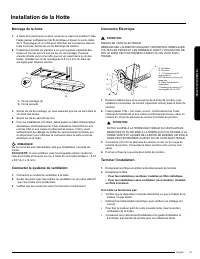
Page 25 - Montage de la hotte; Connecter le système de ventilation; Terminer l'installation; Si la hotte ne fonctionne pas:
Français 25 Installation de la Hotte Montage de la hotte 1. À l'aide de 2 personnes ou plus, soulevez le capot en position fi nale. Faites passer suffisamment de fil électrique à travers le serre-câble de ½ ”homologué UL ou CSA pour effectuer les connexions dans la boîte à bornes. Serrez les vis de ...
Page 26 - Description de la hotte; Fonctionnement de la lumière; Nettoyage; teur Torx T10, retirez la vis du support de filtre.; Pour remplacer le filtre; filtre pour le mettre en place.; Remplacement de la lampe LED; Utilisation et entretien de la hotte
26 Français Utilisation et entretien de la hotte Description de la hotte 1 2 3 4 1. Lampes LED 2. Poignée du filtre 3. Filtre 4. Contrôle Commandes de la hotte A B C D E A. Allumer/Éteindre la lampe Bouton d'arrêt du ventilateur C. Basse vitesse D. Vitesse moyenne E. Vitesse maximale Fonctionnement ...
Page 27 - HOTTE SAMSUNG; Garantie limitée à l’acheteur d’origine
Français 27 garantie (USA) HOTTE SAMSUNG Garantie limitée à l’acheteur d’origine Ce produit de la marque SAMSUNG, qui est fourni et distribué par la société Samsung Electronics America, Inc. (SAMSUNG) et livré neuf, dans son carton d’origine à l’acheteur d’origine, est garanti par Samsung contre les...
Page 30 - Instrucciones Importantes de Seguridad; Determine la Ubicación del Orificio de Cableado; Uso y Mantenimiento de la Campana; Índice; índice
30 Español Instrucciones Importantes de Seguridad 30 Requisitos de Instalación 32 Requisitos Eléctricos 32 Requisitos de Ventilación 32 Métodos de Ventilación 32 Instalación en Condiciones Climáticas Frías 32 Aire Limpio 33 Herramientas y Piezas 33 Dimensiones del Producto 33 Instalación de la Campa...
Page 32 - Al efectuar orificios en una pared o techo, no dañe el cableado
32 Español ADVERTENCIA PARA REDUCIR EL RIESGO DE INCENDIOS, CHOQUE ELÉCTRICO O LESIONES A PERSONAS, OBSERVE LO SIGUIENTE: ■ Use esta unidad sólo de la manera para la que fue diseñada por el fabricante. Si tiene preguntas, póngase en contacto con el fabricante. ■ Antes de dar servicio o limpiar la un...
Page 33 - Requisitos Eléctricos; IMPORTANTE; Contactar un instalador eléctrico calificado.; Requisitos de Ventilación; mantener al mínimo para proveer un funcionamiento eficaz.; Métodos de Ventilación; NOTA; una superficie de cocción a gas y no más de 30 ”(76,2 cm) por encima de; Descarga Posterior; Instalación en condiciones climáticas frías; Requisitos de Instalación
Español 33 Requisitos Eléctricos IMPORTANTE Observe todos los códigos y reglamentos aplicables. Es la responsabilidad del propietario: Contactar un instalador eléctrico calificado. Si la normativa lo permite y se utiliza un cable de toma a tierra independiente, se recomienda que un electricista cali...
Page 34 - Aire Limpio; mayor que el CFM especificado, revise los códigos de construcción; Herramientas y Piezas; PRECAUCIÓN; Herramientas/Materiales requeridos; Dimensiones del Producto
34 Español Aire Limpio • Cuando utilice sistemas de ventilación con un movimiento de aire mayor que el CFM especificado, revise los códigos de construcción locales, ya que pueden requerir sistemas de aire complementario. Consulte a un profesional de HVAC para conocer los requisitos específicos de su...
Page 35 - Instrucciones de Instalación; Esta campana está configurada para; Salida superior; Salida posterior; Instalación de la campana
Español 35 Instrucciones de Instalación Se recomienda que un técnico calificado instale la campana extracto - ra. Es responsabilidad del instalador asegurarse de que la campana extractora cumpla con los espacios de instalación especificados para el producto. • Se recomienda que el sistema de ventila...
Page 36 - Instalación en la pared; ADVERTENCIA; Prepare la Ubicación; Para instalaciones en una superficie que no sea un panel de yeso, se; Instale los 4 tornillos de montaje de 0.45 cm x 1.3 cm en los orificios; Complete la Preparación; Coloque la campana extractora boca arriba sobre una superficie
36 Español Instalación en la pared ADVERTENCIA USE DOS O MÁS PERSONAS PARA MOVER E INSTALAR LA CAMPANA DE COCINA. NO SEGUIR ESTA INSTRUCCIÓN PUEDE OCASIONAR UNA LESIÓN EN LA ESPALDA U OTRO TIPO DE LESIONES. NOTA Marque la ubicación de los precortes de la campana extractora en la pared y haga los cor...
Page 37 - Cableado a través de la parte superior:; Marcar y Cortar la Abertura de Ventilación
Español 37 Determine la Ubicación del Orificio de Cableado 1. Determine y marque claramente una línea central vertical en la pared y la parte inferior del gabinete. A Cableado a través de la parte superior: 1. Marque una línea (A) desde la derecha de la la línea central en la parte inferior del gabi...
Page 38 - Conecte la Transición; Montaje de la Campana; Entre 2 o más personas, levante la campana hasta la posición final.; Perforaciones Conexión Eléctrica; Instale el alivio de tensión de cable
38 Español Conecte la Transición Transición Rectangular de 3¼" x 10" (8.3 x 25.4 cm) 1. Utilizando (2) tornillos de cabeza Phillips cortos, instale el amor- tiguador rectangular de 3¼ "x 10" (8.3 x 25.4 cm) sobre el orificio de ventilación superior o trasero que se quitó en el paso a...
Page 39 - Conecte el Sistema de Ventilación; Conexión Eléctrica; Complete la Instalación; • Para instalaciones ventiladas:
Español 39 A B A. Tornillos de montaje (4) B. Tornillos de seguridad 3. Apriete los tornillos de montaje, asegurándose de que los tornillos estén en el cuello estrecho de las ranuras. 4. Apriete los tornillos de seguridad a la pared. 5. Para instalaciones de cableado directo, instale el cable de sum...
Page 40 - Descripción de la Campana; Controles de la Campana; Operación de iluminación; Limpieza; Superficies exteriores:; Reemplazo de las Lámparas LED; Uso y mantenimiento de la campana
40 Español Uso y Mantenimiento de la Campana Descripción de la Campana 1 2 3 4 1. Lámparas LED 2. Manijas de filtro de grasa 3. Filtro 4. Control Controles de la Campana A B C D E A. Encendido/apagado de la luz B. Apagado del motor C. Velocidad mínima del motor D. Velocidad media del motor E. Veloci...
Page 41 - CAMPANA SAMSUNG; Garantía limitada al comprador original
Español 41 Uso y mantenimiento de la campana garantía (USA) CAMPANA SAMSUNG Garantía limitada al comprador original Este producto de la marca SAMSUNG, suministrado y distri-buido por Samsung Electronics America, Inc. (SAMSUNG) y entregado nuevo, en su empaque original al comprador original, está gar...
Page 44 - Printed in Mexico


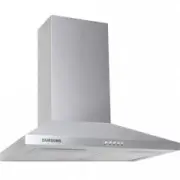 Samsung HDC 6145 BX/BWT
User Manual
Samsung HDC 6145 BX/BWT
User Manual
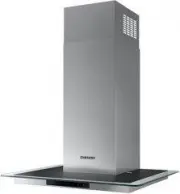
 Samsung HDC6A90TX_HDC6A90UX_HDC9A90TX_HDC9A90UX
User Manual
Samsung HDC6A90TX_HDC6A90UX_HDC9A90TX_HDC9A90UX
User Manual
 Samsung HDC6C55TX_HDC6C55UX_HDC9C55TX_HDC9C55UX
User Manual
Samsung HDC6C55TX_HDC6C55UX_HDC9C55TX_HDC9C55UX
User Manual
 Samsung HDC6D90TG_HDC6D90UG_HDC9D90TG_HDC9D90UG
User Manual
Samsung HDC6D90TG_HDC6D90UG_HDC9D90TG_HDC9D90UG
User Manual
 Samsung NK24M1030IB/UR
User Manual
Samsung NK24M1030IB/UR
User Manual
 Samsung NK24M5060SS
User Manual
Samsung NK24M5060SS
User Manual
 Samsung NK24M5070FS/UR
User Manual
Samsung NK24M5070FS/UR
User Manual
 Samsung NK24M7070VB
User Manual
Samsung NK24M7070VB
User Manual
 Samsung NK30B3000US
User Manual
Samsung NK30B3000US
User Manual
 Samsung NK30B3000US/AA
User Manual
Samsung NK30B3000US/AA
User Manual
 Samsung NK30B3500US
User Manual
Samsung NK30B3500US
User Manual
 Samsung NK30B3500US/AA
User Manual
Samsung NK30B3500US/AA
User Manual
 Samsung NK30CB600W12
User Manual
Samsung NK30CB600W12
User Manual
 Samsung NK30CB600W12AA
User Manual
Samsung NK30CB600W12AA
User Manual
 Samsung NK30CB600W33
User Manual
Samsung NK30CB600W33
User Manual
 Samsung NK30CB600WCG
User Manual
Samsung NK30CB600WCG
User Manual
 Samsung NK30CB700W12
User Manual
Samsung NK30CB700W12
User Manual