Page 2 - Contents; Safety information
English 2 Contents Contents Safety information 4 What you need to know about the safety instructions 4 Important safety symbols 4 CALIFORNIA PROPOSITION 65 WARNING 5 Important safety precautions 5 Warnings 8Cautions 8 Installation requirements 10 Key installation requirements 10 Location considerati...
Page 3 - Maintenance
English 3 Contents Maintenance 46 Cleaning 46 Troubleshooting 47 Checkpoints 47Information codes 50 Specifications 51 Fabric care chart 51 Protecting the environment 52 Specification sheet 53 Untitled-4 3 2020-01-14 12:11:37
Page 4 - SAVE THESE INSTRUCTIONS; What you need to know about the safety instructions
SAVE THESE INSTRUCTIONS English 4 Safety information Congratulations on your new Samsung dryer. This manual contains important information on the installation, use and care of your appliance. Please take some time to read this manual to take full advantage of your dryer’s many benefits and features....
Page 5 - WARNING - Risk of Fire; CALIFORNIA PROPOSITION 65 WARNING; Important safety precautions
SAVE THESE INSTRUCTIONS English 5 Safety information These warning signs are here to prevent injury to yourself and others.Please follow them explicitly.After reading this manual, store it in a safe place for future reference. Read all instructions before using the appliance.As with any equipment th...
Page 7 - WARNING - To reduce the risk of fire or explosion:
SAVE THESE INSTRUCTIONS English 7 Safety information 19. Do not insert your hand under the dryer. - This may result in injury. 20. Take care that children’s fingers are not caught in the door when closing it. - This may result in injury. 21. The control board and inlet valve are intentionally not gr...
Page 8 - Warnings; Cautions
SAVE THESE INSTRUCTIONS Safety information English 8 Safety information Warnings WARNING • Ensure pockets are free of small, irregularly shaped hard objects and foreign material, i.e. coins, knives, pins, etc. These objects could damage your dryer. • Gas leaks may occur in your system, resulting in ...
Page 10 - Key installation requirements; Location considerations
English 10 Installation requirements Read through the following instructions before installing the dryer and keep this manual for future reference. WARNING Certain internal parts are intentionally not grounded and may present a risk of electric shock only during servicing.Service Personnel - Do not ...
Page 11 - Dimensions
English 11 Installation requirements Dimensions A 9 U Type Front loading dryer Dimensions (in. (mm)) A. Overall height 38.7 (984) B. Width 27.0 (686) C. Depth with door open 52.6 (1335) D. Depth 31.5 (800) Untitled-4 11 2020-01-14 12:11:39
Page 12 - Clearance requirement
Installation requirements English 12 Installation requirements Clearance requirement This clearance requirement is applicable for dryers only. NOTE • For washer's clearance requirement, see the washer's user manual.• If the washer and dryer have different clearance requirements, use the one with the...
Page 15 - Ducting requirements; Manometer measurements
English 15 Installation requirements Ducting requirements Weather hood type Recommended Use only for short-run installation 4” (10.2 cm) 2.5” (6.4 cm) No. of 90° elbows Rigid Rigid 0 80 ft. (24.4 m) 74 ft. (22.6 m) 1 68 ft. (20.7 m) 62 ft. (18.9 m) 2 57 ft. (17.4 m) 51 ft. (15.5 m) 3 47 ft. (14.3 m)...
Page 16 - Exhausting requirements; In the United States and Canada; Outside the United States and Canada
Installation requirements English 16 Installation requirements Exhausting requirements The dryer must not be exhausted into a chimney, a wall, a ceiling, an attic, a crawl space, or a concealed space of a building. Exhausting the dryer to the outside will prevent large amounts of lint and moisture f...
Page 17 - Gas requirements
English 17 Installation requirements Gas requirements WARNING • Use only natural or LP (liquid propane) gases.• The installation must be conformed with local codes, or in the absence of local codes, with the national fuel gas code, ANSI Z223.1/NFPA 54, latest revision(for the UNITED STATES), or with...
Page 18 - Commonwealth of Massachusetts installation instructions; Electrical requirements
Installation requirements English 18 Installation requirements Commonwealth of Massachusetts installation instructions Your dryer must be installed by a licensed plumber or gas fitter. A “T” handle manual gas valve must be installed in the gas supply line to your dryer. If a flexible gas connector i...
Page 19 - Grounding
English 19 Installation requirements Grounding This dryer must be grounded. In the event of a malfunction or breakdown, the ground will reduce the risk of electrical shock by providing a path of least resistance for the electrical current. Gas models WARNING • Your dryer has a cord with an equipment...
Page 20 - Electrical connections; Risk of Electric Shock
Installation requirements English 20 Installation requirements Electrical connections Before operating or testing, follow all grounding instructions in the “ Grounding ” section. An individual branch (or separate) circuit serving only your dryer is recommended. Do not use an extension cord. Gas mode...
Page 21 - Installation; What’s included
English 21 Installation This dryer must be installed by a qualified technician. The installer is responsible for connecting the dryer to the main power while observing the relevant safety regulations of your area. What’s included Make sure all the parts are included in the product package. If you ha...
Page 22 - Tools needed for installation
Installation English 22 Installation Tools needed for installation Pliers Cutting knife Pipe wrench (gas models only) Nut screwdriver Level Phillips screwdriver Duct tape Wrench LPG-safe compound or Teflon Tape (for gas installation) WARNING Packing materials can be dangerous to children. Keep all p...
Page 23 - STEP 1; Install the exhaust system; STEP 2
English 23 Installation Step-by-step installation Make sure you have a qualified technician install the dryer. Step by step installation instructions start below.• Do not remove the protective film on the door before completing the product installation. If you remove the protective film before the i...
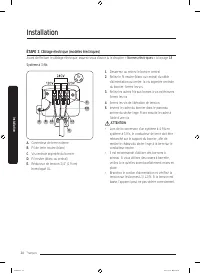
Page 24 - STEP 3; Connect the electrical wiring (for electric models)
Installation English 24 Installation STEP 3 Connect the electrical wiring (for electric models) Before connecting the electrical wiring, make sure you have read the “ Electrical requirements ” section on page 18 . 3-wire system A B L2 L1 C D (N) E A. External ground connector B. Neutral grounding wi...
Page 27 - STEP 4; Level the dryer
English 27 Installation STEP 4 Level the dryer To ensure optimal performance, the dryer must be level. A B Using a level (A) , check if the dryer is level side to side and then front to back. If the dryer is not level, turn the leveling feet (B) clockwise to lower the dryer or counterclockwise to ra...
Page 28 - STEP 5; Final Check
Installation English 28 Installation STEP 5 Power on (for gas models) Make sure all gas connections, the exhaust line, and all wiring is connected correctly. Then, plug the power cord into a power source and check the dryer’s installation and operation using the final checklist in Step 6 below. STEP...
Page 29 - Vent blockage test; Running the vent blockage test
English 29 Installation Vent blockage test After the dryer is installed, start the Vent Blockage Test to check if the duct system is properly installed. The Vent Blockage Test automatically detects the status of the ducts and reports any blockage or problems. Proper ducting can reduce drying time an...
Page 30 - Exhaust ducting guide; Ducting
Installation English 30 Installation NOTE • During or after the test, the internal drum is hot. Use caution to prevent burns. The Vent Blockage Test is used to check for problems in the current duct system when the dryer is installed for the first time. • If the test result displays “ CLg ” (the duc...
Page 34 - Before you start; Sort and load; Lint filter
English 34 Before you start Here are a few things you should know before starting your dryer. Sort and load • Put one wash load in the dryer at a time.• Do not mix heavy and lightweight items together.• To improve drying efficiency for one or two items, add a dry towel to the load.• For best results...
Page 35 - Operations; Control panel
English 35 Operations WARNING To reduce the risk of fire, electric shock, or injury, read the “ Safety information ” before operating this appliance. Control panel 02 01 03 04 05 06 07 08 10 11 09 01 Cycle Selector Turn the Cycle Selector to select the desired cycle. The indicator by the cycle name ...
Page 38 - Simple steps to start; To change the cycle during operation
Operations English 38 Operations Icon description Sensor Dry This icon appears when the dryer operates the cycle which senses the internal humidity to determine the drying time. Filter Check This icon displays after every load as a reminder to clean the lint filter. Clean the lint filter before ever...
Page 39 - Cycle overview; Standard Cycles; Manual Dry
English 39 Operations Cycle overview Standard Cycles Cycle Description NORMAL For most fabrics including cottons and linens.If Normal is selected, the Eco Dry function is enabled by default. For more information, see Eco Dry in the “ Control panel ” section. HEAVY DUTY For drying items made out of h...
Page 40 - Cycle chart
Operations English 40 Operations Cycle chart NOTE For best results, follow the load size recommendations for each dry cycle.• Large load: Fill the drum to about 3/4 full. Do not add items over this level as they need to tumble freely. • Medium load : Fill the drum to about 1/2 full. • Small load : F...
Page 42 - Drying guide
Operations English 42 Operations Drying guide The best way to dry items is to follow the instructions on the care label. If no drying instructions are provided, see the following table for reference. Items Description Bedspreads & Comforters Follow the care label instructions or dry using Beddin...
Page 43 - Special features; Child Lock
English 43 Operations WARNING Do not dry:• Fiberglass items (curtains, draperies, etc.)• Woolens, unless recommended on the label• Items spotted or soaked with vegetable or cooking oils Special features Child Lock Child Lock prevents children from playing with the dryer. When Child Lock is activated...
Page 44 - Smart Care
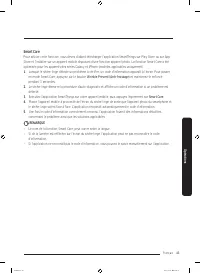
Operations English 44 Operations Smart Care To enable this function, you must first download the SmartThings app at the Play Store or the App Store and install it on a mobile device featuring a camera function. The Smart Care function has been optimized for Galaxy & iPhone series (applicable mod...
Page 45 - Alarm off; Drum Light
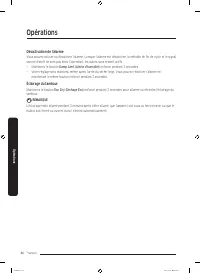
English 45 Operations Alarm off You can turn the alarm on or off. When the alarm is off, the melody of cycle completion and the power-off beep will not sound. However, the other sounds stay active.• Press and hold Damp Alert for 3 seconds. • Your setting will be retained even after you turn off the ...
Page 46 - Cleaning
English 46 Maintenance Keep the dryer clean for best performance and to lengthen its life cycle. WARNING Certain internal parts are intentionally not grounded and may present a risk of electric shock only during servicing.Service Personnel - Do not contact the following parts while the appliance is ...
Page 47 - Troubleshooting; Checkpoints
English 47 Troubleshooting Checkpoints If the dryer operates abnormally, first check the list of problems in the table below and try the suggested actions. Problem Action Does not run. • Make sure the door is latched shut.• Make sure the power cord is plugged into a live electrical outlet. • Check y...
Page 50 - Information codes
Troubleshooting English 50 Troubleshooting Information codes If the dryer fails to operate, you may see an information code on the display panel. To determine what you should do, check the list of codes in the table below, and then try the suggested actions. Code Action dC Operating the dryer with t...
Page 51 - Specifications
English 51 Specifications Fabric care chart The following symbols provide garment care direction. The clothing care labels include symbols for drying, bleaching, ironing, and dry cleaning. The use of symbols ensures consistency among garment manufacturers of domestic and imported items. Follow care ...
Page 52 - Warning symbols for laundering; Protecting the environment
Specifications English 52 Speci fications Warning symbols for laundering Do not wash Do not wring Do not bleach Do not tumble dry No steam (added to iron) Do not iron Dry-clean Dry-clean Do not dry-clean Line dry / Hang to dry Drip dry Dry flat Protecting the environment This appliance is manufactur...
Page 53 - Specification sheet
English 53 Speci fications Specification sheet Type Front loading dryer Capacity (Cu.ft) 7.5 Water pressure (psi (kPa)) 20-116 (137-800) Weight lb (kg) 123.5 (56.0) Heater rating Electric (W) 5300 Gas (BTU/hr) 20000 Power consumption (W) 5400 Untitled-4 53 2020-01-14 12:11:55
Page 54 - SAMSUNG DRYER
English 54 LIMITED WARRANTY (U.S.A.) SAMSUNG DRYER LIMITED WARRANTY TO ORIGINAL CONSUMER PURCHASER WITH PROOF OF PURCHASE This SAMSUNG brand product, as supplied and distributed by SAMSUNG ELECTRONICS AMERICA, INC. (SAMSUNG) and delivered new, in the original carton to the original consumer purchase...
Page 56 - EXCLUSION OF IMPLIED WARRANTIES
LIMITED WARRANTY (U.S.A.) English 56 EXCLUSION OF IMPLIED WARRANTIES IMPLIED WARRANTIES, INCLUDING THE IMPLIED WARRANTIES OF MERCHANTABILITY OR FITNESS FOR A PARTICULAR PURPOSE, ARE LIMITED TO ONE YEAR OR THE SHORTEST PERIOD ALLOWED BY LAW. Some states do not allow limitations on how long an implied...
Page 57 - LIMITED WARRANTY TO ORIGINAL PURCHASER
English 57 Warranty (CANADA) SAMSUNG DRYER LIMITED WARRANTY TO ORIGINAL PURCHASER This SAMSUNG brand product, as supplied and distributed by SAMSUNG ELECTRONICS CANADA, INC. (SAMSUNG) and delivered new, in the original carton to the original consumer purchaser, is warranted by SAMSUNG against manufa...
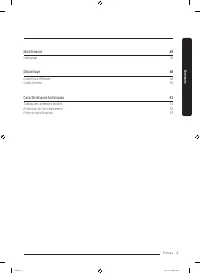
Page 62 - Sommaire; Consignes de sécurité
Français 2 Sommaire Sommaire Consignes de sécurité 4 Remarques importantes sur les consignes de sécurité 4 Symboles de sécurité importants 4 AVERTISSEMENT RELATIF À LA PROPOSITION 65 DE LA CALIFORNIE 5 Consignes de sécurité importantes 5 Avertissements 8Mises en garde 8 Conditions d'installation 10 ...
Page 63 - Caractéristiques techniques
Français 3 Sommaire Maintenance 45 Nettoyage 45 Dépannage 46 Contrôles à effectuer 46 Codes d'erreur 50 Caractéristiques techniques 51 Tableau des symboles textiles 51 Protection de l’environnement 52 Fiche de spécifications 53 Untitled-5 3 2020-01-14 12:14:54
Page 64 - CONSERVEZ SOIGNEUSEMENT CES CONSIGNES; Remarques importantes sur les consignes de sécurité
CONSERVEZ SOIGNEUSEMENT CES CONSIGNES Français 4 Consignes de sécurité Félicitations pour l’achat de votre nouveau sèche-linge Samsung. Ce manuel contient de précieuses informations concernant l'installation, l'utilisation et l'entretien de votre appareil. Prenez le temps de le lire pour tirer plein...
Page 65 - AVERTISSEMENT RELATIF À LA PROPOSITION 65 DE LA CALIFORNIE; Consignes de sécurité importantes
CONSERVEZ SOIGNEUSEMENT CES CONSIGNES Français 5 Consignes de sécurité Ces symboles d'avertissement ont pour but d'éviter tout risque de blessure corporelle.Respectez-les en toutes circonstances.Lisez attentivement ce manuel et conservez-le en lieu sûr afin de pouvoir le consulter ultérieurement. Li...
Page 68 - Avertissements; Mises en garde
CONSERVEZ SOIGNEUSEMENT CES CONSIGNES Consignes de sécurité Français 8 Consignes de sécurité Avertissements AVERTISSEMENT • Vérifiez que les poches sont vides. Les petits objets aux bords irréguliers (pièces de monnaie, canifs, épingles, etc.) risquent en effet d'endommager votre sèche-linge. • Des ...
Page 70 - Conditions d'installation; Conditions d'installation principales
Français 10 Conditions d'installation Lisez attentivement les instructions suivantes avant d'installer le sèche-linge et conservez ce manuel pour vous y reporter ultérieurement. AVERTISSEMENT La mise à la terre de certaines pièces internes n'a volontairement pas été effectuée ; ces éléments peuvent ...
Page 72 - Dégagement requis
Conditions d'installation Français 12 Conditions d'installation Dégagement requis Ce dégagement requis concerne uniquement les sèche-linge. REMARQUE • Pour connaître le dégagement requis pour le lave-linge, reportez-vous au manuel d'utilisation du lave-linge.• Si les dégagements requis pour le lave-...
Page 75 - Conditions requises en matière de conduits; Utilisation du manomètre
Français 15 Conditions d'installation Conditions requises en matière de conduits Type de bouche d’évacuation Recommandé À n’utiliser que pour les installations temporaires 4'' (10,2 cm) 2,5'' (6,4 cm) N° de coudes à 90° Rigide Rigide 0 80 pieds (24,4 m) 74 pieds (22,6 m) 1 68 pieds (20,7 m) 62 pieds...
Page 76 - Conditions requises en matière d’évacuation
Conditions d'installation Français 16 Conditions d'installation Conditions requises en matière d’évacuation L'évacuation du sèche-linge ne doit pas être reliée à un conduit de cheminée, un mur, un plafond, un grenier, un espace mansardé ou exigu d'un bâtiment. L’évacuation du sèche-linge vers l’exté...
Page 77 - Systèmes fonctionnant au gaz
Français 17 Conditions d'installation Systèmes fonctionnant au gaz AVERTISSEMENT • Utilisez uniquement du gaz naturel ou du propane liquide (PL).• L'installation doit être conforme aux réglementations locales en vigueur ou, en l'absence de dispositions spécifiques, à la réglementation nationale sur ...
Page 78 - Instructions d'installation - Commonwealth du Massachusetts; Normes électriques
Conditions d'installation Français 18 Conditions d'installation Instructions d'installation - Commonwealth du Massachusetts Votre sèche-linge doit être installé par un plombier ou un installateur de gaz agréé. Un robinet de gaz manuel à poignée, dit en « T », doit être installé sur la conduite d'ali...
Page 79 - Mise à la terre
Français 19 Conditions d'installation Mise à la terre Ce sèche-linge doit être mis à la terre. En cas de panne ou de défaillance, la mise à la terre réduira le risque de surtension électrique en fournissant un circuit de fuite au courant électrique. Modèles au gaz AVERTISSEMENT • Votre sèche-linge e...
Page 80 - Raccordement électrique; Risque d'électrocution
Conditions d'installation Français 20 Conditions d'installation Raccordement électrique Avant toute mise en marche ou test, suivez toutes les consignes de mise à la terre présentées dans la section « Mise à la terre ». Nous vous recommandons de relier votre sèche-linge à une dérivation individuelle ...
Page 81 - Ce qui est inclus
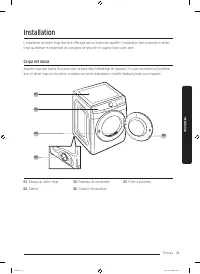
Français 21 Installation L'installation du sèche-linge doit être effectuée par un technicien qualifié. L'installateur doit connecter le sèche-linge au secteur en respectant les consignes de sécurité en vigueur dans votre zone. Ce qui est inclus Assurez-vous que toutes les pièces sont incluses dans l...
Page 82 - Outils requis pour l'installation
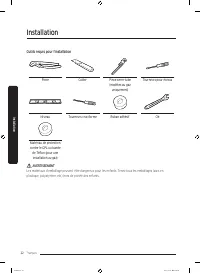
Installation Français 22 Installation Outils requis pour l'installation Pince Cutter Pince serre-tube (modèles au gaz uniquement) Tournevis pour écrous Niveau Tournevis cruciforme Ruban adhésif Clé Matériau de protection contre le GPL ou bande de Téflon (pour une installation au gaz) AVERTISSEMENT L...
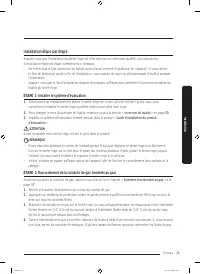
Page 83 - Installation étape par étape; ÉTAPE 1; Installer le système d'évacuation; ÉTAPE 2; Raccordement de la conduite de gaz (modèles au gaz)
Français 23 Installation Installation étape par étape Assurez-vous que l'installation du sèche-linge est effectuée par un technicien qualifié. Les instructions d'installation étape par étape commencent ci-dessous.• Ne retirez pas le film protecteur du hublot avant d'avoir terminé l'installation de l...
Page 84 - ÉTAPE 3
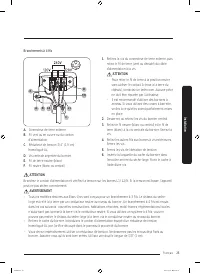
Installation Français 24 Installation ÉTAPE 3 Câblage électrique (modèles électriques) Avant d'effectuer le câblage électrique, assurez-vous d'avoir lu le chapitre « Normes électriques » à la page 18 . Système à 3 fils A B L2 L1 C D (N) E A. Connecteur de terre externe B. Fil de terre neutre (blanc)...
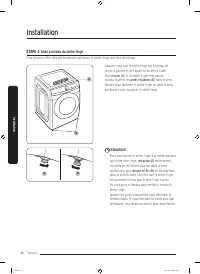
Page 86 - ÉTAPE 4; Mise à niveau du sèche-linge
Installation Français 26 Installation ÉTAPE 4 Mise à niveau du sèche-linge Pour pouvoir offrir des performances optimales, le sèche-linge doit être de niveau. A B Assurez-vous que le sèche-linge est à niveau de droite à gauche et de l'avant à l’arrière à l’aide d’un niveau (A) . Si le sèche-linge n'...
Page 87 - ÉTAPE 5; Dernière vérification
Français 27 Installation ÉTAPE 5 Mise sous tension (modèles à gaz) Assurez-vous que tous les branchements en gaz, le conduit d'évacuation et tout le câblage sont raccordés correctement. Ensuite, branchez le cordon d'alimentation sur une source d'alimentation, et vérifiez l'installation et le bon fon...
Page 88 - Test de blocage de l'aération; Exécution du test de blocage de l'aération
Installation Français 28 Installation Test de blocage de l'aération Une fois le sèche-linge installé, lancez le test de blocage de l'aération afin de vérifier si le système de conduits est correctement installé. Le test de blocage de l'aération détecte automatiquement l'état des conduits et signale ...
Page 89 - Guide d'installation du conduit d'évacuation; Connexion des conduites
Français 29 Installation REMARQUE • Pendant ou après le test, le tambour interne est chaud. Faites attention à ne pas vous brûler. Le test de blocage de l'aération est utilisé pour vérifier l'absence de problèmes dans le système de conduits actuel lorsque le sèche-linge est installé pour la première...
Page 93 - Avant de démarrer; Tri et charge; Filtre à peluches
Français 33 Avant de démarrer Il y a un certain nombre de choses que vous devez savoir avant de démarrer votre sèche-linge. Tri et charge • Mettez une seule charge de linge à la fois dans le sèche-linge.• Ne mélangez pas du linge lourd et du linge léger.• Pour augmenter l'efficacité de séchage pour ...
Page 94 - Opérations; Panneau de commande
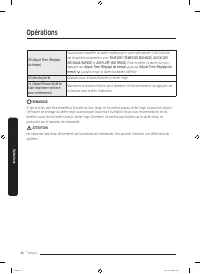
Français 34 Opérations AVERTISSEMENT Pour réduire le risque d'incendie, d'électrocution ou de blessures, lisez la section « Consignes de sécurité » avant d'utiliser cet appareil. Panneau de commande 02 01 03 04 05 06 07 08 10 11 09 01 Sélecteur de programme Faites tourner le sélecteur de programme p...
Page 97 - Étapes simples pour commencer; Pour changer de cycle pendant l'utilisation
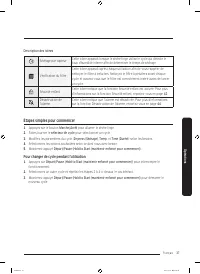
Français 37 Opérations Description des icônes Séchage par capteur Cette icône apparaît lorsque le sèche-linge utilise le cycle qui détecte le taux d'humidité interne afin de déterminer le temps de séchage. Vérification du filtre Cette icône apparaît après chaque utilisation afin de vous rappeler de ...
Page 98 - Présentation des cycles; Cycles standards
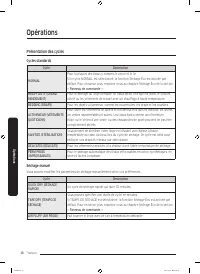
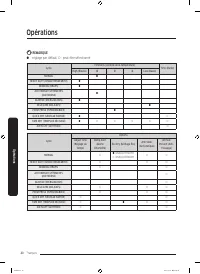
Opérations Français 38 Opérations Présentation des cycles Cycles standards Cycle Description NORMAL Pour la plupart des tissus y compris le coton et le lin.Si le cycle NORMAL est sélectionné, la fonction Séchage Éco est activée par défaut. Pour en savoir plus, reportez-vous au chapitre Séchage Éco d...
Page 99 - Tableau des cycles
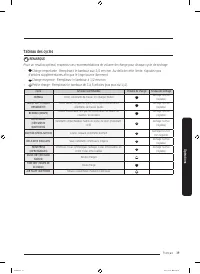
Français 39 Opérations Tableau des cycles REMARQUE Pour un résultat optimal, respectez ces recommandations de volume de charge pour chaque cycle de séchage.• Charge importante : Remplissez le tambour aux 3/4 environ. Au-delà de cette limite, n'ajoutez pas d'articles supplémentaires afin que le linge...
Page 101 - Guide de séchage
Français 41 Opérations Guide de séchage La meilleure méthode pour faire sécher du linge est de suivre les instructions indiquées sur l'étiquette d'entretien. Si aucune instruction de séchage n'est fournie, reportez-vous au tableau suivant pour référence. Articles Description Couvre-lits et couettes ...
Page 102 - Fonctions spéciales; Sécurité enfant
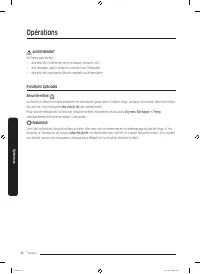
Opérations Français 42 Opérations AVERTISSEMENT Ne faites pas sécher :• des articles en fibre de verre (rideaux, tentures, etc.)• des lainages, sauf indication contraire sur l'étiquette• des articles imprégnés d'huile végétale ou alimentaire Fonctions spéciales Sécurité enfant La fonction Sécurité e...
Page 104 - Désactivation de l'alarme; Éclairage du tambour
Opérations Français 44 Opérations Désactivation de l'alarme Vous pouvez activer ou désactiver l'alarme. Lorsque l'alarme est désactivée, la mélodie de fin de cycle et le signal sonore d'arrêt ne sont pas émis. Cependant, les autres sons restent actifs.• Maintenez le bouton Damp Alert (Alerte d'humid...
Page 105 - Nettoyage
Français 45 Maintenance Gardez le sèche-linge propre afin de garantir les meilleures performances et de rallonger sa durée de vie. AVERTISSEMENT La mise à la terre de certaines pièces internes n'a volontairement pas été effectuée ; ces éléments peuvent donc présenter un risque d'électrocution (lors ...
Page 106 - Dépannage
Français 46 Dépannage Contrôles à effectuer Si le sèche-linge ne fonctionne pas normalement, vérifiez tout d'abord la liste des problèmes dans le tableau ci-dessous et essayez les solutions proposées. Problème Action Ne fonctionne pas. • Assurez-vous que le hublot est bien fermé.• Vérifiez que le co...
Page 112 - Symboles d'avertissement pour le lavage; Protection de l’environnement
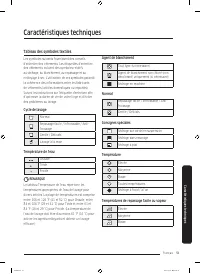
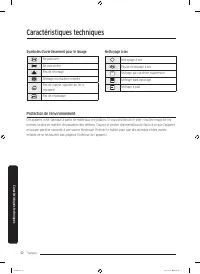
Caractéristiques techniques Français 52 Caractéristiques techniques Symboles d'avertissement pour le lavage Ne pas laver Ne pas tordre Pas de chlorage Séchage en machine interdit Pas de vapeur (ajoutée au fer à repasser) Pas de repassage Nettoyage à sec Nettoyage à sec Pas de nettoyage à sec Séchage...
Page 113 - Fiche de spécifications
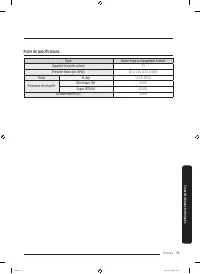
Français 53 Caractéristiques techniques Fiche de spécifications Type Sèche-linge à chargement frontal Capacité (en pieds cubes) 7,5 Pression d'eau (psi (kPa)) 20 à 116 (137 à 800) Poids lb (kg) 123,5 (56,0) Puissance de chauffe Électrique (W) 5300 À gaz (BTU/h) 20000 Consommation (W) 5400 Untitled-5...
Page 116 - EXCLUSION DES GARANTIES IMPLICITES
GARANTIE LIMITÉE (ÉTATS-UNIS) Français 56 EXCLUSION DES GARANTIES IMPLICITES LES GARANTIES IMPLICITES, Y COMPRIS LES GARANTIES IMPLICITES DE QUALITÉ MARCHANDE OU D'ADÉQUATION À UN USAGE PARTICULIER, SONT LIMITÉES À UN AN OU À LA PLUS COURTE PÉRIODE AUTORISÉE PAR LA LOI. Certains États n'autorisent p...
Page 117 - GARANTIE LIMITÉE À L'ACHETEUR INITIAL
Français 57 Garantie (CANADA) SÈCHE-LINGE SAMSUNG GARANTIE LIMITÉE À L'ACHETEUR INITIAL Ce produit de la marque SAMSUNG, fourni et distribué par SAMSUNG ELECTRONICS CANADA, INC. (SAMSUNG), et livré neuf dans son emballage d'origine à l'acheteur initial, est garanti par SAMSUNG contre les défauts de ...
Page 121 - Secadora; Manual del usuario
Secadora Manual del usuario DVE(G)45T6005*/DVE(G)45T6000* Untitled-3 1 2020-01-14 12:08:45
Page 122 - Contenido; Información sobre seguridad
Español 2 Contenido Contenido Información sobre seguridad 4 Lo que necesita saber sobre las instrucciones de seguridad 4 Símbolos de seguridad importantes 4 PROPOSICIÓN 65 DE CALIFORNIA: ADVERTENCIA 5 Precauciones de seguridad importantes 5 Advertencias 8Precauciones 8 Requisitos de instalación 10 R...
Page 123 - Mantenimiento
Español 3 Contenido Mantenimiento 46 Limpieza 46 Solución de problemas 47 Verificaciones 47Códigos de información 50 Especificaciones 52 Tabla de indicaciones sobre telas 52 Protección del medio ambiente 53 Hoja de especificaciones 54 Untitled-3 3 2020-01-14 12:08:46
Page 124 - CONSERVE ESTAS INSTRUCCIONES; Lo que necesita saber sobre las instrucciones de seguridad
CONSERVE ESTAS INSTRUCCIONES Español 4 Información sobre seguridad Felicitaciones por la compra de la nueva secadora Samsung. Este manual contiene información importante acerca de la instalación, el uso y el cuidado del electrodoméstico. Lea detenidamente estas instrucciones a fin de aprovechar al m...
Page 125 - ADVERTENCIA - Riesgo de incendio; PROPOSICIÓN 65 DE CALIFORNIA: ADVERTENCIA; Precauciones de seguridad importantes
CONSERVE ESTAS INSTRUCCIONES Español 5 Información sobre seguridad Estas señales de advertencia están aquí para evitar que usted u otras personas sufran lesiones.Siga las instrucciones completamente.Después de leer este manual, guárdelo en un lugar seguro para consultas futuras. Lea todas las instru...
Page 127 - ADVERTENCIA - Para reducir el riesgo de incendio o explosión:
CONSERVE ESTAS INSTRUCCIONES Español 7 Información sobre seguridad 19. No introduzca las manos bajo la secadora. - Puede provocar lesiones físicas. 20. Al cerrar la puerta tenga cuidado de no atrapar los dedos de los niños. - Puede provocar lesiones físicas. 21. El panel de control y la válvula de e...
Page 128 - Advertencias; Precauciones
CONSERVE ESTAS INSTRUCCIONES Información sobre seguridad Español 8 Información sobre seguridad Advertencias ADVERTENCIA • Asegúrese de que los bolsillos no contengan objetos pequeños, sólidos y de forma irregular, material extraño, etc., por ejemplo: monedas, cuchillos, alfileres, etc. Tales objetos...
Page 130 - Requisitos de instalación importantes; Consideraciones acerca de la ubicación
Español 10 Requisitos de instalación Lea atentamente las siguientes instrucciones antes de instalar la secadora y conserve este manual para futuras consultas. ADVERTENCIA Algunas piezas internas no están conectadas a tierra intencionalmente y pueden presentar riesgo de descarga eléctrica únicamente ...
Page 131 - Dimensiones
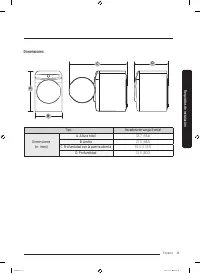
Español 11 Requisitos de instalación Dimensiones A 9 U Tipo Secadora de carga frontal Dimensiones (in. (mm)) A. Altura total 38.7 (984) B. Ancho 27.0 (686) C. Profundidad con la puerta abierta 52.6 (1335) D. Profundidad 31.5 (800) Untitled-3 11 2020-01-14 12:08:47
Page 132 - Requisito de espacio libre
Requisitos de instalación Español 12 Requisitos de instalación Requisito de espacio libre Este requisito de espacio libre solo se aplica a las secadoras. NOTA • Para el requisito de espacio libre para lavadoras, consulte el manual del usuario de la lavadora.• En caso de que la lavadora y la secadora...
Page 135 - Requisitos para el tendido de conductos; Mediciones del manómetro
Español 15 Requisitos de instalación Requisitos para el tendido de conductos Tipo tapa para intemperie Recomendado Utilice solo para instalación de distancia corta 4” (10.2 cm) 2.5” (6.4 cm) N.º de codos de 90° Rígido Rígido 0 80 ft (24.4 m) 74 ft (22.6 m) 1 68 ft (20.7 m) 62 ft (18.9 m) 2 57 ft (17...
Page 136 - Requisitos de drenaje; En Estados Unidos y Canadá; Fuera de Estados Unidos y Canadá
Requisitos de instalación Español 16 Requisitos de instalación Requisitos de drenaje La secadora no debe drenarse hacia una chimenea, pared, techo, altillo, sótano de pequeña altura o espacio oculto de un edificio. Si la secadora tiene un drenaje con salida hacia el exterior se evitará que ingrese u...
Page 137 - Requisitos en cuanto al gas
Español 17 Requisitos de instalación Requisitos en cuanto al gas ADVERTENCIA • Utilice únicamente gas natural o gas LP (gas licuado de propano).• La instalación debe realizarse de conformidad con los códigos locales, o en ausencia de ellos, con el código nacional para gas y combustibles ANSI Z223.1/...
Page 138 - Instrucciones de instalación de la comunidad de Massachusetts; Requisitos eléctricos
Requisitos de instalación Español 18 Requisitos de instalación Instrucciones de instalación de la comunidad de Massachusetts La instalación de la secadora deberá estar a cargo de un plomero o un instalador de gas calificado. Se deberá instalar una válvula de gas manual con una manija en forma de �...
Page 139 - Conexión a tierra
Español 19 Requisitos de instalación Conexión a tierra Esta secadora debe conectarse a tierra. En caso de que el electrodoméstico funcione mal o se descomponga, la conexión a tierra reducirá el riesgo de descarga eléctrica al ofrecer una vía de menor resistencia a la corriente eléctrica. Modelos a g...
Page 140 - Conexiones eléctricas; Riesgo de descarga eléctrica
Requisitos de instalación Español 20 Requisitos de instalación Conexiones eléctricas Antes de poner el electrodoméstico en funcionamiento o realizar pruebas, siga las instrucciones de conexión a tierra de la sección “ Conexión a tierra ”. Se recomienda que se destine un circuito derivado individual ...
Page 141 - Instalación; Componentes
Español 21 Instalación La instalación de la secadora debe estar a cargo de un técnico calificado. El instalador será responsable de conectar la secadora a la fuente de alimentación principal y a la vez de cumplir con las normas de seguridad correspondientes de su zona. Componentes Asegúrese de que t...
Page 142 - Herramientas necesarias para la instalación
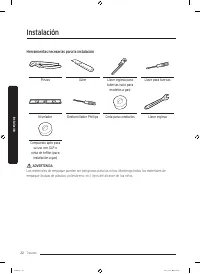
Instalación Español 22 Instalación Herramientas necesarias para la instalación Pinzas Cúter Llave inglesa para tuberías (solo para modelos a gas) Llave para tuercas Nivelador Destornillador Phillips Cinta para conductos Llave inglesa Compuesto apto para su uso con GLP o cinta de teflón (para instala...
Page 143 - Instalación paso a paso; PASO 1; Instale el sistema de drenaje; PASO 2; Conecte el conducto de gas (para modelos a gas)
Español 23 Instalación Instalación paso a paso Asegúrese de que un técnico calificado instale la secadora. A continuación aparecen unas instrucciones paso a paso de la instalación.• No retire la película protectora de la puerta antes de finalizar la instalación del producto. Si retira la película pr...
Page 144 - PASO 3; Conecte el cableado eléctrico (para los modelos eléctricos)
Instalación Español 24 Instalación PASO 3 Conecte el cableado eléctrico (para los modelos eléctricos) Antes de conectar el cableado eléctrico, asegúrese de haber leído la sección “ Requisitos eléctricos ” en la página 18 . Sistema de 3 cables A B L2 L1 C D (N) E A. Conector a tierra externo B. Cable...
Page 147 - PASO 4; Nivele la secadora
Español 27 Instalación PASO 4 Nivele la secadora Para garantizar un desempeño óptimo, la secadora debe estar nivelada. A B Con un nivel (A) , verifique si la secadora está nivelada de lado a lado y de adelante hacia atrás. Si la lavadora no está nivelada, gire la pata niveladora (B) hacia la derecha...
Page 148 - PASO 5; Verificación final
Instalación Español 28 Instalación PASO 5 Encendido (para modelos a gas) Asegúrese de que todas las conexiones de gas, el conducto de drenaje y el cableado se realicen correctamente. Luego, enchufe el cable de alimentación a una fuente de alimentación y verifique la instalación y el funcionamiento d...
Page 149 - Prueba de bloqueo de la ventilación; Ejecución de la prueba de bloqueo de la ventilación
Español 29 Instalación Prueba de bloqueo de la ventilación Una vez instalada la secadora, inicie la prueba de bloqueo de la ventilación para verificar si el sistema de conductos está instalado correctamente. La prueba de bloqueo de la ventilación detecta automáticamente el estado de los conductos e ...
Page 150 - Guía de los conductos de drenaje; Conductos
Instalación Español 30 Instalación NOTA • Durante y luego de la prueba, el interior del tambor está caliente. Tenga cuidado para evitar quemaduras. La prueba de bloqueo de la ventilación se usa para detectar problemas en el sistema de conductos actual cuando la secadora se instala por primera vez. •...
Page 154 - Antes de comenzar; Clasificación y carga; Filtro para pelusas
Español 34 Antes de comenzar Antes de encender la secadora, debe saber algunas cosas. Clasificación y carga • Coloque una carga de ropa en la secadora por vez.• No mezcle prendas pesadas y livianas.• Para mejorar la eficiencia de secado al secar una o dos prendas, agregue una toalla seca a la carga....
Page 155 - Funcionamiento; Panel de control
Español 35 Funcionamiento ADVERTENCIA Para reducir el riesgo de incendio, descarga eléctrica o lesiones, lea “ Información sobre seguridad “ antes de poner en funcionamiento el electrodoméstico. Panel de control 02 01 03 04 05 06 07 08 10 11 09 01 Selector de ciclos Gire el selector de ciclos para s...
Page 158 - Sencillos pasos para comenzar; Para cambiar el ciclo durante el funcionamiento
Funcionamiento Español 38 Funcionamiento Descripción de íconos Secado con sensor Este ícono aparece cuando la secadora ejecuta el ciclo que detecta la humedad interna para determinar el tiempo de secado. Control del filtro Este ícono aparece después de cada carga como recordatorio para limpiar el fi...
Page 159 - Descripción del ciclo; Ciclos normales
Español 39 Funcionamiento Descripción del ciclo Ciclos normales Ciclo Descripción NORMAL Para la mayoría de las telas, incluido algodón y lino.Si está seleccionado el ciclo Normal, la función Secado eco está activada de manera predeterminada. Para obtener más información, consulte Secado eco en la s...
Page 160 - Tabla de ciclos
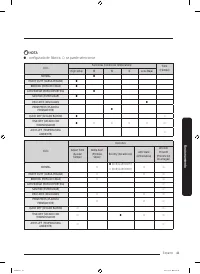
Funcionamiento Español 40 Funcionamiento Tabla de ciclos NOTA Para obtener los mejores resultados, siga las recomendaciones sobre el tamaño de la carga para cada ciclo de secado.• Carga grande: Llene aproximadamente 3/4 del tambor. No agregue prendas por encima de este nivel para que puedan dar vuel...
Page 162 - Guía de secado
Funcionamiento Español 42 Funcionamiento Guía de secado La mejor manera de secar las prendas es seguir las instrucciones de la etiqueta. Si no se brindan instrucciones de secado, consulte la siguiente tabla a modo de referencia. Artículos Descripción Cubrecamas y edredones Siga las instrucciones de ...
Page 163 - Funciones especiales; Seguro para niños
Español 43 Funcionamiento ADVERTENCIA No seque:• Artículos de fibra de vidrio (cortinas, paños de tela, etc.)• Lanas, salvo que se recomiende en la etiqueta• Artículos manchados o embebidos en aceite vegetal o de cocina Funciones especiales Seguro para niños La función Seguro para niños evita que lo...
Page 165 - Alarma Apagada; Luz Interior
Español 45 Funcionamiento Alarma Apagada Puede encender o apagar la alarma. Cuando la alarma está apagada, la melodía de finalización de ciclo y el pitido de apagado no suenan. Sin embargo, los demás sonidos permanecen activos.• Mantenga presionado Damp Alert (Prendas Secas) durante 3 segundos. • El...
Page 166 - Limpieza
Español 46 Mantenimiento Mantenga la secadora limpia para lograr un mejor rendimiento y prolongar su vida útil. ADVERTENCIA Algunas piezas internas no están conectadas a tierra intencionalmente y pueden presentar riesgo de descarga eléctrica únicamente durante el servicio técnico.Personal del servic...
Page 167 - Solución de problemas; Verificaciones
Español 47 Solución de problemas Verificaciones Si la secadora funciona en forma anormal, primero consulte la lista de problemas en la tabla siguiente y pruebe las sugerencias. Problema Acción No funciona. • Asegúrese de que la puerta esté cerrada.• Asegúrese de que el cable de alimentación esté con...
Page 170 - Códigos de información
Solución de problemas Español 50 Solución de problemas Problema Acción No se ve el agua rociada durante los ciclos de vapor. • El agua rociada es difícil de ver cuando la puerta está cerrada. Tiempo prolongado. • Secado con sensor detecta automáticamente la humedad de la carga y apaga la secadora cu...
Page 172 - Especificaciones
Español 52 Especificaciones Tabla de indicaciones sobre telas Los siguientes símbolos ofrecen indicaciones acerca de las prendas. La etiqueta de indicaciones de la prenda incluye símbolos para secado, blanqueado, planchado y limpieza en seco. El uso de símbolos garantiza la consistencia entre los fa...
Page 173 - Símbolos de advertencia para el lavado; Protección del medio ambiente
Español 53 Especi ficaciones Símbolos de advertencia para el lavado No lavar No retorcer No usar blanqueador No secar en secadora Sin vapor (agregado a la plancha) No planchar Limpiar en seco Limpiar en seco No limpiar en seco Secar colgado/tender Colgar para que escurra Secar en posición horizontal...
Page 174 - Hoja de especificaciones
Especificaciones Español 54 Especi ficaciones Hoja de especificaciones Tipo Secadora de carga frontal Capacidad (pies cúbicos) 7.5 Presión de agua (psi (kPa)) 20-116 (137-800) Peso lb (kg) 123.5 (56.0) Potencia del calentador Eléctrico (W) 5300 A gas (BTU/h) 20000 Consumo de potencia (W) 5400 Untitl...
Page 175 - SECADORA SAMSUNG
Español 55 Garantía limitada (Estados Unidos) SECADORA SAMSUNG GARANTÍA LIMITADA AL COMPRADOR CONSUMIDOR ORIGINAL CON PRUEBA DE COMPRA El presente producto de la marca SAMSUNG, tal como lo provee y distribuye SAMSUNG ELECTRONICS AMERICA, INC. (SAMSUNG) y lo entrega como nuevo, en su caja de cartón o...
Page 177 - EXCLUSIÓN DE GARANTÍAS IMPLÍCITAS
Español 57 EXCLUSIÓN DE GARANTÍAS IMPLÍCITAS LAS GARANTÍAS IMPLÍCITAS, INCLUYENDO GARANTÍAS IMPLÍCITAS DE COMERCIABILIDAD O APTITUD PARA UN PROPÓSITO EN PARTICULAR, ESTÁN LIMITADAS A UN AÑO O AL PERIODO MÁS CORTO PERMITIDO POR LA LEY. Algunos estados no permiten limitaciones en cuanto al periodo de ...
Page 178 - GARANTÍA LIMITADA PARA EL COMPRADOR ORIGINAL
Español 58 Garantía (CANADÁ) SECADORA SAMSUNG GARANTÍA LIMITADA PARA EL COMPRADOR ORIGINAL El presente producto de la marca SAMSUNG, tal como lo provee y distribuye SAMSUNG ELECTRONICS CANADA, INC. (SAMSUNG) y lo entrega como nuevo, en su caja de cartón original al comprador o consumidor original, e...
Page 181 - Notas