Page 2 - Contents; Safety information
Engl ish English 2 Contents Safety information 4 What you need to know about the safety instructions 4 Important safety symbols 4 CALIFORNIA PROPOSITION 65 WARNING 6 Important safety precautions 7 Warnings 8Cautions 8 Regulatory notice 10 FCC Notice 10 IC Notice 11 Open Source Announcement 12 Instal...
Page 3 - Operations
Engl ish English 3 Operations 39 Control panel 39 Operating a cycle 41 Cycle overview 42 Options 43Settings 46Special features 48 Cycle chart 50 Drying guide 52 Maintenance 53 Cleaning 53 Troubleshooting 55 Checkpoints 55Information codes 57 Specifications 58 Fabric care chart 58 Protecting the en...
Page 4 - SAVE THESE INSTRUCTIONS; What you need to know about the safety instructions
SAVE THESE INSTRUCTIONS English 4 Engl ish Safety information Congratulations on your new Samsung dryer. This manual contains important information on the installation, use and care of your appliance. Please take some time to read this manual to take full advantage of your dryer’s many benefits and ...
Page 5 - WARNING - Risk of Fire
English 5 Engl ish WARNING - Risk of Fire • Clothes dryer installation must be performed by a qualified installer. • Install the clothes dryer according to the manufacturer’s instructions and local codes. • Do not install a clothes dryer with flexible plastic venting materials. If flexible metal (...
Page 6 - WARNING - To reduce the risk of fire or explosion:; • Do not dry items that have been previously cleaned, washed,; CALIFORNIA PROPOSITION 65 WARNING
Engl ish Safety information English 6 WARNING - To reduce the risk of fire or explosion: • Do not dry items that have been previously cleaned, washed, soaked, or spotted with gasoline, dry cleaning solvents, or other flammable or explosive substances. They emit vapors that could ignite or explode. A...
Page 7 - Important safety precautions
English 7 Engl ish Important safety precautions WARNING To reduce the risk of fire, electric shock, or injury to persons when using your appliance, follow basic precautions, including the following: 1. Read all instructions before using this appliance. 2. Do not dry articles that have been previou...
Page 8 - Warnings; Cautions
Engl ish Safety information English 8 18. Do not insert your hand under the dryer. - This may result in injury. 19. Take care that children’s fingers are not caught in the door when closing it. - This may result in injury. Warnings WARNING • Ensure pockets are free of small, irregularly shaped hard ...
Page 10 - Regulatory notice; FCC Notice; FCC RADIATION EXPOSURE STATEMENT:
SAVE THESE INSTRUCTIONS English 10 Engl ish Regulatory notice FCC Notice CAUTION Any changes or modifications not expressly approved by the party responsible for compliance could void the user’s authority to operate the equipment.This device complies with Part 15 of FCC Rules. Operation is Subject t...
Page 11 - IC Notice; IC RADIATION EXPOSURE STATEMENT:
English 11 Engl ish Unintentional emitter per FCC Part 15Product type : Clothes DryersModel : DV25B6900H*Responsible Party – U.S. Contact InformationSamsung Electronics America, Inc.QA Lab America19 Chapin Rd. Building D Pine Brook NJ 07058Tel: 1-973-808-6375 Fax: 1-973-808-63 IC Notice The term “...
Page 12 - Open Source Announcement
Engl ish Regulatory notice English 12 Open Source Announcement The software included in this product contains open source software. You may obtain the complete corresponding source code for a period of three years after the last shipment of this product by sending an email to mailto:[email protected...
Page 13 - Installation requirements; Key installation requirements; Location considerations
Engl ish English 13 Installation requirements Read through the following instructions before installing the dryer and keep this manual for future reference. WARNING Certain internal parts are intentionally not grounded and may present a risk of electric shock only during servicing.Service Personne...
Page 14 - Dimensions
Installation requirements English 14 Engl ish Dimensions Type Front loading dryer Models DV25B6900H* Dimensions (in. (mm)) A. Overall height 33.5 (850) B. Width 23.6 (600) C. Depth with door open 43.3 (1101) D. Depth 25.8 (655) DV6900B_SimpleUX_WEB_Heatpump_EN.indd 14 2022/6/23 16:27:59
Page 15 - Clearance requirement
Engl ish English 15 Clearance requirement This clearance requirement is applicable for dryers only. NOTE • For washer's clearance requirement, see the washer's user manual.• If the washer and dryer have different clearance requirements, use the one with the larger value. Alcove or closet installat...
Page 17 - Electrical requirements; Electrical connections
Engl ish English 17 Electrical requirements The wiring diagram is located on the plate under the control panel or rear frame. WARNING • Improperly connecting the equipment grounding conductor can result in a risk of electric shock. Check with a qualified electrician or serviceman if you are in dou...
Page 18 - Risk of Electric Shock
Installation requirements English 18 Engl ish • The power cord is not provided with U.S. electric model dryers. This cord is sold separately. Risk of Electric Shock WARNING • When local codes allow, you can connect the dryer’s electrical supply with a new power supply cord kit, marked for use with a...
Page 19 - Installation; What’s included
Engl ish English 19 Installation This dryer must be installed by a qualified technician. The installer is responsible for connecting the dryer to the main power while observing the relevant safety regulations of your area. What’s included Make sure all the parts are included in the product package...
Page 21 - STEP 1; STEP 2
Engl ish English 21 Step-by-step installation Make sure you have a qualified technician install the dryer. Step by step installation instructions start below.• Do not remove the protective film on the door before completing the product installation. If you remove the protective film before the ins...
Page 24 - STEP 3
Installation English 24 Engl ish STEP 3 Level the dryer To ensure optimal performance, the dryer must be level. A B Using a level (A) , check if the dryer is level side to side and then front to back. If the dryer is not level, turn the leveling feet (B) clockwise to lower the dryer or counterclock...
Page 25 - STEP 4; Exhaust ducting guide; Ducting; Cleaning
Engl ish English 25 STEP 4 Final Check When installation is complete, confirm that:• The dryer is plugged into an electrical outlet and grounded properly.• The exhaust ductwork is connected, and the joints are taped.• You have used rigid or stiff-walled flexible metal duct material, not plastic f...
Page 26 - Changing the direction of the exhaust duct (optional); Side venting
Installation English 26 Engl ish Changing the direction of the exhaust duct (optional) WARNING Before performing this exhaust installation, disconnect the dryer from its electrical supply. Wear gloves to protect your hands and arms from sharp edges when working inside the cabinet. Side venting B A 1...
Page 28 - Bottom venting
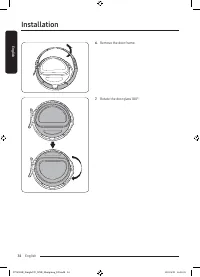
Installation English 28 Engl ish G 8. Cover the back opening with a cover plate (G) . WARNING Never leave the back opening uncovered. It must be covered with a cover plate. Bottom venting A 1. Detach the bottom knockout (A) . B 2. Pull the duct out of the dryer, and then remove the screw (B) from th...
Page 30 - Vent blockage test; Running the vent blockage test
Installation English 30 Engl ish F 8. Cover the back opening with a cover plate (F) . WARNING Never leave the back opening uncovered. It must be covered with a cover plate. Vent blockage test After the dryer is installed, run the Vent Blockage Test function to check if the duct system is properly in...
Page 31 - Installation check codes
Engl ish English 31 - The results remain on the display for about 5 minutes and then automatically turn off. You can turn the results off immediately by tapping . NOTE • During or after the test, the internal drum is hot. Use caution to prevent burns. The Vent Blockage Test function is used to che...
Page 37 - Before you start; Initial setup; Español; Let’s explore; A dryer that knows you!
Engl ish English 37 Before you start Here are a few things you should know before starting your dryer. Initial setup • When you turn on your dryer for the first time, the screen shows the initial setup process. Follow the on-screen instructions to complete it. • If you complete the initial setup a...
Page 38 - Sort and load; Lint filter
Before you start English 38 Engl ish Sort and load • Put one wash load in the dryer at a time.• Do not mix heavy and lightweight items together.• To improve drying efficiency for one or two items, add a dry towel to the load.• For best results, untangle items before inserting them into the dryer. Ta...
Page 39 - Control panel
Engl ish English 39 Operations WARNING To reduce the risk of fire, electric shock, or injury, read the “ Safety information ” before operating this appliance. Control panel 01 04 05 06 07 08 09 02 03 10 01 Power Tap to turn the dryer on or off.• If you do not manipulate the control panel for 10 m...
Page 41 - Operating a cycle
Engl ish English 41 Operating a cycle 01 06 05 03 04 02 1. Tap to turn on the dryer. 2. Turn the Navigation dial to select the cycle you want. For more information on “ Cycle overview ”, see page 42 . 3. Tap Dryness , Temp. , or Time to change the default cycle settings. 4. Tap Options , and then ...
Page 42 - Cycle overview
Operations English 42 Engl ish Cycle overview NOTE Other cycles can be used after adding them to your cycle list using the My Cycles function. For more information, see the “ My Cycles ” section on page 44 . Cycle Description Normal For most fabrics including cottons and linens. Time Dry You can spe...
Page 43 - Options; Using Options
Engl ish English 43 Options Using Options 02 03 01 1. Tap Options . 2. Turn the Navigation dial to select the desired additional function. 3. Tap OK to change the selected function’s settings or start the function. NOTE • To return to the main screen, tap Options again or turn the Navigation dial ...
Page 44 - Damp Alert
Operations English 44 Engl ish Damp Alert This function alerts you when shirts and other items that require ironing are dry enough to be suitable for ironing. 1. Select a cycle and change the cycle settings as necessary. - This function is available for Normal, Heavy Duty, Delicates, Perm Press, Tow...
Page 45 - Child Lock
Engl ish English 45 Child Lock To prevent children or infants from accidentally starting or setting the dryer, Child Lock locks all buttons except for and Options . 1. Close the door. 2. Tap Options . 3. Turn the Navigation dial to select Child Lock , and then tap OK . 4. Tap OK to select On or Of...
Page 46 - Settings; Using Settings
Operations English 46 Engl ish Settings Using Settings 02 03 01 * * Tap and hold 3 seconds. 1. Tap and hold Options for 3 seconds. 2. Turn the Navigation dial and select the desired setting, and then tap OK . 3. Tap OK to change the selected function’s settings or start the function. NOTE • To retur...
Page 47 - Sound
Engl ish English 47 Sound You can turn on or off the sound from the dryer. 1. Tap and hold Options for 3 seconds. 2. Turn the Navigation dial to select Sound , and then tap OK . 3. Tap OK to select On or Off . - The default setting is On . NOTE The setting remains unchanged even if you restart the...
Page 48 - Special features
Operations English 48 Engl ish Special features Smart Control You can connect to the SmartThings app and control your dryer remotely.( Smart Control for electric model. Connecting your dryer • Download and open the SmartThings app on your mobile device• Tap to turn on the dryer.• Tap and hold Smart ...
Page 49 - SmartThings
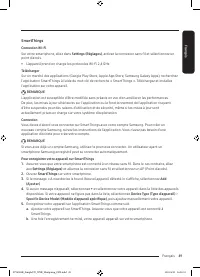
Engl ish English 49 SmartThings Wi-Fi connection On your smartphone, go to Settings and turn on the wireless connection and select an AP (Access Point). • This appliance supports the Wi-Fi 2.4 GHz protocols. Download On an app market (Google Play Store, Apple App Store, Samsung Galaxy Apps), find ...
Page 50 - Cycle chart
Operations English 50 Engl ish Cycle chart NOTE For best results, follow the load size recommendations for each dry cycle.• Large load: Fill the drum to about 3 / 4 full. Do not add items over this level as they need to tumble freely. • Medium load : Fill the drum to about 1 / 2 full. • Small load :...
Page 52 - Drying guide
Operations English 52 Engl ish Drying guide The best way to dry items is to follow the instructions on the care label. If no drying instructions are provided, see the following table for reference. Items Description Bedspreads & Comforters Follow the care label instructions or dry using Bedding....
Page 53 - Maintenance; Drum; Powder coated drum; Exhaust system
Engl ish English 53 Maintenance Keep the dryer clean for best performance and to lengthen its life cycle. WARNING Certain internal parts are intentionally not grounded and may present a risk of electric shock only during servicing.Service Personnel - Do not contact the following parts while the ap...
Page 54 - Vent sensor
Maintenance English 54 Engl ish Vent sensor The dryer features a vent sensor that detects and notifies you when it is time to clean the ductwork. Check the following if you get the “ Check the lint filter or vent condition ” message when you turn on the dryer. NOTE • For duct installation, see Exhau...
Page 55 - Troubleshooting; Checkpoints
Engl ish English 55 Troubleshooting Checkpoints If you encounter a problem with the dryer, first check the table below and try the suggestions. Problem Action Dryer does not start. • Make sure the dryer is plugged in.• Make sure the door is properly closed.• Check the fuse or reset the circuit bre...
Page 57 - Information codes
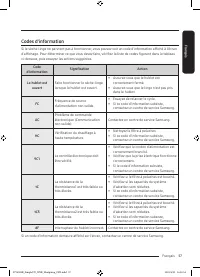
Engl ish English 57 Information codes If the dryer fails to operate, you may see an information code on the display panel. To determine what you should do, check the list of codes in the table below, and then try the suggested actions. Information code Meaning Action Door is open Operating the dry...
Page 58 - Specifications; Fabric care chart
Engl ish English 58 Specifications Fabric care chart The following symbols provide garment care direction. The clothing care labels include symbols for drying, bleaching, ironing, and dry cleaning. The use of symbols ensures consistency among garment manufacturers of domestic and imported items. Fol...
Page 59 - Warning symbols for laundering; Protecting the environment
Engl ish English 59 Warning symbols for laundering Do not wash Do not wring Do not bleach Do not tumble dry No steam (added to iron) Do not iron Dry-clean Dry-clean Do not dry-clean Line dry / Hang to dry Drip dry Dry flat Protecting the environment This appliance is manufactured from recyclable m...
Page 60 - SAMSUNG DRYER
Engl ish English 60 LIMITED WARRANTY (U.S.A.) SAMSUNG DRYER LIMITED WARRANTY TO ORIGINAL CONSUMER PURCHASER WITH PROOF OF PURCHASE This SAMSUNG brand product, as supplied and distributed by SAMSUNG ELECTRONICS AMERICA, INC. (SAMSUNG) and delivered new, in the original carton to the original consumer...
Page 61 - EXCLUSION OF IMPLIED WARRANTIES
English 61 Engl ish Visits by an authorized servicer to explain product functions, maintenance or installation are not covered by this limited warranty. Please contact SAMSUNG at the number below for assistance with any of these issues. EXCLUSION OF IMPLIED WARRANTIES IMPLIED WARRANTIES, INCLUDING...
Page 62 - LIMITED WARRANTY TO ORIGINAL PURCHASER
Engl ish English 62 Warranty (CANADA) SAMSUNG DRYER LIMITED WARRANTY TO ORIGINAL PURCHASER This SAMSUNG brand product, as supplied and distributed by SAMSUNG ELECTRONICS CANADA, INC. (SAMSUNG) and delivered new, in the original carton to the original consumer purchaser, is warranted by SAMSUNG again...
Page 66 - Table des matières; Consignes de sécurité
Français Français 2 Table des matières Consignes de sécurité 4 Remarques importantes sur les consignes de sécurité 4 Importants symboles de sécurité 4 AVERTISSEMENT DE LA PROPOSITION 65 DE L’ÉTAT DE LA CALIFORNIE 6 Consignes de sécurité importantes 7 Avertissements 8Mises en garde 8 Avis réglementai...
Page 68 - CONSERVEZ SOIGNEUSEMENT CES CONSIGNES; Remarques importantes sur les consignes de sécurité
CONSERVEZ SOIGNEUSEMENT CES CONSIGNES Français 4 Français Consignes de sécurité Félicitations pour l’achat de votre nouveau sèche-linge Samsung. Ce manuel contient de précieuses informations concernant l'installation, l'utilisation et l'entretien de votre appareil. Prenez le temps de le lire pour ti...
Page 70 - AVERTISSEMENT DE LA PROPOSITION 65 DE L’ÉTAT DE LA CALIFORNIE
Français Consignes de sécurité CONSERVEZ SOIGNEUSEMENT CES CONSIGNES Français 6 AVERTISSEMENT - Pour réduire le risque d'incendie ou d'explosion : • Ne faites sécher aucun article ayant été précédemment en contact par nettoyage, lavage ou trempage avec de l’essence, des solvants de nettoyage à sec o...
Page 71 - Consignes de sécurité importantes
CONSERVEZ SOIGNEUSEMENT CES CONSIGNES Français 7 Français Consignes de sécurité importantes AVERTISSEMENT Afin de réduire les risques d'incendie, d'électrocution ou de blessures physiques lors de l'utilisation de l'appareil, des précautions de base doivent être prises : 1. Lisez toutes les consignes...
Page 72 - Avertissements; Mises en garde
Français Consignes de sécurité CONSERVEZ SOIGNEUSEMENT CES CONSIGNES Français 8 17. Ne laissez pas les enfants jouer sur ou dans l'appareil. Une surveillance attentive s'impose lorsque l'appareil est utilisé à proximité d'enfants. 18. N’insérez pas votre main sous le sèche-linge. - Cela pourrait pro...
Page 74 - Avis réglementaire; Avis concernant la FCC; DÉCLARATION DE LA FCC :
CONSERVEZ SOIGNEUSEMENT CES CONSIGNES Français 10 Français Avis réglementaire Avis concernant la FCC ATTENTION Tous les changements ou modifications non expressément approuvé(e)s par l'autorité responsable de la conformité à la réglementation peut annuler le droit de l'utilisateur à utiliser cet app...
Page 75 - Notification IC; DÉCLARATION IC SUR L'EXPOSITION AUX RADIATIONS :
CONSERVEZ SOIGNEUSEMENT CES CONSIGNES Français 11 Français Producteur non intentionnel d'émissions selon la Partie 15 du règlement de la FCCType de produit : Sèche-lingeModèle : DV25B6900H*Partie responsable - Coordonnées de contact aux États-UnisSamsung Electronics America, Inc.QA Lab America19 Cha...
Page 76 - Déclaration de logiciel open source
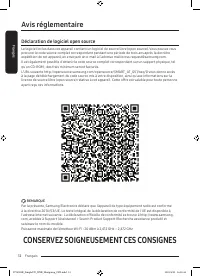
Français Avis réglementaire CONSERVEZ SOIGNEUSEMENT CES CONSIGNES Français 12 Déclaration de logiciel open source Le logiciel inclus dans cet appareil contient un logiciel de source libre (open source). Vous pouvez vous procurer le code source complet correspondant pendant une période de trois ans a...
Page 77 - Exigences d'installation; Conditions d'installation principales
Français Français 13 Exigences d'installation Lisez attentivement les instructions suivantes avant d'installer le sèche-linge et conservez-les dans un endroit sûr afin de pouvoir vous y reporter ultérieurement. AVERTISSEMENT La mise à la terre de certaines pièces internes n'a volontairement pas été ...
Page 79 - Dégagement requis
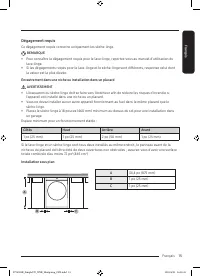
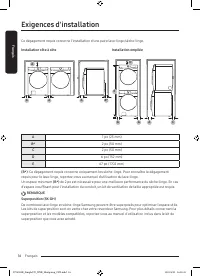
Français Français 15 Dégagement requis Ce dégagement requis concerne uniquement les sèche-linge. REMARQUE • Pour connaître le dégagement requis pour le lave-linge, reportez-vous au manuel d'utilisation du lave-linge. • Si les dégagements requis pour le lave-linge et le sèche-linge sont différents, r...
Page 81 - Normes électriques; Raccordement électrique
Français Français 17 Normes électriques Le schéma de câblage figure sur une plaque située sous le panneau de commande ou le panneau arrière. AVERTISSEMENT • Un branchement incorrect du conducteur de mise à la terre peut créer un risque d'électrocution. Demandez conseil à un électricien ou un réparat...
Page 82 - Risque d'électrocution
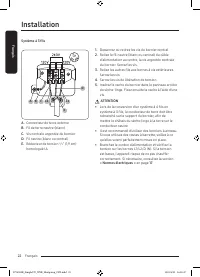
Exigences d'installation Français 18 Français . Modèles électriques : États-Unis uniquement Aux États-Unis, la plupart des sèche-linge requièrent une alimentation en 120/240 V c.a., 60 Hz, tandis que d’autres requièrent une alimentation en 120/208 V c.a., 60 Hz. Vous trouverez les spécifications éle...
Page 83 - Pièces incluses
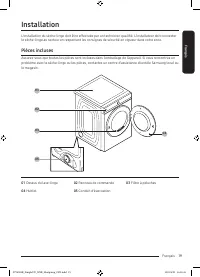
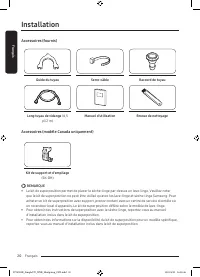
Français Français 19 Installation L'installation du sèche-linge doit être effectuée par un technicien qualifié. L'installateur doit connecter le sèche-linge au secteur en respectant les consignes de sécurité en vigueur dans votre zone. Pièces incluses Assurez-vous que toutes les pièces sont incluses...
Page 85 - Installation étape par étape; ÉTAPE 1
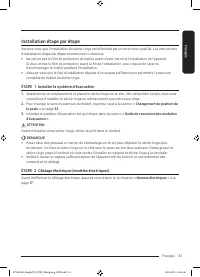
Français Français 21 Installation étape par étape Assurez-vous que l'installation du sèche-linge est effectuée par un technicien qualifié. Les instructions d'installation étape par étape commencent ci-dessous.• Ne retirez pas le film de protection du hublot avant d'avoir terminé l'installation de l'...
Page 88 - ÉTAPE 3
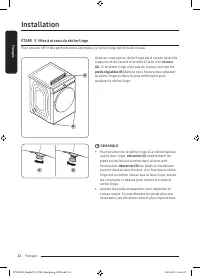
Installation Français 24 Français ÉTAPE 3 Mise à niveau du sèche-linge Pour pouvoir offrir des performances optimales, le sèche-linge doit être de niveau. A B Assurez-vous que le sèche-linge est à niveau de droite à gauche et de l'avant à l’arrière à l’aide d’un niveau (A) . Si le sèche-linge n'est...
Page 89 - ÉTAPE 4; Guide de connexion des conduites d'évacuation; Connexion des conduites
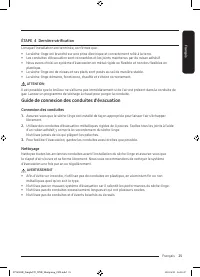
Français Français 25 ÉTAPE 4 Dernière vérification Lorsque l'installation est terminée, confirmez que :• Le sèche-linge est branché sur une prise électrique et correctement relié à la terre.• Les conduites d'évacuation sont connectées et les joints maintenus par du ruban adhésif.• Nous avons choisi...
Page 90 - Aération latérale
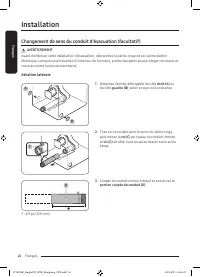
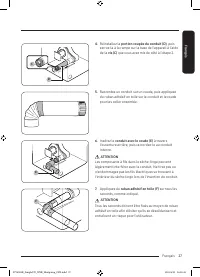
Installation Français 26 Français Changement de sens du conduit d'évacuation (facultatif) AVERTISSEMENT Avant d'effectuer cette installation d'évacuation, débranchez le sèche-linge de son alimentation électrique. Lorsque vous travaillez à l'intérieur de l'armoire, portez des gants pour protéger vos ...
Page 92 - Aération inférieure
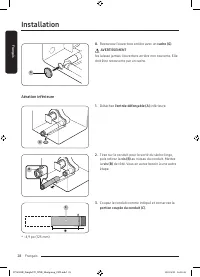
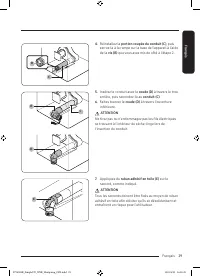
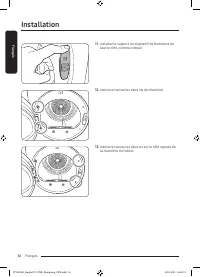
Installation Français 28 Français G 8. Recouvrez l'ouverture arrière avec un cache (G) . AVERTISSEMENT Ne laissez jamais l'ouverture arrière non couverte. Elle doit être recouverte par un cache. Aération inférieure A 1. Détachez l'entrée défonçable (A) inférieure. B 2. Tirez sur le conduit pour le s...
Page 94 - Test de blocage de l'aération; Exécution du test de blocage de l'aération
Installation Français 30 Français F 8. Recouvrez l'ouverture arrière avec un cache (F) . AVERTISSEMENT Ne laissez jamais l'ouverture arrière non couverte. Elle doit être recouverte par un cache. Test de blocage de l'aération Une fois le sèche-linge installé, lancez le test de blocage de l'aération a...
Page 95 - Codes de vérification de l'installation
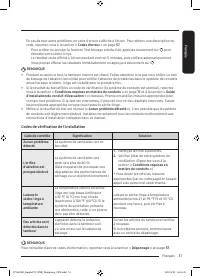
Français Français 31 En cas de tout autre problème, un code d'erreur s'affiche à l'écran. Pour obtenir une description du code, reportez-vous à la section « Codes d’erreur » en page 57 . - Pour arrêter ou annuler la fonction Test blocage entrée d'air, appuyez doucement sur pour éteindre votre sèche-...
Page 96 - Changement de position de la porte
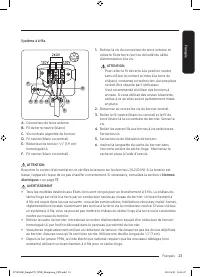
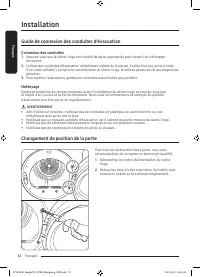
Installation Français 32 Français Guide de connexion des conduites d'évacuation Connexion des conduites 1. Assurez-vous que le sèche-linge est installé de façon appropriée pour laisser l'air s'échapper librement. 2. Utilisez des conduites d’évacuation métalliques rigides de 4 pouces. Scellez tous le...
Page 101 - Avant de démarrer; Configuration initiale
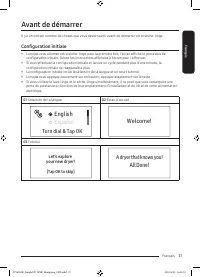
Français Français 37 Avant de démarrer Il y a un certain nombre de choses que vous devez savoir avant de démarrer votre sèche-linge. Configuration initiale • Lorsque vous allumez votre sèche-linge pour la première fois, l'écran affiche le processus de configuration initiale. Suivez les instructions ...
Page 102 - Tri et charge; Filtre à peluches
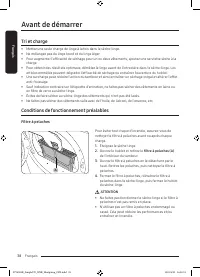
Avant de démarrer Français 38 Français Tri et charge • Mettez une seule charge de linge à la fois dans le sèche-linge.• Ne mélangez pas du linge lourd et du linge léger.• Pour augmenter l'efficacité de séchage pour un ou deux vêtements, ajoutez une serviette sèche à la charge. • Pour obtenir des rés...
Page 103 - Opérations
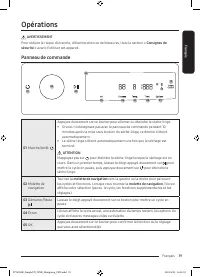
Français Français 39 Opérations AVERTISSEMENT Pour réduire le risque d'incendie, d'électrocution ou de blessures, lisez la section « Consignes de sécurité » avant d'utiliser cet appareil. Panneau de commande 01 04 05 06 07 08 09 02 03 10 01 Marche/Arrêt Appuyez doucement sur ce bouton pour allumer ...
Page 105 - Utilisation d'un cycle
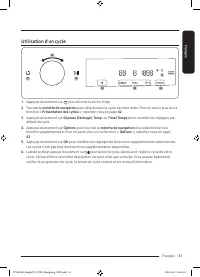
Français Français 41 Utilisation d'un cycle 01 06 05 03 04 02 1. Appuyez doucement sur pour allumer le sèche-linge. 2. Tournez la molette de navigation pour sélectionner le cycle de votre choix. Pour en savoir plus sur la fonction « Présentation des cycles », reportez-vous en page 42 . 3. Appuyez do...
Page 106 - Présentation des cycles
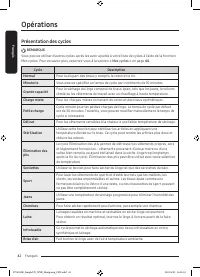
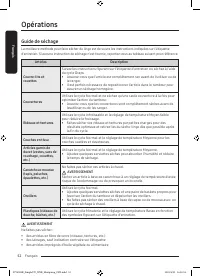
Opérations Français 42 Français Présentation des cycles REMARQUE Vous pouvez utiliser d'autres cycles après les avoir ajoutés à votre liste de cycles à l'aide de la fonction Mes cycles. Pour en savoir plus, reportez-vous à la section « Mes cycles » en page 44 . Cycle Description Normal Pour la plupa...
Page 107 - Utilisation du menu Options
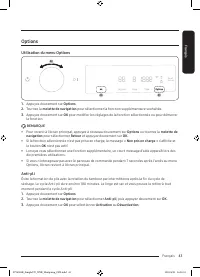
Français Français 43 Options Utilisation du menu Options 02 03 01 1. Appuyez doucement sur Options . 2. Tournez la molette de navigation pour sélectionner la fonction supplémentaire souhaitée. 3. Appuyez doucement sur OK pour modifier les réglages de la fonction sélectionnée ou pour démarrer la fonc...
Page 108 - Alerte humidité
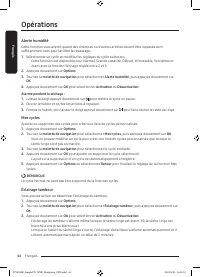
Opérations Français 44 Français Alerte humidité Cette fonction vous avertit quand des chemises ou d'autres articles devant être repassés sont suffisamment secs pour faciliter le repassage. 1. Sélectionnez un cycle et modifiez les réglages du cycle au besoin. - Cette fonction est disponible pour Norm...
Page 110 - Réglages; Utilisation des réglages
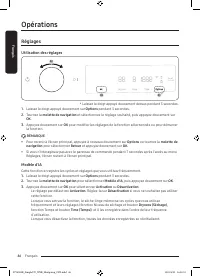
Opérations Français 46 Français Réglages Utilisation des réglages 02 03 01 * * Laissez le doigt appuyé doucement dessus pendant 3 secondes. 1. Laissez le doigt appuyé doucement sur Options pendant 3 secondes. 2. Tournez la molette de navigation et sélectionnez le réglage souhaité, puis appuyez douce...
Page 112 - Fonctions spéciales
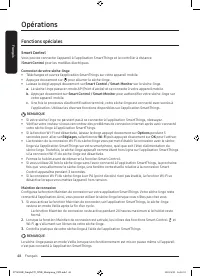
Opérations Français 48 Français Fonctions spéciales Smart Control Vous pouvez connecter l'appareil à l'application SmartThings et le contrôler à distance.( Smart Control pour les modèles électriques. Connexion de votre sèche-linge • Téléchargez et ouvrez l'application SmartThings sur votre appareil ...
Page 114 - Tableau des programmes
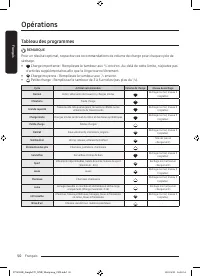
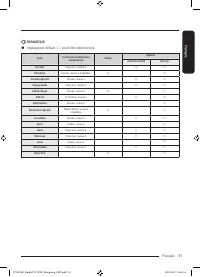
Opérations Français 50 Français Tableau des programmes REMARQUE Pour un résultat optimal, respectez ces recommandations de volume de charge pour chaque cycle de séchage.• Charge importante : Remplissez le tambour aux 3 / 4 environ. Au-delà de cette limite, n'ajoutez pas d'articles supplémentaires af...
Page 116 - Guide de séchage
Opérations Français 52 Français Guide de séchage La meilleure méthode pour faire sécher du linge est de suivre les instructions indiquées sur l'étiquette d'entretien. Si aucune instruction de séchage n'est fournie, reportez-vous au tableau suivant pour référence. Articles Description Couvre-lits et ...
Page 117 - Nettoyage
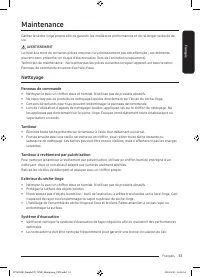
Français Français 53 Maintenance Gardez le sèche-linge propre afin de garantir les meilleures performances et de rallonger sa durée de vie. AVERTISSEMENT La mise à la terre de certaines pièces internes n'a volontairement pas été effectuée ; ces éléments peuvent donc présenter un risque d'électrocuti...
Page 118 - Capteur de ventilation
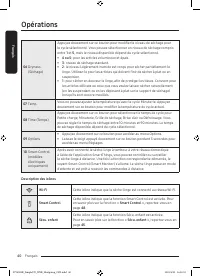
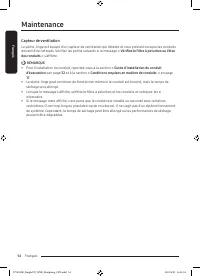
Maintenance Français 54 Français Capteur de ventilation Le sèche-linge est équipé d'un capteur de ventilation qui détecte et vous prévient lorsque les conduits doivent être nettoyés. Vérifiez les points suivants si le message « Vérifiez le filtre à peluches ou l'état des conduits » s'affiche. REMARQ...
Page 119 - Dépannage; Contrôles à effectuer
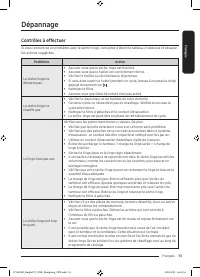
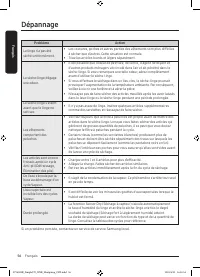
Français Français 55 Dépannage Contrôles à effectuer Si vous rencontrez un problème avec le sèche-linge, consultez d'abord le tableau ci-dessous et essayez les actions suggérées. Problème Action Le sèche-linge ne démarre pas. • Assurez-vous que le sèche-linge est branché. • Assurez-vous que le hublo...
Page 122 - Caractéristiques techniques; Tableau des symboles d’entretien des textiles; Cycle de lavage; Agent de blanchiment
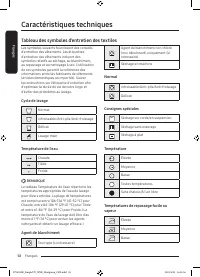
Français Français 58 Caractéristiques techniques Tableau des symboles d’entretien des textiles Les symboles suivants fournissent des conseils d'entretien des vêtements. Les étiquettes d'entretien des vêtements incluent des symboles relatifs au séchage, au blanchiment, au repassage et au nettoyage à ...
Page 123 - Protection de l’environnement
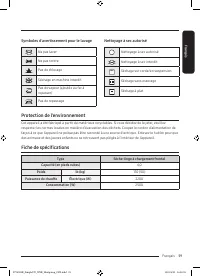
Français Français 59 Symboles d'avertissement pour le lavage Ne pas laver Ne pas tordre Pas de chlorage Séchage en machine interdit Pas de vapeur (ajoutée au fer à repasser) Pas de repassage Nettoyage à sec autorisé Nettoyage à sec autorisé Nettoyage à sec interdit Séchage sur corde/en suspension Sé...
Page 125 - EXCLUSION DES GARANTIES IMPLICITES
Français 61 Français La présente garantie limitée couvre les vices de fabrication au niveau des pièces et de la main d’œuvre identifiés dans le cadre de l’utilisation domestique ou non-commerciale normale de l’appareil en question. Elle ne peut pas couvrir les choses suivantes : les dommages survenu...
Page 126 - LIMITE DE RECOURS
GARANTIE LIMITÉE (ÉTATS-UNIS) Français Français 62 LIMITE DE RECOURS VOTRE SEUL RECOURS EXCLUSIF EST UNE RÉPARATION DE L’APPAREIL, UN REMPLACEMENT DE L’APPAREIL OU UN REMBOURSEMENT DU PRIX D’ACHAT, À LA DISCRÉTION DE SAMSUNG, COMME ACCORDÉ DANS LE CADRE DE LA PRÉSENTE GARANTIE LIMITÉE. SAMSUNG NE PO...
Page 127 - GARANTIE LIMITÉE À L'ACHETEUR INITIAL
Français 63 Français Garantie (CANADA) SÈCHE-LINGE SAMSUNG GARANTIE LIMITÉE À L'ACHETEUR INITIAL Ce produit de la marque SAMSUNG, fourni, distribué par SAMSUNG ELECTRONICS CANADA, INC. (SAMSUNG) et livré neuf, dans son emballage d'origine à l'acheteur initial, est garanti par SAMSUNG contre tout déf...
Page 131 - Secadora; Manual del usuario
Secadora Manual del usuario DV25B6900H* DV6900B_SimpleUX_WEB_Heatpump_MES.indd 1 2022/6/23 16:29:45
Page 132 - Contenido; Información sobre seguridad
Español Español 2 Contenido Información sobre seguridad 4 Lo que necesita saber sobre las instrucciones de seguridad 4 Símbolos de seguridad importantes 4 PROPOSICIÓN 65 DE CALIFORNIA 6 Precauciones de seguridad importantes 7 Advertencias 8Precauciones 8 Normas regulatorias 10 Aviso para FCC 10 Avis...
Page 133 - Funcionamiento
Español Español 3 Funcionamiento 39 Panel de control 39 Operar un ciclo 41 Descripción del ciclo 42 Opciones 43Ajustes 46Características especiales 48 Tabla de ciclos 50 Guía de secado 52 Mantenimiento 53 Limpieza 53 Solución de problemas 55 Verificaciones 55Códigos de información 57 Especificacione...
Page 134 - CONSERVE ESTAS INSTRUCCIONES; Lo que necesita saber sobre las instrucciones de seguridad
CONSERVE ESTAS INSTRUCCIONES Español 4 Español Información sobre seguridad Felicitaciones por la compra de la nueva secadora Samsung. Este manual contiene información importante acerca de la instalación, el uso y el cuidado del electrodoméstico. Lea detenidamente estas instrucciones a fin de aprovec...
Page 135 - ADVERTENCIA - Riesgo de incendio
CONSERVE ESTAS INSTRUCCIONES Español 5 Español ADVERTENCIA - Riesgo de incendio • La instalación de la secadora de ropa debe estar a cargo de un instalador calificado. • Instale la secadora de ropa según las instrucciones del fabricante y los códigos locales. • No instale una secadora de ropa con ma...
Page 136 - ADVERTENCIA - Para reducir el riesgo de incendio o explosión:; PROPOSICIÓN 65 DE CALIFORNIA
Español Información sobre seguridad CONSERVE ESTAS INSTRUCCIONES Español 6 ADVERTENCIA - Para reducir el riesgo de incendio o explosión: • No seque prendas que hayan sido previamente limpiadas, lavadas, remojadas o salpicadas con gasolina, solventes de limpieza en seco u otras sustancias inflamables...
Page 137 - Precauciones de seguridad importantes
CONSERVE ESTAS INSTRUCCIONES Español 7 Español Precauciones de seguridad importantes ADVERTENCIA Para reducir el riesgo de incendio, descarga eléctrica o lesiones físicas cuando usa este electrodoméstico, siga las instrucciones de seguridad básicas que figuran a continuación: 1. Lea todas las instru...
Page 138 - Advertencias; Precauciones
Español Información sobre seguridad CONSERVE ESTAS INSTRUCCIONES Español 8 18. No introduzca las manos bajo la secadora. - Esto puede provocar lesiones personales. 19. Al cerrar la puerta tenga cuidado de no atrapar los dedos de los niños. - Esto puede provocar lesiones personales. Advertencias ADVE...
Page 140 - Normas regulatorias; Aviso para FCC; DECLARACIÓN DE LA FCC:
CONSERVE ESTAS INSTRUCCIONES Español 10 Español Normas regulatorias Aviso para FCC PRECAUCIÓN Cualquier cambio o modificación que no haya sido expresamente aprobado por la parte responsable del cumplimiento podría anular la autoridad del usuario para operar el equipo.Este dispositivo cumple con la p...
Page 141 - Aviso IC; DECLARACIÓN DE LA IC SOBRE LA EXPOSICIÓN A LA RADIACIÓN:
CONSERVE ESTAS INSTRUCCIONES Español 11 Español Emisor involuntario según la sección 15 de las Normas de la FCCTipo de producto: Secadora de ropaModelo: DV25B6900H*Parte responsable: Información de contacto en EE. UU.Samsung Electronics America, Inc.QA Lab America19 Chapin Rd. Building D Pine Brook ...
Page 142 - Anuncio de código abierto
Español Normas regulatorias CONSERVE ESTAS INSTRUCCIONES Español 12 Anuncio de código abierto El software incluido en este producto contiene software de código abierto. Puede obtener el correspondiente código fuente completo para un periodo de tres años a partir del último envío de este producto env...
Page 143 - Requisitos de instalación; Requisitos de instalación importantes; Consideraciones acerca de la ubicación
Español Español 13 Requisitos de instalación Lea atentamente las siguientes instrucciones antes de instalar la secadora y conserve este manual para futuras consultas. ADVERTENCIA Ciertas partes eléctricas se han dejado intencionalmente desconectadas de la tierra física y pueden presentar un riesgo d...
Page 144 - Dimensiones
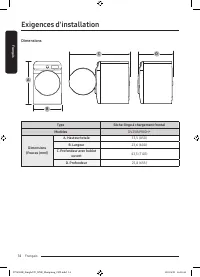
Requisitos de instalación Español 14 Español Dimensiones Tipo Secadora de carga frontal Modelos DV25B6900H* Dimensiones (Pulgadas (mm)) A. Altura total 33.5 (850) B. Ancho 23.6 (600) C. Profundidad con la puerta abierta 43.3 (1101) D. Profundidad 25.8 (655) DV6900B_SimpleUX_WEB_Heatpump_MES.indd 14 ...
Page 145 - Requisito de espacio libre
Español Español 15 Requisito de espacio libre Este requisito de espacio libre solo se aplica a las secadoras. NOTA • Para el requisito de espacio libre para lavadoras, consulte el manual del usuario de la lavadora.• En caso de que la lavadora y la secadora tengan distintos requisitos de espacio libr...
Page 147 - Requisitos eléctricos; Conexiones eléctricas
Español Español 17 Requisitos eléctricos El diagrama del cableado se encuentra en la placa debajo del panel de control o en el armazón posterior. ADVERTENCIA • La conexión inadecuada del conductor de conexión a tierra del equipo puede generar el riesgo de descarga eléctrica. Consulte a un electricis...
Page 148 - Riesgo de descarga eléctrica
Requisitos de instalación Español 18 Español . Modelos eléctricos – Sólo EE.UU. La mayor parte de las secadoras estadounidenses requieren un servicio eléctrico aprobado de CA de 120 / 240 voltios, 60 Hz. Algunas requieren un servicio eléctrico aprobado de 120 / 208 voltios, 60 Hz. Los requisitos del...
Page 149 - Instalación; Componentes
Español Español 19 Instalación La instalación de la secadora debe estar a cargo de un técnico calificado. El instalador será responsable de conectar la secadora a la fuente de alimentación principal y a la vez de cumplir con las normas de seguridad correspondientes de su zona. Componentes Asegúrese ...
Page 151 - Instalación paso a paso; PASO 1; PASO 2
Español Español 21 Instalación paso a paso Asegúrese de que un técnico calificado instale la secadora. A continuación aparecen unas instrucciones paso a paso de la instalación.• No retire la película protectora de la puerta antes de finalizar la instalación del producto. Si retira la película protec...
Page 154 - PASO 3
Instalación Español 24 Español PASO 3 Nivele la secadora Para garantizar un desempeño óptimo, la secadora debe estar nivelada. A B Con un nivel (A) , verifique si la secadora está nivelada de lado a lado y de adelante hacia atrás. Si la lavadora no está nivelada, gire la pata niveladora (B) hacia l...
Page 155 - PASO 4; Guía de los conductos de drenaje; Conductos
Español Español 25 PASO 4 Verificación final Una vez finalizada la instalación, confirme que:• La secadora está enchufada a un tomacorriente y está conectada a tierra correctamente.• Los conductos de drenaje están conectados y se colocó cinta a las uniones.• Usted usó conducto rígido o flexible con...
Page 156 - Cambio de dirección del conducto de drenaje (opcional); Ventilación lateral
Instalación Español 26 Español Cambio de dirección del conducto de drenaje (opcional) ADVERTENCIA Antes de realizar esta instalación de drenaje, desconecte la secadora del suministro eléctrico. Use guantes para protegerse las manos y los brazos de los bordes afilados cuando trabaje dentro del gabine...
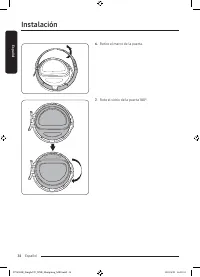
Page 158 - Ventilación inferior
Instalación Español 28 Español G 8. Cubra la abertura trasera con una tapa (G) . ADVERTENCIA Nunca deje la abertura trasera descubierta. Debe cubrirse con una tapa. Ventilación inferior A 1. Retire la placa inferior (A) . B 2. Separe el conducto de la secadora y luego retire el tornillo (B) del cond...
Page 160 - Prueba de bloqueo de la ventilación; Ejecución de la prueba de bloqueo de la ventilación
Instalación Español 30 Español F 8. Cubra la abertura trasera con una tapa (F) . ADVERTENCIA Nunca deje la abertura trasera descubierta. Debe cubrirse con una tapa. Prueba de bloqueo de la ventilación Una vez instalada la secadora, inicie la prueba de bloqueo de la ventilación para verificar si el s...
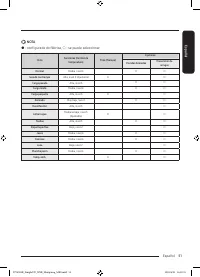
Page 161 - Códigos de verificación de la instalación
Español Español 31 - Los resultados se muestran en la pantalla durante aproximadamente 5 minutos y luego ésta se apaga en forma automática. Puede apagar los resultados de inmediato al pulsar . NOTA • Durante y luego de la prueba, el interior del tambor está caliente. Tenga cuidado para evitar quemad...
Page 167 - Antes de comenzar; Configuración inicial
Español Español 37 Antes de comenzar Antes de encender la secadora, debe saber algunas cosas. Configuración inicial • La primera vez que enciende la secadora, la pantalla muestra el proceso de configuración inicial. Para completarlo, siga las instrucciones en la pantalla. • Si completa la configurac...
Page 168 - Clasificación y carga; Filtro de pelusa
Antes de comenzar Español 38 Español Clasificación y carga • Coloque una carga de ropa en la secadora por vez.• No mezcle prendas pesadas y livianas.• Para mejorar la eficiencia de secado al secar una o dos prendas, agregue una toalla seca a la carga.• Para obtener mejores resultados, desenrede las ...
Page 169 - Panel de control
Español Español 39 Funcionamiento ADVERTENCIA Para reducir el riesgo de incendio, descarga eléctrica o lesiones, lea “ Información sobre seguridad “ antes de poner en funcionamiento el electrodoméstico. Panel de control 01 04 05 06 07 08 09 02 03 10 01 Encendido Toque para encender y apagar la secad...
Page 171 - Operar un ciclo
Español Español 41 Operar un ciclo 01 06 05 03 04 02 1. Toque para encender la secadora. 2. Gire la perilla de navegación para seleccionar el ciclo que desee. Para mayor información sobre la “ Descripción del ciclo ”, vea la página 42 . 3. Pulse Dryness (Nivel de secado) , Temp.(Temperatura) o Time ...
Page 172 - Descripción del ciclo
Funcionamiento Español 42 Español Descripción del ciclo NOTA Es posible utilizar otros ciclos después de agregarlos a la lista de ciclos, utilizando la función Mis ciclos. Para mayor información, vea la sección “ Mis ciclos ” en la página 44 . Ciclo Descripción Normal Para la mayoría de las telas, i...
Page 173 - Opciones; Uso de las opciones
Español Español 43 Opciones Uso de las opciones 02 03 01 1. Pulse Options (Opciones) . 2. Gire la perilla de navegación para seleccionar la función adicional que desee. 3. Pulse OK (ACEPTAR) para cambiar los ajustes de la función seleccionada o iniciar la función. NOTA • Para volver a la pantalla pr...
Page 174 - Prendas húmedas
Funcionamiento Español 44 Español Prendas húmedas Esta función le alerta cuando las camisas y otras prendas que requieren planchado están lo bastante secas para poderse planchar. 1. Seleccione un ciclo y cambie los ajustes de éste según se requiera. - Esta función está disponible para Normal, Carga ...
Page 175 - Seguro para niños
Español Español 45 Seguro para niños Para evitar que los niños enciendan o configuren accidentalmente la secadora, el Seguro para niños bloquea todos los botones excepto y Options (Opciones) . 1. Cierre la puerta. 2. Pulse Options (Opciones) . 3. Gire la perilla de navegación para seleccionar Seguro...
Page 176 - Ajustes; Uso de la configuración
Funcionamiento Español 46 Español Ajustes Uso de la configuración 02 03 01 * * Toque y sostenga durante tres segundos. 1. Mantenga pulsado Options (Opciones) durante 3 segundos. 2. Gire la perilla de navegación y seleccione el ajuste deseado, y luego pulse OK (ACEPTAR) . 3. Pulse OK (ACEPTAR) para c...
Page 177 - Alarma
Español Español 47 Alarma Puede activar/desactivar los sonidos de alarma. 1. Mantenga pulsado Options (Opciones) durante 3 segundos. 2. Gire la perilla de navegación para seleccionar Alarma . y, luego, pulse OK (ACEPTAR) . 3. Pulse OK (ACEPTAR) para seleccionar Encender u Apagar . - La configuración...
Page 178 - Características especiales
Funcionamiento Español 48 Español Características especiales Smart Control Puede conectarse a la aplicación SmartThings y controlar su secadora de manera remota.( Smart Control para modelos eléctricos. Conectar la secadora • Descargue e instale la aplicación SmartThings en su teléfono inteligente• T...
Page 180 - Tabla de ciclos
Funcionamiento Español 50 Español Tabla de ciclos NOTA Para obtener los mejores resultados, siga las recomendaciones sobre el tamaño de la carga para cada ciclo de secado.• Carga grande: Llene aproximadamente 3 / 4 del tambor. No agregue prendas por encima de este nivel para que puedan dar vueltas c...
Page 182 - Guía de secado
Funcionamiento Español 52 Español Guía de secado La mejor manera de secar las prendas es seguir las instrucciones de la etiqueta. Si no se brindan instrucciones de secado, consulte la siguiente tabla a modo de referencia. Elementos Descripción Cubrecamas y edredones Siga las instrucciones de la etiq...
Page 183 - Mantenimiento; Limpieza; Tambor; Tambor acabado con pintura en polvo; Sistema de drenaje
Español Español 53 Mantenimiento Mantenga la secadora limpia para lograr un mejor rendimiento y prolongar su vida útil. ADVERTENCIA Ciertas partes eléctricas se han dejado intencionalmente desconectadas de la tierra física y pueden presentar un riesgo de choque eléctrico durante el mantenimiento.Per...
Page 184 - Sensor de ventilación
Mantenimiento Español 54 Español Sensor de ventilación La secadora está equipada con un sensor de ventilación que detecta y le informa cuándo es momento de limpiar los conductos. Verifique lo siguiente si recibe el mensaje “ Revise el filtro para pelusas o el estado de la ventilación ” al encender l...
Page 185 - Solución de problemas; Verificaciones
Español Español 55 Solución de problemas Verificaciones Si tiene algún problema con la secadora, primero consulte la tabla siguiente y pruebe las sugerencias. Problema Acción La secadora no enciende. • Verifique que la secadora esté conectada. • Asegúrese de que la puerta esté adecuadamente cerrada....
Page 187 - Códigos de información
Español Español 57 Códigos de información Si la secadora no funciona bien, puede ver un código de información en el panel de la pantalla. Para determinar qué debe hacer, consulte la lista de códigos en la tabla siguiente y pruebe las sugerencias. Código de información Significado Acción La puerta es...
Page 188 - Especificaciones; Tabla de indicaciones sobre telas
Español Español 58 Especificaciones Tabla de indicaciones sobre telas Los siguientes símbolos ofrecen indicaciones acerca de las prendas. La etiqueta de indicaciones de la prenda incluye símbolos para secado, blanqueado, planchado y limpieza en seco. El uso de símbolos garantiza la consistencia entr...
Page 189 - Símbolos de advertencia para el lavado; Protección del medio ambiente
Español Español 59 Símbolos de advertencia para el lavado No lavar No retorcer No usar lejía No secar en secadora Sin vapor (agregado a la plancha) No planchar Limpiar en seco Limpiar en seco No limpiar en seco Secar colgado/tender Colgar para que escurra Secar en posición horizontal Protección del ...
Page 190 - SECADORA SAMSUNG
Español Español 60 GARANTÍA LIMITADA (ESTADOS UNIDOS) SECADORA SAMSUNG GARANTÍA LIMITADA AL COMPRADOR CONSUMIDOR ORIGINAL CON PRUEBA DE COMPRA El presente producto de la marca SAMSUNG, tal como lo provee y distribuye SAMSUNG ELECTRONICS AMERICA, INC. (SAMSUNG) y lo entrega como nuevo, en su caja de ...
Page 191 - EXCLUSIÓN DE GARANTÍAS IMPLÍCITAS
Español 61 Español La presente garantía limitada cubre defectos de fabricación de los materiales o la mano de obra encontrados durante el uso normal y doméstico de este producto y no cubrirá lo siguiente: daños que ocurran durante el envío, entrega e instalación y usos para los cuales el presente pr...
Page 193 - GARANTÍA LIMITADA PARA EL COMPRADOR ORIGINAL
Español 63 Español Garantía (CANADÁ) SECADORA SAMSUNG GARANTÍA LIMITADA PARA EL COMPRADOR ORIGINAL El presente producto de la marca SAMSUNG, tal como lo provee y distribuye SAMSUNG ELECTRONICS CANADA, INC. (SAMSUNG) y lo entrega nuevo, en su embalaje de cartón original al comprador o consumidor orig...