Page 2 - Contents; Disposal Information
Contents Congratulations! Thank you for choosing one of our appliances. Before you use the appliance, we strongly recommend that you read through the whole user manual which provides important safety instructions and description of the product and the proper use of its functions. To avoid the ever-p...
Page 3 - Important Safety Instructions
1 Important Safety Instructions Please read these operating instructions carefully. 1. Installation and repair should always be performed by an authorised service. The manufacturer and suppliershall not be held responsible for operations performed by unauthorized persons. 2. The oven should be used ...
Page 4 - Electrical Safety; WARNING
2 Important Safety Instructions 1. Food can spill when foot of oven is dismantled or gets broken, be careful. It may cause personal injuries. 2. During usage, the internal and external surfaces of the oven get hot. As you open the oven door, step back to avoid the hot vapour coming out from the inte...
Page 5 - Gas Safety
3 Important Safety Instructions Gas Safety 1. This appliance is not connected to burning products evacuation apparatus. This appliance must be connectedand installed according to the installation regulations in force. Conditions regarding ventilation must beconsidered. 2. When a gas cooking applianc...
Page 6 - Product Information
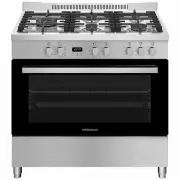
4 Product Information 12 13 14 15 16 1. Oven control knobs 9. Lamp 2. Hob control knobs 10. Grill 3. Wire grill 11. Deep tray 4. Deep tray 12. Large burner 5. Door 13. Middle burner 6. Handle 14. Auxiliary burner 7. Lower cabinet door 15. WOK burner 8. Plastic leg 16. Hot plate
Page 7 - Technical Data; Burner
5 Technical Data Specifications 90x60 Outer width 900 mm Outer depth 610 mm Outer height 925 mm Lamp power 15-25 W Bottom heating element 2000 W Top heating element 1500 W Grill heating element 2500 W / 3250 W Turbo heating element 1250 W x 2 Supply voltage 220-240V AC/380-415V AC 50/60 Hz Hot plate...
Page 8 - Accessories
6 Accessories Deep tray Used for pastries, deep fried foods and stew recipes. In case of frying directly on the grill for cakes, frozen foods and meat dishes, it can be used as an oil catchment tray. Wire grill Used for frying and/or placing the foods to be baked, fried and frozen on the desired rac...
Page 9 - Installation Instructions; Electrical Connection; Gas Connection
7 Installation Instructions Electrical Connection 1. Your oven requir es 16 or 32 Ampere fuse according to the appliance’s power. If necessary, installation by a qualified electrician is recommended. 2. Your oven is adjusted in compliance with 220-240V AC/380-415V AC 50/60Hz. electric supply. If the...
Page 10 - For LPG Connection; NOTE; For Natural Gas Connection; Gas hose passage way
8 Installation Instructions For LPG Connection For LPG (cylinder) connection, affix a metal clamp on the hose coming from LPG cylinder. Affix an edge of the hose on hose inlet connector behind the appliance by pushing to end through heating the hose in boiled water. Afterward, bring the clamp toward...
Page 11 - Changing the Nozzle; Figure 3; Ventilation of Room; Room size; Reduced Gas Flow Rate Setting for Hob Taps
9 Installation Instructions Changing the Nozzle 1. Use a screwdriver to remove and install the nozzle as in Figure 3. 2. Remove the nozzle (figure 4) from the burner with nozzle driver and install a new nozzle (Figure 5). Figure 3 Figure 4 Figure 5 Ventilation of Room This product requires adequate ...
Page 12 - Right Place for Installation and Important Warnings
10 Installation Instructions Check that the appliance has been properly connected to the power supply. If the electrical installation is not suitable, call an electrician and plumber to arrange the utilities as necessary. The manufacturer and supplier shall not be held responsible for damages caused...
Page 13 - Attaching the Feet; Chain Lashing Illustration
11 Installation Instructions Attaching the Feet 1. Screw the feet into the bottom four corners of the oven. 2. You can balance your oven by turning the screwed feet according to the surface type you are using. Figure 7 Figure 8 Figure 9 Chain Lashing Illustration In order to ensure safe use before u...
Page 14 - Installation Instructionserating Instructions; Controls; Using Oven Heating Elements
12 Installation Instructionserating Instructions Controls 1. Mechanical timer 2. Thermostat 3. Function selection button 4. Front left heater 5. Rear left heater 6. Center heater (Wok burner orhotplate) 7. Rear right heater 8. Front right heater WARNING : The control panel above is only for illustra...
Page 15 - Operating Instructions; Using the Grill; To Stop the Grill; Using Gas Burners
13 Operating Instructions Using the Grill When grilling on the top rack, ensure that the food does not touch the grill. Place food in the center of the grill for best grilling results. To Start the Grill • Set the function dial to ‘Grill’. • Set the desired temperature. To Stop the Grill • Set the f...
Page 16 - Pot Sizes
14 Operating Instructions Level 1 Level 2 Level 3 Level 4 Level 5 Level 6 Ø80 mm 200 W 250 W 450 W --- --- --- Ø145 mm 250 W 750 W 1000 W --- --- --- Ø180 mm 500 W 750 W 1500 W --- --- --- Ø145 mm rapid 500 W 1000 W 1500 W --- --- --- Ø180 mm rapid 850 W 1150 W 2000 W --- --- --- Ø145 mm 95 W 155 W ...
Page 17 - Function Dial
15 Operating Instructions Function Dial This is used for determining the cooking function to be used. The cooking functions are described below. All cooking functions may not be available in all models. Rotisserie Fan Lower and upper heating elements Turbo heating and fan Lamp Lower-upper heating el...
Page 18 - Maintenance and Cleaning
16 Maintenance and Cleaning WARNING : Disconnect the appliance from the electrical supply before performing any maintenance or cleaning. 1. While the oven is operating or shortly after it starts operating, it is extremely hot. Avoid touching the heatingelements. 2. Do not use harsh cleaners such as ...
Page 19 - Installation of Oven Door; Figure
17 Maintenance and Cleaning Installation of Oven Door Figure 18 Figure 19 Figure 18.1 Completely open the oven door by pulling it towards yourself. Unlock the hinge by pulling the lock upwards with the help of a screw driver as shown in figure 18.1. Figure 18.2 Bring the hinge lock to the widest ang...
Page 20 - Cleaning And Maintenance of the Oven’s Front Door Glass
18 Maintenance and Cleaning Cleaning And Maintenance of the Oven’s Front Door Glass Remove the profile by pressing the plastic latches on both left and right sides as shown in figure 20 and pulling the profile towards yourself as shown in figure 21. Then remove the inner-glass as shown in figure 22....
Page 21 - Changing the Lamp; Type G9 Lamp
19 Changing the Lamp WARNING : Disconnect the appliance from the power supply and ensure that it is cold before changing the lamp. • Unscrew the glass protective cover. • Remove the lamp by turning it; install a new lamp with the same specifications. • Reinstall glass protective cover, plug the powe...
Page 22 - Troubleshooting; Problem
20 Troubleshooting You may solve the problems you may encounter with your product by checking the following points before calling the technical service. Problem Possible Cause What to Do Oven does not operate. Power supply not available. Check for power supply. Gas supply not available. Check if mai...