Page 2 - Contents; Disposal Information
Contents Congratulations! Thank you for choosing one of our appliances. Before you use the appliance, we strongly recommend that you read through the whole user manual which provides important safety instructions and description of the product and the proper use of its functions. To avoid the ever-p...
Page 3 - Important Safety Instructions; cooking and even damage the enamel.
1 Important Safety Instructions This User Instruction Manual contains important information, including safety & installation points, which will enable you to get the most out of your appliance. Please keep it in a safe place so that it is easily available for future reference; for you or any per...
Page 5 - Installation; Final check
3 Installation The oven should be installed into a purpose built cabinet. Ensure that there is adequate space between the sides of the oven and the walls of the cabinet for ventilation (see the image below for details). Surfaces, synthetic laminates and adhesives used must be heat resistant (100°C...
Page 6 - Electrical Connection; LOCAL AUTHORITY REQUIREMENTS; WARNING
4 Installation Electrical Connection LOCAL AUTHORITY REQUIREMENTS Installation is only permitted by a licensed electrician and carried out according to instructions provided by the manufacturer. Incorrect installation might cause harm and damage, for which the manufacturer accepts no responsibility....
Page 7 - Inserting accessories; Note; Oven Pan
5 Installation The accessories supplied with your appliance are suitable for making many different types of meals. Ensure that you always insert the accessories into the cooking compartment in the correct orientation. Inserting accessories You can insert the accessories into the cooking compartment ...
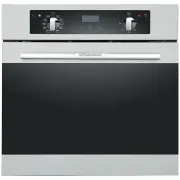
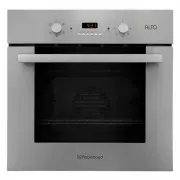
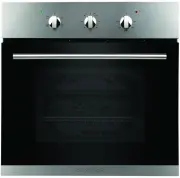
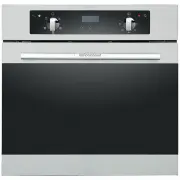
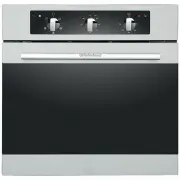
Page 8 - Operating Instructions; Control Panel
6 Operating Instructions Control Panel RHBO65DX RHBO610DX RHBO68DB
Page 9 - Function selector; FAN AND BOTTOM ELEMENT:; ENERGY SAVING GRILLING MODE:
7 Operating Instructions Function selector Use the function selector to select the desired cooking function. There are five functions available for RHBO65DX: OVEN LIGHT: Press to turn interior light on and off. DEFROST: The fan runs without heat to reduce the defrosting time of frozen foods. The tim...
Page 11 - Function Icon Instruction; Before Using the Oven for the First Time; Heating the Oven
9 Operating Instructions Control Panel Function Icon Instruction Icons Function Minus button Plus button/ audible signal selecting key Program button Display screen icon instruction Icons Function Icons Function 1 “Auto” function symbol 4 Clock symbol 2 Oven in use symbol 5 Display the time, can dis...
Page 12 - Timer Working Status; Function to be selected status:; Timer Function Mode Switching
10 Operating Instructions Timer Working Status Switching the timer status The timer has 3 status, they are standby, function to be selected and working status. Stand-by status: After connected to the power supply, the display screen displays the system time, the decimal point symbol flashes, it is t...
Page 13 - Power On
11 Operating Instructions Power On For the first time, the buzzer “beep” for once to show that the timer enters into the standby state. The clock shows the time of the system and starts the timing. Power-on displays as “0·00”, the display screen displays the system time, the decimal point symbol “ ”...
Page 14 - Alarm Clock Setting Function
12 Operating Instructions Alarm Clock Setting Function In the state of function to be selected, when the display shows the system time, oven in use symbol“ ” and decimal point symbol “ ” keep bright, press “ ” twice, then the clock icon“ ”twinkles, and the screen display changes to the alarm clock t...
Page 15 - Cooking Time Setting Function; Note 2
13 Operating Instructions Cooking Time Setting Function In the state of function to be selected, press button“ ” 3 times, then the icon “AUTO” and oven in use symbol icon “ ” twinkle. The screen shows the cooking time ( First set default display “0·00” ) ,cooking time and decimal point symbol “ ” ke...
Page 16 - Cooking End Time Setting Function; can
14 Operating Instructions Cooking End Time Setting Function In the state of function to be selected, press button “ ” 4 times, then icon “AUTO” and oven in use symbol “ ”twinkle, display screen shows cooking end time ( The first setting shows the current system time by default ) ,cooking end time an...
Page 17 - Cooking Reservation Function; Pic 26 Reservation function well set state; Cooking time setting range is within 10 hours.
15 Operating Instructions Cooking Reservation Function In the state of function to be selected, user can reserve the cooking time, by setting how much time to cook and when to have the dish ready. First, press button “ ” 3 times, then the icon “AUTO” and oven in use symbol icon“ ”twinkle. The screen...
Page 18 - Selecting the audible signal
16 Operating Instructions Selecting the audible signal The audible signal has 3 tones. To adjust the signal you should proceed as follows: Under standby mode, that is when display screen shows system time, decimal point symbol “ ” twinkling, audible signal can be adjusted by pressing the plus button...
Page 19 - Cooking Guide; Baking Tips
17 Operating Instructions Cooking Guide Baking Tips 1 、 How to establish whether sponge cake is baked through. Approximately 10 minutes before the end of the baking time specified in the recipe, stick a cocktail stick into the cake at the highest point. If the cocktail stick comes out clean, the cak...
Page 20 - Grilling Tips
18 Operating Instructions Grilling Tips When grilling, preheat the oven for approx. 4 minutes, before placing the food into the cooking compartment. Always grill with the oven door closed. As far as possible, the pieces of food you are grilling should be of equal thickness. This will allow them ...
Page 21 - Foods; Whole fish; layer
19 Operating Instructions Baking and Grilling Table Foods Accessory Heating function Rack place Temperature setting ( ℃ ) Heating time ( Mins ) Cake Round model 2 nd layer 140-160 30-45 Bread Bake Pan 2 nd layer 180-200 10-20 Bake Pan 3 rd layer 170-190 10-20 Bake Pan 3 rd +1 st layer 160-180 10-20 ...
Page 22 - Cleaning and Maintenance; NOTE; Cleaning the oven exterior:; Install the oven door
20 Cleaning and Maintenance NOTE : Cleaning and maintenance operations must only be carried out when the oven is cool. The appliance should be disconnected from the power outlet or turned off at your isolation switch before commencing any cleaning process. Cleaning the oven exterior: Before starting...
Page 23 - Remove and install door panel; Remove; If the glass has some scratches, it may lead to crack.; Install
21 Cleaning and Maintenance Remove and install door panel Remove Remove oven door, put it on a piece of cloth. Using one hand to push the outside glass, the other hand to pull the inside glass, hold the glass then pull out the glass. Notice! Dangerous! If the glass has some scratches, it may lea...
Page 24 - Replacing the Oven Lamp; Lamp Details
22 Cleaning and Maintenance Replacing the Oven Lamp If the oven lamp fails, it must be replaced. Warning: Disconnect the oven from the power source before replacing the lamp. Danger of electric shock. Disconnect the oven from the power source. Unscrew the glass cover by turning it anti-clockwise...
Page 25 - Troubleshooting; Problem
23 Troubleshooting When first using your oven, it may emit a particular smell or some smoke. This is normal. Please refer to the ‘Before Using the Oven for the First Time’ section for instructions on how to properly start using your oven for the first time. Use the below table to check for solutions...