Page 2 - Connection; Precautions; Precautions before
2 En • The navigation features of this product (and the rear view camera option if purchased) are intended solely to aid you in the operation of your vehicle. It is not a substitute for your attentiveness, judgement and care when driving. • Never use this product to route to hospitals, police statio...
Page 3 - Before installing this; Power cord
3 En En glis h • Use this unit with a 12-volt battery and negative earthing only. Failure to do so may result in a fire or malfunction. • To avoid shorts in the electrical system, be sure to disconnect the (–) battery cable before installation. WARNING • Use speakers over 50 W (maximum input power) ...
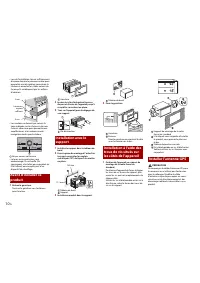
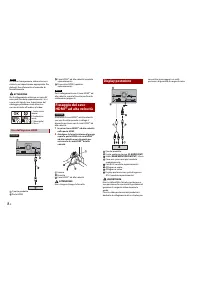
Page 7 - External video; Securing the High
7 En En glis h This product Red, white ( AUDIO INPUT ) 23 cm Yellow ( VIDEO INPUT ) 23 cm RCA cable (sold separately) To audio input To video input External video component (sold separately) NOTE The appropriate setting is required to use the external video component. For details, refer to the Opera...
Page 8 - Installation
8 En This product Rear audio output ( R. AUDIO OUT ) Yellow ( REAR MONITOR OUTPUT ) 30 cm Mini pin plug cable (sold separately) RCA cables (sold separately) To audio input To video input Rear display with RCA input jacks (sold separately) WARNING NEVER install the rear display in a location that ena...
Page 10 - Installation using the screw
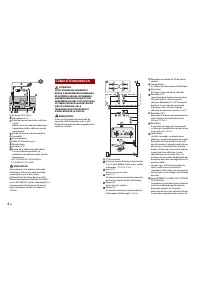
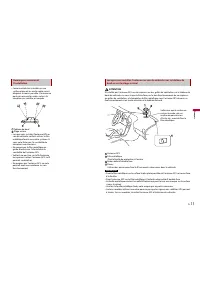
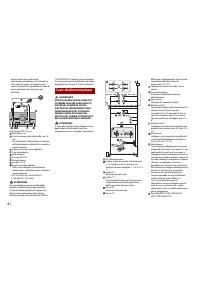
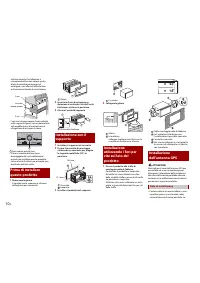
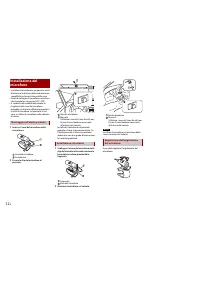
10 En Groove Attach the trim ring with the side with a groove facing downward. 1 Fastening this product to the factory radio-mounting bracket. Position this product so that its screw holes are aligned with the screw holes of the bracket, and tighten the screws at three locations on each side. Use ei...
Page 11 - Installing the
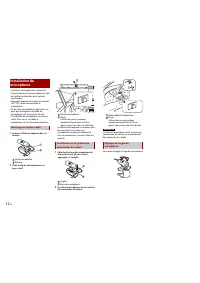
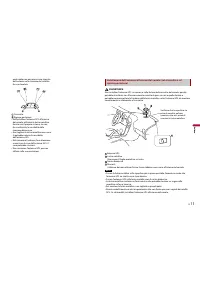
11 En En glis h WARNING Do not install the GPS aerial over any sensors or vents on the dashboard of the vehicle, as doing so may interfere with the proper functioning of such sensors or vents and may compromise the ability of the metal sheet under the GPS aerial to properly and securely affix to the...
Page 12 - After installation; After installing this
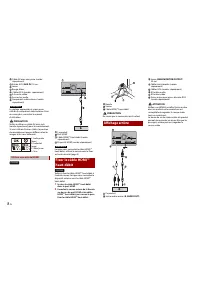
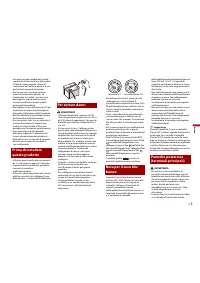
12 En Double-sided tape Clamps Use separately sold clamps to secure the lead where necessary inside the vehicle. NOTE Install the microphone on the steering column, keeping it away from the steering wheel. The microphone angle can be adjusted. Adjusting the microphone angle 1 Reconnect the negative ...
Page 14 - Connexion; Précautions; Précautions avant de
2 Fr • Les fonctions de navigation de ce produit (et la caméra de recul en option, si vous en possédez une) sont uniquement destinées à vous assister lors de la conduite de votre véhicule. Elles ne remplacent pas votre vigilance, appréciation et prudence lorsque vous conduisez. • N’utilisez jamais c...
Page 16 - Câble d’alimentation
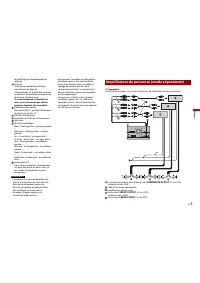
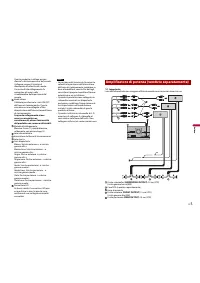
4 Fr Antenne GPS 3,55 m Microphone 3 m Câble de conversion de Bus véhicule 13 cm*. Référez-vous au mode d’emploi pour l’adaptateur de Bus véhicule (vendu séparément). Entrée d’antenne radio numérique* Ce produit Prise d’antenne Câble AV d’entrée/sortie Alimentation Fusible (10 A) Entrée de la téléco...
Page 17 - Amplificateur de puissance (vendu séparément)
5 Fr Fr an ça is de l’affichage de l’emplacement du véhicule. Vert clair Ce fil permet de détecter l’état de marche/arrêt du frein de stationnement. Ce fil doit être raccordé au côté de l’alimentation du contacteur du frein de stationnement. Si ce raccordement est mal fait ou omis, vous ne pourrez p...
Page 18 - smartphone
6 Fr Sortie des médiums (NW ) Jaune/noir (MUTE) Si vous utilisez un équipement muni d’une fonction de désactivation du son, branchez ce fil au fil de désactivation du son de cet équipement. Dans le cas contraire, ne raccordez pas le fil de désactivation du son. Ce produit Télécommande du système Rac...
Page 19 - Smartphone; Caméra; Composant vidéo externe
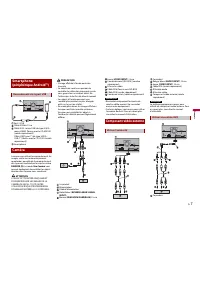
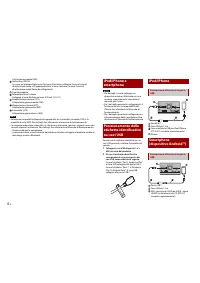
7 Fr Fr an ça is Port 2 USB Câble USB de 1,5 m Câble USB - micro USB (de type USB A - micro USB B) (fourni avec le CD-MU200 (vendu séparément)) Câble USB Type-C® (de type USB A - USB-C®) (fourni avec le CD-CU50 (vendu séparément)) Smartphone Lorsque vous utilisez la caméra de recul, les images vidéo...
Page 20 - Fixer le câble HDMITM; Affichage arrière
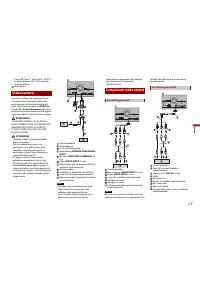
8 Fr Câble AV avec mini-prise (vendu séparément) Entrée AUX ( AUX IN ) 15 cm Jaune Rouge, blanc Câbles RCA (vendus séparément) À la sortie vidéo Aux sorties audio Composant vidéo externe (vendu séparément) REMARQUE Le réglage approprié est requis pour utiliser un composant vidéo externe. Pour en sav...
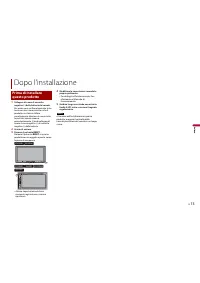
Page 25 - Après l’installation; Une fois ce produit
13 Fr Fr an ça is 1 Rebranchez la borne négative (-) de la batterie du véhicule. Tout d’abord, vérifiez par deux fois que tous les branchements sont bons et que ce produit est installé correctement. Réunissez tous les composants du véhicule que vous avez retirés précédemment. Puis branchez le câble ...
Page 26 - Connessione
2 It • Le funzionalità di navigazione di questo prodotto (e l’opzione della telecamera per la retromarcia, se acquistata) hanno l’unico scopo di assistenza per la guida del proprio veicolo. Non sostituiscono l’attenzione, le valutazioni e la cura necessarie alla guida. • In caso di emergenza, non ut...
Page 28 - Cavo di alimentazione
4 It anche da persone diverse dal conducente, potrebbe essere illegale. In caso siano in vigore, tali regolamenti vanno rispettati e la riproduzione video di questo prodotto non dovrà essere utilizzata. Antenna GPS 3,55 m Microfono 3 m Cavo di conversione Vehicle Bus da 13 cm*. Far riferimento al Ma...
Page 29 - Amplificatore di potenza (venduto separatamente)
5 It It al ia no Questo prodotto si collega qui per rilevare la distanza percorsa dal veicolo. Collegare sempre il circuito di rilevamento di velocità del veicolo. L’assenza di tale collegamento fa aumentare gli errori nella visualizzazione della posizione del veicolo. Verde chiaro Utilizzato per ri...
Page 31 - Videocamera; Componenti video esterni
7 It It al ia no Cavo USB Type-C® (tipo USB A - USB-C®) (in dotazione con CD-CU50 (venduto separatamente)) Smartphone Quando si utilizza una videocamera per vista posteriore, l’immagine della vista posteriore passa automaticamente dal video spostando il cambio su RETRO (R) . La modalità Vista videoc...
Page 32 - Fissaggio del cavo; Display posteriore
8 It NOTA Per usare il componente video esterno, è richiesta un’impostazione appropriata. Per dettagli, fare riferimento al manuale di funzionamento. ATTENZIONE Per il collegamento utilizzare un cavo AV mini-jack (venduto separatamente). Se si usano altri tipi di cavo, la posizione del cablaggio pot...
Page 33 - Installazione
9 It It al ia no ATTENZIONE • Non installare mai il prodotto in luoghi dove o in maniera che: – possa ferire il conducente o i passeggeri se il veicolo si arresta improvvisamente. – possa interferire nella guida del veicolo, come ad esempio sul pavimento davanti al sedile del conducente o vicino al ...
Page 37 - Dopo l’installazione; Prima di installare
13 It It al ia no 1 Collegare di nuovo il morsetto negativo (-) della batteria del veicolo. Per prima cosa verificare bene che tutte le connessioni siano corrette e che il prodotto sia stato installato correttamente. Montare di nuovo tutte le parti del veicolo rimosse precedentemente. Quindi collega...
Page 38 - Conexión; Precauciones; Precauciones antes de
2 Es • Las características de navegación de este producto (y la opción de cámara de visión trasera, en caso de haberla adquirido) tienen como único objetivo ayudarle en la operación de su vehículo. No son un sustituto de su atención, juicio y cuidado durante la conducción. • Nunca use este producto ...
Page 39 - Antes de instalar este; Aviso sobre el cable
3 Es Es pa ño l cortocircuito o un error de funcionamiento y dañar permanentemente el producto. • No corte el cable de la antena GPS para acortarlo ni use una extensión para alargarlo. Alterar el cable de la antena puede ocasionar cortocircuitos o fallos de funcionamiento. • No acorte ningún cable. ...
Page 40 - Cable de alimentación
4 Es Antena GPS de 3,55 m Micrófono de 3 m Cable de conversión de bus del vehículo de 13 cm*. Consulte el manual de instrucciones para el adaptador de bus del vehículo (vendido por separado). Entrada de antena Digital Radio* Este producto Toma de antena Entrada/Salida del cable AV Fuente de alimenta...
Page 41 - Amplificador de potencia (vendido por separado)
5 Es Es pa ño l recorre. Conecte siempre el circuito de detección de velocidad del vehículo. De no realizar esta conexión, se incrementarían los errores de visualización de la ubicación del vehículo. Verde claro Se utiliza para detectar el estado de conexión/desconexión del freno de estacionamiento....
Page 43 - Componente de vídeo
7 Es Es pa ño l Puerto USB 2 Cable USB de 1,5 m Cable USB - micro USB (Tipo USB A - micro USB B) (suministrado con el CD- MU200 (vendido por separado)) Cable USB Type-C® (Tipo USB A - USB- C®) (suministrado con el CD-CU50 (vendido por separado)) Smartphone Cuando se utiliza una cámara de visión tras...
Page 44 - Fijación del HDMITM de
8 Es Este producto Cable AV minijack (vendido por separado) Entrada AUX ( AUX IN ) de 15 cm Amarillo Rojo, blanco Cables RCA (vendido por separado) A la salida de vídeo A las salidas de audio Componente de vídeo externo (vendido por separado) NOTA Para utilizar el componente de vídeo externo, es pre...
Page 45 - Instalación; Precauciones previas a
9 Es Es pa ño l La salida de vídeo trasera de este producto sirve para conectar una pantalla que permite a los pasajeros de los asientos traseros ver la fuente de vídeo. PRECAUCIÓN • Nunca instale este producto en lugares en los que puedan darse las situaciones siguientes: – Pudiese dañar al conduct...
Page 47 - Instalación utilizando
11 Es Es pa ño l 3 Instale este producto en el soporte. Salpicadero 4 Coloque el anillo embellecedor. Anillo embellecedor Ranura Coloque el anillo embellecedor con el lado que tiene una ranura mirando hacia abajo. 1 Fije este producto al soporte de montaje de radio de fábrica. Coloque este producto ...
Page 48 - Instalación del
12 Es ADVERTENCIA No instale la antena GPS sobre sensores o aberturas de ventilación en el salpicadero del vehículo, ya que de hacerlo podría interferir en el correcto funcionamiento de dichos sensores o ventilación y afectar a la capacidad de la lámina de metal bajo la antena GPS de fijarse al salp...
Page 49 - Después de la instalación; Después de la
13 Es Es pa ño l Cinta de doble cara Abrazaderas Utilice abrazaderas (se venden por separado) para fijar el cable en el interior del vehículo donde sea necesario. NOTA Instale el micrófono en la columna de dirección, alejado del volante. Es posible ajustar el ángulo del micrófono. Ajuste del ángulo ...
Page 50 - Anschluss; Vorsichtsmaßnahmen; Vor dem Anschließen des
2 De • Die Navigationsfunktionen dieses Produkts (und die Heckkameraoption, sofern erworben) sind ausschließlich dafür vorgesehen, Sie beim Betrieb Ihres Fahrzeugs zu unterstützen. Sie stellen keinen Ersatz für Ihre Aufmerksamkeit, Ihr Urteilsvermögen und Ihre Sorgfalt beim Fahren dar. • Verwenden S...
Page 51 - Vor dem Einbau dieses; weißen Kabel
3 De De ut sc h installieren, dass sie die Fahrt nicht blockieren oder behindern. • Es muss sichergestellt sein, dass die Kabel nicht die Bedienung von beweglichen Fahrzeugteilen, insbesondere des Lenkrads, des Schalthebels, der Handbremse, der Sitzführungsschienen, der Türen und der Bedienelemente ...
Page 55 - Externe
7 De De ut sc h USB-Anschluss 2 USB-Kabel 1,5 m USB-Micro-USB-Kabel (Typ USB A - Micro-USB B) (mit CD-MU200 geliefert (separat erhältlich)) USB Type-C®-Kabel (Typ USB A - USB-C®) (im Lieferumfang des CD-CU50 enthalten (separat erhältlich)) Smartphone Wenn Sie die Heckkamera nutzen, wechselt das Vide...
Page 57 - Vor der Installation zu
9 De De ut sc h vorgesehen, auf dem Passagiere auf den hinteren Sitzen ein Video ansehen können. VORSICHT • Dieses Produkt niemals so einbauen, dass: – Der Fahrer oder Beifahrer bei einem plötzlichen Bremsmanöver verletzt werden könnte. – Der Fahrer beim Führen des Fahrzeugs behindert wird, wie beis...
Page 60 - Einbau des Mikrofons
12 De WARNUNG Installieren Sie die GPS Antenne nicht über Sensoren oder Lüftungsöffnungen auf dem Armaturenbrett des Fahrzeugs, da dies die ordnungsgemäße Funktion solcher Sensoren oder Lüftungen stören und die einwandfreie und sichere Haftungsfähigkeit des Blechs unter der GPS Antenne am Armaturenb...
Page 61 - Nach dem Einbau
13 De De ut sc h Kabelklemmen Sichern Sie das Kabel je nach Bedarf mit getrennt erhältlichen Kabelklemmen im Fahrzeuginnenraum. HINWEIS Installieren Sie das Mikrofon an der Lenksäule in ausreichendem Abstand zum Lenkrad. Der Mikrofonwinkel kann angepasst werden. Anpassen des Mikrofonwinkels 1 Schlie...
Page 62 - Aansluiten
2 Nl • De navigatiefuncties van dit product (en de optionele achteruitkijkcamera als u die heeft aangeschaft) zijn uitsluitend bedoeld om u te assisteren bij het besturen van uw voertuig. Het is geen vervanging voor uw oplettendheid, oordeel en verantwoordelijkheid tijdens het rijden. • Gebruik dit ...
Page 63 - Voordat dit product; Opmerking voor de
3 Nl Neder lan ds het geen belemmering vormt voor het veilig besturen van het voertuig. • Zorg ervoor dat de kabels en de bedrading geen bewegende onderdelen van het voertuig in de weg zitten of daarin bekneld of verstrikt raken, vooral het stuurwiel, de parkeerrem, de versnellingspook, deuren of an...
Page 64 - Stroomkabel
4 Nl voertuig door personen anders dan de chauffeur zelfs al strafbaar zijn. Waar dergelijke wet- en regelgeving geldt, moet deze nageleefd worden en dient de videobron van dit product niet gebruikt te worden. GPS antenne 3,55 m Microfoon 3 m Voertuig-busconversiekabel 13 cm*. Raadpleeg de gebruiksa...
Page 67 - Extern videocomponent
7 Nl Neder lan ds USB-aansluiting 2 USB kabel 1,5 m USB - micro USB-kabel (Type USB A - micro USB B) (meegeleverd met CD- MU200 (apart verkocht)) USB Type-C® kabel (type USB A - USB- C®) (meegeleverd bij CD-CU50 (apart verkrijgbaar)) Smartphone Wanneer u de achteruitkijkcamera gebruikt, dan wisselt ...
Page 68 - hogesnelheidskabel
8 Nl Dit product Kabel voor AV ministekker (apart verkocht) AUX ingang ( AUX IN ) 15 cm Geel Rood, wit RCA-kabels (apart verkocht) Naar video-uitgang Naar audio-uitgangen Extern video-onderdeel (apart verkocht) OPMERKING Voor het gebruik van een extern video- onderdeel is een bepaalde instelling ver...
Page 69 - Installatie; Voorzorgsmaatregelen
9 Nl Neder lan ds De uitgang van dit product voor video achter is voor het aansluiten van een beeldscherm zodat passagiers achterin een video kunnen bekijken. LET OP • Monteer dit product nooit op plaatsen waar, of op een manier waardoor: – De bestuurder of de passagiers letsel kunnen oplopen als he...
Page 71 - Installatie met behulp; antenne
11 Nl Neder lan ds Dashboard Houder 3 Schuif dit product in de houder. Dashboard 4 Monteer de sierrand. Sierrand Gleuf Bevestig de sierrand met de kant met de gleuf erin naar beneden gericht. 1 Bevestig dit product aan de standaard montagebeugel. Breng dit product zodanig in positie dat de schroefga...
Page 72 - De microfoon
12 Nl WAARSCHUWING Plaats de GPS-antenne niet boven sensoren of ventilatieroosters op het dashboard van het voertuig omdat dit de juiste werking van dergelijke sensoren of roosters kan aantasten en de metalen plaat onder de GPS-antenne ook niet goed en stevig op het dashboard kan worden gemonteerd. ...
Page 73 - Na installatie; Nadat dit product
13 Nl Neder lan ds Dubbelzijdig plakband Klemmen Gebruik apart verkrijgbare klemmen om de draad waar nodig in het voertuig vast te klemmen. OPMERKING Monteer de microfoon op de stuurkolom, maar zorg dat de microfoon de werking van het stuur niet hindert. De hoek van de microfoon kan worden aangepast...