Page 2 - After you have finished reading the instructions, keep this man-; Before You Start; Contents
Black plate (2,1) Thank you for buying this Pioneer product. Please read through these operating instructions so you will know how to operateyour model properly. After you have finished reading the instructions, keep this man- ual in a safe place for future reference. Before You Start Information to...
Page 3 - English
Black plate (3,1) Initial Settings Entering PIN code for Bluetooth wireless connection 24 Operating with different head units Using as an external unit 25 Function compatibility charts 26 – Head unit group 1 26 – Head unit group 2 28 – Head unit group 3 29 – Head unit group 4 30 Connecting a cellula...
Page 4 - Information to User; Reorient or relocate the receiving antenna.; For Canadian model
Black plate (4,1) Information to User FCC ID: AJDK013MODEL NO.: CD-BTB100IC: 775E-K013This device complies with Part 15 of FCC Rulesand RSS-Gen of IC Rules. Operation is subjectto the following two conditions: (1) this devicemay not cause interference, and (2) this devicemust accept any interference...
Page 5 - About this unit; Wash hands; CAUTION; Protect this unit from moisture.; Operating environment; Using as an external unit; In case of trouble
Black plate (5,1) About this unit This unit is the adapter for a Pioneer head unitto connect cellular phone featuring Bluetoothwireless technology for hands-free and listento songs on Bluetooth audio player. ! This unit is designed to use only in a vehi-cle. WARNING: For U.S. models Handling the cor...
Page 6 - Pressing
Black plate (6,1) About Bluetooth Bluetooth is a short-range wireless radio con-nectivity technology that is developed as acable replacement for mobile phones, hand-held PCs and other devices. Bluetooth oper-ates in 2.4 GHz frequency range and transmitsvoice and data at speeds up to 1 megabit persec...
Page 7 - Registering connected cellular phone
Black plate (7,1) 2 Press RESET with a pen tip or other pointed instrument. All memory is now completely cleared. # It takes about 10 seconds to delete the data. To make it sure, leave the ignition switch ACC orON position for 10 seconds after you operate thedeletion. # Please confirm if all data ha...
Page 8 - ab; Important; Shows which source has been selected.; Notes; Bluetooth Telephone
Black plate (8,1) Hands-free phoning withcellular phones featuringBluetooth wireless technology 9 8 7 6 4 3 2 1 5 ab If your cellular phone features Bluetooth wire-less technology, you can use this adapter toconnect to a Pioneer head unit for hands-free,wireless calls, even while driving. Important ...
Page 9 - About the telephone source; Standby mode; Touch the source icon and then touch
Black plate (9,1) ! The line-of-sight distance between this unitand your cellular phone must be 10 meters orless for sending and receiving voice and datavia Bluetooth wireless technology. However,the transmission distance may become short-er than the estimated distance, depending onthe environment i...
Page 10 - Making a phone call; Voice recognition; If your cellular phone does not feature voice; Taking a phone call; Answering an incoming call; Even when a source other than; If the private mode is selected on the cellular; Rejecting an incoming call; Setting the automatic re-; Note
Black plate (10,1) Basic operation of hands-free phoning These are the basic operations to use hands-free phoning via Bluetooth wireless technol-ogy. More advanced hands-free phoning op-erations are explained starting on Introduction of advanced hands-free phoning operation on the next page. Importa...
Page 11 - Shows the function names.; AV MENU
Black plate (11,1) Answering a call waiting If while you are talking on the phone anothercall comes in, the number (or name if it is inyour phone book) of the new caller appears onthe display to signal that you have a call wait-ing. You can put the first caller on hold whileyou answer the call waiti...
Page 12 - Connecting a cellular phone; Registering connected cellular; NOT FOUND; Putting the unit in; Entering PIN code for Bluetooth wireless con-
Black plate (12,1) Connecting a cellular phone To use a phone wirelessly with this unit, it isnecessary first to establish a connection usingBluetooth wireless technology. There are sev-eral ways you can do this. ! Connection is normally established by HFP,which gives you a full control of functions...
Page 13 - Disconnecting a cellular phone; After the disconnection is completed,; If the assignment is empty, the device name is; Deleting a registered phone; A confirmation display appears. Touch; It takes about 10 seconds to delete the data.
Black plate (13,1) Disconnecting a cellular phone When you are done using your phone with thisunit, you can close the Bluetooth wireless con-nection. 1 Touch PHONE CONNECT on the function menu. 2 Touch DISCONNECT to disconnect the currently connected cellular phone fromthis unit. After the disconnec...
Page 14 - To turn automatic connection off, touch; Using the Phone Book; s display and select
Black plate (14,1) Connecting to a registeredcellular phone Once your phone is registered with this unit itis a simple matter to establish a Bluetoothwireless connection, either manually by select-ing a registration assignment, or automaticallywhen a registered phone is within range. Connecting to a...
Page 15 - The Phone Book Transfer is now on standby.; While transferring the phone book, hourglass; Display order for the Phone Book is changed.; To change to the other display order, touch
Black plate (15,1) Transferring entries to thePhone Book To populate the Phone Book you can transferthe numbers in a registered user phone ’ s ad- dress book.The Phone Book can hold a total of 500 en-tries; 300 from User 1, 150 from User 2, and 50from User 3. ! Once the transferring Phone Book funct...
Page 16 - Calling a number in the
Black plate (16,1) 2 Touch a Phone Book entry you want to call. The display is switched to the Phone Book editdisplay. # Touch PREV or NEXT to display other phone book entries. 3 Touch phone number of the Phone Book entry you want to call. If several phone numbers are entered to anentry, touch one y...
Page 17 - Editing phone numbers; Calling a number in; CLEAR; Clearing a Phone Book entry; Clearing memor y; Clearing memory; CLEAR ALL
Black plate (17,1) 5 Touch a letter to enter. # To delete a character and leave a space, touch . 6 Touch MEMORY to store the new name. Editing phone numbers You can edit the phone numbers of PhoneBook entries. 1 Touch PHONE BOOK to display the Phone Book. 2 Select a Phone Book entry you want to edit...
Page 18 - CANCEL; Using the Call History; Displaying the Call History; Touching; PREV; Using preset numbers; Assigning preset numbers
Black plate (18,1) # It takes about 10 seconds to delete the data. To make it sure, leave the ignition switch ACC orON position for 10 seconds after you operate thedeletion. # If you do not want to clear memory that you have selected, touch CANCEL . Using the Call History The 12 most recent calls ma...
Page 19 - Recalling preset numbers; Preset numbers; Switching the ring tone; RING TONE
Black plate (19,1) # Up to 30 phone numbers (six phone numbers for each of the three registered phones and twoguest phones) can be stored in memory. Recalling preset numbers You can easily recall the preset phone num-bers. 1 Touch LIST to display preset numbers P 1-P 6. Preset numbers P 1-P 6 appear...
Page 20 - To turn the automatic call rejection off, touch; Touch AUTO ANSWER on the function; To turn the automatic answer off, touch; Touch DEVICE INFO on the function; BD ADDRESS
Black plate (20,1) Setting the automaticrejecting If this function is on, this unit automatically re-jects all incoming calls. ! This feature cannot be set for each differentuser phone. ! The rejected call is not memorized in re-ceived or missed call history list. % Touch REFUSE ALL CALLS on the fun...
Page 21 - Source icon; Bluetooth Audio
Black plate (21,1) Listening to songs on BT Audio(Bluetooth audio player) 1 2 3 4 If you connect this adapter to a Pioneer headunit, you can control a Bluetooth audio playervia Bluetooth wireless technology. Important ! This unit can control a Bluetooth audio playervia A2DP or AVRCP profile. Bluetoo...
Page 24 - PIN code input display appears.; Initial Settings
Black plate (24,1) Entering PIN code forBluetooth wireless connection With some Bluetooth audio players, you maybe required to enter to this unit in advancePIN code of your Bluetooth audio player, inorder to set this unit ready for a connectionfrom your Bluetooth audio player. 1 Touch the source ico...
Page 25 - TEL
Black plate (25,1) Using as an external unit The following head units operate this unit asan external unit. For more details about the ex-ternal unit, refer to the head unit ’ s manual. ! 1 – 6KEY doesn ’ t be used to operate this unit. ! When selecting TEL as a source, AUTO/MANUAL (A/M) doesn ’ t b...
Page 26 - Function compatibility charts; Head unit group 1
Black plate (26,1) ! When using this unit as an external unit, thePIN code is set to 0000 . You can not change the PIN code. This unit can connect only theBluetooth audio player which request 0000 as the PIN code or does not request any PINcode. ! Since there are a number of Bluetooth audioplayers a...
Page 28 - Head unit group 2; You can use this function when you select
Black plate (28,1) Head unit group 2 Controls of Bluetooth telephone Select TEL / BT AUDIO as a source Press SOURCE . Switch between TEL and BT AUDIO When selecting TEL / BT AUDIO as a source, press BAND . Put the unit in VOICE ON mode *1 When selecting TEL as a source, press and hold BAND . Take a ...
Page 29 - Head unit group 3
Black plate (29,1) Controls of Bluetooth audio Pause a song When selecting BT AUDIO as a source, press MULTI- CONTROL in FUNC1 (F1) . Put the unit in C.OPEN mode When selecting BT AUDIO as a source, press and hold MULTI-CONTROL in FUNC1 (F1) . Play songs When selecting BT AUDIO as a source, press MU...
Page 30 - Head unit group 4
Black plate (30,1) Controls of Bluetooth audio Select TEL / BT AUDIO as a source Press SOURCE . Switch between TEL and BT AUDIO When selecting TEL / BT AUDIO as a source, press BAND . Skip back or forwardto another song *1 When selecting BT AUDIO as a source, touch c or d . Fast forward/re-verse *2 ...
Page 32 - NO TEL
Black plate (32,1) ! A phone may be connected via Bluetoothwireless technology but not yet registeredwith this unit. In this case it is said to betemporarily connected, and the availablefeatures are limited. To take full advantageof all the features available, we recommendyou register your phone wit...
Page 33 - When you turn the automatic connection on; Setting the ring tone
Black plate (33,1) Voice recognition If your cellular phone features voice recogni-tion technology, you can make a call by voicecommands. ! Operation varies depending on the type ofyour cellular phone. Refer to the instructionmanual that came with your cellular phonefor detailed instructions. ! This...
Page 34 - Pioneer BT unit; NO AUDIO
Black plate (34,1) Displaying the deviceinformation of this unit You can display the device information of thisunit such as the BD address and the devicename.Should this unit fails to operate properly andyou consult with dealer for repair, you may beasked to indicate the system versions of thisunit ...
Page 35 - Connections
Black plate (35,1) Important ! This unit can not be installed in a vehicle thatdoes not have an ACC (accessory) position onthe ignition switch. ACC ON S T A R T O FF ON S T A R T O FF ACC posi-tion No ACC po-sition ! This unit is for vehicles with a 12-volt batteryand negative grounding. Before inst...
Page 36 - Connecting the units; Blue
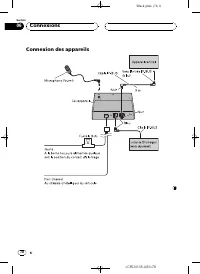
Black plate (36,1) Connecting the units Black (ground) To vehicle (metal) body. Fuse (3 A) YellowTo terminal always supplied with power regardless of ignition switch position. 3 m (9 ft. 10 in.) IP-BUS cable IP-BUS cable Blue To IP-BUS input (blue) Multi-CD player (sold separately) Head unit Black B...
Page 37 - Installing this unit; Mounting with Velcro fasteners; Mount this unit using the Velcro fasten-; Installing the microphone; Installation
Black plate (37,1) Important ! Before making a final installation of the unit,temporarily connect the wiring to confirm thatthe connections are correct and the systemwork properly. ! Use only the parts included with the unit toensure proper installation. The use of un-authorized parts can cause malf...
Page 40 - Error messages; Specifications; General; Additional Information
Black plate (40,1) Error messages When you contact your dealer or your nearestPioneer Service Center, be sure to record theerror message. Message Cause Action ERROR-10 Built-in Blue-tooth unit en-countered anerror Turn the ignitionOFF and ON. ERROR-80 Built-in FLASHROM encoun-tered an error Turn the...
Page 41 - Nous vous prions de lire ces instructions d; Avant de commencer; Français; Table des matières
Black plate (41,1) Nous vous remercions d ’ avoir acheté cet appareil Pioneer. Nous vous prions de lire ces instructions d ’ utilisation afin que vous sachiez utiliser votre appareil correctement. Quand vous aurez fini la lecture de ces instructions, rangez ce mode d ’ emploi dans un endroit sûr pou...
Page 43 - PRÉCAUTION
Black plate (43,1) Informations pour l ’ utilisateur ID FCC : AJDK013MODELE NO. : CD-BTB100IC : 775E-K013Cet appareil est conforme à la Partie 15 des Rè-gles FCC et RSS-Gen des Règles IC. Son utili-sation est soumise aux deux conditionssuivantes : (1) cet appareil ne doit pas provo-quer d ’ interfér...
Page 44 - Appuyer sur la touche
Black plate (44,1) Environnement d ’ utilisation Cet appareil doit être utilisé dans les plages detempérature ci-dessous.Plage de température de fonctionnement : -10°C à +60 °C (14 °F à 140 °F)Température de test ETC EN300328 : -20 °C et+55 °C (-4 °F et 131 °F) Quelques mots sur ce moded ’ emploi Ut...
Page 45 - La suppression des données prend environ 10
Black plate (45,1) Réinitialisation de cet appareilsans effacer les donnéestéléphoniques Appuyer sur la touche RESET de cet appareil vous permet de réinitialiser celui-ci à ses ré-glages initiaux sans effacer les données télé-phoniques. Toutefois, les valeurs des réglagessuivants sont réinitialisées...
Page 46 - effectuer des appels; sance vocale; Téléphone Bluetooth
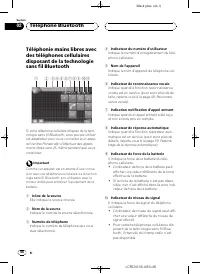
Black plate (46,1) Téléphonie mains libres avecdes téléphones cellulairesdisposant de la technologiesans fil Bluetooth 9 8 7 6 4 3 2 1 5 ab Si votre téléphone cellulaire dispose de la tech-nologie sans fil Bluetooth, vous pouvez utilisercet adaptateur pour vous connecter à un appa-reil central Pione...
Page 47 - Remarques; Mode attente; Touchez l
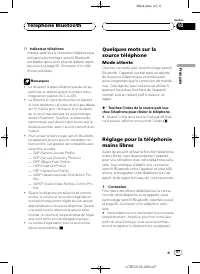
Black plate (47,1) b Indicateur téléphone Indique quand une connexion téléphoniqueutilisant la technologie sans fil Bluetoothest établie (pour avoir plus de détails, repor-tez-vous à la page 50, Connexion d ’ un télé- phone cellulaire ). Remarques ! La réception d ’ appel téléphonique de cet ap- par...
Page 48 - Exécution d; Reconnaissance vocale; Touchez VOICE pour mettre en service; VOICE; Prononcez le nom de votre contact.
Black plate (48,1) 2 Enregistrement Reportez-vous à la page 52, Enregistrement d ’ un téléphone cellulaire connecté pour des instructions sur la procédure d ’ enregistrement de votre téléphone connecté temporairement. 3 Réglage du volume Réglez le volume de l ’ écouteur sur votre télé- phone cellula...
Page 49 - Paramétrage de la ré-; Remarque
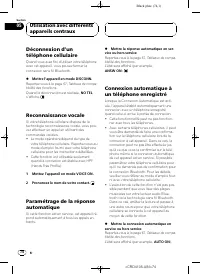
Black plate (49,1) Prise d ’ un appel Réponse à un appel entrant Même quand une source autre que Telephone est sélectionnée ou quand cet ap- pareil lui-même est mis hors service, vouspouvez toujours répondre aux appels entrants.Si vous réglez cet appareil pour qu ’ il réponde automatiquement aux app...
Page 50 - gistrement d
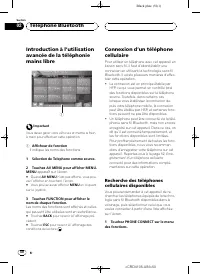
Black plate (50,1) Introduction à l ’ utilisation avancée de la téléphoniemains libre 1 Important Vous devez garer votre véhicule et mettre le freinà main pour effectuer cette opération. 1 Afficheur de fonction Il indique les noms des fonctions. 1 Sélection de Telephone comme source. 2 Touchez AV ME...
Page 51 - Utilisation d; Saisie du; Déconnexion d
Black plate (51,1) 2 Touchez Search pour rechercher les té- léphones cellulaires disponibles. Pendant la recherche, SEARCHING s ’ affiche. Quand l ’ appareil trouve des téléphones cellu- laires équipés de la technologie sans fil Blue-tooth, les noms d ’ appareil de ces téléphones (ou Name Not Found ...
Page 53 - Touchez à nouveau; Utilisation de l
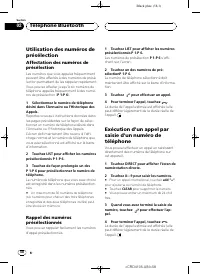
Black plate (53,1) 1 Touchez PHONE CONNECT sur le menu des fonctions. 2 Touchez DIRECT CONNECT. 3 Touchez le nom de l ’ appareil que vous voulez connecter.CONNECTING clignote pendant la connexion. Si la connexion est établie, CONNECTED s ’ affi- che. Connexion automatique à untéléphone enregistré Lo...
Page 56 - Effacement d
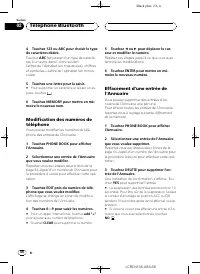
Black plate (56,1) 4 Touchez 123 ou ABC pour choisir le type de caractères désiré. Toucher ABC fait passer d ’ un type de caractè- res à un autre dans l ’ ordre suivant. Lettres de l ’ alphabet (en majuscules), chiffres et symboles — Lettre de l ’ alphabet (en minus- cules) 5 Touchez une lettre pour...
Page 57 - Effacement de la mémoire
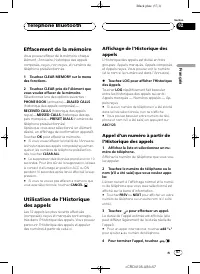
Black plate (57,1) Effacement de la mémoire Vous pouvez effacer de la mémoire chaqueélément ; Annuaire, historique des appelscomposés, reçus, non reçus, et numéros detéléphone présélectionnés. 1 Touchez CLEAR MEMORY sur le menu des fonctions. 2 Touchez CLEAR près de l ’ élément que vous voulez effac...
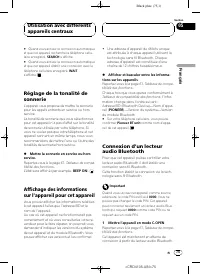
Page 59 - Touchez ECHO CANCEL sur le menu des; ECHO CANCEL; Touchez RING TONE sur le menu des; Touchez REFUSE ALL CALLS sur le menu; REFUSE ALL CALLS; Touchez AUTO ANSWER sur le menu de; AUTO ANSWER
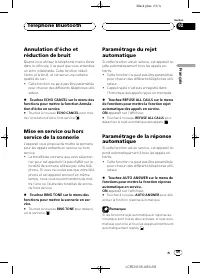
Black plate (59,1) Annulation d ’ écho et réduction de bruit Quand vous utilisez la téléphonie mains libresdans le véhicule, il se peut que vous entendiezun écho indésirable. Cette fonction réduitl ’ écho et le bruit, et conserve une certaine qualité du son. ! Cette fonction ne peut pas être paramét...
Page 60 - Touchez DEVICE INFO sur le menu de
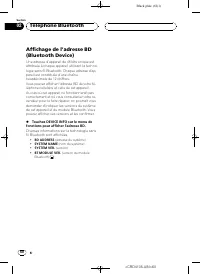
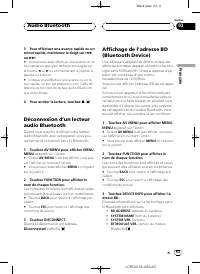
Black plate (60,1) Affichage de l ’ adresse BD (Bluetooth Device) Une adresse d ’ appareil de 48 bits unique est attribuée à chaque appareil utilisant la techno-logie sans fil Bluetooth. Chaque adresse d ’ ap- pareil est constituée d ’ une chaîne hexadécimale de 12 chiffres.Vous pouvez afficher l ’ ...
Page 61 - Connexion d; Audio Bluetooth
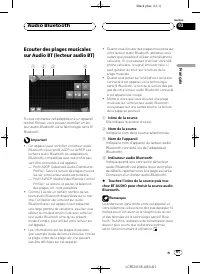
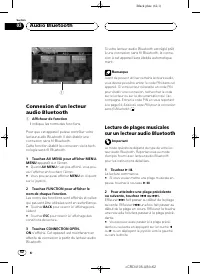
Black plate (61,1) Ecouter des plages musicalessur Audio BT (lecteur audio BT) 1 2 3 4 Si vous connectez cet adaptateur à un appareilcentral Pioneer, vous pouvez contrôler un lec-teur audio Bluetooth via la technologie sans filBluetooth. Important ! Cet appareil peut contrôler un lecteur audioBlueto...
Page 64 - écran de saisie du code PIN s; Réglages initiaux
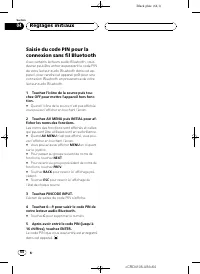
Black plate (64,1) Saisie du code PIN pour laconnexion sans fil Bluetooth Avec certains lecteurs audio Bluetooth, vousdevrez peut-être entrer auparavant le code PINde votre lecteur audio Bluetooth dans cet ap-pareil, pour rendre cet appareil prêt pour uneconnexion Bluetooth en provenance de votrelec...
Page 67 - Appareils centraux du groupe 1; Vous pouvez utiliser cette fonction quand vous sélectionnez
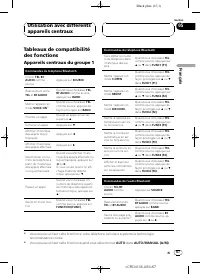
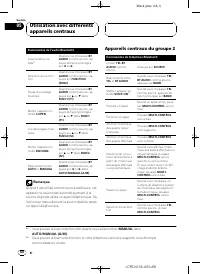
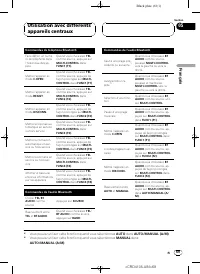
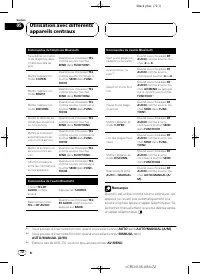
Black plate (67,1) Tableaux de compatibilitédes fonctions Appareils centraux du groupe 1 Commandes du téléphone Bluetooth Choisir TEL / BT AUDIO comme source Appuyez sur SOURCE . Basculement entre TEL et BT AUDIO Quand vous choisissez TEL / BT AUDIO comme source, appuyez sur BAND . Mettre l ’ appare...
Page 68 - Appareils centraux du groupe 2
Black plate (68,1) Commandes de l ’ audio Bluetooth Avance/retour ra-pide *1 Quand vous choisissez BT AUDIO comme source, ap- puyez de façon prolongéesur c ou d . Sélection d ’ une fonc- tion Quand vous choisissez BT AUDIO comme source, ap- puyez sur FUNCTION (FUNC) . Pause d ’ une plage musicale Qu...
Page 70 - Appareils centraux du groupe 3
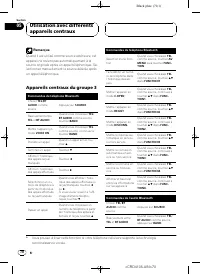
Black plate (70,1) Remarque Quand il est utilisé comme source extérieure, cetappareil ne revient pas automatiquement à lasource originale après un appel téléphonique. Sé-lectionnez manuellement la source désirée aprèsun appel téléphonique. Appareils centraux du groupe 3 Commandes du téléphone Blueto...
Page 71 - Appareils centraux du groupe 4
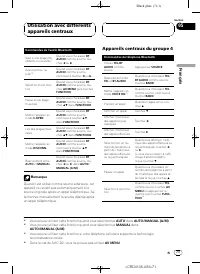
Black plate (71,1) Commandes de l ’ audio Bluetooth Saut à une plage pré-cédente ou suivante *1 Quand vous choisissez BT AUDIO comme source, tou- chez c ou d . Avance/retour ra-pide *2 Quand vous choisissez BT AUDIO comme source, continuez à toucher c ou d . Sélection d ’ une fonc- tion Quand vous c...
Page 73 - tibilité des fonctions
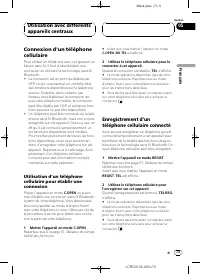
Black plate (73,1) Connexion d ’ un téléphone cellulaire Pour utiliser un téléphone avec cet appareil enliaison sans fil, il faut d ’ abord établir une connexion en utilisant la technologie sans filBluetooth. ! La connexion est en principe établie parHFP, ce qui vous permet un contrôle totaldes fonc...
Page 75 - appareil pour cet appareil
Black plate (75,1) # Quand vous activez la connexion automatique et que cet appareil recherche le téléphone cellu-laire enregistré, SEARCH s ’ affiche. # Quand vous activez la connexion automatique et que cet appareil établit une connexion avec letéléphone cellulaire enregistré, WAIT s ’ affiche. Ré...
Page 76 - Quand la connexion est établie,; Quand vous avez fini d
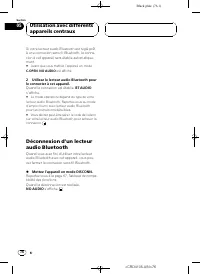
Black plate (76,1) Si votre lecteur audio Bluetooth est réglé prêtà une connexion sans fil Bluetooth, la conne-xion à cet appareil sera établie automatique-ment. # Avant que vous mettiez l ’ appareil en mode C.OPEN , NO AUDIO est affiché. 2 Utilisez le lecteur audio Bluetooth pour le connecter à cet...
Page 77 - Connexions
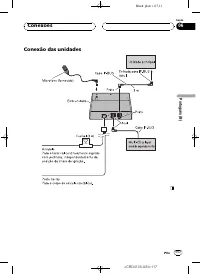
Black plate (77,1) Important ! Cet appareil ne peut pas être installé dans unvéhicule qui ne possède pas de position ACC(Accessoires) sur le contact d ’ allumage. ACC ON S T A R T O FF ON S T A R T O FF Avec posi-tion ACC Sans posi-tion ACC ! Cet appareil est utilisable sur des véhiculeséquipés d ’ ...
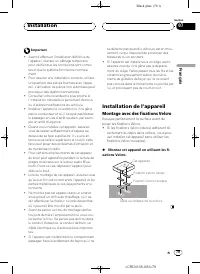
Page 79 - Installation de l; Montage avec des fixations Velcro; Montez cet appareil en utilisant les fi-
Black plate (79,1) Important ! Avant d ’ effectuer l ’ installation définitive de l ’ appareil, réalisez un câblage temporaire pour vérifier que les connexions sont correc-tes et que le système fonctionne normale-ment. ! Pour assurer une installation correcte, utilisezuniquement des pièces fournies ...
Page 80 - Installation du microphone; enrouler autour de la colonne de; Installez le microphone sur le clip micro-
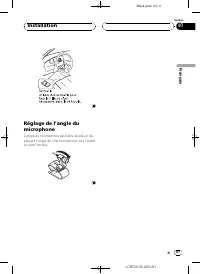
Black plate (80,1) Installation du microphone PRÉCAUTION Il est extrêmement dangereux de laisser le fil dumicrophone s ’ enrouler autour de la colonne de direction ou du levier de vitesse. Assurez-vousd ’ installer cet appareil de telle manière qu ’ il ne gêne pas la conduite. Remarque Installez le ...
Page 81 - angle du microphone peut être ajusté en dé-
Black plate (81,1) Réglage de l ’ angle du microphone L ’ angle du microphone peut être ajusté en dé- plaçant l ’ angle du clip microphone vers l ’ avant ou vers l ’ arrière. <CRD4105-A/N>81 Installation Fr 81 Section Français 07
Page 82 - entretien agréé par Pioneer le plus; Caractéristiques techniques; Généralités
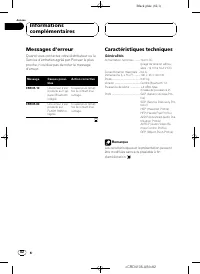
Black plate (82,1) Messages d ’ erreur Quand vous contactez votre distributeur ou leService d ’ entretien agréé par Pioneer le plus proche, n ’ oubliez pas de noter le message d ’ erreur. Message Causes possi-bles Action corrective ERROR-10 Une erreur s ’ est produite sur l ’ ap- pareil Bluetoothint...
Page 83 - ro para referência futura.; Antes de utilizar este produto; ortu; Conteúdo
Black plate (83,1) Agradecemos por você ter adquirido este produto Pioneer. Leia as instruções de operação a seguir para saber como operar corretamente oseu modelo. Ao terminar de ler as instruções, guarde este manual em um local segu- ro para referência futura. Antes de utilizar este produto Sobre ...
Page 85 - Sobre esta unidade; CUIDADO; Proteja esta unidade contra umidade.; Ambiente de operação; lizando como uma unidade externa; No caso de problemas
Black plate (85,1) Sobre esta unidade Esta unidade é o adaptador da unidade princi-pal da Pioneer utilizado para conectar um tele-fone celular com tecnologia sem fio Bluetoothpara atender chamadas no viva-voz e ouvirmúsicas no áudio player Bluetooth. ! É projetado para ser utilizado apenas emveículo...
Page 86 - Reajustando esta unidade; Pressionar o botão; Toda a memória foi apagada.; Leva cerca de 10 segundos para excluir os
Black plate (86,1) ! A palavra e os logotipos Bluetooth são depropriedade da Bluetooth SIG, Inc. e qual-quer uso dessas marcas pela Pioneer Cor-poration é feito sob licença. Outras marcascomerciais e marcas registradas perten-cem a seus respectivos proprietários. Reajustando esta unidade CUIDADO Pre...
Page 87 - Importante; Mostra qual fonte foi selecionada.; Telefone Bluetooth
Black plate (87,1) Chamadas viva-voz utilizandotelefones celulares comtecnologia sem fio Bluetooth 9 8 7 6 4 3 2 1 5 ab Se o seu telefone celular tiver a tecnologia semfio Bluetooth, você poderá utilizar este adapta-dor para conectar-se a uma unidade principal daPioneer e realizar chamadas viva-voz,...
Page 88 - Notas; Sobre a fonte telefone; Modo de espera; Quando o ícone de fonte não for visualizado,; Conexão; Seu telefone deve estar conectado temporaria-; Registro
Black plate (88,1) b Indicador de telefone Mostra quando é estabelecida uma conexãotelefônica através da tecnologia sem fioBluetooth (para obter mais detalhes, con-sulte Conectando um telefone celular na pá- gina 91). Notas ! A recepção de chamadas desta unidade esta-rá em modo de espera quando a ch...
Page 89 - Fazendo uma chamada; Reconhecimento de voz; Recebendo uma chamada; Atendendo uma chamada; estiver selecionada ou quando
Black plate (89,1) 3 Ajuste do volume Ajuste o volume do fone do telefone celularpara um nível que seja confortável. Depois deconfigurado, o nível de volume é memorizadona unidade como sendo o ajuste padrão. # O volume de voz do chamador e o volume do toque podem variar dependendo do tipo de telefo-...
Page 90 - Recusando uma chamada; Ajustando a recusa automática; Nota; Atendendo uma chamada em espera; O chamador com quem você estava falando; Recusando uma chamada em espera; O número da chamada recusada não é adicio-
Black plate (90,1) Recusando uma chamada Você pode recusar uma chamada recebida. Sedeseja configurar esta unidade para recusarautomaticamente as chamadas, consulte Ajustando a recusa automática na página 100. % Quando receber uma chamada, toque em . A chamada foi recusada. Nota A chamada recusada ma...
Page 91 - Display de função; Toque em FUNCTION para visualizar os; BACK; Registrando
Black plate (91,1) Introdução à utilizaçãoavançada das chamadasviva-voz 1 Importante Você deverá estacionar o veículo e puxar o freiode mão para executar esta operação. 1 Display de função Mostra os nomes das funções. 1 Selecione Telephone como uma fonte. 2 Toque em AV MENU para visualizar MENU.MENU...
Page 92 - (se os nomes não puderem; Colocar a unidade no modo; Introduzindo o código PIN para conexão sem; será
Black plate (92,1) 2 Toque em Search para fazer uma busca por telefones celulares disponíveis. Durante a busca, SEARCHING é visualizado. Quando forem encontrados telefones celula-res disponíveis com a tecnologia sem fio Blue-tooth, os nomes dos dispositivos ou Name Not Found (se os nomes não puderem...
Page 93 - Selecione entre as seguintes opções:; Se a categoria estiver vazia, o nome do dispo-; Uma confirmação é exibida. Toque em
Black plate (93,1) Registrando um telefonecelular conectado Você pode registrar um telefone que está co-nectado temporariamente a esta unidade parausufruir de todos os recursos disponíveis atra-vés da tecnologia sem fio Bluetooth. Podemser registrados até cinco telefones: três telefo-nes celulares d...
Page 94 - Para desativar a conexão automática, toque
Black plate (94,1) 3 Toque no nome do dispositivo que você deseja conectar. Durante a conexão, CONNECTING fica piscan- do. Se a conexão for estabelecida, CONNECTED será visualizado. Conectando-se automaticamentea um telefone celular registrado Quando a Conexão automática estiver ativada,a unidade es...
Page 96 - Chamando
Black plate (96,1) # Toque em PREV ou NEXT para exibir os outros registros da Agenda de telefones. 3 Toque em um número de telefone do registro da Agenda de telefones que desejachamar. Se vários números de telefone tiverem sido in-seridos em um registro, toque naquele que de-seja chamar.O display re...
Page 97 - Editando números de telefone; Apagando a memória
Black plate (97,1) 5 Toque em uma letra a ser introduzida. # Para excluir um caractere e deixar um espaço, toque em . 6 Toque em MEMORY para armazenar o novo nome. Editando números de telefone Você pode editar os números de telefone nosregistros da Agenda de telefones. 1 Toque em PHONE BOOK para exi...
Page 98 - Exibindo o Histórico de chamadas; Tocar em; Atribuindo números programados
Black plate (98,1) Após a seleção de um item desejado, umaconfirmação é exibida. Toque em OK para ex- cluir a memória. # Se quiser apagar toda a Agenda de telefones, a lista do histórico de chamadas discadas/recebi-das/não atendidas e os números de telefonesprogramados, toque em CLEAR ALL . # Leva c...
Page 100 - Alterando o toque; Toque em RING TONE no menu de fun-; Para desativar o toque, toque novamente em; Toque em REFUSE ALL CALLS no menu; Para desativar a recusa automática de chama-; Toque em AUTO ANSWER no menu de; Para desativar o atendimento automático,; Toque em DEVICE INFO no menu de
Black plate (100,1) Alterando o toque A unidade oferece a possibilidade de ativar oudesativar o toque da recepção de chamadas. ! O toque selecionado para esta unidade nãoafeta o toque utilizado em seu telefone ce-lular. Se não deseja que seu telefone celu-lar e esta unidade toquem ao mesmotempo, rec...
Page 101 - Ícone de fonte; Áudio Bluetooth
Black plate (101,1) Ouvindo músicas no áudio BT(Áudio player Bluetooth) 1 2 3 4 Se você conectar este adaptador a uma unidadeprincipal da Pioneer, poderá controlar um áudioplayer Bluetooth através da tecnologia sem fioBluetooth. Importante ! Esta unidade pode controlar um áudio playerBluetooth por m...
Page 104 - Ajustes iniciais
Black plate (104,1) Introduzindo o código PINpara conexão sem fioBluetooth Com alguns áudio players Bluetooth, vocêpode precisar introduzir o código PIN nestaunidade primeiro para que ela fique prontapara uma conexão com o seu áudio playerBluetooth. 1 Toque no ícone de fonte e, em seguida, toque em ...
Page 106 - Grupo de unidades principais 1
Black plate (106,1) ! Ao utilizar esta unidade como uma unidadeexterna, o código PIN é ajustado a 0000 . Você não pode alterar o código PIN. Esta unidadesó poderá conectar o áudio player Bluetoothque solicitar 0000 como código PIN ou não solicitar um código PIN. ! Uma vez que há uma grande quantidad...
Page 107 - É possível utilizar esta função ao selecionar
Black plate (107,1) Controles do telefone Bluetooth Exibir o histórico dechamadas recebidas//não atendidas Pressione c . Exibir o histórico dechamadas discadas Pressione d . Selecionar um núme-ro de telefone do his-tórico de chamadasdiscadas, recebidasou não atendidas Ao exibir o histórico de cha-ma...
Page 108 - Grupo de unidades principais 2
Black plate (108,1) Nota Ao utilizar como uma unidade externa, esta uni-dade não retorna automaticamente à fonte origi-nal após uma chamada. Selecione uma fontedesejada manualmente após a chamada. Grupo de unidades principais 2 Controles do telefone Bluetooth Selecionar TEL / BT AUDIO como uma fonte...
Page 109 - Grupo de unidades principais 3
Black plate (109,1) Controles do áudio Bluetooth Selecionar TEL / BT AUDIO como uma fonte Pressione SOURCE . Alternar entre TEL e BT AUDIO Ao selecionar TEL / BT AUDIO como uma fonte, pressione BAND . Retroceder ou avan-çar para uma outramúsica *1 Ao selecionar BT AUDIO como uma fonte, pressione MUL...
Page 111 - Grupo de unidades principais 4
Black plate (111,1) Grupo de unidades principais 4 Controles do telefone Bluetooth Selecionar TEL / BT AUDIO como uma fonte Pressione SOURCE . Alternar entre TEL e BT AUDIO Ao selecionar TEL / BT AUDIO como uma fonte, toque em BAND . Colocar a unidade nomodo VOICE ON *1 Ao selecionar TEL como uma fo...
Page 112 - Antes de colocar a unidade no modo; Utilize o telefone celular para conectar-; O recurso varia dependendo do tipo de telefo-
Black plate (112,1) Controles do áudio Bluetooth Selecionar uma fun-ção Ao selecionar BT AUDIO como uma fonte, toque em AV MENU ou pressione o joystick e, em seguida, toqueem FUNCTION * . Pausar uma música Ao selecionar BT AUDIO como uma fonte, toque em SEND em FUNCTION1 . Colocar a unidade nomodo C...
Page 113 - Para completar a conexão, será necessário in-; Consulte; Consulte
Black plate (113,1) # Para completar a conexão, será necessário in- troduzir o código do link no seu telefonecelular. Registrando um telefonecelular conectado Você pode registrar um telefone que está co-nectado temporariamente a esta unidade parausufruir de todos os recursos disponíveis atra-vés da ...
Page 114 - Quando você ativa a conexão automática e; Ajustando o toque
Black plate (114,1) Conectando-seautomaticamente a umtelefone celular registrado Quando a Conexão automática estiver ativada,a unidade estabelecerá automaticamenteuma conexão com um telefone registradoassim que entrar no campo de alcance. ! Esse recurso pode não funcionar comtodos os telefones. ! Em...
Page 115 - Gráficos de compatibilidade das fun-
Black plate (115,1) Endereço BD (Dispositivo Bluetooth) — Nome do dispositivo ( PIONEER ) — Versão do sistema — Versão do módulo Bluetooth # Em seu telefone celular, você pode confirmar o nome do dispositivo desta unidade como Pioneer BT unit . Conectando um áudioplayer Bluetooth Para que esta unida...
Page 116 - antes de iniciar a instalação.; Conexões
Black plate (116,1) Importante ! A unidade não pode ser instalada em um veí-culo que não tenha uma posição ACC (Aces-sório) na chave de ignição. ACC ON S T A R T O FF ON S T A R T O FF PosiçãoACC Sem posi-ção ACC ! Esta unidade é projetada para veículos combateria de 12 volts e aterramento negativo....
Page 118 - Instalação desta unidade; Instalação com velcro; Instale esta unidade utilizando velcro.; Instalação
Black plate (118,1) Importante ! Antes de fazer a instalação final da unidade,conecte temporariamente a fiação para confir-mar se as conexões estão corretas e se o sis-tema está funcionando corretamente. ! Utilize apenas as peças incluídas na unidadepara garantir a instalação apropriada. O usode peç...
Page 119 - Instalando o microfone; Instale o microfone no prendedor apro-
Black plate (119,1) Instalando o microfone CUIDADO É extremamente perigoso permitir que o condu-tor do microfone seja enrolado em torno da colu-na de direção ou da marcha. Certifique-se deinstalar a unidade de maneira que ela não ob-strua a condução. Nota Instale o microfone em uma posição e orienta...
Page 121 - Mensagens de erro; Especificações; Geral; Informações adicionais
Black plate (121,1) Mensagens de erro Ao entrar em contato com o revendedor ou aCentral de Serviços da Pioneer mais próxima,certifique-se de gravar a mensagem de erro. Mensagem Causa Ação ERROR-10 A unidade Blue-tooth incorpora-da encontrou umerro Ligue e desligue aignição. ERROR-80 O FLASH ROMincor...
Page 124 - PIONEER CORPORATION
Black plate (124,1) PIONEER CORPORATION 4-1, MEGURO 1-CHOME, MEGURO-KU, TOKYO 153-8654, JAPAN PIONEER ELECTRONICS (USA) INC. P.O. Box 1540, Long Beach, California 90801-1540, U.S.A.TEL: (800) 421-1404 PIONEER EUROPE NV Haven 1087, Keetberglaan 1, B-9120 Melsele, BelgiumTEL: (0) 3/570.05.11 PIONEER E...