Page 2 - About this unit; CAUTION; Contents; Before You Start
Before You Start About this unit 2 Demo mode 3 In case of trouble 3 Sound muting 3 About this manual 3 Operating this unit Head unit 3 Optional remote control 3 Display indication 4 Basic Operations 4 Menu operations identical for function settings/audio adjustments/initialsettings/lists 5 Tuner 5 C...
Page 3 - Demo mode; DISP; English
Note Function setting operations are completed evenif the menu is cancelled before the operationsare confirmed. Demo mode Important Failure to connect the red lead (ACC) of this unitto a terminal coupled with ignition switch on/offoperations may lead to battery drain. Demo mode The demo automaticall...
Page 4 - Display indication; Basic Operations; Important; Note; Operating this unit
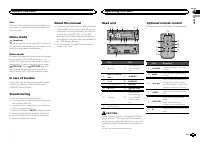
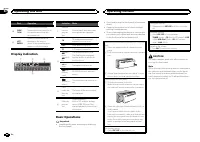
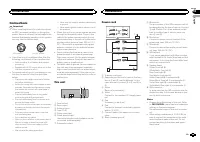
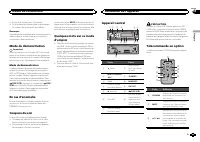
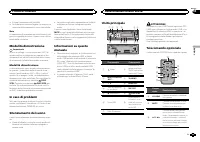
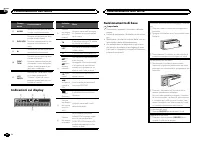
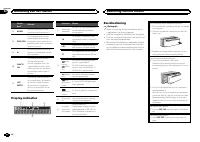
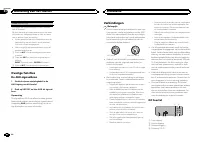
Part Operation k FUNC-TION Press to select functions.Press and hold to recall the ini-tial setting menu when thesources are off. l LIST / ENTER Press to display the list de-pending on the source.While in the operating menu,press to control functions. Display indication 1 4 2 3 Indicator State 1 Info...
Page 5 - Tuner; Using PI Seek; Using preset tuning buttons; Switching the RDS display; PTY list; Function settings
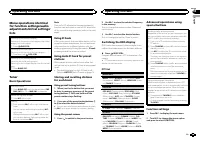
Menu operations identicalfor function settings/audioadjustments/initial settings/lists Returning to the previous displayReturning to the previous list/category (the folder/category one level higher) 1 Press / DISP / SCRL . Returning to the main menuReturning to the top tier of the list/category. 1 P...
Page 6 - Displaying text information; Notes
3 Turn M.C. to select the function. After selecting, perform the following proce-dures to set the function. # If MW/LW band is selected, only BSM or LOCAL is available. BSM (best stations memory) BSM (best stations memory) automatically storesthe six strongest stations in the order of their sig-nal ...
Page 7 - and press to select FUNCTION.; iPod; Press
Viewing a list of the files (or folders) in the se-lected folder 1 When a folder is selected, press M.C. Playing a song in the selected folder 1 When a folder is selected, press and hold M.C. Advanced operations usingspecial buttons Selecting a repeat play range 1 Press 6 / to cycle between the foll...
Page 9 - Audio Adjustments; and press to select AUDIO.; Initial Settings; Press and hold SRC/OFF until the unit
Audio Adjustments 1 Press M.C. to display the main menu. 2 Turn M.C. to change the menu option and press to select AUDIO. 3 Turn M.C. to select the audio function. After selecting, perform the following proce-dures to set the audio function. FAD/BAL (fader/balance adjustment) 1 Press M.C. to display...
Page 10 - Other Functions; Using an AUX source; Insert the stereo mini plug into the AUX
Normally, the FM tuning step employed by seektuning is 50 kHz. When AF or TA is on, the tuningstep automatically changes to 100 kHz. It may bepreferable to set the tuning step to 50 kHz whenAF is on. 1 Press M.C. to display the setting mode. 2 Turn M.C. to select the FM tuning step. 100KHz (100 kHz)...
Page 11 - Connections; This unit; Installation
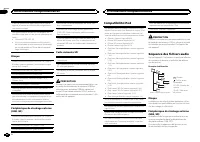
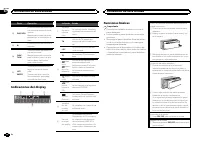
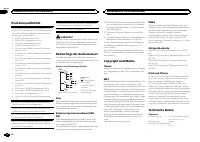
Connections Important ! When installing this unit in a vehicle withoutan ACC (accessory) position on the ignitionswitch, failure to connect the red cable to theterminal that detects operation of the ignitionkey may result in battery drain. O N S T A R T O F F ACC position No ACC position ! Use of th...
Page 12 - Removing the unit; Removing the front panel to
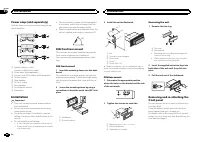
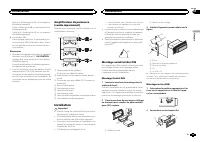
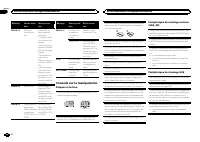
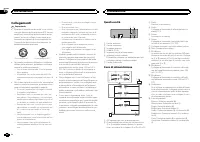
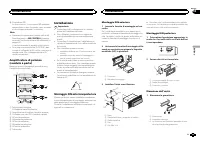
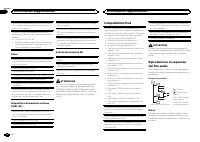
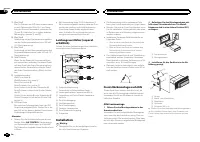
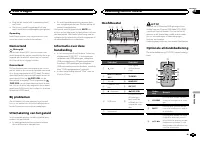
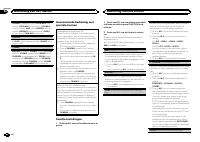
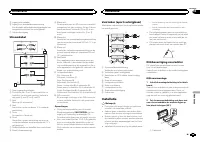
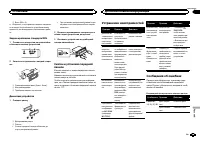
Power amp (sold separately) Perform these connections when using the op-tional amplifier. 1 1 3 2 4 5 5 3 2 6 7 7 1 3 2 8 9 9 1 System remote controlConnect to Blue/white cable. 2 Power amp (sold separately) 3 Connect with RCA cables (sold separately) 4 To Rear output 5 Rear ...
Page 13 - Additional Information
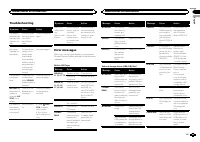
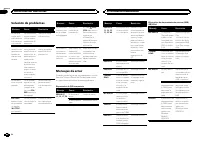
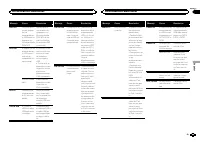
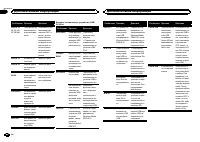
Troubleshooting Symptom Cause Action The displayautomaticallyreturns to theordinary dis-play. You did not per-form any opera-tion withinabout 30 sec-onds. Perform operationagain. The repeatplay rangechanges un-expectedly. Depending onthe repeat playrange, the se-lected rangemay changewhen anotherfol...
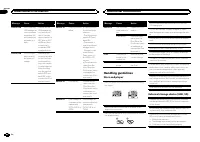
Page 14 - Handling guidelines; Discs and player
Message Cause Action CHECK USB The connectedUSB storage de-vice consumesmore than 500mA (maximumallowable cur-rent). Disconnect theUSB storage de-vice and do notuse it. Turn theignition switch toOFF, then to ACCor ON and thenconnect onlycompliant USBstorage devices. CHECK USB The iPod oper-ates corr...
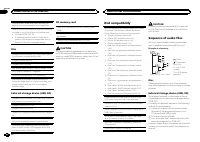
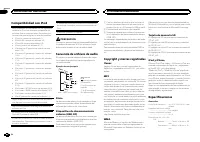
Page 16 - iPod compatibility; Sequence of audio files; Disc; Put those files into a folder.
There may be a slight delay when starting play-back of audio files embedded with image data. Russian text to be displayed on this unit should beencoded in one of the following character sets: ! Unicode (UTF-8, UTF-16) ! A character set other than Unicode that isused in a Windows environment and is s...
Page 17 - Copyright and trademark; iTunes; Made for iPod; Specifications
For USB portable audio players, the sequence isdifferent and depends on the player. Copyright and trademark iTunes Apple and iTunes are trademarks of Apple Inc.,registered in the U.S. and other countries. MP3 Supply of this product only conveys a license forprivate, non-commercial use and does not c...
Page 18 - Nous vous remercions; Quelques mots sur cet appareil; APPAREIL À LASER DE CLASSE 1; PRÉCAUTION; Table des matières; Avant de commencer
Avant de commencer Quelques mots sur cet appareil 18 Mode de démonstration 19 En cas d ’ anomalie 19 Coupure du son 19 Quelques mots sur ce mode d ’ emploi 19 Utilisation de l ’ appareil Appareil central 19 Télécommande en option 19 Indications affichées 20 Opérations de base 20 Opérations communes ...
Page 19 - Mode de démonstration; Français
! Évitez tout contact avec l ’ humidité. ! Si la batterie est débranchée ou déchargée,le contenu de la mémoire sera effacé. Remarque Les opérations de réglage des fonctions sont va-lidées même si le menu est annulé avant laconfirmation des opérations. Mode de démonstration Important La non-connexion...
Page 21 - Syntoniseur; Remarque; Utilisation des touches de présélection; Utilisation de l
Choix d ’ une source 1 Appuyez sur SRC / OFF pour parcourir les op- tions disponibles : TUNER (syntoniseur) — CD (lecteur de CD inté- gré) — USB (USB)/ USB-iPod (iPod) — SD (carte mémoire SD) — AUX (AUX) Réglage du volume 1 Tournez M.C. pour régler le volume. PRÉCAUTION Pour des raisons de sécurité,...
Page 22 - option de; Opérations de base
Utilisation avancée à l ’ aide de touches spéciales Réception des bulletins d ’ informations routières Quelle que soit la source que vous écoutez, vouspouvez recevoir des bulletins d ’ informations rou- tières automatiquement avec la fonction TA (miseen attente de bulletins d ’ informations routière...
Page 23 - Utilisation avancée à l
Lecture de plages musicales sur une carte mé-moire SD 1 Retirez la face avant. 2 Insérez une carte mémoire SD dans le loge-ment prévu à cet effet.Insérez-la en orientant la surface de contactvers le bas et en appuyant sur la carte jusqu ’ à ce qu ’ un déclic soit émis et que la carte soit verrouillé...
Page 24 - Remarques
1 Appuyez sur M.C. pour mettre en pause ou re- prendre la lecture. S.RTRV (sound retriever) Améliore automatiquement l ’ audio compressé et restaure un son riche. 1 Appuyez sur M.C. pour afficher le mode de pa- ramétrage. 2 Tournez M.C. pour choisir le réglage désiré. Pour les détails, reportez-vous...
Page 25 - Réglages des fonctions; Réglages sonores
Utilisation de la fonction iPod de cet appareil àpartir de votre iPodVous pouvez écouter l ’ audio des applications de votre iPod depuis les haut-parleurs de votre véhi-cule lorsque APP est sélectionné. Cette fonction n ’ est pas compatible avec les mo- dèles d ’ iPod suivants. ! iPod nano 1ère géné...
Page 28 - Connexions; Cet appareil
Connexions Important ! Lors de l ’ installation de cet appareil dans un véhicule sans position ACC (accessoire) surle contacteur d ’ allumage, ne pas connecter le câble rouge à la borne qui détecte l ’ utilisa- tion de la clé de contact peut entraîner le dé-chargement de la batterie. O N S T A R T O...
Page 29 - Montage avant/arrière DIN; Montage frontal DIN
Vert/noir : Arrière gauche * ou haut-parleur d ’ extrêmes graves * Violet : Arrière droite + ou haut-parleur d ’ ex- trêmes graves + Violet/noir : Arrière droite * ou haut-parleur d ’ extrêmes graves * e Connecteur ISODans certains véhicules, il est possible quele connecteur ISO soit divisé en deux....
Page 30 - appareil contre le vol.; Dépannage; Messages d; entretien agréé par Pioneer le plus; Informations complémentaires
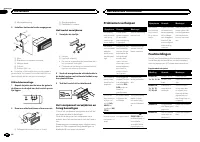
1 Vis taraudeuse (5 mm × 8 mm) 2 Support de montage 3 Tableau de bord ou console Retrait de l ’ appareil 1 Retirez l ’ anneau de garniture. 1 Anneau de garniture 2 Encoche ! Relâcher la face avant permet d ’ accéder plus facilement à l ’ anneau de garniture. ! Quand vous remontez l ’ anneau de garni...
Page 32 - Conseils sur la manipulation; Disques et lecteur
Message Causes possi-bles Action correc-tive ERROR-19 Panne decommunica-tion. ! Effectuez une des opérationssuivantes. – Coupez et remet- tez le contact d ’ al- lumage. – Déconnectez ou éjectez le périphé-rique de stockageexterne. – Choisissez une autre source.Revenez ensuite àla source USB ouSD. ! ...
Page 33 - iPod dans un
Carte mémoire SD Cet appareil prend uniquement en charge lestypes suivants de cartes mémoire SD. ! SD ! miniSD ! microSD ! SDHC Conservez la carte mémoire SD hors de portée desenfants. Au cas où la carte mémoire SD serait ava-lée, consultez immédiatement un médecin. Ne touchez pas les connecteurs de...
Page 34 - Compatibilité iPod; Séquence des fichiers audio; Disque
Il peut se produire un léger retard lors du démar-rage de la lecture de fichiers audio intégrés avecdes données image. Les textes russes à afficher sur cet appareil doi-vent être codés avec un des jeux de caractères sui-vants : ! Unicode (UTF-8, UTF-16) ! Un jeu de caractères autre que Unicode quies...
Page 35 - Généralités
1 Créez un nom de fichier en incluant desnombres qui spécifient la séquence de lec-ture (par exemple, 001xxx.mp3 et099yyy.mp3). 2 Placez ces fichiers dans un dossier. 3 Enregistrez le dossier contenant les fichierssur le périphérique de stockage externe(USB, SD). Toutefois, avec certains environneme...
Page 38 - Informazioni sull; PRODOTTO LASER DI CLASSE 1; ATTENZIONE; Sommario; Prima di iniziare
Prima di iniziare Informazioni sull ’ unità 38 Modalità dimostrazione 39 In caso di problemi 39 Silenziamento del suono 39 Informazioni su questo manuale 39 Funzionamento dell ’ unità Unità principale 39 Telecomando opzionale 39 Indicazioni sui display 40 Funzionamento di base 40 Operazioni dei menu...
Page 39 - Modalità dimostrazione; Italiano
! Evitare l ’ esposizione all ’ umidità. ! Se la batteria viene scollegata o si scarica, lamemoria delle preselezioni viene cancellata. Nota Le operazioni di impostazione delle funzioni ven-gono completate anche se il menu viene chiusoprima della conferma. Modalità dimostrazione Importante Se non si...
Page 40 - Importante
Compo-nente Funzionamento h AUDIO Premere questo tasto per sele-zionare una funzione audio. i DISP / SCRL Premere questo tasto per sele-zionare diversi display.Premere e tenere premuto perscorrere le informazioni ditesto. j e Premere per attivare la pausa oriprendere la riproduzione. k FUNC-TION Pre...
Page 41 - Sintonizzatore; Funzionamento di base; Nota; Uso della ricerca PI; Uso dei tasti di preselezione sintonia; Scorrimento del display RDS; Elenco PTY; Funzionamento dell
Selezione di una sorgente 1 Premere SRC / OFF per passare in rassegna: TUNER (Sintonizzatore) — CD (Lettore CD in- corporato) — USB (USB)/ USB-iPod (iPod) — SD (Scheda di memoria SD) — AUX (AUX) Regolazione del volume 1 Ruotare M.C. per regolare il volume. ATTENZIONE Per motivi di sicurezza, parcheg...
Page 42 - Impostazioni delle funzioni; opzione di
Operazioni avanzate tramite itasti speciali Ricezione dei notiziari sul trafficoIndipendentemente dalla sorgente che si staascoltando, è possibile ricevere automaticamentei notiziari sul traffico con la funzione TA (attesa dinotiziari sul traffico). 1 Sintonizzarsi su una stazione TP o su una sta-zi...
Page 43 - elenco dei nomi; Premere
Selezione di una cartella 1 Spingere M.C. in alto o in basso. Selezione di una traccia 1 Spingere M.C. a sinistra o a destra. Avanzamento rapido/modalità inversa rapida 1 Spingere e tenere premuto M.C. a sinistra o a destra. Ritorno alla cartella principale 1 Premere e tenere premuto BAND / ESC . Pa...
Page 44 - Scorrimento dei brani; Per passare al menu superiore della ricer-
iPod Funzionamento di base Riproduzione di brani da un iPod 1 Sollevare la copertura del connettore USB. 2 Collegare l ’ iPod utilizzando un cavo USB tra l ’ interfaccia e il connettore Dock dell ’ iPod. Selezione di una traccia (capitolo) 1 Spingere M.C. a sinistra o a destra. Avanzamento rapido/mo...
Page 47 - Uso della sorgente AUX; Collegare il cavo mini plug stereo al con-
Impostazioni iniziali 1 Premere e tenere premuto SRC/OFF fino a quando l ’ unità non si spegne. 2 Premere e tenere premuto M.C. fino a quando sul display viene visualizzato il menudelle impostazioni iniziali. 3 Ruotare M.C. per selezionare l ’ imposta- zione iniziale. Dopo averla selezionata, esegui...
Page 48 - Collegamenti; Questa unità; Installazione
Collegamenti Importante ! Quando si installa questa unità in un veicoloche non dispone della posizione ACC (acces-soria) per l ’ interruttore della chiave di avvia- mento, se non si collega il cavo rosso a unterminale accoppiato al funzionamento del-l ’ interruttore della chiave di avviamento, la ba...
Page 49 - Montaggio DIN anteriore/posteriore; Montaggio DIN anteriore
e Connettore ISOIn alcuni veicoli, il connettore ISO potrebbeessere diviso in due. In questo caso, accertar-si di collegare entrambi i connettori. Note ! Cambiare le impostazioni iniziali dell ’ unità. Fare riferimento a SW CONTROL (imposta- zione dell ’ uscita posteriore e del subwoofer) a pagina 4...
Page 50 - Risoluzione dei problemi; Messaggi di errore; Informazioni supplementari
! Quando si riapplica la guarnizione, spingereil lato con la linguetta intaccata verso ilbasso. 2 Inserire le chiavi di estrazione fornite su entrambi i lati dell ’ unità fino a che non scat- tano in posizione. 3 Estrarre l ’ unità dal cruscotto. Rimozione e reinserimento delfrontalino È possibile r...
Page 52 - Linee guida per l; Dischi e lettori
Messaggio Causa Azione ERROR-19 Errore di comu-nicazione. ! Eseguire una delle operazioniriportate di segui-to. – Portare l ’ interrut- tore della chiavedi avviamento inposizione OFF equindi di nuovosu ON. – Scollegare o espellere il dispo-sitivo di memoriaesterno. – Passare a una sorgente diversa.Q...
Page 53 - iPod in luoghi esposti ad
Scheda di memoria SD L ’ unità è compatibile esclusivamente con i se- guenti tipi di schede di memoria SD. ! SD ! miniSD ! microSD ! SDHC Tenere la scheda di memoria SD lontana dalla por-tata dei bambini. Se la scheda di memoria SDviene inghiottita, rivolgersi immediatamente a unmedico. Non toccare ...
Page 54 - Compatibilità iPod; Disco
Se si avvia la riproduzione dei file audio incorpora-ti con dati immagine, potrebbe intercorrere un ri-tardo di alcuni istanti. Il testo cirillico da visualizzare su questa unitàdeve essere codificato con uno dei seguenti set dicaratteri: ! Unicode (UTF-8, UTF-16) ! Un set di caratteri diverso da Un...
Page 55 - Copyright e marchi registrati; Dati tecnici
Dispositivo di memoria esterno(USB, SD) La sequenza di riproduzione è la stessa della se-quenza di registrazione sul dispositivo di memo-ria esterno (USB, SD).Per specificare la sequenza di riproduzione, siconsiglia di utilizzare il seguente metodo. 1 Creare un nome file includendo i numeri chespeci...
Page 56 - Sintonizzatore MW
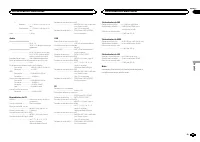
Sensibilità ........................ 9 dBf (0,8 µV/75 W , mono, rap- porto S/R: 30 dB) Rapporto segnale/rumore ................................... 72 dB (rete IEC-A) Sintonizzatore MW Gamma di frequenza ........ da 531 kHz a 1 602 kHz (9 kHz)Sensibilità ........................ 25 µV (rapporto S/R: ...
Page 58 - Gracias; Acerca de esta unidad; PRECAUCIÓN; Índice; Antes de comenzar
Antes de comenzar Acerca de esta unidad 58 Modo demo 59 En caso de problemas 59 Silenciamiento del sonido 59 Acerca de este manual 59 Utilización de esta unidad Unidad principal 59 Mando a distancia opcional 59 Indicaciones del display 60 Funciones básicas 60 Las operaciones del menú son idénticas p...
Page 59 - Modo demo; Español
! Si se desconecta o se descarga la batería,todas las memorias preajustadas se borra-rán. Nota Las operaciones se realizan incluso si se cance-la el menú antes de confirmar. Modo demo Importante Si no se conecta el cable rojo (ACC) de esta uni-dad a un terminal acoplado con las funcionesde activació...
Page 60 - Indicaciones del display; Funciones básicas; Utilización de esta unidad
Parte Operación i DISP / SCRL Pulse este botón para seleccio-nar diferentes modos de visua-lización.Manténgalo pulsado para des-plazarse por la información detexto. j e Pulse este botón para pausar oreanudar. k FUNC-TION Pulse este botón para seleccio-nar las funciones.Mantenga pulsado este botónpar...
Page 61 - Sintonizador; Uso de la búsqueda PI; y el sonido; Uso de la pantalla de presintonías; Cambio de la visualización RDS; Nombre del servicio de programa; Lista PTY
Selección de una fuente 1 Pulse SRC / OFF para desplazarse entre: TUNER (sintonizador) — CD (reproductor de CD incorporado) — USB (USB)/ USB-iPod (iPod) — SD (Tarjeta de memoria SD) — AUX (AUX) Ajuste del volumen 1 Haga girar M.C. para ajustar el volumen. PRECAUCIÓN Por motivos de seguridad, detenga...
Page 62 - Ajustes de funciones; de menú y pulse para seleccionar FUNCTION.
Operaciones avanzadas medianteel uso de botones especiales Recepción de anuncios de tráficoAl margen de la fuente que esté escuchando,puede recibir automáticamente anuncios de tráfi-co con la función TA (espera por anuncio de tráfi-co). 1 Sintonice una emisora TP o la emisora TP deotra red realzada....
Page 64 - Para buscar una canción; Para ir al menú superior de la búsqueda
Notas ! El iPod no puede encenderse o apagarsecuando el modo de control está ajustado en AUDIO . ! Desconecte los auriculares del iPod antes deconectarlo a esta unidad. ! El iPod se apagará aproximadamente dos mi-nutos después de que la llave de encendidodel automóvil se ponga en OFF. Visualización ...
Page 65 - Ajustes de audio
2 Haga girar M.C. para cambiar la opción de menú y pulse para seleccionar FUNCTION. 3 Gire M.C. para seleccionar la función. Una vez seleccionada, siga los siguientes pasospara ajustar la función: REPEAT (repetición de reproducción) 1 Pulse M.C. para mostrar el modo de ajuste. 2 Haga girar M.C. para...
Page 66 - Ajustes iniciales; Mantenga pulsado SRC/OFF hasta que se
La sonoridad compensa las deficiencias en lasgamas de frecuencias bajas y altas cuando se es-cucha a un volumen bajo. 1 Pulse M.C. para mostrar el modo de ajuste. 2 Gire M.C. para seleccionar el ajuste deseado. OFF (desactivado) — LOW (bajo) — MID (medio) — HIGH (alto) 3 Pulse M.C. para confirmar la...
Page 67 - Otras funciones; Uso de una fuente AUX; Inserte el miniconector estéreo en el co-; Conexiones; Esta unidad; Instalación
1 Pulse M.C. para activar o desactivar la visuali- zación de la demostración. EVER SCRL (ajuste del modo de desplazamiento) Si la función de desplazamiento continuo está ac-tivada (ON), la información de texto que hay regis-trada se desplaza de manera ininterrumpida por eldisplay. Desactive la funci...
Page 68 - Cable de alimentación; Notas; Montaje delantero/posterior de DIN; Montaje delantero DIN; Inserte el manguito de montaje en el sal-
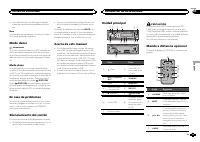
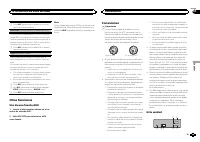
1 Salida delantera 2 Salida trasera 3 Entrada de la antena 4 Fusible (10 A) 5 Entrada del cable de alimentación 6 Entrada remota conectadaEs posible conectar un adaptador de mandoa distancia físicamente conectado (se vendepor separado). 7 Salida de subgraves Cable de alimentación 1 3 3 2 4 4 5 5 6 6...
Page 69 - Colocación del panel delantero
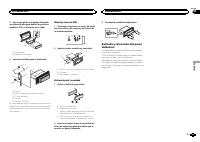
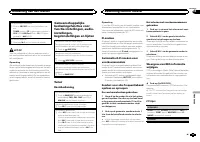
2 Fije el manguito de montaje utilizando un destornillador para doblar las pestañasmetálicas (90°) y colocarlas en su lugar. 1 2 1 Salpicadero 2 Manguito de montaje 3 Instale la unidad según la ilustración. 1 2 3 4 5 1 Tuerca 2 Muro cortafuego o soporte de metal 3 Correa metálica 4 Tornillo 5 Tornil...
Page 70 - Solución de problemas; Mensajes de error; Información adicional
Solución de problemas Síntoma Causa Resolución La pantallavuelve auto-máticamentea la visualiza-ción normal. No ha realizadoninguna opera-ción en aproxi-madamente 30segundos. Realice la opera-ción de nuevo. La gama derepetición dereproduccióncambia demanera ines-perada. Dependiendode la gama derepet...
Page 72 - Pautas para el manejo; Discos y reproductor
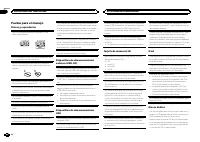
Pautas para el manejo Discos y reproductor Utilice únicamente discos que tengan uno deestos dos logotipos: Utilice discos de 12 cm. No utilice discos de 8 cmo un adaptador de discos de 8 cm. Utilice sólo discos convencionales y completa-mente circulares. No use discos con formas irre-gulares. No col...
Page 74 - Coloque esos archivos en una carpeta.
Compatibilidad con iPod Esta unidad sólo es compatible con los siguientesmodelos de iPod. Las versiones compatibles delsoftware iPod se muestran abajo. Es posible quelas versiones más antiguas no sean compatibles. ! iPhone 4 (versión del software 4.0) ! iPhone 3GS (versión del software 4.0) ! iPhone...
Page 76 - Zu diesem Gerät; Inhalt; Bevor Sie beginnen
Bevor Sie beginnen Zu diesem Gerät 76 Demo-Modus 77 Im Störungsfall 77 Abschalten des Tons 77 Zu dieser Anleitung 77 Bedienung des Geräts Hauptgerät 78 Optionale Fernbedienung 78 Display-Anzeige 78 Grundlegende Bedienvorgänge 79 Identische Menübedienung für Funktionseinstellungen/Audio- Einstellunge...
Page 77 - LASER KLASSE 1; VORSICHT; Hinweis; Im Störungsfall; Der Ton wird abgeschaltet, im Display wird; Zu dieser Anleitung; externes
VORSICHT Dieses Produkt ist ein Laserprodukt entspre-chend dem Lasersicherheitsstandard Klasse1 IEC 60825-1:2007 und verfügt über ein Laser-modul der Klasse 1M. Um eine fortwährendeSicherheit zu gewährleisten, dürfen keinerleiAbdeckungen entfernt und sich Zugang zumInneren des Produkts verschafft we...
Page 78 - Hauptgerät; Optionale Fernbedienung; Bedienung des Geräts
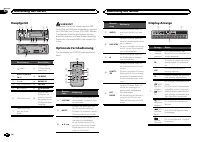
Hauptgerät d 7 8 3 b a 9 c 6 1 2 4 5 Bezeichnung Bezeichnung 1 (Liste) 8 AUX-Eingang(3,5-mm-Stereo-anschluss) 2 MULTI-CONTROL ( M.C. ) 9 TA / NEWS 3 1 bis 6 a BAND / ESC 4 Disc-Ladeschacht b SRC / OFF 5 h (Auswurf) c / DISP / SCRL 6 USB-Anschluss d Wenn Sie dieFrontplatte ab-nehmen, wird derSteckpla...
Page 79 - Grundlegende Bedienvorgänge; Wichtig
Anzeige Status 3 Pegelmes-seranzei-gebereich Die Pegel der Audioausgabewerden angezeigt. 4 Hauptan-zeigebe-reich Tuner: FrequenzEingebauter CD-Player, ex-ternes Speichermedium (USB,SD) und iPod: verstricheneWiedergabezeit und Textinfor-mationen Grundlegende Bedienvorgänge Wichtig ! Gehen Sie beim Ab...
Page 80 - Gebrauch des PI-Suchlaufs; angezeigt und der Ton; Verwendung der Stationstasten; Umschalten der RDS-Anzeige; Frequenz; Funktionseinstellungen
Tuner Grundlegende Bedienvorgänge Wahl eines Bands (Wellenbereich) 1 Drücken Sie BAND / ESC , bis der gewünschte Wellenbereich angezeigt wird ( FM1 , FM2 , FM3 für UKW bzw. MW/LW ). Manuelle (schrittweise) Abstimmung 1 Drücken Sie M.C. nach links oder rechts. Suchlauf 1 Drücken und halten Sie M.C. n...
Page 81 - Hinweise; Anzeigen von Textinformationen; Deutsch
2 Drehen Sie M.C., um die Menüoption zu wechseln, und drücken Sie FUNCTION, umdie angezeigte Option zu wählen. 3 Drehen Sie M.C., um die gewünschte Funktion zu wählen. Gehen Sie nach der Funktionswahl wie folgt vor,um die Funktion einzustellen. # Wenn das MW/LW-Band gewählt ist, stehen nur BSM oder ...
Page 85 - Grundeinstellungen
Sie können die Einstellungen für die derzeit ge-wählte Equalizer-Kurve nach Wunsch ändern. In-dividuell angepasste Equalizer-Kurven werdenunter CUSTOM1 oder CUSTOM2 gespeichert. ! Für jede Programmquelle kann eine separate CUSTOM1 -Kurve erstellt werden. Sobald Sie an einer anderen Equalizer-Kurve a...
Page 86 - Andere Funktionen; als Programmquelle zu wählen.
CLOCK SET (Einstellen der Uhrzeit) 1 Drücken Sie M.C. , um den Einstellmodus auf- zurufen. 2 Drücken Sie M.C. , um den Teil der Zeitanzeige zu wählen, der eingestellt werden soll.Stunden — Minuten 3 Drehen Sie M.C. , um die Uhrzeit einzustellen. CLOCK (Zeitanzeige Ein/Aus) 1 Drücken Sie M.C. , um di...
Page 87 - Anschlüsse; Dieses Gerät
Anschlüsse Wichtig ! Bei der Installation des Geräts in einemKraftfahrzeug, das am Zündschalter keinePosition ACC aufweist, kann es je nach An-schlusstyp zu einer Entleerung der Fahrzeug-batterie kommen, wenn das rote Kabel nichtmit dem Anschluss verbunden wurde, derfür die Erkennung des Zündschlüss...
Page 89 - Entfernen des Geräts; Entfernen Sie den Einpassungsring.; Fehlerbehebung; Fehlermeldungen; Zusätzliche Informationen
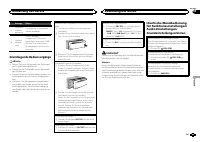
DIN-Rückmontage 1 Bestimmen Sie die geeignete Position, damit die Löcher an der Klammer und denGeräteseiten ordnungsgemäß ausgerichtetsind. 2 Ziehen Sie auf jeder Seite zwei Schrau- ben fest. 1 2 3 1 Blechschraube (5 mm × 8 mm) 2 Montageklammer 3 Armaturenbrett oder Konsole Entfernen des Geräts 1 En...
Page 91 - Handhabungsrichtlinien; Discs und Player
Meldung Ursache Abhilfemaßnah-me CHECK USB Das ange-schlosseneUSB-Speicher-medium ver-braucht mehrals 500 mA (ma-ximal zulässigerStromver-brauch). Trennen Sie dasUSB-Speicherme-dium von diesemGerät und verwen-den Sie es nichtmehr in Verbin-dung mit demGerät. Drehen Sieden Zündschlüs-sel in die Posit...
Page 93 - WMA
VORSICHT Bewahren Sie Discs, externe Speichermedien(USB, SD) oder einen iPod nicht an Orten auf,an denen hohe Temperaturen herrschen. Kompatible komprimierteAudioformate (Disc, USB, SD) WMA Dateierweiterung: .wma Bitrate: 48 kbit/s bis 320 kbit/s (CBR - KonstanteBitrate), 48 kbit/s bis 384 kbit/s (V...
Page 94 - Reihenfolge der Audio-Dateien; Copyright und Marke; mand; Technische Daten; Allgemein
iPod-Kompatibilität Dieses Gerät unterstützt nur die folgenden iPod-Modelle. Die unterstützten iPod-Softwareversionensind unten stehend aufgelistet. Ältere Versionenwerden ggf. nicht unterstützt. ! iPhone 4 (Softwareversion 4.0) ! iPhone 3GS (Softwareversion 4.0) ! iPhone 3G (Softwareversion 4.0) ! ...
Page 95 - Audio; USB
Abmessungen (B × H × T): DIN Einbaugröße ...... 178 mm × 50 mm × 165 mm Frontfläche ........ 188 mm × 58 mm × 18 mm D Einbaugröße ...... 178 mm × 50 mm × 165 mm Frontfläche ........ 170 mm × 46 mm × 18 mm Gewicht ........................... 1,16 kg Audio Max. Ausgangsleistung .... 50 W × 4 70 W × 1/...
Page 96 - Hartelijk dank; Informatie over dit toestel; LET OP; Inhoud; Vóór u begint
Vóór u begint Informatie over dit toestel 96 Demostand 97 Bij problemen 97 Uitschakeling van het geluid 97 Informatie over deze handleiding 97 Bediening van het toestel Hoofdtoestel 97 Optionele afstandsbediening 97 Display-indicaties 98 Basisbediening 98 Gemeenschappelijke bedieningsfuncties voor f...
Page 97 - Demostand; Nederlands
! Zorg dat dit toestel niet in aanraking komtmet vocht. ! Als de accu wordt losgekoppeld of leegraakt, wordt het voorkeuzegeheugen gewist. Opmerking Instellingen worden ook uitgevoerd als u hetmenu annuleert zonder te bevestigen. Demostand Belangrijk Als de rode draad (ACC) van dit toestel nietwordt...
Page 98 - Basisbediening; Belangrijk; Bediening van het toestel
Onder-deel Gebruik h AUDIO Druk op deze toets om eenaudio-functie te selecteren. i DISP / SCRL Druk op deze toets om eenander display te selecteren.Houd deze toets ingedrukt omtekstinformatie over het displayte laten schuiven. j e Druk op deze toets om het af-spelen te onderbreken (pauze)of te herva...
Page 99 - Opmerking; De voorkeuzetoetsen gebruiken; Programmaservicenaam
Een signaalbron selecteren 1 Druk op SRC / OFF om over te schakelen tus- sen: TUNER (tuner) — CD (ingebouwde cd-speler) — USB (USB)/ USB-iPod (iPod) — SD (SD-geheu- genkaart) — AUX (AUX) Het volume afstellen 1 Draai aan M.C. om het volume te regelen. LET OP Voor uw veiligheid en die van anderen moet...
Page 101 - Tekstinformatie weergeven; Opmerkingen
1 Druk op M.C. om de functie Stand-by voor ver- keersberichten in en uit te schakelen. AF (alternatieve frequenties zoeken) 1 Druk op M.C. om AF aan of uit te zetten. NEWS (onderbreking door nieuwsberichten) 1 Druk op M.C. om de nieuwsfunctie in of uit te schakelen. Cd/cd-r/cd-rw-discs en externeops...
Page 102 - Druk op
REPEAT (herhaalde weergave) 1 Druk op M.C. om de instellingenmodus weer te geven. 2 Draai aan M.C. om een herhaalbereik te selec- teren.Raadpleeg Een herhaalbereik selecteren op de vorige bladzijde voor meer informatie. 3 Druk op M.C. om de selectie te bevestigen. RANDOM (willekeurige weergave) 1 Dr...
Page 105 - Begininstellingen; Houd SRC/OFF ingedrukt tot het toestel
Als u wilt dat de luidsprekers voorin of achteringeen lage tonen (uit het frequentiebereik van desubwoofer) weergeven, kunt u het high pass filter(HPF) aanzetten. Alleen frequenties boven het ge-selecteerde bereik worden weergegeven door devoor- of achterluidsprekers. 1 Druk op M.C. om de instelling...
Page 106 - Overige functies; Steek de stereo-miniplugkabel in de; Verbindingen; Dit toestel; Vooruitgang; Installatie
TITLE (taalinstelling) Dit toestel kan titels weergeven in een Europesetaal of Russisch.Op een disk met gecomprimeerde audio kan tekst-informatie zijn vastgelegd zoals de titel, de naamvan de artiest of een opmerking. ! Als de gebruikte taal niet overeenkomt met detaalinstelling van dit toestel, wor...
Page 107 - Stroomkabel
5 Ingang stroomkabel 6 Ingang voor draadafstandsbedieningEen bedrade afstandsbedieningsadapter kanaangesloten worden (los verkrijgbaar). 7 Subwooferuitgang Stroomkabel 1 3 3 2 4 4 5 5 6 6 b 8 9 7 a e d c 1 Naar ingang stroomkabel 2 De functie van 3 en 5 kan verschillen af- hankelijk van het type voe...
Page 108 - Het toestel verwijderen; Het voorpaneel tegen diefstal ver wij-; Problemen verhelpen; Foutmeldingen; Aanvullende informatie
2 Montagebehuizing 3 Installeer het toestel zoals aangegeven. 1 2 3 4 5 1 Moer 2 Brandmuur of metalen steunvlak 3 Metalen band 4 Schroef 5 Schroef (M4 × 8) # Controleer of het toestel stevig op zijn plaats is gemonteerd. Het toestel functioneert wellicht nietnaar behoren als het niet goed is bevesti...
Page 110 - Aanwijzingen voor het gebruik; Discs en de player
Melding Oorzaak Maatregel ERROR-16 De versie van deiPod-firmware isverouderd. Werk de versievan de iPod bij. iPod-fout Verwijder dekabel uit de iPod.Sluit de kabelweer aan als hethoofdmenu vande iPod wordtweergegeven.Reset de iPod. STOP De huidige lijstbevat geensongs. Selecteer een lijstdie wel son...
Page 112 - Plaats de bestanden in een map.; Gemaakt voor iPod
LET OP Pioneer is niet verantwoordelijk voor eventueelverlies van gegevens op USB-geheugen, eendraagbare USB-audiospeler, een SD-geheugen-kaart of SDHC-geheugenkaart, ook niet als datgebeurt tijdens het gebruik van het toestel. Compatibiliteit met iPod Alleen de volgende iPod-modellen kunnen met dit...
Page 114 - Благодарим Вас; Сведения об этом устройстве; RDS; ЛАЗЕРНЫЙ ПРОДУКТ КЛАСС 1; Содержание; Перед началом эксплуатации
Перед началом эксплуатации Сведения об этом устройстве 114 Демонстрационный режим 115 В случае возникновения неполадок 115 Приглушение звука 115 Сведения об этом руководстве 115 Управление данным устройством Основное устройство 115 Дополнительный пульт дистанционного управления 115 Индикация на дисп...
Page 115 - Примечание; Демонстрационный режим
ВНИМАНИЕ ! Не допускайте попадания жидкости наданное устройство . Это может повлечь поражение электрическим током . Кроме того , попадание жидкости в устройство может стать причиной его выхода изстроя , перегрева и появления дыма . ! Pioneer CarStereo-Pass предназначен для использования только в Гер...
Page 116 - Важно; Управление данным устройством
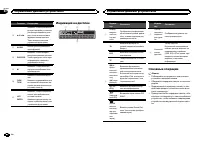
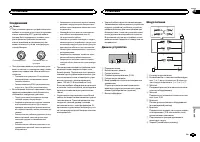
Элемент Назначение g a / b / c / d Нажмите , чтобыпроизвести ручную настройку с поиском , ускоренную перемотку впе - ред , назад и использовать функции поиска дорожки . Также используется дляуправления функциями . h AUDIO Используется для выборааудиофункций . i DISP / SCRL Нажмите , чтобывыбрать раз...
Page 117 - PI; PI seek; AUTO PI
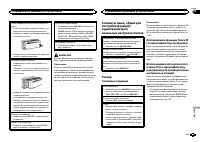
Снятие передней панели в целях защитыоткражи 1 Чтобыотсоединить переднюю панель , на - жмите на кнопку отсоединения панели . 2 Нажмите на панель по направлению вверхи потяните на себя . 3 Всегда храните отсоединенную переднююпанель в защитном футляре . Установка передней панели 1 Зафиксируйте левый ...
Page 118 - Список; Настройка функций; FUNCTION
Сохранение и вызов из памятирадиостанций для каждогодиапазона Использование кнопокпредварительной настройки 1 Чтобы сохранить в памяти нужную ра - диостанцию , нажмите одну из кнопок предварительной настройки ( с 1 по 6 ) и удерживайте ее , пока номер предвари - тельной настройки не прекратит мигать...
Page 119 - Основные операции; Примечания
Настройка с местным поиском позволяет Вамнастраиваться только на радиостанции с до - статочно мощными сигналами для качествен - ного приема . 1 Для отображения установочного меню на - жмите M.C. 2 Поворачивайте M.C. для выбора настрой - ки . FM: OFF — LEVEL1 — LEVEL2 — LEVEL3 — LEVEL4 MW/LW: OFF — L...
Page 120 - дорожек из списка
Выбор и воспроизведениефалов / дорожек из списка 1 Нажмите кнопку , чтобы отобразить список названий файлов / дорожек . 2 С помощью M.C. выберите нужное имя файла ( или папки ). Выбор названия файла или папки 1 Поворачивайте M.C. Воспроизведение 1 Выберите файл или дорожку и нажмите M. C. Просмотр с...
Page 121 - Поиск композиции
Отображение текстовойинформации Выбор текстовой информации 1 Нажмите кнопку / DISP / SCRL . Прокрутка текстовой информации влево 1 Нажмите и удерживайте / DISP / SCRL . Поиск композиции 1 Для перехода к главному меню поиска по списку нажмите . 2 С помощью M.C. выберите категорию / композицию . Выбор...
Page 122 - Регулировки параметров звука
Настройка функций 1 Нажмите M.C. , чтобы открыть главное меню . 2 Поворачивайте M.C. для прокрутки пунктов меню ; нажмите FUNCTION , чтобы выбрать . 3 Для выбора функции поворачивайте M.C. Затем выполните следующие действия , чтобыподтвердить настройку . REPEAT ( повторное воспроизведение ) 1 Для от...
Page 123 - Начальные настройки; SRC
1 Для отображения установочного меню на - жмите M.C. 2 Поворачивайте M.C. , чтобывыбрать кри - вую эквалайзера . POWERFUL — NATURAL — VOCAL — CU- STOM1 — CUSTOM2 — FLAT — SUPER BASS 3 Нажмите M.C. , чтобыподтвердить выбор . GRAPHIC EQ ( регулировка эквалайзера ) Выможете отрегулировать текущую выбра...
Page 124 - Другие функции; AUX
CLOCK SET ( установка часов ) 1 Для отображения установочного меню на - жмите M.C. 2 Нажимайте M.C. , чтобывыбрать сегмент дисплея часов , который Вы хотите устано - вить . Часы — Минуты 3 Поворачивайте M.C. , чтобыотрегулировать время . CLOCK ( включение / выключение часов ) 1 Нажмите M.C. , чтобыв...
Page 125 - Соединения; Данное устройство; Установка
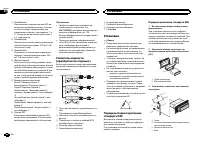
Соединения Важно ! При установке данного устройства в авто - мобиле , в котором отсутствует положение ключа зажигания АСС , красный кабель должен быть подключен к клемме , кото - рая определяет рабочее положениеключа зажигания ; в противном случае может возникнуть утечка тока аккумуля - торной батар...
Page 126 - SW CONTROL; Усилительмощности; RCA; Переднее; Переднее крепление стандарта
9 Синий / белый Расположение штекера разъема ISO на различных автомобилях может отличать - ся . Если штекер 5 предназначен для управления антенной , подсоедините 9 к b . На других автомобилях подключать 9 к b запрещается . a Синий / белый Подключите к клемме панели управленияусилителя мощности ( мак...
Page 127 - Устранение неисправностей; Сообщения об ошибках; Дополнительная информация
5 Винт (M4 × 8) # Убедитесь , что устройство надежно закрепле - но в гнезде . Неустойчивость устройства может привести к его выпадению и неполадкам в рабо - те . Заднее крепление стандарта DIN 1 Совместите отверстия на кронштейне и боковых панелях устройства . 2 Затяните по два винта с каждой сторо ...
Page 129 - Диски и проигрыватель
Сообщение Причина Действие ERROR-19 Сбой связи . ! Выполните следующие дей - ствия . – Установите ключ зажиганияв положение OFF, а затем – в положение ON. – Отсоедините или извлекитевнешнее запо - минающее ус - тройство . – Выберите дру - гой источник сиг - нала . Затем снова вы - берите USB или SD ...
Page 130 - компакт
Запоминающее устройство USB Подключение через USB- концентратор не под - держивается . Не подключайте других устройств , кроме запо - минающих устройств USB. При движении автомобиля надежно закрепитезапоминающее устройство USB. Не роняйте запоминающее устройство USB на пол , где оно может застрять п...
Page 131 - Диск; Pioneer; Поддержка
WAV Расширение : .wav Разрядность квантования : 8 и 16 (LPCM), 4 (MS ADPCM) Частота дискретизации : от 16 кГц до 48 кГц (LPCM), 22,05 кГц и 44,1 кГц (MS ADPCM) AAC Совместимый формат : файлы AAC, преобраз - ованные при помощи iTunes Расширение : .m4a Частота дискретизации : от 11,025 кГц до 48 кГц С...
Page 132 - Технические характеристики; Общие; Аудио
Функции iPod могут различаться в зависимо - сти от версии программного обеспечения . Для подключения iPod с разъемом Dock Con- nector требуется соответствующий USB ка - бель . Интерфейсный кабель Pioneer CD-IU50 можно приобрести отдельно . За дополнительной ин - формацией обращайтесь к Вашему дилеру...
Page 135 - Русский