Page 4 - empty page before TOC
Page 6 - Contents; Read all instructions before using this product.
English 6 English Contents IMPORTANT SAFETY INSTRUCTIONS ______________________ 6 Introduction __________________________________________ 12 General description ____________________________________ 12 What do the icons on my product handle mean?___________ 13 How do I connect my shaver and smartphon...
Page 7 - DANGER; To reduce the risk of electric shock:; WARNING
7 English DANGER To reduce the risk of electric shock: - To charge the product, only use a USB power source on a certified product with output rating 5 V, ≥ 1 A. For safe chargingin a moist environment (e.g. in a bathroom), only use an IPX4(splash-proof) power source. A suitable power source (e.g. P...
Page 10 - Philips Norelco Quick Clean Pod Cartridge fluid; - The frequency band in which the appliance
10 English - To avoid accidental short-circuiting of batteries after removal, do not let battery terminals come into contact with metal objects(e.g. coins, hairpins, rings). Do not wrap batteries in aluminumfoil. Tape battery terminals or put batteries in a plastic bagbefore you discard them. Philip...
Page 11 - equipment and receiver.
11 English interference received, including interference thatmay cause undesired operation. This equipment has been tested and found tocomply with the limits for a Class B digital device,pursuant to Part 15 of the FCC Rules. These limitsare designed to provide reasonable protectionagainst harmful in...
Page 12 - SAVE THESE INSTRUCTIONS; Introduction
12 English Inc. and any use of such marks by KoninklijkePhilips N.V. is under license. SAVE THESE INSTRUCTIONS Introduction Congratulations on your purchase and welcometo Philips Norelco! To fully benefit from thesupport that Philips offers, register your productat www.philips.com/welcome or via the...
Page 13 - - This shaver is waterproof. It is suitable for use; Icon Behavior; blue
13 English The accessories supplied may vary for differentproducts. The box shows the accessories thathave been supplied with your product. - This shaver is waterproof. It is suitable for use in the bath or shower and for cleaning underthe tap. For safety reasons, the shaver cantherefore only be use...
Page 14 - green
14 English Icon Behavior Meaning Flashing quicklywhen you removethe shaver fromthe Quick CleanPod or press theon/off buttonduring thecleaning program The cleaning program was stopped. Ifyou wish to continue, you need torestart the cleaning cycle by putting theshaver into the Quick Clean Pod andpress...
Page 15 - Lights up; white; The product is in quick charge mode.
15 English Icon Behavior Meaning Lights up white when you pick upthe product. The number of bars lit up show theremaining battery charge. Bottom lightflashing orange The battery is low. If the light flashesfast, the battery is almost empty. All three lightsflashing insequence The product is in quick...
Page 16 - Pair the shaver and smartphone; More information is available at
16 English to take your smartphone with you when youshave.The first few times you switch on the shaver, thenotification symbol flashes if no connection isestablished with a smartphone. 3 sec. You can switch off Bluetooth on your shaver byactivating the travel lock (see 'Storage andtravel'). Pair the...
Page 17 - Notification symbol; Press and hold the on/off
17 English Notification symbol The shaver is equipped with a notificationsymbol. The notification symbol lights up whenthere is an important message for you in the app.When it lights up, simply open the app on yoursmartphone and follow the easy tips that the appgives you. If you need further support...
Page 18 - Tap on the name of the shaver.; How do I charge my product?; - Charge the product before you use it for the
18 English Note: Unpairing is successful when thenotification symbol lights up 4 times briefly. Unpair your smartphone:1 Go to the settings on your smartphone andselect Bluetooth. 2 Tap on the name of the shaver. 3 Tap 'forget' or 'unpair'. Note: The unpairing procedure may vary bysmartphone. Please...
Page 19 - Make sure that the product is switched off.; - While the product charges, first the bottom
19 English Danger: Keep the USB cable and the USBpower source dry. 1 Make sure that the product is switched off. 2 Insert the small plug of the USB cable into thesocket in the bottom of the product. NOT INCLUDED 3 Insert the USB plug into the USB power source(not included). NOT INCLUDED 4 Insert the...
Page 20 - Charging in the charging stand; How do I use my product?
20 English 5 After charging, remove the USB power sourcefrom the power outlet and pull the small plugout of the product. Charging in the charging stand 1 Make sure that the product is switched off. 2 Put the small plug in the charging stand andput the power cord in the power outlet. 3 Put the produc...
Page 21 - SenseIQ technology; contribute to the best shaving results.; Shaving; Switch on the product.
21 English Note: This product is waterproof. It is suitable foruse in the bath or shower and for cleaning underthe tap with water. For safety reasons, thisproduct can only be used without cord. SenseIQ technology This product is equipped with SenseIQtechnology which intelligently detects your beardd...
Page 22 - When you have finished shaving you
22 English Note: Do not press too hard, as this can causeskin irritation. Note: If you are shaving with gel or foam, rinsethe shaving unit regularly during your shave toensure that it continues to glide smoothly overyour skin. 3 Use the narrow sides of the shaving unit toshave in hard-to-reach areas...
Page 24 - Cleaning reminder; - Clean the shaving heads thoroughly once a; Trimming
24 English Cleaning reminder When you switch off the product, the cleaningreminder flashes to remind you to clean theproduct.- Clean the product and attachments after each use (see 'How do I clean my shaver?') toprevent clogging and damage. - Clean the shaving heads thoroughly once a month or when t...
Page 25 - Using the click-on attachments; Using the beard styler attachment with comb
25 English Using the click-on attachments Note: The accessories supplied may vary fordifferent products. The box shows the accessoriesthat have been supplied with your product. Using the beard styler attachment with comb You can use the beard styler attachment with thecomb attached to style your bea...
Page 26 - Pull the comb off the beard styler attachment.; Using the nose/ear trimmer attachment
26 English 5 Move the product upwards while you exertgentle pressure. Make sure the front of thecomb is in full contact with the skin. 6 Switch off the product and clean theattachment after each use (see 'How do I cleanmy shaver?'). Using the beard styler attachment withoutcomb You can use the beard...
Page 27 - Trimming ear hair
27 English 1 Twist the shaving head or other attachment toremove it from the handle and press thenose/ear hair trimmer onto the handle. 2 Switch on the product. 3 Carefully insert the trimming head into one ofyour nostrils. Do not insert the attachment more than0.5 cm into your nostrils. 4 Slowly mo...
Page 28 - How do I clean my shaver?; Cleaning the shaver under the tap; Switch on the shaver.
28 English 4 Slowly turn the trimming head around toremove all unwanted hairs from your outer earchannel. 5 Switch off the product and clean theattachment after each use (see 'How do I cleanmy shaver?'). How do I clean my shaver? Clean the product and the attachments aftereach use for optimal perfor...
Page 29 - Rinse the hair chamber under a warm tap.; Thorough cleaning
29 English 4 Rinse the hair chamber under a warm tap. 5 Rinse the shaving head holder under a warmtap. 6 Carefully shake off excess water and let theshaving head holder air-dry completely. 7 Close the shaving unit. Thorough cleaning We advise you to clean the shaving headsthoroughly once a month or ...
Page 30 - Clean the cutter and guard under the tap.; Cleaning the pop-up trimmer
30 English 3 Rinse the hair chamber and shaving headholder under the tap. 4 Remove the shaving heads. For detailedinstructions, see 'How do I replace the shavingheads?'. Note: Do not clean more than one cutter andguard at a time, since they are all matchingsets. If you accidentally put a cutter in t...
Page 31 - How do I use the Quick Clean Pod?; Preparing the Quick Clean Pod for use
31 English 1 Make sure that the product is switched off anddisconnected from the power outlet. 2 Push the trimmer release slide down to openthe pop-up trimmer. 3 Switch on the product and rinse the pop-uptrimmer with warm water. 4 After cleaning, switch off the product. 5 Carefully shake off excess ...
Page 32 - Using the Quick Clean Pod
32 English 3 Lift the tab on the seal and pull it by the cornerto remove the seal from the Quick Clean PodCartridge. 4 Press the small circular piece on the handle ofthe Quick Clean Pod Cartridge to break thesnap hook on the handle. 5 Place the Quick Clean Pod Cartridge into theQuick Clean Pod. 6 Pu...
Page 33 - Icon
33 English Always shake excess water off the shaverbefore you place it in the Quick Clean Pod. 1 Place the shaver upside down into the QuickClean Pod. The shaver automatically detectsthat it is in the Quick Clean Pod. 2 Switch on the shaver to start the cleaningprogram. Each cleaning program takes a...
Page 34 - Replacing the Quick Clean Pod Cartridge; Frequency of use
34 English Replacing the Quick Clean Pod Cartridge Replace the Quick Clean Pod Cartridgeimmediately when the cartridge replacementicon on the Quick Clean Pod becomes visible orfollow the table below. Frequency of use Cycles When to replace the Quick Clean Pod Cartridge Every day About 30 Every month...
Page 35 - Scan the QR code to the left or visit; Cleaning the click-on attachments
35 English 3 Pour any remaining fluid down a drain andrecycle the empty cartridge in accordance withlocal waste regulations. 4 Place a new Quick Clean Pod Cartridge intothe Quick Clean Pod. Scan the QR code to the left or visit www.philips.com/cleaning-cartridge to order replacement Quick Clean PodC...
Page 36 - Storage and travel; - Be sure the product is switched off. Remove
36 English Never dry the cutting unit with a towel ortissue, as this may damage the trimmingteeth. Tip: For optimal performance, lubricate theteeth of the beard styler attachment with adrop of sewing machine oil regularly. Storage and travel - Be sure the product is switched off. Remove the power co...
Page 37 - Travel lock; How do I replace the shaving heads?; Replacing the shaving heads; Switch off the shaver.
37 English Travel lock You can lock the shaver when you are going totravel to prevent it from switching onaccidentally. Activating the travel lock 3 sec. Press the on/off button for 3 seconds to use thetravel lock mode. When the travel lock is activated, the travel locksymbol flashes. Note: When the...
Page 38 - Place new shaving heads in the holder.
38 English 2 Press the release button on the shaving unitand pull the shaving head holder off theshaving unit. 1 2 3 Turn the retaining rings counterclockwise andremove them. Place them aside in a safe place. 4 Remove the shaving heads from the shavinghead holder. Discard the used shaving heads imme...
Page 39 - Accessories
39 English 7 Insert the hinge of the shaving head holderinto the slot in the top of the shaving unit andclose the shaving unit. Accessories Replacement parts and accessories may bepurchased at a store near you or on our website www.philips.com/store . The following accessories and spare parts areava...
Page 40 - - Contact your local town or city officials for; Full Two-Year Warranty; IMPORTANT; : This warranty does not cover
40 English - Contact your local town or city officials for battery disposal information. You can also call1-800-822-8837 or visit www.call2recycle.org for battery drop-off locations. - For assistance, visit our website www.philips.com/support or call 1-8xx-xxx- xxxx toll free. - Your product is desi...
Page 41 - In order to obtain warranty service, simply go to
41 English In order to obtain warranty service, simply go to www.philips.com/support . It is suggested that for your protection you return shipments ofproduct by insured mail, insurance prepaid.Damage occurring during shipment is notcovered by this warranty. NOTE: No other warranty, written or oral,...
Page 42 - We cannot be responsible for lost mail.; Supplier's Declaration of Conformity; Responsible Party – U.S. Contact Information
42 English We cannot be responsible for lost mail. The product must be postmarked no later than45 days after the date of purchase. Philipsreserves the right to verify the purchase price ofthe product and limit refunds not to exceedsuggested retail price. To obtain money-back guarantee service,please...
Page 43 - Trademarks
43 English Stamford | CT 06904 1-800-243-3050 Trademarks Apple, the Apple logo, iPad, and iPhone aretrademarks of Apple Inc., registered in the U.S.and other countries. App Store is a service markof Apple Inc. Android is a trademark of Google Inc. GooglePlay and the Google Play logo are trademarks o...
Page 44 - Contenido; Lea todas las instrucciones antes de usar este producto.
Español 44 Español Contenido INSTRUCCIONES IMPORTANTES DE SEGURIDAD ___________ 44 Introducción __________________________________________ 50 Información general ___________________________________ 51 ¿Qué significan los íconos que están en el mango delproducto? _ 52 ¿Cómo conecto la afeitadora con ...
Page 45 - PELIGRO; Para reducir el riesgo de descarga eléctrica:
45 Español PELIGRO Para reducir el riesgo de descarga eléctrica: - Para cargar el producto, use solo una fuente de alimentación USB en un producto certificado con valores de salida de 5 V, ≥1 A. Para la carga segura en ambientes húmedos (por ejemplo,en un baño), use solo una fuente de alimentación I...
Page 46 - ADVERTENCIA
46 Español ADVERTENCIA Para reducir el riesgo de quemaduras, incendio, descargaeléctrica o lesiones: - Este producto no está destinado a personas (adultos o niños) con capacidades física, sensorial o mental disminuidas, o que notengan los conocimientos o la experiencia necesarios, a menosque una per...
Page 48 - Líquido para cartucho del Quick Clean Pod de Philips Norelco
48 Español - No coloque los productos y sus baterías en hornos microondas ni en ollas de inducción. - No abra, modifique, perfore, dañe ni desarme el producto o la batería, para evitar que las baterías se calienten o liberensustancias tóxicas o peligrosas. No provoque un cortocircuito,sobrecargue ni...
Page 49 - - La potencia máxima de radiofrecuencia
49 Español - La potencia máxima de radiofrecuencia irradiada en la banda de frecuencia en la quefunciona el aparato es inferior a 20 dBm - Este dispositivo cumple con los límites de exposición a la radiación por radiofrecuenciade las reglas FCC y ha sido evaluado deacuerdo con la condición de exposi...
Page 50 - - Aumentar la distancia entre el equipo y el; Introducción
50 Español este equipo causa interferencia perjudicial a larecepción de radio o televisión, lo cual puededeterminarse encendiendo y apagando elequipo, se le recomienda al usuario tratar decorregir la interferencia tomando una o más delas siguientes medidas:- Reorientar o cambiar de lugar la antena r...
Page 51 - Información general
51 Español asistencia que te ofrece Philips, registra tuproducto en www.philips.com/welcome o a través de la aplicación. Información general 1 Cortadora emergente2 Botón deslizante de apertura de cortadora3 Unidad de afeitado4 Botón de liberación de la unidad de afeitado5 Botón de encendido/apagado6...
Page 52 - - Esta afeitadora es resistente al agua. Es; Íco; Pulsa en color; azul
52 Español - Esta afeitadora es resistente al agua. Es apropiado para su uso en el baño o la ducha ypuede lavarse en la llave. Por motivos deseguridad, por lo tanto la afeitadora debeemplearse únicamente sin cable. ¿Qué significan los íconos que están en elmango del producto? Íco no Comportamien t...
Page 53 - verde; Se ilumina
53 Español Íco no Comportamien to Significado Parpadearápidamentecuando retira laafeitadora delQuick Clean Podo presiona elbotón deencendido/apagado durante elprograma delimpieza Se detuvo el programa de limpieza. Sidesea continuar, es necesario quereinicie el ciclo de limpieza; parahacerlo, colo...
Page 54 - Parpadeante; blanco
54 Español Íco no Comportamien to Significado Parpadeante El producto se tiene que desconectardel tomacorriente antes de que sepueda encender. Parpadea alpresionar elbotón deencendido El bloqueo de viaje está activado (ver'Almacenamiento y viaje'). Se ilumina encolor blanco cuando tomas elproducto...
Page 55 - Bluetooth®; Empareja la afeitadora y el teléfono inteligente; Obtén más información en
55 Español ¿Cómo conecto la afeitadora con mismartphone? Nota: Asegúrate de que tu teléfono inteligenteesté equipado con Bluetooth® 4.2 o superior. Esta afeitadora cuenta con Bluetooth® 4.2 y versiones superiores para conectarse a laaplicación. Cuando haya apareado la afeitadora ysu smartphone, el ...
Page 56 - Encienda la afeitadora.; Símbolo de notificación
56 Español S7920 2 Asegúrate de que el Bluetooth esté encendidoen tu teléfono inteligente. 3 Encienda la afeitadora. 4 Abre la aplicación y sigue las instruccionespara iniciar el proceso de apareo. 5 Cuando se hayan emparejado, la afeitadora yla aplicación se conectarán automáticamentecuando abras l...
Page 57 - Desempareja la afeitadora y el teléfono inteligente; Desempareja la afeitadora:; Mantén presionado; ¿Cómo se carga el producto?
57 Español 2 La aplicación se conecta automáticamente ysincroniza sus últimas afeitadas. Desempareja la afeitadora y el teléfono inteligente Puedes emparejar tu afeitadora con un soloteléfono inteligente a la vez. Para desaparejar laafeitadora de tu teléfono inteligente (porejemplo, cuando adquieres...
Page 58 - - Cargue el producto antes de usarlo por
58 Español regadera y puede limpiarse colocándolo bajo elagua de la llave. Por razones de seguridad, esteproducto solo puede usarse sin cable. - Cargue el producto antes de usarlo por primera vez y cuando la luz inferior delindicador de estado de la batería empiece aparpadear de color naranja, lo qu...
Page 59 - - Cuando el producto se ha cargado; Carga en la base de carga; Asegúrese de que el producto esté apagado.
59 Español NOT INCLUDED 4 Inserte la fuente de alimentación USB en eltomacorriente.- Mientras el producto está en modo de carga rápida, las luces del indicador deestado de la batería se van iluminando unatras otra. Después de aproximadamente 5minutos, empieza a parpadear la luzinferior del indicador...
Page 60 - Coloque el producto en la base de carga.; ¿Cómo se usa el producto?
60 Español 2 Coloque la clavija pequeña en la base de cargay conecte el cable de alimentación altomacorriente. 3 Coloque el producto en la base de carga. Símbolo de "Desconectar para usar" El símbolo de "Desconectar para usar" parpadeapara recordarle que debe desconectar la fuentede ...
Page 61 - Tecnología SenseIQ; - Siga los consejos que se obtengan de las; Afeitado; Encienda el producto.
61 Español Por motivos de higiene, el producto debeemplearse únicamente por una persona. Tecnología SenseIQ Este producto está equipado con tecnologíaSenseIQ que detecta automáticamente ladensidad de su barba y su técnica de afeitado.Debes usar la aplicación para aprovechar estafunción. Para una mej...
Page 63 - Al terminar de afeitarse, recibirá; - Cuando se puede mejorar el movimiento; naranja; - Prueba de 21 días y proceso de adaptación. Es
63 Español SenseIQ: Al terminar de afeitarse, recibirá retroalimentación en el mango. El ícono delsensor de Control de movimiento se iluminade varios colores para darle retroalimentaciónsobre su afeitado en general. - Cuando te afeitas con el movimiento correcto (movimientos circulares), el íconodel...
Page 64 - - Sea perseverante. Si alterna entre métodos de; Recordatorio de limpieza; - Limpie los cabezales de afeitado a fondo una; Recorte
64 Español - Sea perseverante. Si alterna entre métodos de afeitado durante el período de adaptación,será más difícil acostumbrarse al sistema deafeitado de Philips Norelco. - Si después de 21 días todavía no está satisfecho con los resultados, Philips Norelco lereembolsará el precio total de la com...
Page 65 - Uso de los accesorios de ajuste de clic.
65 Español 3 Sostenga la cortadora perpendicular a la piel ymuévala hacia abajo ejerciendo una presiónsuave. 4 También puedes usar el recortador paraafeitar el área debajo de la nariz. 5 Apague el producto y limpie la cortadoradespués de cada uso para evitar que seobstruya o se dañe. 6 Cierre la cor...
Page 67 - Saque el peine de la recortadora de barba.; Cómo cortar el vello de nariz
67 Español 1 Saque el peine de la recortadora de barba. Nota: Tome el peine por el centro para sacarlodel accesorio de recortadora de barba. No jalede los lados del peine. 2 Encienda el producto. 3 Sostén el accesorio de recortadora de barbaperpendicular a la piel y mueve el dispositivohacia abajo m...
Page 68 - Cómo cortar el vello de las orejas
68 Español 4 Mueve el cabezal de recorte lentamentealrededor de cada fosa nasal para asegurartede que la punta del recortador se sostengafirmemente contra la piel. Esto reduce elefecto de picazón que podría ocurrir. 5 Desconecte el producto y limpie el accesoriodespués de cada uso. El moco nasal sec...
Page 69 - ¿Cómo se limpia la afeitadora?; Limpieza de la afeitadora bajo la llave de agua.
69 Español ¿Cómo se limpia la afeitadora? Para un óptimo desempeño, limpie el producto ylos accesorios después de cada uso. Limpieza de la afeitadora bajo la llave de agua. Limpie la afeitadora después de cada uso paraevitar que se obstruya o se dañe. Nunca seque la unidad de afeitado con unatoalla ...
Page 70 - Cierre la unidad de afeitado.; Limpieza a fondo
70 Español 5 Enjuague el sostenedor del cabezal deafeitado con agua caliente de la llave. 6 Elimine cuidadosamente el exceso de agua ydeje que el soporte del cabezal de afeitado seseque al aire completamente. 7 Cierre la unidad de afeitado. Limpieza a fondo Le aconsejamos que limpie los cabezales de...
Page 71 - Limpie el cortador y el protector en el grifo.; Limpieza de la cortadora emergente
71 Español protector de afeitado equivocado, tardarávarias semanas en volver a lograr undesempeño óptimo del afeitado. 5 Limpie el cortador y el protector en el grifo. 6 Sacuda el exceso de agua. 7 Vuelve a colocar los cabezales de afeitado ensu soporte. Para consultar instruccionesdetalladas, vea &...
Page 72 - Después de la limpieza, apague el producto.; ¿Cómo uso el Quick Clean Pod?; Preparación del Quick Clean Pod para el uso
72 Español 3 Enciende la afeitadora y enjuaga la cortadoraemergente con agua tibia. 4 Después de la limpieza, apague el producto. 5 Elimina cuidadosamente el exceso de agua ydeja que la cortadora emergente se seque alaire. 6 Cierre la cortadora. Sugerencia: Para obtener un rendimientoóptimo, lubriqu...
Page 73 - Uso del Quick Clean Pod
73 Español 4 Presione la pequeña pieza circular en elmango del cartucho del Quick Clean Pod pararomper el broche de presión del mango. 5 Coloque el cartucho del Quick Clean Pod en elQuick Clean Pod. 6 Vuelva a colocar la parte superior del QuickClean Pod en la base y gírela en el sentido delas manec...
Page 74 - Ícono Comportamiento
74 Español 2 Encienda la afeitadora para iniciar el programade limpieza. Cada programa de limpieza tomaaproximadamente un minuto. Durante elprograma de limpieza, el símbolo de limpiezase queda continuamente iluminado y el íconoazul pulsa. La afeitadora vibra dos veces rápidamentecuando termina el pr...
Page 75 - Reemplazo del cartucho del Quick Clean Pod
75 Español Reemplazo del cartucho del Quick Clean Pod Reemplace el cartucho del Quick Clean Podinmediatamente cuando el ícono de reemplazodel cartucho del Quick Clean Pod se vuelvavisible, o bien, siga las indicaciones que semuestran en la siguiente tabla. Frecuencia de uso Ciclos Cuándo reemplazar ...
Page 76 - para; Limpieza de los accesorios de ajuste de clic
76 Español 3 Vierta el líquido restante por el desagüe yrecicle el cartucho vacío conforme a lareglamentación local en materia de residuos. 4 Coloque un nuevo cartucho del Quick CleanPod en el Quick Clean Pod. Escanea el código QR que se encuentra a laizquierda o visita www.philips.com/cleaning-cart...
Page 77 - Almacenamiento y viaje; - Asegúrese de que el producto esté apagado.
77 Español 4 Elimina cuidadosamente el exceso de agua dela recortadora de barba, los peines y losaccesorios de la recortadora de vello denariz/oreja y deja que se sequen porcompleto. Nunca seque el elemento de corte con unatoalla o paño, ya que esto puede dañar eldentado de recorte. Sugerencia: Para...
Page 78 - Bloqueo para viajes
78 Español - Coloca la tapa protectora (si se incluye) en la afeitadora para protegerla de la acumulaciónde suciedad. - Guarda el producto en el estuche de viaje.- Como alternativa, guarda la afeitadora en el soporte de carga (si se incluye) o en el QuickClean Pod de Philips (si se incluye). Bloqueo...
Page 79 - Reemplazo de los cabezales de afeitado; Apague la afeitadora.
79 Español ¿Cómo se reemplazan los cabezales deafeitado? Para un rendimiento de afeitado óptimo, leaconsejamos que reemplace los cabezales deafeitado cada año. Reemplace los cabezales deafeitado dañados inmediatamente. Siempre reemplace los cabezales de afeitado concabezales originales de Philips No...
Page 80 - - Cada anillo de retención tiene dos ranuras que; Accesorios; - Paquete de 2 cartuchos del Quick Clean Pod
80 Español 1 2 6 Coloque los anillos de retención de nuevo enlos cabezales de afeitado y gírelos hacia laderecha para volver a colocar el anillo deretención. - Cada anillo de retención tiene dos ranuras que ajustan perfecto en los salientes del soportedel cabezal de afeitado. Gira el anillo hacia la...
Page 81 - Asistencia
81 Español Asistencia Consulta https://www.usa.philips.com/c-m- pe/face-shavers para obtener más información sobre tu afeitadora. Para obtener más ayuda, visita nuestro sitio web: www.philips.com/support o llama al número gratuito 1-800-243-3050.. La información en línea está disponible las24 horas,...
Page 82 - Garantía Total de Dos Años; IMPORTANTE; : Esta garantía no cubre ningún
82 Español Garantía Total de Dos Años Philips North America LLC garantiza esteproducto nuevo (excepto los cabezales deafeitado) contra defectos en los materiales o enla mano de obra por un período de dos añosdesde la fecha de compra y acepta reparar oreemplazar cualquier producto defectuoso sincargo...
Page 83 - *Lea las instrucciones adjuntas atentamente.
83 Español exclusión o la limitación de los daños fortuitos oresultantes, de modo que es posible que laslimitaciones o exclusiones arriba mencionadas nose apliquen a su caso. *Lea las instrucciones adjuntas atentamente. GARANTÍA DE DEVOLUCIÓN DE SU DINEROPOR 45 DÍAS Para disfrutar de una afeitada có...
Page 84 - Declaración de conformidad del proveedor
84 Español Para obtener el servicio de garantía dedevolución de dinero, visitewww.PhilipsMoneyBack.com. La entrega del cheque de reembolso ocurriráde 6 a 8 semanas después de la recepción delproducto devuelto. Declaración de conformidad del proveedor Este dispositivo cumple con la Parte 15 de lasreg...
Page 85 - Philips North America LLC.; Marcas registradas
85 Español Philips North America LLC. Apartado postal 10313 Stamford | CT 06904 1-800-243-3050 Marcas registradas Apple, el logotipo de Apple, iPad y iPhone sonmarcas comerciales de Apple Inc., registradas enlos Estados Unidos de América y otros países. AppStore es una marca de servicio de Apple Inc...
Page 89 - Empty page before back cover
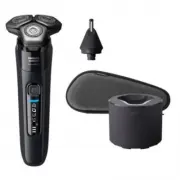


 Philips S7887/82 User Manual
 Philips S8692/35 User Manual
 Philips S8696/35 User Manual
 Philips S8697/35 User Manual
 Philips S9311 Manual
 Philips S9321/89 User Manual
 Philips S9721 Manual
 Philips S9974/35 User Manual
 Philips S9974/55 User Manual
 Philips S9974/63 User Manual
 Philips S9975/35 User Manual
 Philips S9975/55 User Manual