Page 2 - Contents
2 EN Contents 1 Important 3 2 Your Micro System 4 Introduction 4 What's in the box 4 Over view of the main unit 5 Over view of the remote control 6 3 Get started 8 Placement 8 Prepare FM/DAB+ antenna 8 Prepare the remote control 8 Connect power 8 Set clock 8 Turn on 9 4 Play 9 Play from iPod/iPhone/...
Page 3 - Important
3 EN 1 Important Warning • Never remove the casing of this micro system. • Never lubricate any par t of this system. • Never place this system on other electrical equipment. • Never look into the laser beam inside this system. • Keep this system away from direct sunlight, naked flames or heat. • Mak...
Page 4 - Introduction
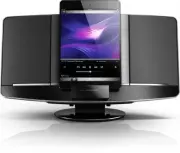
4 EN 2 Your Micro System Congratulations on your purchase, and welcome to Philips! To fully benefit from the suppor t that Philips offers, register your product at www.philips.com/welcome. Introduction With this micro system, you can: • enjoy audio from discs, iPod/iPhone/iPad, USB devices, and othe...
Page 5 - Overview of the main unit
5 EN Overview of the main unit a • Connect a USB storage device. b • Headphone socket. c • Turn the system on. • Switch to standby mode. d SOURCE • Select a source: CD, USB, DAB+, FM, MP3 Link, or Dock. D O C K f o r a hi j b cdef k l m g o p n DC IN 3A V 12 FM ANT MP 3-LINK OK / MENU / SOURCE VOLUM...
Page 6 - Overview of the remote
6 EN h • Open or close the disk tray. i VOLUME + / - • Adjust volume. j MENU/ • For iPhone 5, go back to the previous menu. • Access FM/DAB+ menu. • Stop play or erase a program. k Display panel • Show play information. l Disc tray m DOCK for iPod/iPhone/iPad n DC IN • Connect power. o FM ANT • Impr...
Page 8 - Get started; Placement; Mount on a wall; Prepare the remote control; Set clock
8 EN 3 Get started Caution • Use of controls or adjustments or performance of procedures other than herein may result in hazardous radiation exposure or other unsafe operation. Always follow the instructions in this chapter in sequence. Placement You can place the system on a flat surface or mount i...
Page 9 - Turn on; Switch to standby mode
9 EN 2 Press and hold CLOCK on the remote control for two seconds. » [SET CLOCK] (set clock) scrolls on the display, and then 12 or 24 hour format blinks. 3 Press / repeatedly to select the hour format. 4 Press CLOCK to confirm. 5 Repeat steps 3-4 to set the hour and minute respectively. 6 Repeat st...
Page 10 - Play disc
10 EN Listen to the iPod/iPhone/iPad Note • Make sure that the iPod/iPhone/iPad is loaded correctly. 1 Press SOURCE repeatedly or DOCK on the remote control to select iPod/iPhone/ iPad source. 2 Play tracks on the iPod/iPhone/iPad. • To pause or resume play, press . • To skip to a track, press / . •...
Page 11 - Program tracks
11 EN Control play (CD/USB mode) / Select an audio file; Press and hold to fast forward or fast reverse the track during playback, then release to resume play. / For MP3/WMA tracks, select an album or folder. Star t or pause play. Stop play. OK Confirm a selection. REPEAT / SHUFFLE [ ] : Play the cu...
Page 12 - radio
12 EN 5 Listen to DAB+ radio Digital Audio Broadcasting (DAB+) is a way of broadcasting radio digitally through a network of transmitters. It provides you with more choice, better sound quality and more information. For first-time use 1 Press DOCK/DAB repeatedly to select DAB+ radio. » [FULL SCAN] (...
Page 13 - Show DAB+ information; Listen to FM; Tune to FM radio stations; Program FM radio stations
13 EN available DAB+ stations, or scan DAB+ stations if no station is stored in the list. • [FULL SCAN] (full scan): Scan and store all available DAB+ radio stations. • [MANUAL TUNE] (manual tune): Tune to a specific channel/frequency manually. • [PRUNE] (prune): Remove invalid stations from the sta...
Page 15 - Other features; Use system menu; Register your product; Perform the upgrade; Set the alarm timer
15 EN 7 Other features Use system menu 1 In FM/DAB+ mode, when the [System] (system) menu is displayed, press / repeatedly to select an option. 2 Press OK to confirm the selection. [Factory Reset] [Yes] Reset the system to factor y default status. [No] Cancel. [SW version] Display software version. ...
Page 16 - Set the sleep timer; Play from an external audio
16 EN 5 Press TIMER to confirm. » The minute digits blink. 6 Repeat steps 4-5 to set the minute and alarm volume. Tip • If the system is idle for 90 seconds, it exits alarm setting mode automatically. • If iPod/iPhone/iPad is selected as alarm source, and you have created a playlist called "PHIL...
Page 17 - Amplifier; USB playability information
17 EN 8 Product information Note • Product information is subject to change without prior notice. Specifications Amplifier Max Output Power 2 x 10 W Frequency Response 63 -14000 Hz, -3 dB Signal to Noise Ratio > 57 dBA Total Harmonic Distor tion <1% MP3 Link Input 650 mV RMS Disc Laser Type Se...
Page 18 - Supported MP3 disc formats; Troubleshooting
18 EN Unsupported formats: • Empty albums: an empty album is an album that does not contain MP3/WMA files, and is not be shown in the display. • Unsuppor ted file formats are skipped. For example, Word documents (.doc) or MP3 files with extension .dlf are ignored and not played. • AAC, WAV, PCM audi...