Philips BTM2180/37 - User Manual
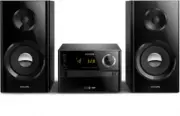
Philips BTM2180/37 – User Manual, read for free online in PDF format. We hope this helps you resolve any issues you may have. If you have further questions, please contact us through the contact form.


Table of Contents:
- Page 2 – Contents; Specifications
- Page 3 – Important; Safety; WARNING: To reduce the risk of fire or electric; Important Safety Instructions; other apparatus (including amplifiers) that
- Page 5 – welcome to Philips! To fully benefit from the; Introduction; You can enrich sound output with below
- Page 6 – Overview of the main unit; Bluetooth indicator; Disc compartment
- Page 8 – Get started; Connect speakers; Demonstrate the features
- Page 9 – Prepare the remote control; To insert the remote control battery:; Set clock; Turn on; Switch to standby mode; Switch to ECO standby mode:; Switch between standby mode and ECO
- Page 10 – Play from disc; Play from USB; Control play; Select an audio file.
- Page 11 – Skip to a track; For MP3 disc and USB:; Program tracks; PROG; Play from Bluetooth-enabled; Bluetooth
- Page 12 – To disconnect the Bluetooth-enabled device:
- Page 13 – FM
- Page 14 – Other features; Set the alarm timer; Set the sleep timer
- Page 15 – Amplifier; Speakers; Frequency band; Frequency Response; General information
- Page 16 – USB playability information; Compatible USB devices:; Supported MP3 disc formats
- Page 17 – Troubleshooting; Cannot display some files in USB device
- Page 19 – Notice; This equipment has been tested and found
www.philips.com/support
User manual
Always there to help you
Register your product and get support at
BTM2180
Question?
Contact
Philips
"Loading the manual" means you need to wait until the file loads and becomes available for online reading. Some manuals are very large, and the time they take to appear depends on your internet speed.
Was this manual helpful?
About this manual
- Brand
- Philips
- Model
- BTM2180/37
- Document type
- User Manual
- Language(s)
- English
- Pages
- 21
- File size
- 910.2 KB
- Format
Summary
2 EN Contents 1 Important 3 Safety 3 2 Your micro system 5 Introduction 5 What's in the box 5 Over view of the main unit 6 Over view of the remote control 7 3 Get started 8 Connect speakers 8 Connect power 8 Demonstrate the features 8 Prepare the remote control 9 Set clock 9 Turn on 9 4 Play 10 Play...
3 EN 1 Important Safety This 'bolt of lightning' indicates uninsulated material within the device may cause an electrical shock. For the safety of ever yone in your household, please do not remove the covering. The 'exclamation mark' calls attention to features for which you should read the enclosed...
5 EN 2 Your micro system Congratulations on your purchase, and welcome to Philips! To fully benefit from the suppor t that Philips offers, register your product at www.philips.com/suppor t. Introduction With this unit, you can: • enjoy audio from discs, Bluetooth-enabled devices, USB storage devices...
Ask a question
Related manuals
Popular Philips Other


More Philips Other models
 Philips BTB3370/12 User Manual
 Philips BTB7150 Manual
 Philips BTB7150/10 User Manual
 Philips BTB8000/12 User Manual
 Philips BTD5210/12 User Manual
 Philips BTM630 Manual
 Philips BTM2280/12 Quick Guide
 Philips BTM2360/12 User Manual
 Philips BTM2460/12 User Manual
 Philips BTM2660W/12 User Manual
 Philips BTM3360/12 User Manual
 Philips C50 Manual