Page 3 - ES
Page 5 - Modificación de temperatura del horno.; DESCRIPCIÓN DEL HORNO
INOXPAN S.L. ES - 5 1 Frente de mandos 2 Bloqueo / Interruptor de puerta (solo para modelos pirolíticos) 3 Resistencia de grill 4 Soporte bandejas 5 Parrilla 6 Bandeja 7 Bisagra 8 Cristal interior 9 Salida de aire de refrigeración 10 Interruptor de puerta (solo para modelos NO pirolíticos) 11 Fijaci...
Page 6 - ENCENDIDO Y PUESTA EN HORA
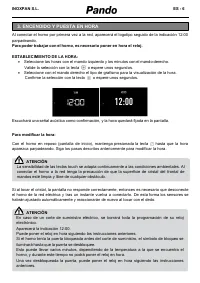
INOXPAN S.L. ES - 6 Al conectar el horno por primera vez a la red, aparecerá el logotipo seguido de la indicación 12:00 parpadeando. Para poder trabajar con el horno, es necesario poner en hora el reloj. ESTABLECIMIENTO DE LA HORA: Seleccione las horas con el mando izquierdo y los minutos con el m...
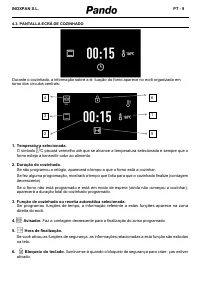
Page 7 - DESCRIPCIÓN DE LA PANTALLA DE CONTROL
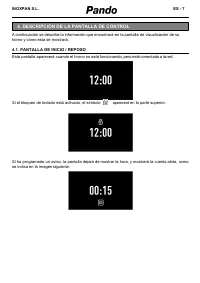
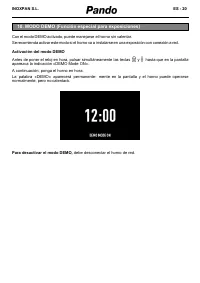
INOXPAN S.L. ES - 7 A continuación se describe la información que encontrará en la pantalla de visualización de su horno y cómo esta se mostrará. 4.1. PANTALLA DE INICIO / REPOSO Esta pantalla aparecerá cuando el horno no esté funcionando, pero esté conectado a la red. Si el bloqueo de teclado está ...
Page 8 - (si usted no toca ninguna tecla, pasados unos
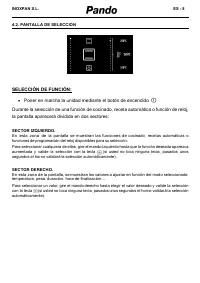
INOXPAN S.L. ES - 8 4.2. PANTALLA DE SELECCION SELECCIÓN DE FUNCIÓN: Poner en marcha la unidad mediante el botón de encendido Durante la selección de una función de cocinado, receta automática o función de reloj, la pantalla aparecerá dividida en dos sectores: SECTOR IZQUIERDO. En esta zona de la ...
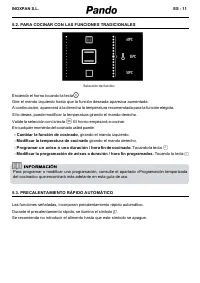
Page 10 - COCINADO CON FUNCIONES TRADICIONALES
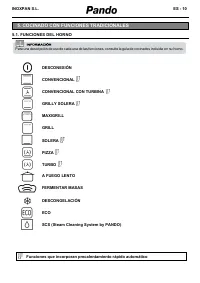
INOXPAN S.L. ES - 10 5.1. FUNCIONES DEL HORNO DESCONEXIÓN CONVENCIONAL CONVENCIONAL CON TURBINA GRILLY SOLERA MAXIGRILL GRILL SOLERA PIZZA TURBO A FUEGO LENTO FERMENTAR MASAS DESCONGELACIÓN ECO SCS (Steam Cleaning System by PANDO) Funciones que incorporan precalentamiento rápido automático 5. COCINA...
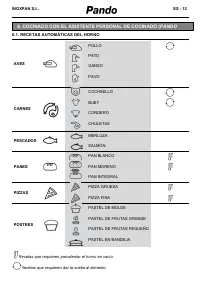
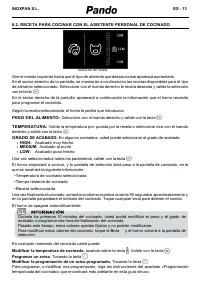
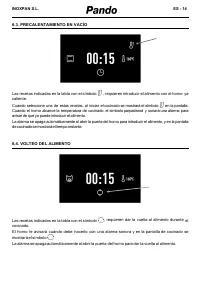
Page 12 - Recetas que requieren precalentar el horno en vacío.; COCINADO CON EL ASISTENTE PERSONAL DE COCINADO (PANDO
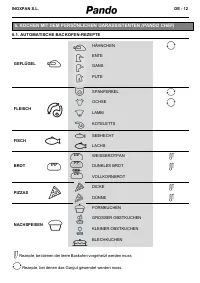
INOXPAN S.L. ES - 12 6.1. RECETAS AUTOMÁTICAS DEL HORNO AVES POLLO PATO GANSO PAVO CARNES COCHINILLO BUEY CORDERO CHULETAS PESCADOS MERLUZA SALMÓN PANES PAN BLANCO PAN MORENO PAN INTEGRAL PIZZAS PIZZA GRUESA PIZZA FINA POSTRES PASTEL DE MOLDE PASTEL DE FRUTAS GRANDE PASTEL DE FRUTAS PEQUEÑO PASTEL E...
Page 15 - PROGRAMACIÓN TEMPORIZADA DEL HORNO
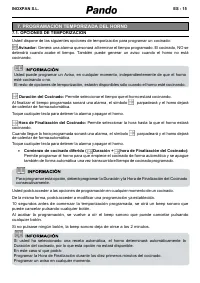
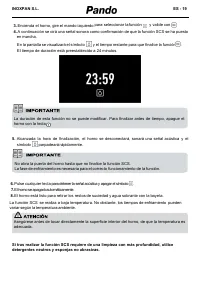
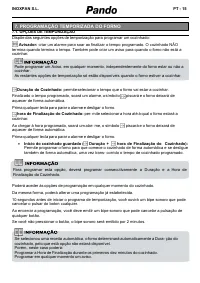
INOXPAN S.L. ES - 15 7.1. OPCIONES DE TEMPORIZACIÓN Usted dispone de las siguientes opciones de temporización para programar un cocinado: Avisador: Genera una alarma que sonará al terminar el tiempo programado. El cocinado, NO se detendrá cuando acabe el tiempo. También puede generar un aviso cuando...
Page 16 - Toque sobre la tecla
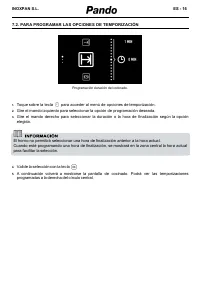
INOXPAN S.L. ES - 16 7.2. PARA PROGRAMAR LAS OPCIONES DE TEMPORIZACIÓN Programación duración del cocinado. 1. Toque sobre la tecla para acceder al menú de opciones de temporización. 2. Gire el mando izquierdo para seleccionar la opción de programación deseada. 3. Gire el mando derecho para seleccion...
Page 17 - FUNCIONES DE SEGURIDAD
INOXPAN S.L. ES - 17 8.1. BLOQUEO DE SEGURIDAD PARA NIÑOS (BLOQUEO DEL PANEL DE CONTROL) Esta función se puede activar en cualquier momento: • Con el horno apagado. El bloqueo de niños no permitirá que el horno se encienda al pulsar la tecla . • Durante el uso del horno. Si activa la función mientra...
Page 18 - Siga para ello las siguientes instrucciones:
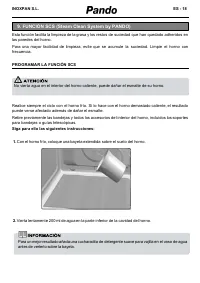
INOXPAN S.L. ES - 18 Esta función facilita la limpieza de la grasa y los restos de suciedad que han quedado adheridos en las paredes del horno. Para una mayor facilidad de limpieza, evite que se acumule la suciedad. Limpie el horno con frecuencia. PROGRAMAR LA FUNCIÓN SCS Realice siempre el ciclo co...
Page 21 - ESPECIFICACIONES TÉCNICAS
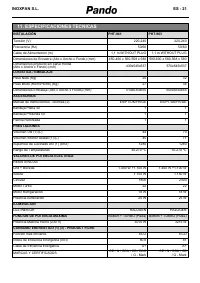
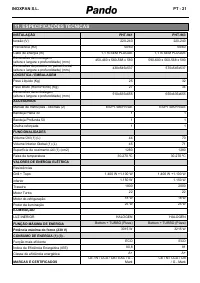
INOXPAN S.L. ES - 21 INSTALACIÓN PHT-941 PHT-963 Tensión (V) 220-240 220-240 Frecuencia (Hz) 50/60 50/60 Cable de Alimentación (m) 1,1 m WITHOUT PLUG 1,1 m WITHOUT PLUG Dimensiones de Encastre (Alto x Ancho x Fondo) (mm) 450-460 x 560-568 x 580 590-600 x 560-568 x 580 Dimensiones producto sin panel ...
Page 22 - ESQUEMAS INSTALACIÓN Y COTAS; AVISO
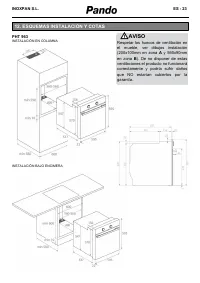
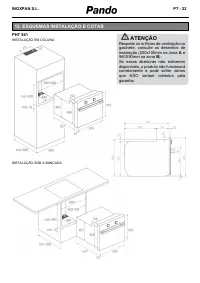
INOXPAN S.L. ES - 22 PHT 941 INSTALACIÓN EN COLUMNA INSTALACIÓN BAJO ENCIMERA 12. ESQUEMAS INSTALACIÓN Y COTAS AVISO Respetar los huecos de ventilación en el mueble, ver dibujos instalación (200x100mm en zona A y 560x90mm en zona B). De no disponer de estas ventilaciones el producto no funcionará co...
Page 24 - Datos de contacto Servicio Técnico Oficial Autorizado Pando:; CERTIFICADO DE GARANTÍA PANDO
INOXPAN S.L. ES - 24 INOXPAN S.L., le agradece la elección y confianza depositada en un producto de nuestra marca Pando, que se distingue por su Calidad, Diseño e Innovación, siendo fiel a sus orígenes y compromisos. CONDICIONES GARANTIA PANDO: No estará cubierto por la garantía o podría ser causa d...
Page 27 - PT
Page 29 - Alteração datemperatura do forno.; DESCRIÇÃO DO FORNO
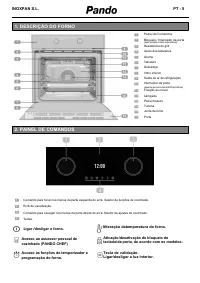
INOXPAN S.L. PT - 5 1 Painel de Comandos 2 Bloqueio / Interruptor da porta (apenas para modelos pirolíticos) 3 Resistência do grill 4 Apoio dos tabuleiros 5 Grelha 6 Tabuleiro 7 Dobradiça 8 Vidro interior 9 Saída de ar de refrigeração 10 Interruptor da porta (apenas para modelos NÃO pirolíticos) 11 ...
Page 30 - LIGAR E ACERTAR A HOR
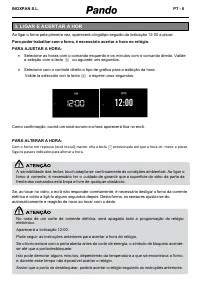
INOXPAN S.L. PT - 6 Ao ligar o forno pela primeira vez, aparecerá o logótipo seguido da indicação 12:00 a piscar. Para poder trabalhar com o forno, é necessário acertar a hora no relógio. PARA AJUSTAR A HORA: Selecione as horas com o comando esquerdo e os minutos com o comando direito. Valide a se...
Page 31 - DESCRIÇÃO DO ECRÃ DE CONTROLO
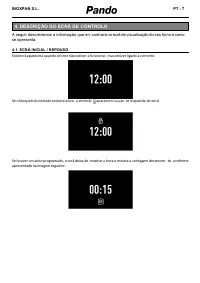
INOXPAN S.L. PT - 7 A seguir descrevemos a informação que en- contrará no ecrã de visualização do seu forno e como se apresenta . 4.1. ECRÃ INICIAL / REPOUSO Este ecrã aparecerá quando o forno não estiver a funcionar, mas estiver ligado à corrente . Se o bloqueio do teclado estivere ativo, o símbolo...
Page 34 - COZINHADO COM FUNÇÕES TRADICIONAIS
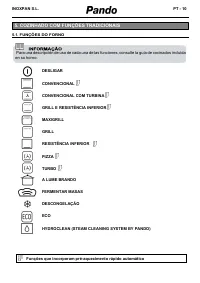
INOXPAN S.L. PT - 10 5.1. FUNÇÕES DO FORNO DESLIGAR CONVENCIONAL CONVENCIONAL COM TURBINA GRILL E RESISTÊNCIA INFERIOR MAXIGRILL GRILL RESISTÊNCIA INFERIOR PIZZA TURBO A LUME BRANDO FERMENTAR MASAS DESCONGELAÇÃO ECO HYDROCLEAN (STEAM CLEANING SYSTEM BY PANDO) Funções que incorporam pré-aquecimento r...
Page 35 - PARA COZINHAR COM AS FUNÇÕES TRADICIONAIS
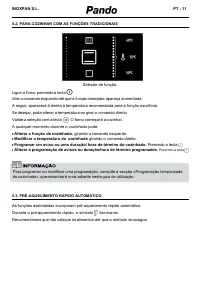
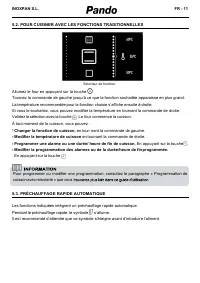
INOXPAN S.L. PT - 11 5.2. PARA COZINHAR COM AS FUNÇÕES TRADICIONAIS Seleção de função. Ligue o forno premindo a tecla . Gire o comando esquerdo até que a função desejada apareça aumentada. A seguir, aparecerá à direita a temperatura recomendada para a função escolhida. Se desejar, pode alterar a tem...
Page 37 - tecla
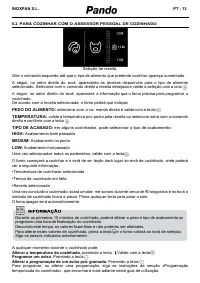
INOXPAN S.L. PT - 13 6.2. PARA COZINHAR COM O ASSESSOR PESSOAL DE COZINHADO Seleção de receita. Gire o comando esquerdo até que o tipo de alimento que pretende cozinhar apareça aumentado. A seguir, no setor direito do ecrã, aparecerão as receitas disponíveis para o tipo de alimento selecionado. Sele...
Page 39 - PROGRAMAÇÃO TEMPORIZADA DO FORNO
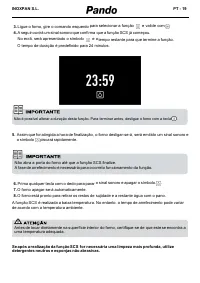
INOXPAN S.L. PT - 15 7.1. OPÇÕES DE TEMPORIZAÇÃO Dispõe das seguintes opções de temporização para programar um cozinhado: Avisador: criar um alarme para soar ao finalizar o tempo programado. O cozinhado NÃO termina quando termina o tempo. Também pode criar um aviso para quando o forno não está a coz...
Page 40 - PARA PROGRAMAR AS OPÇÕES DE TEMPORIZAÇÃO; Programação duração do cozinhado
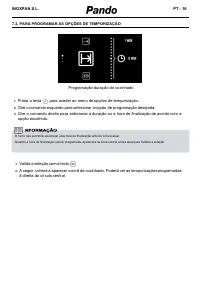
INOXPAN S.L. PT - 16 7.2. PARA PROGRAMAR AS OPÇÕES DE TEMPORIZAÇÃO Programação duração do cozinhado 1. Prima a tecla para aceder ao menu de opções de temporização. 2. Gire o comando esquerdo para selecionar a opção de programação desejada. 3. Gire o comando direito para selecionar a duração ou a hor...
Page 41 - FUNÇÕES DE SEGURANÇA
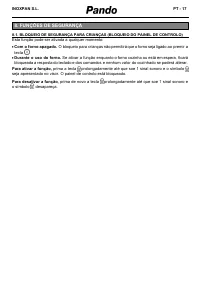
INOXPAN S.L. PT - 17 8.1. BLOQUEIO DE SEGURANÇA PARA CRIANÇAS (BLOQUEIO DO PAINEL DE CONTROLO) Esta função pode ser ativada a qualquer momento: Com o forno apagado. O bloqueio para crianças não permitirá que o forno seja ligado ao premir a tecla . Durante o uso do forno. Se ativar a função enqua...
Page 42 - PROGRAMAR A FUNÇÃO SCS
INOXPAN S.L. PT - 18 Esta função facilita a limpeza de gordura e res- tos de sujidade que tenham aderido às paredes do forno. Para facilitar a limpeza, evite a acumulação de sujidade. Limpe frequentemente o forno. PROGRAMAR A FUNÇÃO SCS Realize sempre o ciclo com o forno frio. Se o procedimento for ...
Page 45 - ESPECIFICAÇÕES TÉCNICAS
INOXPAN S.L. PT - 21 INSTALAÇÃO PHT-941 PHT-963 tensão (V) 220-240 220-240 Frecuência (Hz) 50/60 50/60 Cabo de energia (m) 1,1 m SEM PLUGUE 1,1 m SEM PLUGUE Dimensões de montagem (altura x largura x profundidade) (mm) 450-460 x 560-568 x 580 590-600 x 560-568 x 580 Dimensões do produto no painel fro...
Page 46 - ESQUEMAS INSTALAÇÃO E COTAS; ATENÇÃO
INOXPAN S.L. PT - 22 PHT 941 INSTALAÇÃO EM COLUNA INSTALAÇÃO SOB A BANCADA 12. ESQUEMAS INSTALAÇÃO E COTAS ATENÇÃO Respeite os orifícios de ventilação no gabinete, consulte os desenhos de instalação (200x100mm na zona A e 560X90mm na zona B). Se essas aberturas não estiverem disponíveis, o produto n...
Page 48 - Datos de contacto Serviço Técnico Oficial Autorizado Pando:
INOXPAN S.L. PT - 24 INOXPAN S.L., agradece a escolha e a confiança depositada num produto da nossa marca Pando, que se distingue pela sua Qualidade, Design eInovação sendo fiel às suas origens e compromisos . CONDIÇÕES DE GARANTIA PANDO: Não estará coberto pela garantía ou podría ser causa de anula...
Page 51 - FR
Page 53 - Modification des températures du four.; DESCRIPTION DU FOUR
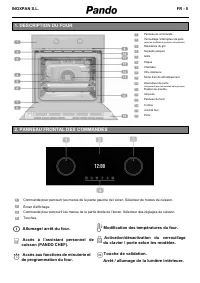
INOXPAN S.L. FR - 5 1 Panneau de commande 2 Verrouillage / interrupteur de porte (pour les modèles à pyrolyse uniquement) 3 Résistance du gril 4 Supports plaques 5 Grille 6 Plaque 7 Charnière 8 Vitre intérieure 9 Sortie d’air de refroidissement 10 Interrupteur de porte (uniquement pour les modèles s...
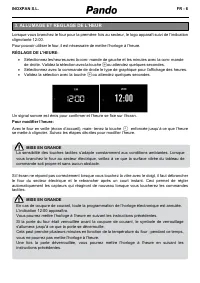
Page 54 - Pour modifier l’heure:; ALLUMAGE ET REGLAGE DE L’HEUR; MISE EN GRANDE
INOXPAN S.L. FR - 6 Lorsque vous branchez le four pour la première fois au secteur, le logo apparaît suivi de l’indication clignotante 12:00. Pour pouvoir utiliser le four, il est nécessaire de mettre l’horloge à l’heure. RÉGLAGE DE L'HEURE: Sélectionnez les heures avec la com- mande de gauche et ...
Page 55 - DESCRIPTION DE L’ECRAN DE CONTROLE
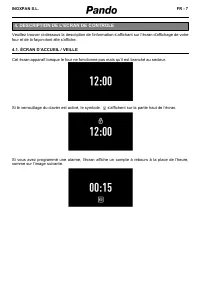
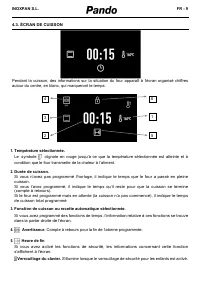
INOXPAN S.L. FR - 7 Veuillez trouver ci-dessous la description de l’information s’affichant sur l’écran d’affichage de votre four et de la façon dont elle s’affiche. 4.1. ÉCRAN D’ACCUEIL / VEILLE Cet écran apparaît lorsque le four ne fonctionne pas mais qu’il est branché au secteur. Si le verrouilla...
Page 56 - SELECTEUR DE FONCTION:; valide la sélection automatiquement après quelques secondes).
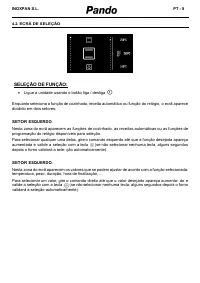
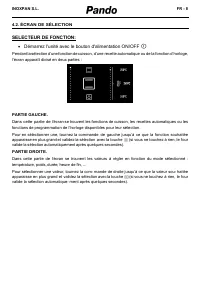
INOXPAN S.L. FR - 8 4.2. ÉCRAN DE SÉLECTION SELECTEUR DE FONCTION: Démarrez l'unité avec le bouton d'alimentation ON/OFF Pendant la sélection d’une fonction de cuisson, d’une recette automatique ou de la fonction d’horloge, l’écran apparaît divisé en deux parties : PARTIE GAUCHE. Dans cette partie...
Page 58 - CUISSON AVEC DES FONCTIONS TRADITIONNELLES
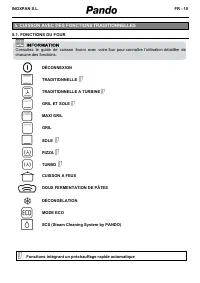
INOXPAN S.L. FR - 10 5.1. FONCTIONS DU FOUR DÉCONNEXION TRADITIONNELLE TRADITIONNELLE A TURBINE GRIL ET SOLE MAXI GRIL GRIL SOLE PIZZA TURBO CUISSON A FEUX DOUX FERMENTATION DE PÂTES DÉCONGÉLATION MODE ECO SCS (Steam Cleaning System by PANDO) Fonctions intégrant un préchauffage rapide automatique 5....
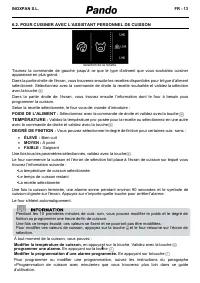
Page 60 - CUISSON AVEC L’ASSISTANT PERSONNEL DE CUISSON (PANDO CHEF)
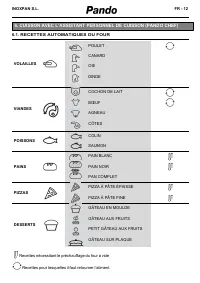
INOXPAN S.L. FR - 12 6.1. RECETTES AUTOMATIQUES DU FOUR VOLAILLES POULET CANARD OIE DINDE VIANDES COCHON DE LAIT BŒUF AGNEAU CÔTES POISSONS COLIN SAUMON PAINS PAIN BLANC PAIN NOIR PAN COMPLET PIZZAS PIZZA À PÂTE ÉPAISSE PIZZA À PÂTE FINE DESSERTS GÂTEAU EN MOULDE GÂTEAU AUX FRUITS PETIT GÂTEAU AUX F...
Page 63 - PROGRAMMATION AVEC MINUTERIE DU FOUR
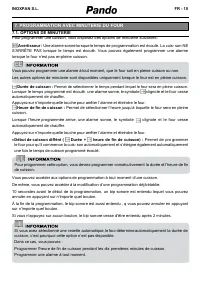
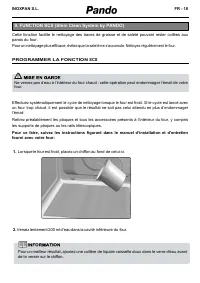
INOXPAN S.L. FR - 15 7.1. OPTIONS DE MINUTERIE Pour programmer une cuisson, vous disposez des options de minuterie suivantes : Avertisseur : Une alarme sonne lorsque le temps de programmation est écoulé. La cuis- son NE S’ARRÊTE PAS lorsque le temps est écoulé. Vous pouvez également programmer une a...
Page 64 - Appuyez sur la touche
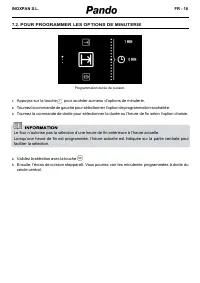
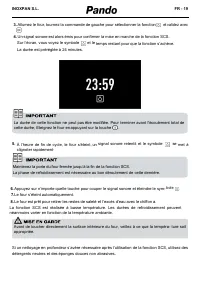
INOXPAN S.L. FR - 16 7.2. POUR PROGRAMMER LES OPTIONS DE MINUTERIE Programmation durée de cuisson. 1. Appuyez sur la touche pour accéder au menu d’options de minuterie. 2. Tournez la commande de gauche pour sélectionner l’option de programmation souhaitée. 3. Tournez la commande de droite pour sélec...
Page 65 - la touche; FONCTIONS DE SECURITE
INOXPAN S.L. FR - 17 8.1. VERROUILLAGE DE SÉCURITÉ POUR LES ENFANTS ( verrouillage du panneau de contrôle) Cette fonction peut être sélectionnée à tout moment pendant l’utilisation du four. Avec le four éteint. Le verrouillage pour les enfants empêche le four de s’allumer en appuyant sur la touche...
Page 69 - SPÉCIFICATIONS TECHNIQUES
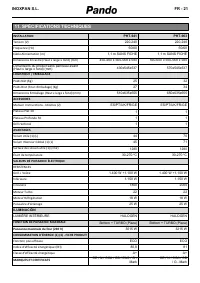
INOXPAN S.L. FR - 21 INSTALLATION PHT-941 PHT-963 Tension (V) 220-240 220-240 Frequence (Hz) 50/60 50/60 Câble Alimentation (m) 1,1 m SANS FICHE 1,1 m SANS FICHE Dimensions Encastre (Haut x large x fond) (mm) 450-460 x 560-568 x 580 590-600 x 560-568 x 580 Dimensions du produit sans panneau avant (H...
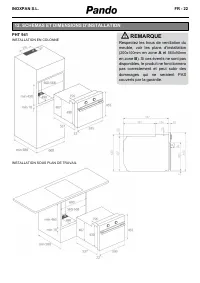
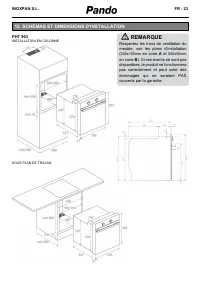
Page 70 - SCHÉMAS ET DIMENSIONS D'INSTALLATION; REMARQUE; en zone A et
INOXPAN S.L. FR - 22 PHT 941 INSTALLATION EN COLONNE INSTALLATION SOUS PLAN DE TRAVAIL 12. SCHÉMAS ET DIMENSIONS D'INSTALLATION REMARQUE Respectez les trous de ventilation du meuble, voir les plans d'installation ( 200x100mm en zone A et 560x90mm en zone B). Si ces évents ne sont pas disponibles, le...
Page 75 - EN
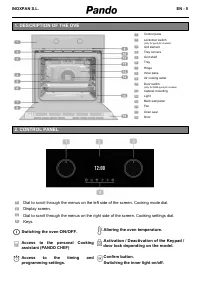
Page 77 - DESCRIPTION OF THE OVE
INOXPAN S.L. EN - 5 1 Control pane 2 Lock/door switch (only for pyrolytic models) 3 Grill element 4 Tray runners 5 Grid shelf 6 Tray 7 Hinge 8 Inner pane 9 Air cooling outlet 10 Door switch (only for NON-pyrolytic models) 11 Cabinet mounting 12 Light 13 Back wall panel 14 Fan 15 Oven seal 16 Door 1 ...
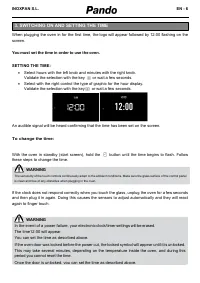
Page 78 - SWITCHING ON AND SETTING THE TIME
INOXPAN S.L. EN - 6 When plugging the oven in for the first time, the logo will appear followed by 12:00 flashing on the screen. You must set the time in order to use the oven. SETTING THE TIME: Select hours with the left knob and minutes with the right knob. Validate the selection with the key or...
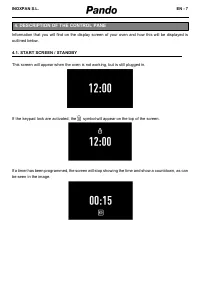
Page 79 - DESCRIPTION OF THE CONTROL PANE
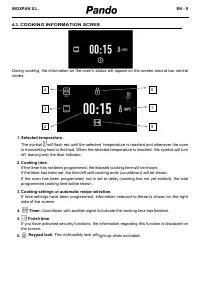
INOXPAN S.L. EN - 7 Information that you will find on the display screen of your oven and how this will be displayed is outlined below. 4.1. START SCREEN / STANDBY This screen will appear when the oven is not working, but is still plugged in. If the keypad lock are activated, the symbol will appear ...
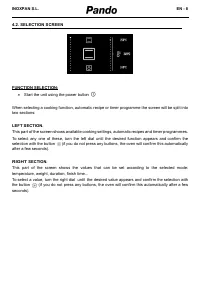
Page 80 - Start the unit using the power button
INOXPAN S.L. EN - 8 4.2. SELECTION SCREEN FUNCTION SELECTION: Start the unit using the power button When selecting a cooking function, automatic recipe or timer programme the screen will be split into two sections: LEFT SECTION. This part of the screen shows available cooking settings, automatic r...
Page 82 - TRADITIONAL COOKING FUNCTION
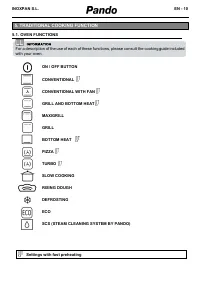
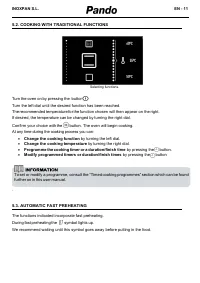
INOXPAN S.L. EN - 10 5.1. OVEN FUNCTIONS ON / OFF BUTTON CONVENTIONAL CONVENTIONAL WITH FAN GRILL AND BOTTOM HEAT MAXIGRILL GRILL BOTTOM HEAT PIZZA TURBO SLOW COOKING RISING DOUGH DEFROSTING ECO SCS (STEAM CLEANING SYSTEM BY PANDO) Settings with fast preheating 5. TRADITIONAL COOKING FUNCTION For a ...
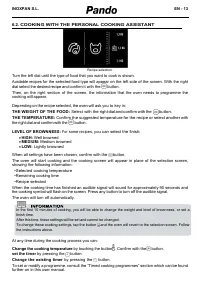
Page 85 - After this time, these settings will be set and cannot be changed.
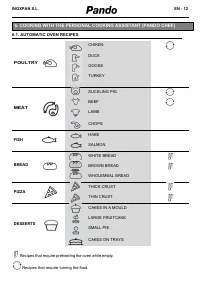
INOXPAN S.L. EN - 13 6.2. COOKING WITH THE PERSONAL COOKING ASSISTANT Recipe selection. Turn the left dial until the type of food that you want to cook is shown. Available recipes for the selected food type will appear on the left side of the screen. With the right dial select the desired recipe and...
Page 87 - OVEN TIMER SETTINGS
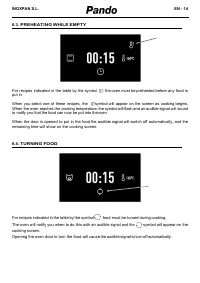
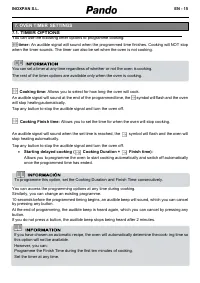
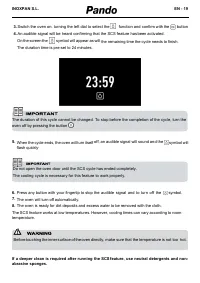
INOXPAN S.L. EN - 15 7.1. TIMER OPTIONS You can use the following timer options to programme cooking: timer: An audible signal will sound when the programmed time finishes. Cooking will NOT stop when the timer sounds. The timer can also be set when the oven is not cooking. Cooking time: Allows you t...
Page 88 - button to access the timer options menu.
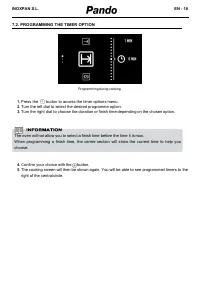
INOXPAN S.L. EN - 16 7.2. PROGRAMMING THE TIMER OPTION Programming during cooking. 1. Press the button to access the timer options menu. 2. Turn the left dial to select the desired programme option. 3. Turn the right dial to choose the duration or finish time depending on the chosen option. 4. Confi...
Page 89 - SAFETY INSTRUCTIONS
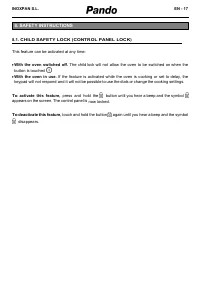
INOXPAN S.L. EN - 17 8.1. CHILD SAFETY LOCK (CONTROL PANEL LOCK) This feature can be activated at any time: With the oven switched off. The child lock will not allow the oven to be switched on when the button is touched . With the oven in use. If the feature is activated while the oven is cookin...
Page 93 - TECHNICAL SPECIFICATIONS
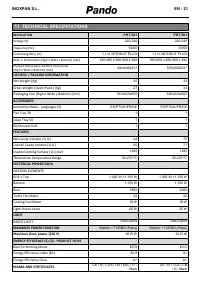
INOXPAN S.L. EN - 21 INSTALATION PHT-941 PHT-963 Voltage (V) 220-240 220-240 Frequency (Hz) 50/60 50/60 Connecting Wire (m) 1,1 m WITHOUT PLUG 1,1 m WITHOUT PLUG Built-in Dimensions (High x Wide x Bottom) (mm) 450-460 x 560-568 x 580 590-600 x 560-568 x 580 Product Dimensions without front panel (Hi...
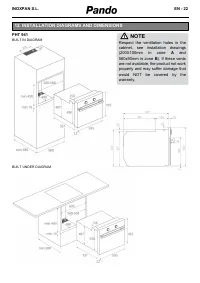
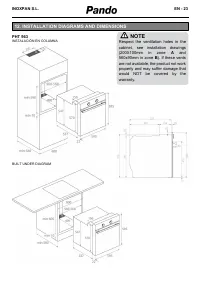
Page 94 - INSTALLATION DIAGRAMS AND DIMENSIONS; NOTE; in
INOXPAN S.L. EN - 22 PHT 941 BUILT IN DIAGRAM BUILT UNDER DIAGRAM 12. INSTALLATION DIAGRAMS AND DIMENSIONS NOTE Respect the ventilation holes in the cabinet, see installation drawings (200X100mm in zone A and 560x90mm in zone B). If these vents are not available, the product not work properly and ma...
Page 99 - DE
Page 101 - Änderung der Backofentemperatur.; BACKOFENBESCHREIBU
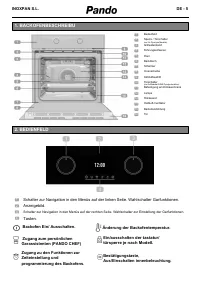
INOXPAN S.L. DE - 5 1 Bedienfeld 2 Sperre / Türschalter (nur für Pyrolyse-Modelle) 3 Grillwiderstand 4 Führungsschienen 5 Rost 6 Backblech 7 Scharnier 8 Innenscheibe 9 Kühlluftaustritt 10 Türschalter (nur für Modelle OHNE Pyrolysefunktion) 11 Befestigung am Einbauschrank 12 Lampe 13 Rückwand 14 Heiß...
Page 102 - EINSCHALTEN UND UHREINSTELLUNG
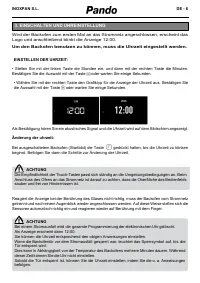
INOXPAN S.L. DE - 6 Wird der Backofen zum ersten Mal an das Stromnetz angeschlossen, erscheint das Logo und anschließend blinkt die Anzeige 12:00. Um den Backofen benutzen zu können, muss die Uhrzeit eingestellt werden. EINSTELLEN DER UHRZEIT: • Stellen Sie mit der linken Taste die Stunden ein, und ...
Page 103 - BESCHREIBUNG DES BEDIENFELD
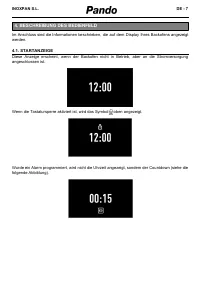
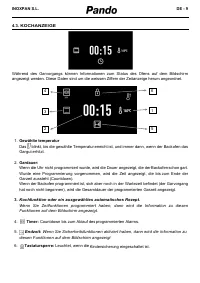
INOXPAN S.L. DE - 7 Im Anschluss sind die Informationen beschrieben, die auf dem Display Ihres Backofens angezeigt werden. 4.1. STARTANZEIGE Diese Anzeige erscheint, wenn der Backofen nicht in Betrieb, aber an die Stromversorgung angeschlossen ist. Wenn die Tastatursperre aktiviert ist, wird das Sym...
Page 104 - Schalten Sie das Gerät mit dem Ein/Aus Schalter ein
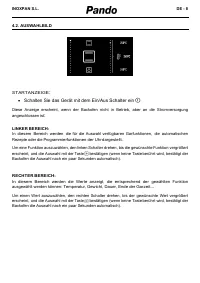
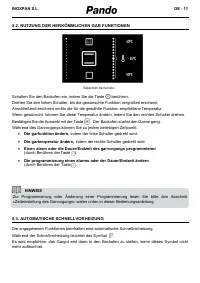
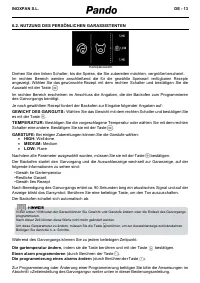
INOXPAN S.L. DE - 8 4.2. AUSWAHLBILD STARTANZEIGE : Schalten Sie das Gerät mit dem Ein/Aus Schalter ein Diese Anzeige erscheint, wenn der Backofen nicht in Betrieb, aber an die Stromversorgung angeschlossen ist : LINKER BEREICH: In diesem Bereich werden die für die Auswahl verfügbaren Garfunktione...
Page 106 - NUTZUNG DER HERKÖMMLICHEN GARFUNKTIONE
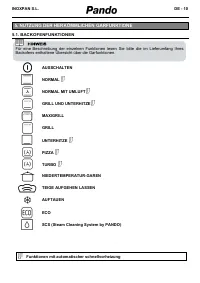
INOXPAN S.L. DE - 10 5.1. BACKOFENFUNKTIONEN AUSSCHALTEN NORMAL NORMAL MIT UMLUFT GRILL UND UNTERHITZE MAXIGRILL GRILL UNTERHITZE PIZZA TURBO NIEDERTEMPERATUR-GAREN TEIGE AUFGEHEN LASSEN AUFTAUEN ECO SCS (Steam Cleaning System by PANDO) Funktionen mit automatischer schnellvorheizung 5. NUTZUNG DER H...
Page 111 - ZEITEINSTELLUNG DES BACKOFENS
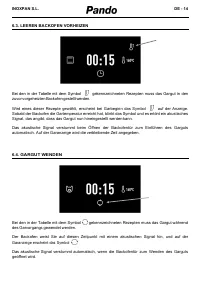
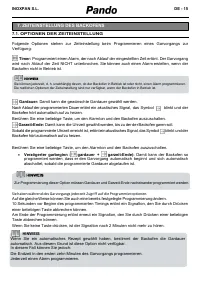
INOXPAN S.L. DE - 15 7.1. OPTIONEN DER ZEITEINSTELLUNG Folgende Optionen stehen zur Zeiteinstellung beim Programmieren eines Garvorgangs zur Verfügung: Timer: Programmiert einen Alarm, der nach Ablauf der eingestellten Zeit ertönt. Der Garvorgang wird nach Ablauf der Zeit NICHT unterbrochen. Sie kön...
Page 112 - PROGRAMMIERUNG DER OPTIONEN DER ZEITEINSTELLUNG; Berühren Sie die Taste
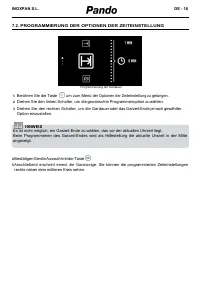
INOXPAN S.L. DE - 16 7.2. PROGRAMMIERUNG DER OPTIONEN DER ZEITEINSTELLUNG Programmierung der Gardauer 1. Berühren Sie die Taste , um zum Menü der Optionen der Zeiteinstellung zu gelangen. 2. Drehen Sie den linken Schalter, um die gewünschte Programmieroption zu wählen. 3. Drehen Sie den rechten Scha...
Page 113 - SICHERHEITSFUNKTIONEN
INOXPAN S.L. DE - 17 8.1. KINDERSICHERUNG (SPERRE DES BEDIENFELDS) Diese Funktion kann jederzeit eingeschaltet werden: Bei ausgeschaltetem Backofen. Die Kindersicherung verhindert, dass der Backofen durch Betätigung der Taste eingeschaltet werden kann. Beim gebrauch des Backofens. Wird die Funkt...
Page 117 - TECHNISCHE SPEZIFIKATIONEN
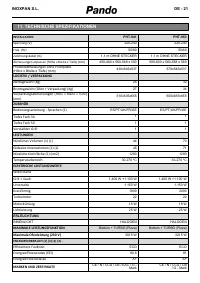
INOXPAN S.L. DE - 21 INSTALLATION PHT-941 PHT-963 Spannung (V) 220-240 220-240 Freq. (Hz) 50/60 50/60 Zuführungskabel (m) 1,1 m OHNE STECKER 1,1 m OHNE STECKER Abmessungen anpassen (Höhe x Breite x Tiefe) (mm) 450-460 x 560-568 x 580 590-600 x 560-568 x 580 Produktabmessungen ohne Frontplatte (Höhe ...
Page 118 - INSTALLATION SCHEMES UND ABMESSUNGEN; WICHTIG
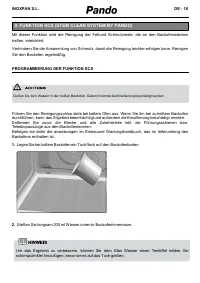
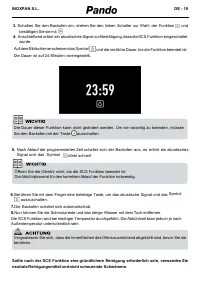
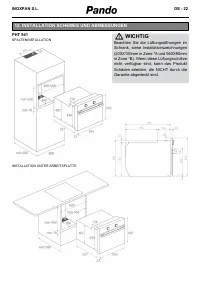
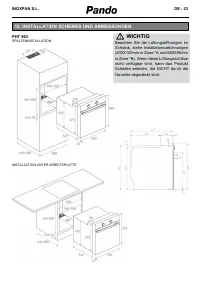
INOXPAN S.L. DE - 22 PHT 941 SPALTENINSTALLATION INSTALLATION UNTER ARBEITSPLATTE 12. INSTALLATION SCHEMES UND ABMESSUNGEN WICHTIG Beachten Sie die Lüftungsöffnungen im Schrank, siehe Installationszeichnungen (200X100mm in Zone *A und 560X90mm in Zone *B). Wenn diese Lüftungsschlitze nicht verfügbar...
Page 120 - GARANTIEURKUNDE PANDO
INOXPAN S.L. DE - 24 INOXPAN S.L. bedankt sich für den Kauf und für das Vertrauen, das Sie in ein Produkt unserer Marke Pando gesetzt haben. Dieses Produkt ist aufgrund von Qualität, Design und Innovation herausragend und seinem Ursprung und seiner Verpflichtung treu geblieben. GARANTIEBEDINGUNGEN P...
Page 124 - od
INOXPAN S.L. Pol. Ind. El Cros Av. El Molí de les Mateves,11 Apdo. Correos nº 21 08310 ARGENTONA (Barcelona - Spain) Tel. +34 93 757 94 11 Fax +34 93 757 96 53 www.pando.es [email protected] Export: [email protected] Tel. 902 41 55 11 C od . 3 3 7 1 1 9 2 -0 0 Sistema de Gestión de la Calidad Qualit...