Page 2 - Contents; Safety lock
Contents 2 Warning and Safety instructions ...................................................................... 5 Caring for the environment .............................................................................. 14 Saving energy ................................................................
Page 4 - Information for dealers
Contents 4 Installing the wine conditioning unit .................................................................... 74 Before installing the wine conditioning unit.................................................... 74Setting up the wine conditioning unit .............................................
Page 5 - Warning and Safety instructions; Danger of injury from broken glass.; Correct application; This wine conditioning unit is intended for use in the home and in
Warning and Safety instructions 5 This wine conditioning unit complies with all current local and na-tional safety requirements. Inappropriate use can, however, lead topersonal injury and material damage. Read the operating and installation instructions carefully beforeusing the wine conditioning un...
Page 6 - Safety with children
Warning and Safety instructions 6 The wine conditioning unit is intended for domestic use only for storing wine.It must not be used for any other purpose. The wine conditioning unit is not suitable for storing and keeping cool medicines, blood plasma, laboratory preparations or other suchmateria...
Page 7 - Danger of suffocation! Whilst playing, children could become en-
Warning and Safety instructions 7 Danger of suffocation! Whilst playing, children could become en- tangled in packaging (such as plastic wrapping) or pull it over theirhead and suffocate. Keep packaging material away from children.
Page 8 - Technical safety
Warning and Safety instructions 8 Technical safety The refrigerant circuit has been checked for leaks. The wine con- ditioning unit complies with statutory safety requirements and theappropriate EU directives. This wine conditioning unit contains the coolant Isobutane (R600a), a natural gas whic...
Page 9 - To avoid the risk of damage to the wine conditioning unit, make
Warning and Safety instructions 9 To avoid the risk of damage to the wine conditioning unit, make sure that the connection data (fuse rating, frequency and voltage) onthe data plate corresponds to the household supply.Check that this is the case before connecting the wine conditioningunit. Consult...
Page 11 - Correct use; Do not cover or block the air vents as this could impair the effi-
Warning and Safety instructions 11 Correct use The wine conditioning unit is designed for use within a certain cli- mate range (ambient temperatures), and should not be used outsidethis range. The climate range for your wine conditioning unit is statedon the data plate inside the appliance. Instal...
Page 12 - Accessories and spare parts
Warning and Safety instructions 12 Accessories and spare parts Only use genuine original Miele accessories and spare parts with this appliance. Using accessories or spare parts from other manu-facturers will invalidate the warranty, and Miele cannot accept liabil-ity. Miele will guarantee to sup...
Page 13 - Disposing of your old appliance; If your old wine unit or refrigeration appliance has a door lock,; Symbol on the compressor (depending on model); The oil in the compressor can be fatal if swallowed or if it penet-
Warning and Safety instructions 13 Disposing of your old appliance If your old wine unit or refrigeration appliance has a door lock, destroy it.This will prevent the risk of children playing accidentally lockingthemselves in and endangering their lives. Splashes of coolant can damage the eyes. B...
Page 14 - Caring for the environment
Caring for the environment 14 Disposal of the packing mater-ial The packaging is designed to protectthe wine conditioning unit from damageduring transportation. The packagingmaterials used are selected from mater-ials which are environmentally friendlyfor disposal and should be recycled. Recycling t...
Page 15 - Saving energy; In a ventilated room.
Saving energy 15 Normal energy consump-tion Increased energy con-sumption Installation /Maintenance In a ventilated room. In an enclosed, unventilatedroom. Protected from direct sun-light. In direct sunlight. Not near to a heat source(radiator, oven). Near to a heat source (radi-ator, oven). Where t...
Page 16 - Guide to the appliance; Control panel; For selecting the upper or lower wine conditioning zone
Guide to the appliance 16 Control panel a For switchingthe whole wine conditioning unit on and off b Optical interface(for Service technicians only) c For selecting the upper or lower wine conditioning zone d For switching the DynaCool function (constant humidity) on and off e For switching the feat...
Page 17 - Symbols; Symbol
Guide to the appliance 17 Symbols Symbol Meaning Function Lock function To prevent inadvertent switching off and al-tering of settings Audible tones Choice of keypad tone and door alarm tone Miele@home Only visible when a communication moduleor communication stick is fitted and signedon Demo...
Page 18 - Active AirClean filter
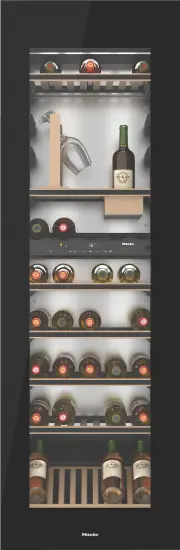
Guide to the appliance 18 a Door-opening mechanism(Push2open) b Lighting strip(in both wine conditioning zones) c Wooden shelves with labels(FlexiFrames with Noteboard) d Glass holder* e Bottle holder* (ConvinoBox) f Control panel for the upper andlower wine conditioning zones/isolation plate for th...
Page 19 - Opening the appliance door
Guide to the appliance 19 Using the door-opening mech-anism correctly The Push2open system on your wineunit makes it easy to open the appli-ance door. The appliance door on yourwine unit is sensitive to pressure. The Push2open system is deactivatedat the factory. The function has to beactivated by t...
Page 20 - Accessories; Accessories supplied; Chalk; Optional accessories; Multi-purpose microfibre cloth
Accessories 20 Accessories supplied Chalk Use the chalk to annotate the magneticstrips on the wooden shelves to identifyyour wines quickly and easily. Optional accessories A range of useful Miele accessories andcare products are available for yourwine conditioning unit. Multi-purpose microfibre clot...
Page 21 - Switching on and off; Before using for the first time; Packaging material
Switching on and off 21 Before using for the first time Packaging material Remove all packaging material fromthe inside of the appliance. Cleaning the wine unit Please refer to the relevant instruc-tions in “Cleaning and care”. Clean the inside of the appliance andthe accessories. Operating the ...
Page 22 - Selecting settings
Switching on and off 22 The interior lighting will come on whenthe door is opened. Selecting settings A different setting can be set for eachwine conditioning zone. Touch the sensor for the wine condi-tioning zone you want to adjust thesettings for. The sensor that has been selected ishighlighted ...
Page 23 - Switch the wine unit off.
Switching on and off 23 Switching off for longer peri-ods of time If the wine unit is not going to be usedfor a longer period of time: Switch the wine unit off. Switch off at the wall and withdrawthe plug from the socket, or discon-nect the fuse. Clean the wine unit. Leave the door ajar to a...
Page 24 - Selecting further settings
Selecting further settings 24 Certain settings on the wine condition-ing unit can only be selected in settingsmode. The door alarm is automatically dis-abled when the appliance is in set-tings mode. Safety lock The safety lock can be activated to pre-vent: - the appliance being switched off by mi...
Page 25 - Audible tones; Switching audible signals on/off
Selecting further settings 25 Audible tones The wine conditioning unit has audibletones such as the keypad tone and thedoor and temperature alarms. You can switch the keypad tone or thedoor alarm tone on or off but you can-not deactivate the temperature alarm. There are four settings to choose fr...
Page 26 - Display brightness; Altering the display brightness
Selecting further settings 26 Display brightness The display brightness can be adjustedto suit lighting conditions in the room. The display brightness can be adjustedin steps from 1 to 3 . The factory default setting is 3 (maximum brightness). Altering the display brightness Touch the setting...
Page 27 - The optimum temperature and air quality; The optimum temperature; Type of wine
The optimum temperature and air quality 27 Wine keeps on maturing depending onthe surrounding conditions. The lengthof time for which wine can be kept ingood condition will therefore dependnot only on the temperature but also onthe air quality. The wine conditioning unit with its con-stant ideal tem...
Page 28 - Isolator plate for thermal separation
The optimum temperature and air quality 28 Safety device in case of low ambienttemperatures The appliance is equipped with a safetythermostat to protect your wine againsta sharp drop in temperature. If the ex-ternal temperature should fall, a heaterelement switches on automatically tokeep the temper...
Page 29 - The
The optimum temperature and air quality 29 - Touching a sensor once: The last temperature selected flashes. - Each subsequent touch of the sensor: Adjusts the temperature shown in1 °C increments. - Leaving a finger on the sensor: Changes the temperature continu-ously. A negative tone will sound (if ...
Page 30 - Air quality and humidity; Danger of damage from excess
The optimum temperature and air quality 30 Air quality and humidity In most refrigerators the humidity is toolow for wine and therefore a refrigeratoris not suitable for wine storage. Highhumidity levels are necessary whenstoring wine to moisten corks from theoutside. When the humidity is too lowthe...
Page 31 - Switching off DynaCool
The optimum temperature and air quality 31 Switching off DynaCool The wine conditioning unit usesslightly more energy and is a littlenoisier when the DynaCool function isswitched on. You can switch it off nowand then if you wish. Touch the sensor for switching theDynaCool function on and off so th...
Page 32 - Temperature and door alarm; Temperature alarm
Temperature and door alarm 32 This wine conditioning unit is equippedwith an alarm system so that the tem-perature cannot rise or fall unnoticed,thus possibly damaging the wine. Temperature alarm If the temperature in one of the wineconditioning zones rises or falls by acertain amount, the sensor fo...
Page 33 - Door alarm; lights up in the display.
Temperature and door alarm 33 Door alarm An alarm will sound if the appliancedoor has been left open for longer thanapprox. 2 minutes. The sensors for thewine conditioning zones will flash in thecontrol panel. The alarm symbol lights up in the display. As soon as the door is closed, thealarm will...
Page 34 - Feature lighting; flashes in the display
Feature lighting 34 The interior lighting can be set to re-main on when the door is closed soyour wines can be on display at alltimes. Each wine conditioning zone has itsown lighting strip so that all zones areilluminated. Thanks to the use of LED lighting, thewine will not be adversely affected byh...
Page 35 - Open the appliance door.
Feature lighting 35 Touch the OK sensor to confirm yourchoice. The set brightness is saved to memory.The temperature display then appearsagain. As soon as the appliance door isclosed, the set brightness for the fea-ture lighting takes effect. When the ap-pliance door is opened, the interiorlightin...
Page 36 - By touching the sensor
Feature lighting 36 By touching the sensor - lighting duration is reduced by 30 minutes - lighting duration is increased by 30 minutes. Touch the OK sensor to confirm yourchoice. The selected lighting duration is savedand the temperature reappears in thedisplay. The lighting duration set starts an...
Page 37 - Storing wine bottles; We also recommend increasing the
Storing wine bottles 37 Vibration and movement have a negat-ive effect on the maturing process,which can in turn affect the taste of thewine. To avoid disturbing other bottles whenremoving a bottle of wine, store bottlesof the same type beside each other onthe same shelf. Avoid stacking bottleson to...
Page 38 - Wooden shelves; Moving the wooden shelves
Storing wine bottles 38 Wooden shelves The wooden shelves are on telescopicrunners which can be pulled out tomake it easier to store and removebottles. Moving the wooden shelves The wooden shelves can be removedand replaced again if required. Pull the wooden shelf out until itstops . Release t...
Page 39 - Adjusting the wooden shelves
Storing wine bottles 39 To replace the wooden shelf, positionit on the extended runners. Thenotches in the wooden shelf fit overthe retaining pins. The magnetic stripshould be pointing forwards. Slide the wooden shelf back into theappliance as far as it will go . Push the wooden shelf right ...
Page 40 - Annotating wooden shelves
Storing wine bottles 40 Annotating wooden shelves For quick and easy identification of thewines stored, you can write on theblackboard-painted surface on themagnetic strips on the wooden shelves. Use the chalk supplied. You can writedirectly on the magnetic strip or removeit from the wooden shelf. T...
Page 41 - Risk of damage and injury.
Storing wine bottles 41 If you do not wish to use the 3Dbottle presenter for presentation pur-poses or would like to make use ofthe maximum storage capacity ofyour wine conditioning unit, simplyfold down the rear struts. Place the 3D bottle presenter flat onthe floor of the wine conditioning uni...
Page 42 - Maximum capacity; Without SommelierSet
Storing wine bottles 42 Maximum capacity Risk of damage. Do not exceed the maximum load-bearing capacity of 25 kg for eachwooden shelf. Do not stack bottles on the woodenshelves in more than two layers. Except when the 3D bottle presenteris folded down in the bottom of theappliance, in which case ...
Page 43 - With SommelierSet
Storing wine bottles 43 - With 3D bottle presenter set up With the 3D bottle presenter set up, upto 70 Bordeaux-type bottles (0.75 l) can be stored in the wine conditioningunit, with 33 in the upper zone and 37bottles in the lower zone. With SommelierSet - With 3D bottle presenter folded down Up to ...
Page 45 - SommelierSet; Setting up the SommelierSet; Fitting the runner covers
SommelierSet 45 Setting up the SommelierSet The SommelierSet can be used to havethe wine in your wine unit ready fordrinking. You can store wine glassesand accessories, decant your wine andstore open bottles in the wine unit. You can place the SommelierSet in theupper or lower wine conditioning zone...
Page 46 - Inserting the glass holder
SommelierSet 46 Inserting the glass holder This can be used for storing and chillingwine glasses. To fit the glass holder , remove the necessary number of slats from thewooden shelf. Place the glass holder on the wooden shelf. Tip: There are two compartments un- derneath the glassware rail...
Page 47 - Automatic defrosting
Automatic defrosting 47 The wine conditioning unit defrostsautomatically.
Page 48 - Cleaning and care; Cleaning agents; do not use
Cleaning and care 48 Do not let water get into the elec-tronic unit or the lighting. Risk of damage due to moisture ingress.The steam from a steam cleaner candamage plastic and and electricalcomponents.Do not use a steam cleaner to cleanthe wine conditioning unit. The data plate located inside the...
Page 49 - Before cleaning the wine unit
Cleaning and care 49 Before cleaning the wine unit Switch the wine unit off. Take any wine bottles out of the wineunit and store them in a cool place. Take out all other removable parts forcleaning. Remove the magnetic strips from thewooden shelves before cleaningthem. Interior, accessories ...
Page 50 - Cleaning the ventilation gaps; Risk of damage as a result of in-; After cleaning
Cleaning and care 50 Cleaning the ventilation gaps A build-up of dust will increase the en-ergy consumption of the appliance. The ventilation gaps should becleaned on a regular basis with abrush or vacuum cleaner (you coulduse a Miele vacuum cleaner dustingbrush, for example). Cleaning the door se...
Page 51 - Active AirClean filters; lights up in the display, the
Active AirClean filters 51 Fresh air from the room enters the wineconditioning unit through the ActiveAirClean filter. Filtering the incoming airthrough the Active AirClean filter en-sures that all the air entering the appli-ance is fresh and free from dust andodours. The reminder to change the Acti...
Page 53 - Problem solving guide; Problem
Problem solving guide 53 Many malfunctions and faults that can occur in daily operation can be easilyremedied. Time and money will be saved because a service call will not beneeded. The following guide may help you to find the reason for a malfunction or a fault,and to correct it. To prevent cold fr...
Page 55 - Display warnings; The door alarm has been activated.
Problem solving guide 55 Display warnings Message Cause and remedy The alarm symbol is lit in the display andboth sensors for thewine conditioning zonesare flashing in the con-trol field. Furthermore,an audible alarm is alsosounding. The door alarm has been activated. Close the appliance door. B...
Page 56 - The interior lighting is not working.
Problem solving guide 56 The interior lighting is not working. Problem Cause and remedy The LED interior lightingis not working. The wine conditioning unit is not switched on. Switch the wine conditioning unit on. To avoid overheating, the LED lighting switches itselfoff automatically after approx...
Page 57 - General problems with the wine conditioning unit
Problem solving guide 57 General problems with the wine conditioning unit Problem Cause and remedy The door seal is dam-aged or needs to be re-placed. No tools are required to change the door seal. Change the door seal. A replacement is availablefrom Miele or from specialist retailers. There is no...
Page 58 - Noises; Normal noises
Noises 58 Normal noises What causes them Brrrrr ... A humming noise is made by the motor (compressor). Thisnoise can get louder for brief periods when the motor switcheson. Blubb, blubb ... A gurgling noise can be heard when coolant is circulatingthrough the pipes. Click ... Clicking sounds are made...
Page 59 - Service; Contact in the event of a fault; Warranty
Service 59 Contact in the event of a fault In the event of any faults which youcannot remedy yourself, please contactyour Miele dealer or the Miele CustomerService Department. You can book a Miele Customer Ser-vice Department call-out online atwww.miele.com/service. Contact information for the Miele...
Page 60 - Installation; Location; Risk of damage and injury from
Installation *INSTALLATION* 60 Location Risk of damage and injury from wine conditioning unit tipping over.The wine conditioning unit is veryheavy and can tip forwards when theappliance door is open.Keep the appliance door shut untilthe wine conditioning unit has beenbuilt in and secured in its bu...
Page 62 - - The socket must be easily accessible
Installation *INSTALLATION* 62 This appliance should be installed in adry, well-ventilated room. When deciding where to install yourwine conditioning unit, please bear inmind that it will use more energy if in-stalled near to a heater, a cooker or an-other appliance that gives off heat. Dir-ect sunl...
Page 63 - Danger from broken glass!; Climate range
Installation *INSTALLATION* 63 Danger from broken glass! Danger of injury from broken glass. If installed at altitudes above 1500 mthere is a risk of the glass in the doorbreaking because of changes in airpressure. Shards of glass can causesevere injury if not handled with care. Risk of damage d...
Page 64 - Ventilation; Risk of fire and damage due to
Installation *INSTALLATION* 64 Ventilation Risk of fire and damage due to insufficient ventilation.If the wine conditioning unit is notventilated sufficiently, the com-pressor will run more frequently andfor longer periods. This will result inincreased energy consumption and ahigher operating temp...
Page 65 - ing unit; Installation dimensions
Installation *INSTALLATION* 65 The ventilation gap at the top of the ap-pliance can be constructed in differentways: - : Directly above the wine condition- ing unit - : Above a top box - : In a top box through a ventilation grille at the front The ventilation gaps must not becovered or blocked...
Page 66 - Adjusting the door hinges
Installation *INSTALLATION* 66 Side view Adjusting the door hinges The door hinges on the wine condition-ing unit are set ex-works to enable theappliance door to be opened wide. However if the opening angle of the ap-pliance door needs to be limited for anyreason, the hinge can be adjusted toaccommo...
Page 67 - Changing the door hinging
Installation *INSTALLATION* 67 Changing the door hinging The wine conditioning unit is suppliedright-hinged. If left-hand hinging is re-quired, the hinges must be changed. To change the door hinging, you willneed the following tools: Danger of injury and damage to the appliance.The glass door is b...
Page 68 - Danger of injury and damage to
Installation *INSTALLATION* 68 Danger of injury and damage to the appliance.The appliance door is not secureonce the screws in the hinges havebeen removed.The second person must support theappliance door. Danger of injury from folding hinges.If the hinges close there is a dangerof injury.Leave t...
Page 69 - Take care not to let the screws that
Installation *INSTALLATION* 69 Tip: Take care not to let the screws that you have loosened fall through the slitsin the appliance door. Unscrew cover . Pull the door seal back a little fromthe bottom corner of the appliancedoor and remove cover . Tip: Take care not to let the screws that y...
Page 70 - Remove the stopper
Installation *INSTALLATION* 70 Remove the stopper from the ap- pliance door. Remove the spacer from the appli- ance door, rotate it 180° and fit it onthe opposite side. Refit the stopper on the opposite side of the door. Pull the door seal back a little fromthe top and bottom corner...
Page 71 - Secure the hinges
Installation *INSTALLATION* 71 Unscrew the mounting plate fromhinge A and then screw it onto hingeB. Unscrew the mounting plate fromhinge B and then screw it onto hingeA. Secure the hinges diagonally on the opposite side.
Page 72 - Screw on the cover
Installation *INSTALLATION* 72 Screw on the cover and the sup- plied cover . To do so use the screws that you put to one side thatwere previously used for the transportsafety device . Refit the covers . Secure the seal . Make sure that the seal is properlyseated.
Page 75 - ditioning unit in its housing unit:
Installation *INSTALLATION* 75 The following parts are supplied withthe wine conditioning unit: All installation parts are number coded.This coding is also used in the installa-tion instructions. - Required for installing the wine con- ditioning unit in its housing unit:
Page 76 - Setting up the wine conditioning unit
Installation *INSTALLATION* 76 All fitting instructions given are for aright-hinged appliance. If you haveconverted the appliance to left handhinging you will need to adapt theseinstructions accordingly. Setting up the wine conditioning unit Unscrew the transport safetydevices from both sides o...
Page 77 - With 16 mm thick unit walls only:
Installation *INSTALLATION* 77 Slide the filler panel supplied from the front into the holders on the wineconditioning unit as shown. If the wine conditioning unit is left-hinged, allow for the position of thelug (see illustration above). If the wine conditioning unit is right-hinged, allow...
Page 79 - Fix the sealing strip
Installation *INSTALLATION* 79 Remove the edge protection from allsides of the door. Push the appliance two thirds of theway into the building-in niche. Carefully remove the protective foilfrom the supplied sealing strip . Fix the sealing strip flush with the front of the appliance on ...
Page 80 - Installing the wine conditioning unit
Installation *INSTALLATION* 80 Installing the wine conditioning unit If the wine conditioning unit ispushed too far into the niche, thedoor will not close properly. This cancause ice to build up, condensate toaccumulate and lead to faults in theappliance. These can all lead to in-creased energy cons...
Page 81 - through
Installation *INSTALLATION* 81 1. 2. Push the hinged side of the applianceto the housing unit wall. To secure the wine conditioning unitto the housing unit, screw the sup-plied chipboard screws through the hinge plates at the top and bot-tom (1. + 2.). Push the fixing brackets and aga...
Page 83 - from the bottom of the ap-
Installation *INSTALLATION* 83 If not already done, remove the trans-port safety device as follows: 19 19 Pull the door seal back a little fromthe bottom corner of the door and re-move the cover . 20 Unscrew the transport safetydevice from the bottom of the ap- pliance. Screw the suppl...
Page 84 - Adjusting the appliance door
Installation *INSTALLATION* 84 Adjusting the appliance door Align the appliance door by width (X)with neighbouring furniture fronts. Risk of damage to the adjacent furniture front.The adjacent furniture front may getdamaged.When adjusting the appliance doortake care not to damage furniturefronts...
Page 85 - Refit the covers
Installation *INSTALLATION* 85 Refit the covers . Secure the seal back on the appli-ance door.
Page 86 - - The appliance door does not touch
Installation *INSTALLATION* 86 The following confirms that the wineunit is correctly installed: - The appliance door closes properly. - The appliance door does not touch the housing unit. - The seal on the top corner of the handle side is firmly seated. To double check place a torch in thewine uni...
Page 87 - Electrical connection; Risk of fire from overheating.
Installation *INSTALLATION* 87 Electrical connection The wine unit is supplied with a mainscable with moulded plug ready for con-nection to an earthed socket. The socket must be easily accessibleafter the wine unit has been installed. Ifthe socket is not easily accessible, en-sure that a suitable me...
Page 88 - Demo mode; Switching on demo mode
Information for dealers 88 Demo mode The wine conditioning unit can bedemonstrated in the showroom or atexhibitions in “Demo mode”. In thismode the control panel and interiorlighting are active but the compressorremains switched off, so that the appli-ance does not cool down. Switching on demo mod...
Page 89 - Touch the
Information for dealers 89 Touch the or sensor until 0 ap- pears (means: Demo mode isswitched off). Touch the OK sensor to confirm yourselection. The selected setting is applied, the symbol flashes. Touch the settings sensor to leavesettings mode.Otherwise the appliance exits set-tings ...


 Miele WWD380 WCS PWash&Steam&9kg User Manual
 Miele W 1614 Manual
 Miele G 5266 SCVi SFP Active Plus User Manual
 Miele Classic C1 Turbo Team PowerLine - SBAN0 User Manual
![Miele PDR 307 [EL]](https://manualsarea.com/img/product/thumbs/48/ba/fd/bafde84806e8abc8b420f34eaf8fcd6e.webp) Miele PDR 307 [EL] User Manual
Miele PDR 307 [EL] User Manual Miele F 1911 Vi Manual
![Miele PDR 908 [EL MAR 3N AC 400V 50-60Hz]](https://manualsarea.com/img/product/thumbs/48/05/b7/05b705998b251f92b271e908423e1ecb.webp) Miele PDR 908 [EL MAR 3N AC 400V 50-60Hz] Installation Manual
Miele PDR 908 [EL MAR 3N AC 400V 50-60Hz] Installation Manual Miele K 9757 iD Manual
 Miele KWT 2672 ViS User Manual
 Miele KWT 4584 E User Manual
 Miele KWT 6312 UGS User Manual
 Miele KWT 6322 UG User Manual
 Miele KWT 6322 UG-1 User Manual
 Miele KWT 6422 iG-1 User Manual
 Miele KWT 6722 iS User Manual
 Miele KWT 6722 iS-1 User Manual
 Miele KWT 7112 iG User Manual
 Miele KWTUS 7096 E User Manual
 Miele M Manual
 Miele M-Nr 09 798 370 Manual