Page 2 - Contents; Safety lock
Contents 2 IMPORTANT SAFETY INSTRUCTIONS ............................................................ 5 Caring for the environment .............................................................................. 12 Saving energy ............................................................................
Page 4 - Information for dealers
Contents 4 Reversing the door hinge .................................................................................... 64Installing the wine conditioning unit .................................................................... 69 Before installing the wine conditioning unit..........................
Page 5 - IMPORTANT SAFETY INSTRUCTIONS; Risk of injury from broken glass.
IMPORTANT SAFETY INSTRUCTIONS 5 When using the appliance, follow basic safety precautions, including the fol-lowing: Read all instructions before installation and use to prevent accidents and ma-chine damage. This wine conditioning unit complies with all current local and na-tional safety requiremen...
Page 6 - Use
IMPORTANT SAFETY INSTRUCTIONS 6 Use This wine conditioning unit is intended for use in domestic house- holds and similar residential environments such as - staff kitchen areas in shops, offices and other working environ- ments - farm houses and by clients in hotels, motels and other residential ty...
Page 7 - Children
IMPORTANT SAFETY INSTRUCTIONS 7 Children Children near the wine conditioning unit must be supervised. Do not let children play with the wine conditioning unit. Ensure that any packing material is disposed of safely and kept out of the reach of children. DANGER of suffocation! Technical safety ...
Page 9 - Proper use
IMPORTANT SAFETY INSTRUCTIONS 9 To ensure safe operation, use the wine conditioning unit only when it has been installed. The wine conditioning unit must be disconnected from the power supply during installation, side-by-side heater installation, mainte-nance and repair work. The appliance is on...
Page 10 - Cleaning and care
IMPORTANT SAFETY INSTRUCTIONS 10 If the wine conditioning unit is used for storing food which con- tains fat or oil, make sure that it does not come into contact withplastic components. Any spillages of oil or fat could cause stresscracks to the plastic and cause it to break or split. Risk of fi...
Page 11 - Transport
IMPORTANT SAFETY INSTRUCTIONS 11 Transport Always transport the wine conditioning unit in an upright position and in its original transport packaging to avoid damage in transit. Risk of injury and damage. The wine conditioning unit is very heavy and must be transported by two people. Disposing o...
Page 12 - Caring for the environment; Disposal of packaging material
Caring for the environment 12 Disposal of packaging material The packaging is designed to protectthe wine conditioning unit from damageduring transportation. The packagingmaterials used are selected from mate-rials which are environmentally friendlyfor disposal and should be recycled. Ensure that an...
Page 13 - Saving energy
Saving energy 13 Normal energy consumption Increased energy consumption Installation/main-tenance In a well-ventilated room. In an enclosed, poorly venti-lated room. Protected from direct sun-light. In direct sunlight. Away from heat sources(heater element, range). Near a heat source (heaterelement,...
Page 14 - Guide to the appliance; Control panel; On/Off of the entire appliance
Guide to the appliance 14 Control panel a On/Off of the entire appliance b Optical interface(for Miele Technical Service only) c For switching the DynaCool function (constant humidity) on and off d For switching the feature lighting on and off e For setting the temperature( for colder) f For confi...
Page 15 - Explanation of symbols; Symbol
Guide to the appliance 15 Explanation of symbols Symbol Meaning Function Safety lock To prevent inadvertent switching off and al-tering of settings ° C °F Celsius (°C) or Fahren-heit (°F) For selecting the temperature unit Acoustic signals Choice of sensor tone and door alarm tone Miele@home (...
Page 17 - A glass holder, a bottle holder, and two covers for the runners.
Guide to the appliance 17 * The SommelierSet consists of: A glass holder, a bottle holder, and two covers for the runners.
Page 18 - Opening the door
Guide to the appliance 18 Using the door-opening aidcorrectly The Push2open system on your wineconditioning unit makes it easy to openthe door. The appliance door on yourwine conditioning unit is sensitive topressure. The Push2open system is deactivatedat the factory. The system has to beactivated b...
Page 19 - Accessories; Accessories supplied; Chalk; Optional accessories; Active AirClean filter
Accessories 19 Accessories supplied Chalk Use the chalk supplied to write on themagnetic strips on the wooden shelvesfor easy identification of the wines instorage. Active AirClean filter The Active AirClean filter ensures opti-mum air exchange and therefore excel-lent air quality in the wine condit...
Page 20 - Switching the wine conditioning unit on and off; Before first use; Packaging material
Switching the wine conditioning unit on and off 20 Before first use Packaging material Remove all packaging material fromthe inside of the appliance. Protective film (depending on model) Stainless steel surfaces have a layer ofprotective film to prevent scratchingduring transportation. Do not re...
Page 21 - Switching the wine unit off
Switching the wine conditioning unit on and off 21 Switching the wine unit off Touch the On/Off sensor.If this is not possible, the safety lock is activated. The temperature shown in the displaywill go out and the power connectionsymbol appears. The interior lighting goes out and cool-ing is...
Page 22 - Selecting additional settings
Selecting additional settings 22 Certain settings on the wine condition-ing unit can only be selected in settingsmode. The door alarm is automatically dis-abled when the appliance is in set-tings mode. Safety lock The safety lock can be activated to pre-vent: - the appliance being turned off by m...
Page 25 - Acoustic signals; Switching acoustic signals on/off
Selecting additional settings 25 Acoustic signals The wine conditioning unit has audibletones such as the sensor tone and thedoor and temperature alarms. You can turn the sensor tone or theacoustic door alarm on or off, but youcannot turn off the temperature alarm. There are four settings to choo...
Page 26 - Display brightness
Selecting additional settings 26 Display brightness You can adjust the brightness of thedisplay to suit the ambient light condi-tions in the room. The display brightness can be adjustedincrementally from 1 to 3 . The factory default setting is 3 (maximum bright- ness). Changing the brightness...
Page 27 - Sabbath mode; Turning on Sabbath mode
Selecting additional settings 27 Sabbath mode The Sabbath mode supports the obser-vance of religious customs. The following are turned off: - the interior lighting when the door is opened, - all acoustic and optical signals - the temperature display, - the DynaCool function (if previously activate...
Page 28 - As soon as the
Selecting additional settings 28 As soon as the symbol goes out in the display after 3 seconds, Sabbathmode is switched on. Turn off Sabbath mode after the Sab-bath has passed. Turning off Sabbath mode Touch the Settings sensor to leaveSabbath mode. The temperature will appear in the dis-play ...
Page 29 - Optimum temperature and air quality; Temperature; Type of wine
Optimum temperature and air quality 29 Wine continues to mature depending onthe surrounding conditions. The lengthof time for which wine can be kept ingood condition will therefore dependnot only on the temperature but also onthe air quality. The wine conditioning unit with its con-stant ideal tempe...
Page 30 - Sets the temperature
Optimum temperature and air quality 30 Safety device in case of low ambienttemperatures The appliance is equipped with a safetythermostat to protect your wine againsta sharp drop in temperature. If the ex-ternal temperature should drop belowthis level, a heater element turns on au-tomatically to kee...
Page 31 - Temperature range; Air quality and humidity; Risk of damage caused by ex-
Optimum temperature and air quality 31 Temperature range The temperature can be set between41° and 68°F (5° and 20°C). Temperature display In normal operation the temperaturedisplay shows the actual temperature inthe appliance. If the temperature in one of the zones isnot within the range that the a...
Page 32 - Switching on DynaCool
Optimum temperature and air quality 32 Using DynaCool (constant humidity) DynaCool raises the relative humidityinside the whole of the wine condition-ing unit. It also distributes the humidityand the temperature evenly around theinterior so that you can store all yourwine under the same excellent...
Page 33 - symbol will appear in the
Optimum temperature and air quality 33 Air filtration with the Active AirCleanfilter The Active AirClean filter achieves opti-mum air quality by filtering the incomingair. Fresh air from the room enters the ap-pliance via the Active AirClean filter.The fans (DynaCool function) then dis-tribute the a...
Page 34 - Temperature and door alarm; Temperature alarm
Temperature and door alarm 34 The appliance is equipped with analarm system so that the temperaturecannot rise or fall unnoticed, whichcould possibly damage the wine. Temperature alarm If the temperature becomes too warmor too cold, the alarm symbol will flash in the display.An alarm will also s...
Page 35 - Door alarm; will light up in the dis-
Temperature and door alarm 35 Door alarm An alarm will sound if the door has beenleft open for longer than 2 minutes. Thealarm symbol will light up in the dis- play. The alarm will stop and the alarm sym-bol will go out as soon as the door is closed. Turning the door alarm off early If the a...
Page 36 - Feature lighting; and
Feature lighting 36 The interior lighting can be set to re-main on when the door is closed soyour wines can be on display at alltimes. Thanks to the use of LED lighting, thewine will not be adversely affected byheat or UV light. Switching the feature lightingon and off Touch the On/Off sensor for ...
Page 38 - Storing wine bottles; We also recommend increasing the
Storing wine bottles 38 Vibration and movement have a nega-tive effect on the maturing processwhich can in turn affect the taste of thewine. To avoid disturbing other bottles whenremoving a bottle of wine, store bottlesof the same type beside each other onthe same shelf. Avoid stacking bottleson top...
Page 39 - Wooden shelves; Moving the wooden shelves
Storing wine bottles 39 Wooden shelves The wooden shelves are mounted ontelescopic runners which can be pulledout to make it easier to store and re-move bottles. Moving the wooden shelves The wooden shelves can be removedand replaced again if required. Pull the wooden shelf out until itstops . ...
Page 40 - Adjusting the wooden shelves
Storing wine bottles 40 To replace the wooden shelf, positionit on the extended runners. Thenotches in the wooden shelf fit overthe retaining pins. The magnetic stripshould be pointing forwards. Slide the wooden shelf back into theappliance as far as it will go . Push the wooden shelf righ...
Page 41 - Labeling the wooden racks
Storing wine bottles 41 Labeling the wooden racks For quick and easy identification of thewines stored, you can write on theblackboard-painted surface on themagnetic strips on the wooden shelves. Use the chalk supplied. You can writedirectly on the magnetic strip or removeit from the wooden shelf. T...
Page 42 - Then lay the bottles on them.; Maximum capacity; Without SommelierSet
Storing wine bottles 42 Slide the bottle holders in the posi-tions shown in the drawing. Then lay the bottles on them. Inserting the decor shelf Place the decor shelf at the very bot-tom of the appliance (see “Guide tothe appliance”). Maximum capacity Without SommelierSet Up to 46 Bordeaux bot...
Page 43 - With SommelierSet
Storing wine bottles 43 With SommelierSet Up to 17 Bordeaux bottles (0.75 L(25.4 fl oz.)) can be stored in the wineconditioning unit. The load-bearing capacity of eachwooden shelf is max. 55 lb (25 kg).
Page 44 - SommelierSet; Setting up the SommelierSet; Fitting the runner covers
SommelierSet 44 Setting up the SommelierSet The SommelierSet can be used to haveyour wine ready for drinking. You canstore wine glasses and accessories inthe appliance, decant your wine, andstore open bottles in the appliance. To insert the SommelierSet, remove thewooden shelf above it first. Pull...
Page 45 - Inserting the bottle holder
SommelierSet 45 Inserting the bottle holder You can store opened wine bottles inthe bottle holder . Remove the necessary number ofslats on the wooden shelf and placebottle holder on it. Position the dividers in the bottle holder to suit the size of bottles beingheld. They should be he...
Page 46 - Automatic defrosting
Automatic defrosting 46 The wine conditioning unit defrosts au-tomatically.
Page 47 - Cleaning agents; do not
Cleaning and care 47 Do not let water get into the elec-tronic, the ventilation grille, or thelighting. Risk of damage due to moisture penetration.The steam from a steam cleaner candamage plastic and electrical com-ponents.Do not use a steam cleaner to cleanthe wine conditioning unit. The data pla...
Page 48 - Switch off the appliance.; Cleaning the ventilation gaps; Risk of damage as a result of in-
Cleaning and care 48 Before cleaning the wine con-ditioning unit Switch off the appliance. Unplug the appliance or trip the cir-cuit breaker. Take any wine bottles out of the wineconditioning unit and store them in acool place. Take out all other removable parts forcleaning. Remove the mag...
Page 49 - Cleaning the air filter
Cleaning and care 49 Cleaning the air filter Clean the air filter behind the ventila-tion grille at least once a year. Remove the air filter and vacuum itthoroughly on both sides. A dirty filtercan prevent the wine conditioningunit from cooling sufficiently. After cleaning Replace all parts in...
Page 50 - lights up in the display, the
Active AirClean filter 50 Fresh air from the room enters the wineconditioning unit through the Active Air-Clean filter. Filtering the incoming airthrough the Active AirClean filter en-sures that all air entering the applianceis fresh and free from dust and odors. The reminder to change the Active Ai...
Page 52 - Frequently asked questions; Problem
Frequently asked questions 52 With the aid of this guide, minor problems can be corrected without a service call.If, having followed the suggestions below, you still cannot resolve the problem,please contact Miele Service. To prevent cold air from escaping, open the appliance doors as little as poss...
Page 54 - Messages in the display; The door alarm has been activated.
Frequently asked questions 54 Messages in the display Message Possible cause and solution The alarm symbol is lit up in the display andan alarm is also sound-ing. The door alarm has been activated. Close the appliance door. The alarm sym-bol will go out and the alarm will stop. The alarm s...
Page 55 - The interior lighting is not working.
Frequently asked questions 55 The interior lighting is not working. Problem Possible cause and solution The LED interior lightingis not working. The wine conditioning unit is not switched on. Switch the wine conditioning unit on. To avoid overheating, the LED lighting switches itselfoff automatica...
Page 56 - General problems with the wine conditioning unit
Frequently asked questions 56 General problems with the wine conditioning unit Problem Possible cause and solution An alarm does notsound even though theappliance door hasbeen open for a longtime. This is not a fault. The alarm tone has beenswitched off in settings mode (see “Acoustic sig-nals ” ...
Page 57 - Causes of noises; Normal noises
Causes of noises 57 Normal noises Cause Brrrrr... A humming noise is made by the motor (compressor). Thisnoise can get louder for brief periods when the motor switcheson. Blub, blub.... A gurgling noise can be heard when the coolant circulatesthrough the pipes. Click.... Clicking sounds occur whenev...
Page 58 - Service and warranty; Technical service; - your Miele dealer or; Warranty; MieleCare
Service and warranty 58 Technical service In the event of a fault which you cannoteasily correct yourself, please contact: - your Miele dealer or - Miele Technical Service. Contact details can be found in theback of these operating and installa-tion instructions. Please quote the model and serial nu...
Page 59 - Installation; Installation location
Installation *INSTALLATION* 59 Installation location Risk of damage and injury from the wine conditioning unit tippingover.The wine conditioning unit is veryheavy and can tip forward when theappliance door is open.Keep the appliance door shut untilthe wine conditioning unit has beeninstalled and s...
Page 60 - Please contact Miele for specific; Climate class
Installation *INSTALLATION* 60 Side-by-side This wine conditioning unit can be in-stalled side-by-side with another refrig-eration appliance. Tip: Please contact Miele for specific information about which combinationswill work with your appliance. Climate class The wine conditioning unit is designed...
Page 61 - Risk of damage due to high hu-; Ventilation
Installation *INSTALLATION* 61 Risk of damage due to high hu- midity.In environments with high humidity,condensation can build up on the ex-ternal wine conditioning unit panels,which can cause corrosion.Install the wine conditioning unit withsufficient ventilation in a dry and/orair-conditioned ro...
Page 62 - Installation dimensions; ventilation grille
Installation *INSTALLATION* 62 Installation dimensions 580 Before installation, ensure the niche and ventilation gap dimensions are the correctsize. The specified air vents must be observed and the cut-out in the toe-kickpanel must be aligned centrally with the appliance in order to ensure the corre...
Page 63 - View from above
Page 64 - Adjusting the door hinge; Risk of injury and damage.
Installation *INSTALLATION* 64 Adjusting the door hinge The door hinges on the wine condition-ing unit are set at the factory to enablethe appliance door to be opened wide. However, if the opening angle of the ap-pliance door needs to be limited for anyreason, the hinge can be adjusted toaccommodate...
Page 68 - and replace it on the op-
Installation *INSTALLATION* 68 Take off lower retainingbracket and replace it on the op- posite side. Fit appliance door . Risk of injury! The second person must support theappliance door. Tighten the screws in upper hinge . Tighten the screws in lower hinge . Now install th...
Page 70 - Setting up the wine conditioning unit
Installation *INSTALLATION* 70 Setting up the wine conditioning unit The air filter prevents soiling of thecompressor compartment to ensureefficient functioning of the appliance. Carefully remove the protective foilfrom air filter . Insert the air filter into the bottom leftof the appliance p...
Page 71 - If adjacent furniture doors
Installation *INSTALLATION* 71 Align the wine conditioning unit hori-zontally and vertically. If the wineconditioning unit is not correctlyaligned it can distort. Check the alignment of adjacent fur-niture housing doors. If adjacentdoors vary in height from the wineconditioning unit, see “Aligni...
Page 72 - Secure the bracket
Installation *INSTALLATION* 72 To avoid damaging the wine condi-tioning unit, the ventilation grille mustbe positioned precisely in front of thevent outlet! If you wish to fit a trimacross the bottom of the wine condi-tioning unit, make sure it providesadequate ventilation. The filler panel must b...
Page 73 - Open the appliance door.
Installation *INSTALLATION* 73 Securing the wine conditioning unitin theniche The wine conditioning unit must pro-trude evenly from the furniture doorsby 1/16" (2 mm). Open the appliance door. Remove cover and first screw the wine conditioning unit to the adjacentfurniture unit at the t...
Page 75 - Insert foam block
Installation *INSTALLATION* 75 Secure the covers. Insert foam block supplied into the appliance plinth. If the foam block is not fitted, thewine conditioning unit will notachieve optimum cooling and maybe damaged. Fit unit base . The cut-out in the plinth facing mustbe in the center of...
Page 76 - Electrical connection; solar
Installation *INSTALLATION* 76 Electrical connection Connect this appliance to a 110 – 120VAC, 60 Hz and 15 amp (20 amp forside-by-side) circuit with a circuitbreaker or fuse. This appliance is equipped with a three-prong grounding plug to prevent shockhazards. It should be plugged directlyinto a pr...
Page 77 - Demo mode; Turning on Demo mode
Information for dealers 77 Demo mode The appliance can be demonstrated inthe showroom or at exhibitions in“Demo mode”. In this mode the controlpanel and interior lighting are active butthe compressor remains turned off, sothat the appliance does not cool down. Turning on Demo mode Switch the wi...
Page 78 - Touch the
Information for dealers 78 Touch the or sensor so that the symbol 0 appears in the display (meaning: Demo mode is inactive). Touch the OK sensor to confirm yourselection. The selected setting will be adoptedand the symbol will flash. Touch the settings sensor to leave thesettings...
Page 79 - National Headquarters; Canada; Headquarters and Miele Centre
9 Independence WayPrinceton, NJ 08540 U.S.A. Miele, Inc. National Headquarters Please have the model and serial numberof your appliance available whencontacting Customer Service. Canada ImporterMiele Limited Headquarters and Miele Centre Customer Service & Support Phone: 888-99-MIELE(64353)[emai...
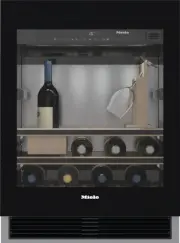


 Miele WWD380 WCS PWash&Steam&9kg User Manual
 Miele W 1614 Manual
 Miele G 5266 SCVi SFP Active Plus User Manual
 Miele Classic C1 Turbo Team PowerLine - SBAN0 User Manual
![Miele PDR 307 [EL]](https://manualsarea.com/img/product/thumbs/48/ba/fd/bafde84806e8abc8b420f34eaf8fcd6e.webp) Miele PDR 307 [EL] User Manual
Miele PDR 307 [EL] User Manual Miele F 1911 Vi Manual
![Miele PDR 908 [EL MAR 3N AC 400V 50-60Hz]](https://manualsarea.com/img/product/thumbs/48/05/b7/05b705998b251f92b271e908423e1ecb.webp) Miele PDR 908 [EL MAR 3N AC 400V 50-60Hz] Installation Manual
Miele PDR 908 [EL MAR 3N AC 400V 50-60Hz] Installation Manual Miele K 9757 iD Manual
 Miele KWT 1601 Vi Manual
 Miele KWT 1611 SF Manual
 Miele KWT 2612 Vi User Manual
 Miele KWT 2672 ViS User Manual
 Miele KWT 4584 E User Manual
 Miele KWT 6322 UG User Manual
 Miele KWT 6322 UG-1 User Manual
 Miele KWT 6422 iG-1 User Manual
 Miele KWT 6722 iGS-1 User Manual
 Miele KWT 6722 iS User Manual
 Miele KWT 6722 iS-1 User Manual