Page 2 - Contents; Settings mode
Contents 2 Warning and Safety instructions ............................................................................... 5 Caring for the environment ......................................................................................... 13 Installation .............................................
Page 3 - Push2open
Contents 3 Initial commissioning ................................................................................................... 55 Before using for the first time ....................................................................................... 55 Choosing the right door assistant ( Push2...
Page 5 - Warning and Safety instructions; Danger of injury and damage to the appliance due to the wine
Warning and Safety instructions 5 This wine conditioning unit complies with all current local andnational safety requirements. Inappropriate use can, however, leadto personal injury and material damage. Read the operating and installation instructions carefully beforeusing the wine conditioning unit...
Page 6 - Correct application
Warning and Safety instructions 6 Correct application This wine conditioning unit is intended for use in the home and in similar environments, for example– in shops, offices and similar work settings– on agricultural estates– by the guests in hotels, motels, bed & breakfasts and other typicalh...
Page 7 - Danger of suffocation! Whilst playing, children could become; Technical safety; The refrigerant circuit has been checked for leaks. The wine
Warning and Safety instructions 7 Danger of suffocation! Whilst playing, children could become entangled in packaging (such as plastic wrapping) or pull it over theirhead and suffocate. Keep packaging material away from children. Technical safety The refrigerant circuit has been checked for leak...
Page 9 - Correct use
Warning and Safety instructions 9 While the wine conditioning unit is under warranty, repairs should only be undertaken by a Miele authorised service technician.Otherwise the warranty is invalidated. Faulty components must only be replaced with genuine Miele original spare parts. Miele can only ...
Page 10 - Accessories and spare parts
Warning and Safety instructions 10 In areas which may be subject to infestation by cockroaches or other vermin, pay particular attention to keeping the appliance and itssurroundings clean at all times. Any damage caused by cockroachesor other vermin will not be covered by the warranty. Accessories...
Page 11 - Disposal of your old appliance; Symbol on the compressor (depending on model)
Warning and Safety instructions 11 Disposal of your old appliance Children playing could become trapped in the wine unit and could suffocate. - Remove the appliance door.- Leave the wooden/metal shelves in the wine unit so children cannot climb inside. - If the wine unit has a door lock, make sure...
Page 12 - The oil in the compressor can be fatal if swallowed or if it
Warning and Safety instructions 12 The oil in the compressor can be fatal if swallowed or if it penetrates the airways.
Page 13 - Caring for the environment; Disposing of your old appliance
Caring for the environment 13 Disposing of the packagingmaterial The packaging material is used forhandling and protects the appliancefrom transport damage. The packagingmaterial used is selected from materialswhich are environmentally friendly fordisposal and can generally be recycled.Recycling the...
Page 14 - Installation; Location
Installation *INSTALLATION* 14 Location This appliance should be installed in adry, well-ventilated room.When deciding where to install yourwine conditioning unit, please bear inmind that it will use more energy ifinstalled near to a heater, a cooker oranother appliance that gives off heat.Direct su...
Page 15 - Climate range; SN; Installation notes; Risk of damage and injury from; Adjoining cabinets/units
Installation *INSTALLATION* 15 Climate range This wine unit is designed for use withinspecific ambient temperatures (climaterange). Do not use in ambienttemperatures for which it is notdesigned. The climate range is stated onthe data plate inside the wine unit. Climate range Ambient temperature SN 1...
Page 16 - Ventilation; Risk of fire and damage due to; Door hinge; Risk of damage and injury when
Installation *INSTALLATION* 16 Load-bearing capacity of the nichefloor To ensure the safe installation of thewine conditioning unit and to guaranteeits correct functioning, the floor of theniche where the appliance is to beinstalled must be smooth and even.It must be made from strong, rigidmaterial....
Page 17 - The wall; at least 16 mm; is; narrower than; , you will need the side panel; thicker than
Installation *INSTALLATION* 17 . . . with partition wall The wall a between the side-by-side wine conditioning units/refrigerationappliances must be at least 16 mm thick. If the door hinges of the appliancesare next to each other, you must takeinto account the thickness of thefurniture fronts and do...
Page 18 - Building-in dimensions
Installation *INSTALLATION* 18 Building-in dimensions A B C A B C KWT 26x2 Vi(S) 2134–2164 mm 610 mm 610 mm + furniture front(19–38 mm)
Page 20 - Dimensions when the appliance door is opened (opening angle 90°/115°); Door handle
Installation *INSTALLATION* 20 Dimensions when the appliance door is opened (opening angle 90°/115°) 10 mm D A B C A B* C* D (with a furniturefront of 19 mm) 677 mm Furniture front (19–38 mm) Door handle 296 mm * The dimensions of the furniture front and the door handle vary depending on thedesign o...
Page 21 - Dimensions of the furniture front
Installation *INSTALLATION* 21 Dimensions of the furniture front 604 mm 450 mm 77 mm 149 . 5 mm 1622 mm 2029 mm 257 . 5 mm ≥ 102−132 mm
Page 22 - Tools required; depending on materials; Other
Installation *INSTALLATION* 22 Installing the wine conditioningunit Before starting ... It is essential to read these operatingand installation instructions carefullybefore starting to install the wineconditioning unit.The wine conditioning unit should beinstalled by a suitably qualifiedinstaller in...
Page 23 - Weight of the furniture front; If the furniture front is too heavy,; Aligning the building-in niche
Installation *INSTALLATION* 23 Weight of the furniture front Before fitting a furniture front, ensurethat the weight of the furniture frontdoes not exceed the maximumpermitted weight: Wine conditioningunit Max. weight ofthe furniture front KWT 26x2 Vi(S) 73 kg If the furniture front is too heavy, ...
Page 24 - Checking the building-in niche
Installation *INSTALLATION* 24 Checking the building-in niche Check the installation dimensions(see “Installation – Installationdimensions”). Check the position of the electricalconnection. The length of theelectrical connection cable is 3 m. The electrical socket must not beconcealed behind the...
Page 25 - Do; not; remove the installation aids; must be installed; Unscrew the fixing brackets
Installation *INSTALLATION* 25 To protect the floor when installingthe wine conditioning unit, secure anoff-cut of flooring or similar materialto the floor in front of the installationarea. Do not remove the installation aids from the appliance door. These will berequired later for aligning t...
Page 26 - Preparing the building-in niche
Installation *INSTALLATION* 26 Preparing the building-in niche Risk of damage and injury from the wine conditioning unit tippingover.The wine conditioning unit is veryheavy and can tip forwards when theappliance door is open.The building-in niche must besecured to the wall behind it and/orabove it...
Page 27 - Danger of injury and damage to
Installation *INSTALLATION* 27 Danger of injury and damage to the appliance due to the wineconditioning unit tipping over.If the anti-tip brackets are fixed toohigh up, they cannot be used tosecure the wine conditioning unit.There must not be more than 8 mmbetween the anti-tip brackets and thewine...
Page 29 - Aligning the wine conditioning unit
Installation *INSTALLATION* 29 Risk of damage due to electrical overload.If the wine conditioning unit iselectrically overloaded, this cancause a short circuit and thereforedamage to your appliance.When you install appliances side byside, each appliance must have itsown separate electrical socket....
Page 30 - Risk of damage due to incorrect
Installation *INSTALLATION* 30 Furniture front thickness of 38 mm The adjustable feet at the front andback of the appliance can all beadjusted from the front of theappliance. Risk of damage due to incorrect feet adjustment.You may damage the adjustable feetif you use a cordless screwdriver.Always ...
Page 31 - Proceed carefully when adjusting
Installation *INSTALLATION* 31 Adjust the rear feet with a ratchet(attachment: socket, 8 mm) or aTX 20 screwdriver . Adjust the front feet with a ratchet(attachment: socket, 8 mm) or aTX 20 screwdriver . Tip: Proceed carefully when adjusting the feet, alternating between the leftand right ...
Page 32 - only until
Installation *INSTALLATION* 32 Place a spirit level across theinstallation aids on the appliance door to check the wine conditioningunit's alignment. Unscrew the adjustable feet and on both sides at least until themarking on the plinth has reached thespecified distance of 32 mm on thesp...
Page 34 - Preparing to install the furniture fronts; Unscrew the installation aids
Installation *INSTALLATION* 34 Preparing to install the furniture fronts Open the appliance door as far as itwill go. Unscrew the installation aids from the appliance door. Unscrew the angle trims from both sides of the appliance door and placethe trims and screws to one side –they will ...
Page 36 - Secure the mounting frame
Installation *INSTALLATION* 36 Secure the mounting frame to the top of the furniture front, using atleast 6 screws. The mounting frame has severaldifferent types of holes to take accountof a variety of furniture fronts.When securing the frame, alwaysscrew into the strongest part of thefurniture...
Page 39 - Mounting the fixing brackets; Slide the fixing bracket
Installation *INSTALLATION* 39 Mounting the fixing brackets The fixing bracket is used to secure thefurniture front to the bottom of theappliance door. Do not mount the fixing brackets untilthe wine conditioning unit (or side-by-side combination, if applicable) hasbeen installed and the furniture fr...
Page 40 - Securing the covers
Installation *INSTALLATION* 40 Tighten the screw at the bottom ofthe appliance door. Fit the cover over the fixing bracket . Click the covers onto the fixing bracket. Securing the covers Before the cover can be installed in the gap above the wine conditioningunit, it must be asse...
Page 41 - Place the assembled cover
Installation *INSTALLATION* 41 Cover viewed from the side Place the assembled cover into the gap above the wine conditioning unitso it clicks into place. While doing so,slide both parts of the cover togetheras required. Installing the cover in a side-by-sidecombination Insert the pin (from th...
Page 42 - Now attach the covers; Fitting the door trim
Installation *INSTALLATION* 42 Secure both sides of the wineconditioning unit using at least 3clips for the covers. Now attach the covers onto the retaining clips on each side. In the case of side-by-sideinstallation, the covers are onlyrequired on the outer side. Fit the cover ont...
Page 43 - Click the plinth ventilation grille
Installation *INSTALLATION* 43 Trim the long pieces of door trim forthe right and left sides to the lengthrequired X. Fit the door trim into the gap betweenthe furniture front and the glass. Cut the short pieces of door trim forthe top and bottom of the door to thelength required Y. Fit the ...
Page 44 - Open the appliance door.
Installation *INSTALLATION* 44 Limiting the opening angle of theappliance door The door hinges on the wineconditioning unit are set ex-works toenable the appliance door to be openedwide.If the appliance door hits an adjacentwall when opened, for example, theopening angle can be limited to 90°. Ope...
Page 45 - Electrical connection; Risk of fire from overheating.; Connecting the wine conditioning unit
Installation *INSTALLATION* 45 Electrical connection The refrigeration appliance must only beconnected to an earthed socket usingthe mains connection cable supplied.The socket must be easily accessibleafter the refrigeration appliance hasbeen installed. If the socket is not easilyaccessible, ensure ...
Page 47 - Saving energy; In a ventilated room.
Saving energy 47 Normal energyconsumption Increased energyconsumption Installation /Maintenance In a ventilated room. In an enclosed, unventilatedroom. Protected from directsunlight. In direct sunlight. Not near to a heat source(radiator, oven). Near to a heat source(radiator, oven). Where the ideal...
Page 48 - Use
Saving energy 48 Normal energyconsumption Increased energyconsumption Use Wooden shelves arranged asthey were when theappliance was delivered. Only open the door whennecessary and for as short atime as possible. Store winebottles in an organised way. Frequent opening of the doorfor long periods will...
Page 49 - Guide to the appliance; Display
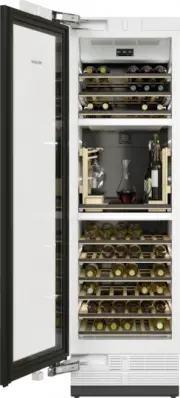
Guide to the appliance 49 a Display b On/Off switch c Wooden shelves with labels d Interior lighting e Isolator plate for thermal separation of the wine conditioning zones f SommelierSet* g Glass door with UV filter h Automatic door opening (Push2open/Pull2open)
Page 51 - Main screen; sensor control
Guide to the appliance 51 Main screen ° C 11 1 2 3 4 5 ° C 11 ° C 11 a Temperature display (target temperature) for the 3 wine conditioning zones b sensor control For setting the temperature and humidity c sensor control For switching the interior lighting on and off when the appl...
Page 52 - Symbol; Set
Guide to the appliance 52 Settings mode In Settings mode, you can select the following appliance functions and alter theirsettings to some extent: Symbol Function Language Set Display brightness Adjust (darker to brighter) Colour scheme Set (dark or bright) / Buzzer tones Adjust the volum...
Page 53 - see “Selecting additional settings”); Symbols in Settings mode; Scroll in Settings mode or select a setting
Guide to the appliance 53 * Demo mode Switch off * (only visible when Demo mode , is switched on see “Selecting additional settings”) Factory default settings Reset to default settings (see “Selecting additional settings”) Ambient lighting Choose between 5 different settings for ambientlightin...
Page 54 - Accessories; Accessories supplied; Appliance plug; Optional accessories; Multi-purpose microfibre cloth
Accessories 54 Accessories supplied Appliance plug Chalk Use the chalk to annotate the magneticstrips on the wooden shelves to identifyyour wines quickly and easily. Optional accessories A range of useful Miele accessories andcare products are available for your wineconditioning unit. Multi-purpose ...
Page 55 - Initial commissioning; Before using for the first time; Packaging material
Initial commissioning 55 Before using for the first time Allow the wine conditioning unit tostand for approx. 1 hour beforeconnecting it to the power supply. This will prevent potential functionalproblems with the wine conditioningunit. Packaging material Remove all packaging material fromthe insi...
Page 56 - - Call up information on the operating; Availability of the WiFi connection; or from the Google Play StoreTM.
Initial commissioning 56 Miele@home Your wine conditioning unit isequipped with an integrated WiFimodule.Networking is deactivated at thefactory. You will need: - A WiFi network- The Miele@mobile app- A Miele user account The user account can be created via theMiele@mobile app. The Miele@mobile app ...
Page 57 - selected; coloured; OK
Initial commissioning 57 Operating the wine conditioningunit The touch display can be scratchedby pointed or sharp objects, e.g.pens.Only touch the display with yourfingers. If your fingers are cold, the touchdisplay may not react. 39 °F 39 0 °F ° C 11 ° C 11 ° C 11 The sensor cont...
Page 58 - Starting up for the first time
Initial commissioning 58 Starting up for the first time Open the appliance door. Switch the wine conditioning unit onby pressing the on/off switch. The on/off switch is located below thedisplay. The wine conditioning unit will start tocool and the interior lighting will comeon when the appliance...
Page 59 - Switching on and off; will appear, followed by the main
Switching on and off 59 Switching the wine conditioningunit on Open the appliance door. Switch the wine conditioning unit onby pressing the On/Off switch. The wine conditioning unit will start tocool and the interior lighting will comeon when the appliance door is opened. Miele will appear, foll...
Page 60 - Selecting additional settings; Switching Keypad lock
Selecting additional settings 60 In Settings mode , you can select different wine conditioning unitfunctions and alter their settings tosome extent, allowing you to adjust theappliance to suit your requirements.Only the functions in Settings mode that require further explanation aredescribed b...
Page 61 - Performing a Self test; Switching on the
Selecting additional settings 61 Performing a Self test Perform a Self test if you are concerned that your wine conditioning unit is notworking properly and want to check if itis suffering from any problems. In Settings mode , use the and sensor controls to select Self test and select...
Page 62 - Switching on Push2open
Selecting additional settings 62 Switching on Push2open In Settings mode , use the and sensor controls to select Door assistant and select OK to confirm your selection. Use the and sensor controls to select Mode and select OK to confirm your selection. Use the and sensor...
Page 64 - Setting up Miele@home; Activating Miele@home; Checking the WiFi connection status
Selecting additional settings 64 Miele@home Setting up Miele@home The message Set up Miele@home only appears if the wine appliance has notyet been connected to a WiFi network. Connect your wine appliance asdescribed in “Before using for the firsttime”. Deactivating Miele@home In Settings mode ...
Page 65 - Setting up Miele@home again; Resetting the network configuration; Switching off the Demo mode; without the cooling
Selecting additional settings 65 Setting up Miele@home again If you have changed your WiFi network,you can set up Miele@home again foryour wine conditioning unit. In Settings mode , use the and sensor controls to select Miele@home and select OK to confirm your selection. Use the an...
Page 66 - Resetting the settings to their default settings
Selecting additional settings 66 Resetting the settings to their default settings You can reset the wine conditioning unit‘s settings to their default settings. Reset the settings to the default settings when disposing of your wineconditioning unit, selling it, or putting a used wine conditioning...
Page 67 - Function
Selecting additional settings 67 Function Default setting Language English Display brightness Middle value (4 of 7 segments) Colour scheme Dark / Buzzer tones Middle value (4 of 7 segments) / Keypad tone Middle value (4 of 7 segments) °C / °F Temperature unit °Celsius / Keypad lock Switc...
Page 68 - Switching Sabbath mode; Switching the
Selecting additional settings 68 Switching Sabbath mode on or off The wine conditioning unit offers a Sabbath mode for the purposes of religious observance. When Sabbath mode is switched on, you cannot make any settings on yourwine conditioning unit. Ensure that the appliance door isproperly clo...
Page 69 - Selecting the intensity of the
Selecting additional settings 69 Selecting the intensity of the Ambient lighting You can set the intensity of the Ambient lighting in Settings mode . You can also choose the wineconditioning zones in which the Ambient lighting should be switched on. In Settings mode , use the and ...
Page 70 - Selecting the
Selecting additional settings 70 Selecting the Ambient display You can choose what the display shouldlook like when the appliance door isclosed. In Settings mode , use the and sensor controls to select Ambient display and select OK to confirm your selection. Use the and sensor co...
Page 71 - The ideal temperature and humidity; Perfectly storing wine; Recommended drinking temperatures
The ideal temperature and humidity 71 Perfectly storing wine Wine keeps on maturing depending onthe surrounding conditions. The lengthof time for which wine can be kept ingood condition will therefore dependnot only on the temperature but also onthe air quality.The wine unit with its constant andwin...
Page 72 - Isolator plates for thermal separation; required; Humidity
The ideal temperature and humidity 72 Isolator plates for thermal separation The wine conditioning unit has 2 fixedisolator plates that divide the interiorcabinet into 3 zones, which can beconditioned in different ways. Thismeans that you can store up to3 different types of wine at the sametime – fo...
Page 73 - Increasing the humidity; Not increasing the humidity
The ideal temperature and humidity 73 Increasing the humidity If you have set a higher level ofhumidity, the fans will switch onautomatically. This will distribute thehumidity and the temperature evenlyaround the wine conditioning unit sothat you can store all your wine underthe same excellent co...
Page 74 - Door alarm; will also; Switching the door alarm off early; Touch the
Door alarm 74 Door alarm An alarm will sound if the appliancedoor has been left open for longer than2 minutes.The message Close the door will also appear on the display.As soon as the appliance door is closed,the alarm tone will stop and themessage in the display will go out. Switching the door alar...
Page 75 - Storing wine bottles; Risk of injury from falling wine; Wooden shelves; Moving the wooden shelves
Storing wine bottles 75 Vibration and movement have anegative effect on the maturing process,which can in turn affect the taste of thewine.To avoid disturbing other bottles whenremoving a bottle of wine, store bottlesof the same type beside each other onthe same wooden shelf. Avoid stackingbottles o...
Page 76 - Adjusting the wooden shelves; Do not use a cleaning agent
Storing wine bottles 76 Adjusting the wooden shelves The slats in the wooden shelves can beindividually adjusted to suit, so thatevery bottle is stored in perfect safetyregardless of shape or size. Simply lift individual slats to move orremove them from the woodenshelves. Labelling wooden shelves ...
Page 77 - Maximum capacity; Risk of damage due to heavy
Storing wine bottles 77 Maximum capacity Risk of damage due to heavy loads.Excessive loads can damage thewooden shelves.Do not exceed the maximum load-bearing capacity of 35 kg for eachwooden shelf.Do not stack bottles on the woodenshelves. Up to 91 Bordeaux bottles (0.75 l) canbe stored in the wi...
Page 78 - SommelierSet; Setting up the SommelierSet
SommelierSet 78 Setting up the SommelierSet The SommelierSet can be used to havethe wine in your wine conditioning unitready for drinking. You can store wineglasses and accessories, decant yourwine and store open bottles in the wineconditioning unit. a Large and small box for accessories b Decanter ...
Page 80 - Automatic defrosting; The wine unit defrosts automatically.
Automatic defrosting 80 The wine unit defrosts automatically.
Page 81 - Cleaning and care; Risk of damage due to moisture; Cleaning agents; do not use the following:; ammonia, acids or chlorides
Cleaning and care 81 The data plate located inside the wineunit must not be removed. It containsinformation which is required in theevent of a fault. Do not let water get into theelectronic unit or the lighting. Risk of damage due to moisture ingress.The steam from a steam cleaner candamage plasti...
Page 82 - use a cleaning agent.; be allowed to; Cleaning the door seal; Risk of damage as a result of
Cleaning and care 82 Remove the labelling strips from thewooden shelves before cleaning them(see “Labelling wooden shelves” in“Storing wine bottles”). Interior cabinet, accessoriesand appliance door Clean the wine conditioning unit atleast once a month.Remove soiling immediately toprevent it from ...
Page 83 - Cleaning the ventilation gaps; Switch the wine unit on.
Cleaning and care 83 The door seal should be cleanedregularly with clean water, and thenwiped dry with a soft cloth. Cleaning the ventilation gaps A build-up of dust will increase theenergy consumption of the appliance. The ventilation gaps should becleaned on a regular basis with abrush or vacu...
Page 84 - Problem solving guide; Problem
Problem solving guide 84 Many malfunctions and faults that can occur in daily operation can be easilyremedied. You can save time and money in many cases, as you do not need to callthe Miele Customer Service Department.Information to help you rectify faults yourself can be found at www.miele.com/serv...
Page 86 - Display warnings
Problem solving guide 86 Problem Cause and remedy The appliance door can-not be opened. The Pull2open door assistant is switched on but the wine conditioning unit has a handle-free furniturefront. For handle-free furniture fronts, switch on the Push2open door assistant (see “Switching on the Doo...
Page 87 - Message; The
Problem solving guide 87 Message Cause and remedy F Please call Miele Service appears on the displayand an alarm sounds. There is a fault. Make a note of the error message if necessary. Call the Miele Customer Service Department. To turn the alarm off, touch the symbol. The error message wi...
Page 88 - The interior lighting is not working.; General problems with the wine conditioning unit
Problem solving guide 88 The interior lighting is not working. Problem Cause and remedy The interior lighting isnot working. The wine conditioning unit is not switched on. Switch the wine conditioning unit on. The Sabbath mode function is switched on: the temperature display is dark and the sy...
Page 89 - The corks have oxidised due to contact with the air.
Problem solving guide 89 Problem Cause and remedy The wooden slats in thewooden shelves arewarping. A change in volume due to moisture absorption ordrying out is a typical characteristic of wood. Anincrease in humidity in the wine unit causes woodencomponents to warp. Therefore, under certaincircums...
Page 90 - Noises; What is causing them?; Bottles or containers are touching. Separate them.
Noises 90 Normalnoises What is causing them? Brrrrr ... A humming noise is made by the motor (compressor). This noisecan get louder for brief periods when the motor switches on. Blubb, blubb ... A gurgling noise can be heard when the refrigerant circulatesthrough the pipes. Click ... Clicking sounds...
Page 91 - Service; Contact in the event of a fault; Contact en cas d'anomalies; Warranty
Service 91 Information to help you rectify faultsyourself and about Miele spare partscan be found at www.miele.com/service. Contact in the event of a fault In the event of a fault which you cannotremedy yourself, please contact yourMiele dealer or Miele Customer Service. You can book a Miele Custome...
Page 92 - EU Conformity declaration
EU Conformity declaration 92 Miele hereby declares that this wineunit complies with Directive 2014/53/EU. The complete text of the EU declarationof conformity is available from one ofthe following internet addresses: - Products, Download from www.miele.ie - For service, information, operating instru...
Page 93 - UK Conformity declaration; manuals and enter the name of the product or the serial number; This; Statement of Compliance; confirms this Miele product fully complies with the; Paul Wright
UK Conformity declaration 93 Miele hereby declares that this wine unit complies with UK Radio EquipmentRegulations 2017, as amended. The complete text of the UK declaration of conformity is available from one of thefollowing internet addresses: - Products, Download from www.miele.co.uk- For service,...
Page 94 - Copyrights and Licences
Copyrights and Licences 94 Miele uses their own and third party software which is not subject to any so-calledOpen Source Licence for the operation and control of the appliance. This software/these software components are protected by copyright. The copyright powers ofMiele and third parties have to...
Page 95 - United Kingdom
United Kingdom Miele Co. Ltd., Fairacres, Marcham Road, Abingdon, Oxon, OX14 1TWTel: 0330 160 6600, Internet: www.miele.co.uk, E-mail: [email protected] Australia Miele Australia Pty. Ltd.ACN 005 635 398ABN 96 005 635 398Level 4, 141 Camberwell RoadHawthorn East, VIC 3123Tel: 1300 464 353E-mail: [em...


 Miele WWD380 WCS PWash&Steam&9kg User Manual
 Miele W 1614 Manual
 Miele G 5266 SCVi SFP Active Plus User Manual
 Miele Classic C1 Turbo Team PowerLine - SBAN0 User Manual
![Miele PDR 307 [EL]](https://manualsarea.com/img/product/thumbs/48/ba/fd/bafde84806e8abc8b420f34eaf8fcd6e.webp) Miele PDR 307 [EL] User Manual
Miele PDR 307 [EL] User Manual Miele F 1911 Vi Manual
![Miele PDR 908 [EL MAR 3N AC 400V 50-60Hz]](https://manualsarea.com/img/product/thumbs/48/05/b7/05b705998b251f92b271e908423e1ecb.webp) Miele PDR 908 [EL MAR 3N AC 400V 50-60Hz] Installation Manual
Miele PDR 908 [EL MAR 3N AC 400V 50-60Hz] Installation Manual Miele K 9757 iD Manual
 Miele KU 7016 D User Manual
 Miele KU 7030 D User Manual
 Miele KWT 1601 Vi Manual
 Miele KWT 1611 SF Manual
 Miele KWT 2612 Vi User Manual
 Miele KWT 4584 E User Manual
 Miele KWT 6312 UGS User Manual
 Miele KWT 6322 UG User Manual
 Miele KWT 6322 UG-1 User Manual
 Miele KWT 6422 iG-1 User Manual
 Miele KWT 6722 iGS-1 User Manual