Page 2 - Contents
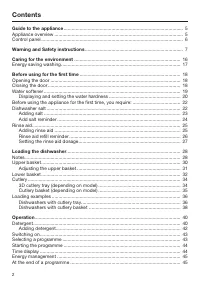
Contents 2 Guide to the appliance .......................................................................................... 5 Appliance overview ................................................................................................. 5Control panel ...........................................
Page 3 - Short
Contents 3 Switching off.......................................................................................................... 46Unloading the dishwasher ..................................................................................... 46Interrupting a programme.................................
Page 4 - Optional accessories
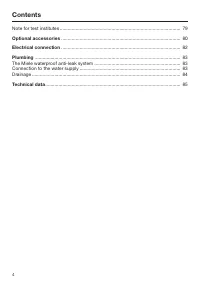
Contents 4 Note for test institutes ........................................................................................... 79 Optional accessories .......................................................................................... 80 Electrical connection ..................................
Page 5 - Guide to the appliance; Appliance overview
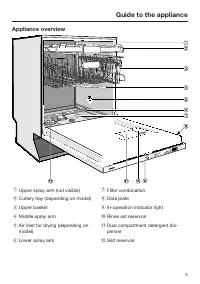
Guide to the appliance 5 Appliance overview a Upper spray arm (not visible) b Cutlery tray (depending on model) c Upper basket d Middle spray arm e Air inlet for drying (depending onmodel) f Lower spray arm g Filter combination h Data plate i In-operation indicator light j Rinse aid reservoir k Dual...
Page 6 - Control panel
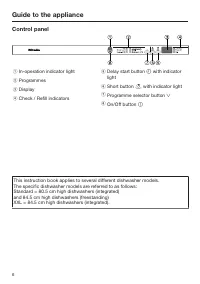
Guide to the appliance 6 Control panel a In-operation indicator light b Programmes c Display d Check / Refill indicators e Delay start button with indicator light f Short button with indicator light g Programme selector button h On/Off button This instruction book applies to several differen...
Page 7 - Warning and Safety instructions
Warning and Safety instructions 7 This dishwasher complies with current safety requirements. Inap-propriate use can, however, lead to personal injury and damage toproperty. To avoid the risk of accidents and damage to the dishwasher,please read the installation sheet and the operating instructionsca...
Page 8 - Correct application; This dishwasher is intended for use in domestic households and
Warning and Safety instructions 8 Correct application This dishwasher is intended for use in domestic households and similar working and residential environments. The dishwasher is not intended for outdoor use. It must only be used as a domestic appliance as specified in these operating instru...
Page 9 - Safety with children
Warning and Safety instructions 9 Safety with children Children under 8 years of age must be kept away from the appli- ance unless they are constantly supervised. Children 8 years and older may only use the dishwasher unsuper- vised if they have been shown how to use it safely and recogniseand u...
Page 10 - Technical safety
Warning and Safety instructions 10 Technical safety Unauthorised installation, maintenance and repairs can cause considerable danger for the user. Installation, maintenance and re-pairs must only be carried out by a Miele authorised technician. A damaged dishwasher is dangerous. Check it for any...
Page 13 - Correct installation
Warning and Safety instructions 13 This dishwasher is supplied with a special lamp to cope with par- ticular conditions (e.g. temperature, moisture, chemical resistance,abrasion resistance and vibration). This special lamp must only beused for the purpose it is intended for. It is not suitable for...
Page 14 - Correct use
Warning and Safety instructions 14 Correct use Do not use solvents in the dishwasher. Danger of explosion. Do not inhale or ingest dishwasher detergent. Dishwasher deter- gents can cause burning in the nose, mouth and throat if swallowed,or inhibit breathing. Seek medical attention immediately i...
Page 15 - Plastic items which cannot withstand being washed in hot water,; Accessories; Only use genuine original Miele accessories and spare parts with; Disposal of your old dishwasher; Make the door lock inoperative so that children cannot accident-
Warning and Safety instructions 15 In an appliance with a cutlery basket (depending on model), cut- lery is cleaned and dried more efficiently if placed in the basket withthe handles downwards. However, to avoid the risk of injury, placeknives and forks etc. with the handles upwards. Plastic ite...
Page 16 - Caring for the environment
Caring for the environment 16 Disposal of the packing mater-ial The packaging is designed to protectthe appliance from damage duringtransportation. The packaging materialsused are selected from materials whichare environmentally friendly for disposaland should be recycled. Recycling the packaging re...
Page 17 - Energy saving washing; ECO
Caring for the environment 17 Energy saving washing This dishwasher is exceptionally eco-nomical in its use of water and electri-city.You can make the most of your appli-ance by following these tips: – For most economical dishwashing, make full use of the baskets withoutoverloading the dishwasher. –...
Page 18 - Before using for the first time; Opening the door; Water in the dishwasher may be; Closing the door; Push the baskets right in.
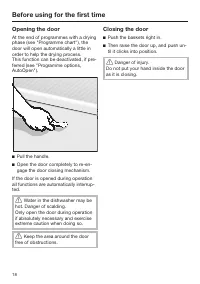
Before using for the first time 18 Opening the door At the end of programmes with a dryingphase (see "Programme chart"), thedoor will open automatically a little inorder to help the drying process. This function can be deactivated, if pre-ferred (see "Programme options,AutoOpen"). ...
Page 19 - Water softener; – The water softener requires dish-
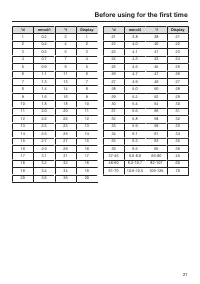
Before using for the first time 19 Water softener In order to achieve good cleaning res-ults, the dishwasher needs to operatewith soft water. Hard water results in abuild-up of calcium deposits on crock-ery and in the dishwasher. Mains water with a hardness levelhigher than 0.7 mmol/l (4 °d - German...
Page 20 - whilst holding it in
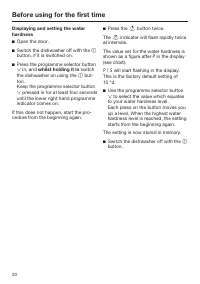
Before using for the first time 20 Displaying and setting the waterhardness Open the door. Switch the dishwasher off with the button, if it is switched on. Press the programme selector button in, and whilst holding it in switch the dishwasher on using the but- ton. Keep the programme sel...
Page 22 - – domestic dishwasher detergent,; Dishwasher salt; you do
Before using for the first time 22 Before using the appliance forthe first time, you require: – approx. 2 litres of water, – approx. 2 kg dishwasher salt, – domestic dishwasher detergent, – rinse aid formulated for domestic dishwashers. Every dishwasher is tested at the fact-ory. There will be resid...
Page 23 - Adding salt
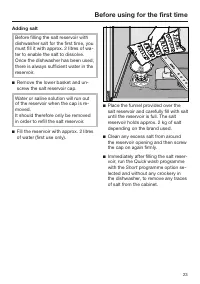
Before using for the first time 23 Adding salt Before filling the salt reservoir withdishwasher salt for the first time, youmust fill it with approx. 2 litres of wa-ter to enable the salt to dissolve.Once the dishwasher has been used,there is always sufficient water in thereservoir. Remove the low...
Page 24 - Add salt reminder
Before using for the first time 24 Add salt reminder Fill the salt reservoir with dishwashersalt when the salt indicator light comes on. (If it comes on during aprogramme, wait until the end of theprogramme). Risk of corrosion. Immediately after filling the saltreservoir, run the Quick wash pro-...
Page 25 - Rinse aid; Adding rinse aid
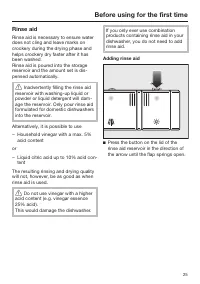
Before using for the first time 25 Rinse aid Rinse aid is necessary to ensure waterdoes not cling and leave marks oncrockery during the drying phase andhelps crockery dry faster after it hasbeen washed. Rinse aid is poured into the storagereservoir and the amount set is dis-pensed automatically. I...
Page 26 - Rinse aid refill reminder
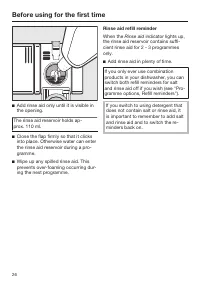
Before using for the first time 26 Add rinse aid only until it is visible inthe opening. The rinse aid reservoir holds ap-prox. 110 ml. Close the flap firmly so that it clicksinto place. Otherwise water can enterthe rinse aid reservoir during a pro-gramme. Wipe up any spilled rinse aid. Thispr...
Page 27 - Setting the rinse aid dosage
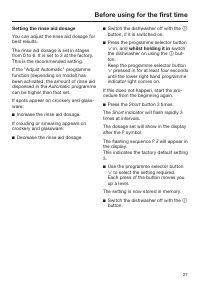
Before using for the first time 27 Setting the rinse aid dosage You can adjust the rinse aid dosage forbest results. The rinse aid dosage is set in stagesfrom 0 to 6. It is set to 3 at the factory.This is the recommended setting. If the "Adjust Automatic" programmefunction (depending on mode...
Page 28 - Loading the dishwasher; Notes
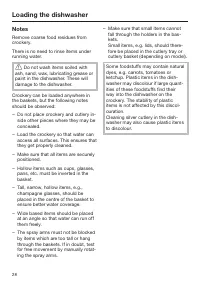
Loading the dishwasher 28 Notes Remove coarse food residues fromcrockery. There is no need to rinse items underrunning water. Do not wash items soiled with ash, sand, wax, lubricating grease orpaint in the dishwasher. These willdamage to the dishwasher. Crockery can be loaded anywhere inthe basket...
Page 29 - Items not suitable for dishwashers:
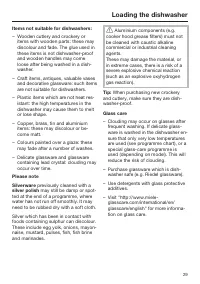
Loading the dishwasher 29 Items not suitable for dishwashers: – Wooden cutlery and crockery or items with wooden parts: these maydiscolour and fade. The glue used inthese items is not dishwasher-proofand wooden handles may comeloose after being washed in a dish-washer. – Craft items, antiques, valua...
Page 30 - Upper basket; Cup rack
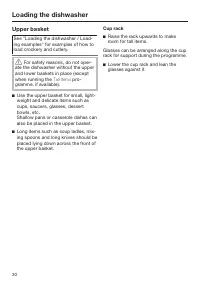
Loading the dishwasher 30 Upper basket See "Loading the dishwasher / Load-ing examples" for examples of how toload crockery and cutlery. For safety reasons, do not oper- ate the dishwasher without the upperand lower baskets in place (exceptwhen running the Tall items pro- gramme, if availa...
Page 31 - Adjusting the upper basket
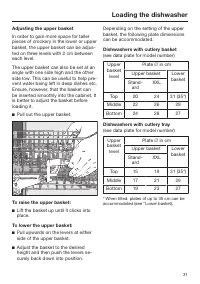
Loading the dishwasher 31 Adjusting the upper basket In order to gain more space for tallerpieces of crockery in the lower or upperbasket, the upper basket can be adjus-ted on three levels with 2 cm betweeneach level. The upper basket can also be set at anangle with one side high and the otherside l...
Page 32 - Lower basket; MultiComfort zone
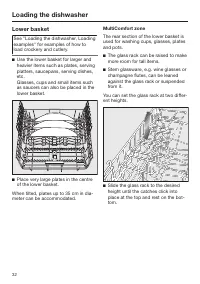
Loading the dishwasher 32 Lower basket See "Loading the dishwasher, Loadingexamples" for examples of how toload crockery and cutlery. Use the lower basket for larger andheavier items such as plates, servingplatters, saucepans, serving dishes,etc.Glasses, cups and small items suchas saucers...
Page 33 - Hinged spikes
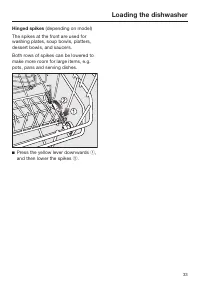
Loading the dishwasher 33 Hinged spikes (depending on model) The spikes at the front are used forwashing plates, soup bowls, platters,dessert bowls, and saucers. Both rows of spikes can be lowered tomake more room for large items, e.g.pots, pans and serving dishes. Press the yellow lever downwards...
Page 34 - Cutlery; D cutlery tray
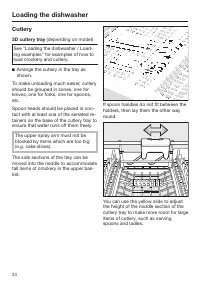
Loading the dishwasher 34 Cutlery 3D cutlery tray (depending on model) See "Loading the dishwasher / Load-ing examples" for examples of how toload crockery and cutlery. Arrange the cutlery in the tray asshown. To make unloading much easier, cutleryshould be grouped in zones, one forknives,...
Page 35 - Cutlery basket
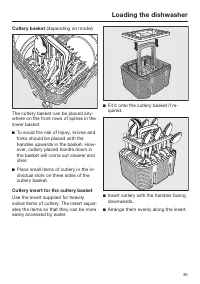
Loading the dishwasher 35 Cutlery basket (depending on model) The cutlery basket can be placed any-where on the front rows of spikes in thelower basket. To avoid the risk of injury, knives andforks should be placed with thehandles upwards in the basket. How-ever, cutlery placed handle down inthe b...
Page 36 - Loading examples; Dishwashers with cutlery tray
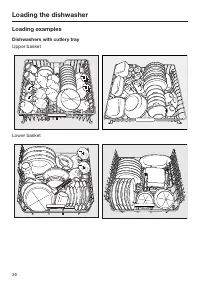
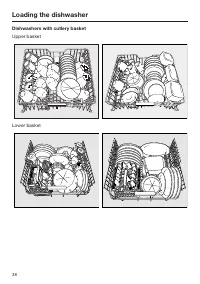
Loading the dishwasher 36 Loading examples Dishwashers with cutlery tray Upper basket Lower basket
Page 37 - Cutlery tray
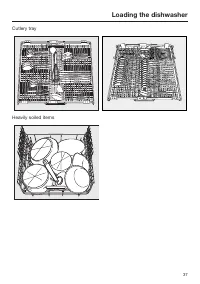
Loading the dishwasher 37 Cutlery tray Heavily soiled items
Page 38 - Dishwashers with cutlery basket
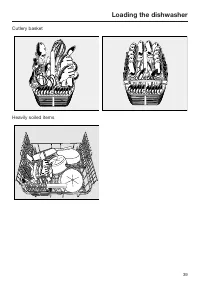
Loading the dishwasher 38 Dishwashers with cutlery basket Upper basket Lower basket
Page 40 - Operation; Detergent; Active ingredients
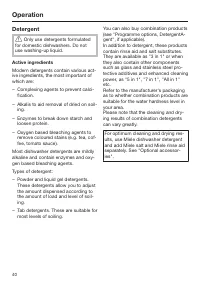
Operation 40 Detergent Only use detergents formulated for domestic dishwashers. Do notuse washing-up liquid. Active ingredients Modern detergents contain various act-ive ingredients, the most important ofwhich are: – Complexing agents to prevent calci- fication. – Alkalis to aid removal of dried o...
Page 41 - Detergent dosage
Operation 41 Detergent dosage Follow the dosage recommended bythe manufacturer on the packaging. Unless directed otherwise, use onedetergent tab or add 20 to 30 ml de-tergent to compartment II, dependingon the level of soiling. With veryheavy soiling you can also add asmall amount of detergent t...
Page 42 - Adding detergent
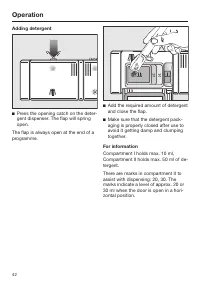
Operation 42 Adding detergent Press the opening catch on the deter-gent dispenser. The flap will springopen. The flap is always open at the end of aprogramme. Add the required amount of detergentand close the flap. Make sure that the detergent pack-aging is properly closed after use toavoid it...
Page 43 - Switching on; Switch the dishwasher on with the; Selecting a programme; Programme
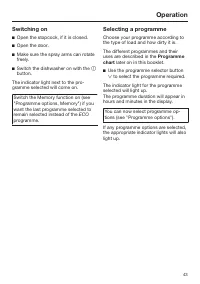
Operation 43 Switching on Open the stopcock, if it is closed. Open the door. Make sure the spray arms can rotatefreely. Switch the dishwasher on with the button. The indicator light next to the pro-gramme selected will come on. Switch the Memory function on (see"Programme options, Memo...
Page 44 - Starting the programme; The programme will begin.; Time display
Operation 44 Starting the programme Start the programme by closing thedoor. The programme will begin. The in-operation indicator comes on toshow that a programme has been star-ted. A programme should only be can-celled in the first few minutes, if atall. Otherwise important programmestages could b...
Page 45 - Energy management; Press the; At the end of a programme; The programme has finished when
Operation 45 Energy management To save energy, the dishwasher willswitch off automatically 10 minutesafter the last time a button has beenpressed or 10 minutes after the end ofthe programme (see "Programme op-tions, Optimise standby"). Press the button to switch the dishwasher back on. ...
Page 46 - Switching off; At the end of a programme:; Unloading the dishwasher
Operation 46 Switching off At the end of a programme: Open the door. The dishwasher can be switched offat any time using the button. Switching the dishwasher off during aprogramme stops the programme. Switching the dishwasher off during therun-up to a delay start time (FlexiTimer)will also sto...
Page 47 - Interrupting a programme; Changing a programme; Switch the dishwasher off with the
Operation 47 Interrupting a programme A programme is interrupted as soon asthe door is opened. If the door is closed again, the pro-gramme will continue from the point itwas at before the door was opened. Water in the dishwasher may be hot. Danger of scalding.Only open the door if absolutely ne-ce...
Page 48 - Programme options
Programme options 48 Short The Short option reduces the dura- tion of programmes in which this optionis available. In order to achieve optimum cleaningresults consumption rates are increasedwith this option. When used in combination with theQuick wash programme, the Short option results in a w...
Page 49 - Refill reminders
Programme options 49 Refill reminders If you only ever use combinationproducts in your dishwasher, you canswitch the refill reminders for salt andrinse aid off if you wish. Doing so willnot affect the DetergentAgent function. Open the door. Switch the dishwasher off with the button, if it is s...
Page 50 - Delay start
Programme options 50 Delay start You can set the start time for a pro-gramme, e.g. to take advantage of nighttime electricity tariffs. The start time canbe delayed between 30 minutes and 24hours. The delay period is shown in 30minutes increments for a delay periodbetween 30 minutes and 9 hours 30min...
Page 51 - indicator light will
Programme options 51 Open the door if you need to checkhow long the delay period has left torun. The time up until the programme startswill show counting down in the displayin hours for durations above 10 hours,and in minutes for durations below this. When the set time is reached, the pro-gramme s...
Page 52 - Buzzer tones
Programme options 52 Buzzer tones A sequence of audible tones will soundat the end of the programme or if thereis a fault. The buzzer at the end of a programmeand the warning buzzer in the event of afault will sound 4 times at intervals witha short pause between each set. The buzzer tones are activa...
Page 53 - Adjust Automatic; Automatic
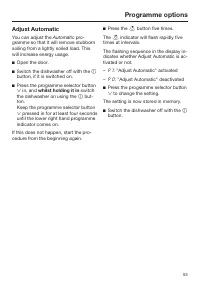
Programme options 53 Adjust Automatic You can adjust the Automatic pro- gramme so that it will remove stubbornsoiling from a lightly soiled load. Thiswill increase energy usage. Open the door. Switch the dishwasher off with the button, if it is switched on. Press the programme selector butt...
Page 54 - Memory
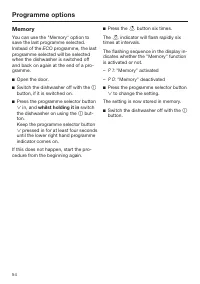
Programme options 54 Memory You can use the "Memory" option tosave the last programme selected. Instead of the ECO programme, the last programme selected will be selectedwhen the dishwasher is switched offand back on again at the end of a pro-gramme. Open the door. Switch the dishwasher ...
Page 55 - AutoOpen
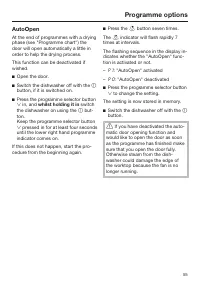
Programme options 55 AutoOpen At the end of programmes with a dryingphase (see "Programme chart") thedoor will open automatically a little inorder to help the drying process. This function can be deactivated ifwished. Open the door. Switch the dishwasher off with the button, if it is s...
Page 56 - Optimise standby
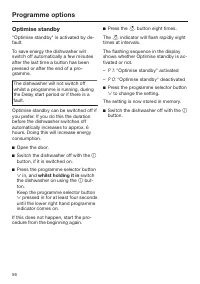
Programme options 56 Optimise standby "Optimise standby" is activated by de-fault. To save energy the dishwasher willswitch off automatically a few minutesafter the last time a button has beenpressed or after the end of a pro-gramme. The dishwasher will not switch offwhilst a programme is ru...
Page 57 - Factory default
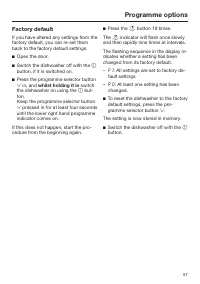
Programme options 57 Factory default If you have altered any settings from thefactory default, you can re-set themback to the factory default settings. Open the door. Switch the dishwasher off with the button, if it is switched on. Press the programme selector button in, and whilst holding...
Page 58 - Programme chart
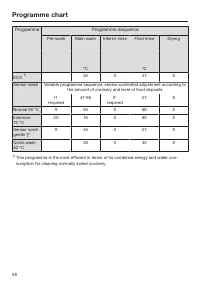
Programme chart 58 Programme Programme sequence Pre-wash Main wash Interim rinse Final rinse Drying °C °C ECO 1) 52 X 47 X Sensor wash Variable programme sequence, sensor-controlled adjustment according to the amount of crockery and level of food deposits If required 47-65 If required 57 X Normal 55...
Page 59 - Consumption
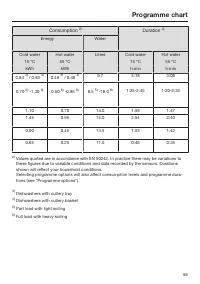
Programme chart 59 Consumption 2) Duration 2) Energy Water Cold water Hot water Litres Cold water Hot water 15 °C 55 °C 15 °C 55 °C kWh kWh h:min h:min 0.84 3) / 0.83 4) 0.49 3) / 0.48 4) 9.7 3:18 3:08 0.70 5) -1.30 6) 0.50 5) -0.85 6) 6.5 5) -16.0 6) 1:25-2:45 1:20-2:35 1.10 0.70 14.0 1:59 1:47 1.4...
Page 60 - Crockery
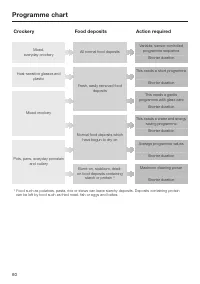
Programme chart 60 Mixed, everyday crockery Heat-sensitive glasses and plastic Mixed crockery Pots, pans, everyday porcelain and cutlery All normal food deposits Fresh, easily removed food deposits Normal food deposits which have begun to dry on Burnt-on, stubborn, dried- on food deposits containing...
Page 61 - Compartment I
Programme chart 61 - 25 ml or 1 tab Sensor wash +short - 20 ml or 1 tab 3) Quick wash 40 °C +short - 20 ml or 1 tab Sensor wash gentle +short - 25 ml or 1 tab ECO +short - 25 ml or 1 tab Normal 55 °C +short 10 ml 25 ml or 1 tab Intensive 75 °C +short 2) see "Detergent" 3) In some cases, ta...
Page 62 - Cleaning and care; The external surfaces of the; Cleaning the wash cabinet; The control panel should; Cleaning the reflector panel
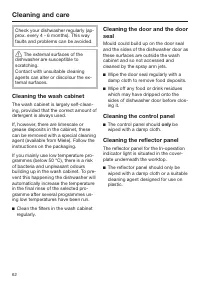
Cleaning and care 62 Check your dishwasher regularly (ap-prox. every 4 - 6 months). This wayfaults and problems can be avoided. The external surfaces of the dishwasher are susceptible toscratching.Contact with unsuitable cleaningagents can alter or discolour the ex-ternal surfaces. Cleaning the wa...
Page 63 - Cleaning the door front
Cleaning and care 63 Cleaning the door front Soiling that is left too long might become impossible to remove andcould cause the external surfaces toalter or discolour.Remove any soiling immediately. Clean the front with a clean spongeand a solution of hot water and wash-ing-up liquid. After clea...
Page 64 - This dishwasher must not be; Cleaning the filters; Switch the dishwasher off.
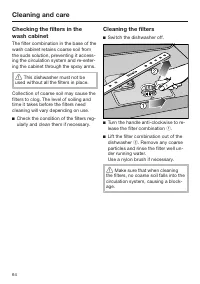
Cleaning and care 64 Checking the filters in thewash cabinet The filter combination in the base of thewash cabinet retains coarse soil fromthe suds solution, preventing it access-ing the circulation system and re-enter-ing the cabinet through the spray arms. This dishwasher must not be used withou...
Page 65 - Press catches
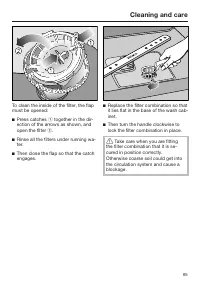
Cleaning and care 65 To clean the inside of the filter, the flapmust be opened: Press catches together in the dir- ection of the arrows as shown, andopen the filter . Rinse all the filters under running wa-ter. Then close the flap so that the catchengages. Replace the filter combination ...
Page 66 - Cleaning the spray arms; top
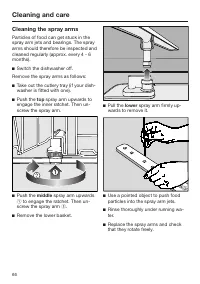
Cleaning and care 66 Cleaning the spray arms Particles of food can get stuck in thespray arm jets and bearings. The sprayarms should therefore be inspected andcleaned regularly (approx. every 4 - 6months). Switch the dishwasher off. Remove the spray arms as follows: Take out the cutlery tray (if...
Page 67 - Problem solving guide; Technical problems; Problem
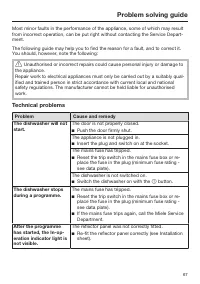
Problem solving guide 67 Most minor faults in the performance of the appliance, some of which may resultfrom incorrect operation, can be put right without contacting the Service Depart-ment. The following guide may help you to find the reason for a fault, and to correct it.You should, however, note ...
Page 70 - Water inlet fault
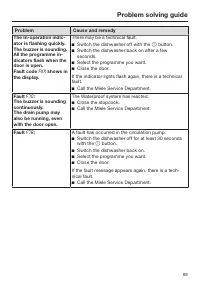
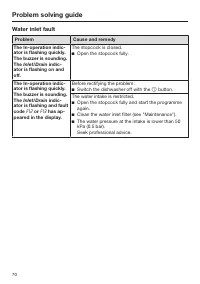
Problem solving guide 70 Water inlet fault Problem Cause and remedy The In-operation indic-ator is flashing quickly.The buzzer is sounding.The Inlet/Drain indic- ator is flashing on andoff. The stopcock is closed. Open the stopcock fully. The In-operation indic-ator is flashing quickly.The buzzer ...
Page 71 - Water drainage fault
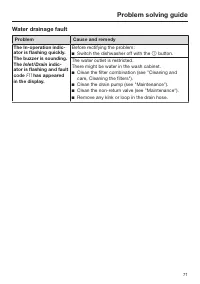
Problem solving guide 71 Water drainage fault Problem Cause and remedy The In-operation indic-ator is flashing quickly.The buzzer is sounding.The Inlet/Drain indic- ator is flashing and faultcode has appeared in the display. Before rectifying the problem: Switch the dishwasher off with the b...
Page 72 - General problems
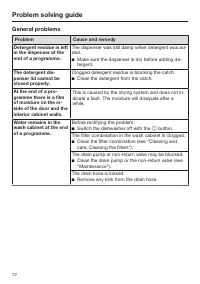
Problem solving guide 72 General problems Problem Cause and remedy Detergent residue is leftin the dispenser at theend of a programme. The dispenser was still damp when detergent was ad-ded. Make sure the dispenser is dry before adding de-tergent. The detergent dis-penser lid cannot beclosed prope...
Page 73 - Noises
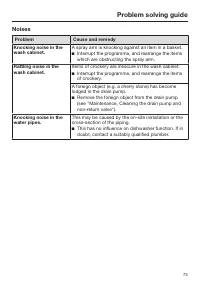
Problem solving guide 73 Noises Problem Cause and remedy Knocking noise in thewash cabinet. A spray arm is knocking against an item in a basket. Interrupt the programme, and rearrange the itemswhich are obstructing the spray arm. Rattling noise in thewash cabinet. Items of crockery are insecure in...
Page 74 - Unsatisfactory washing result
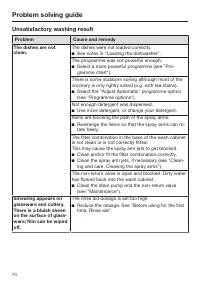
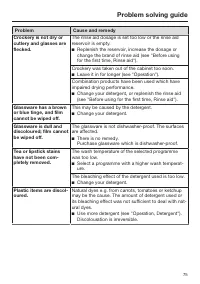
Problem solving guide 74 Unsatisfactory washing result Problem Cause and remedy The dishes are notclean. The dishes were not loaded correctly. See notes in "Loading the dishwasher". The programme was not powerful enough. Select a more powerful programme (see "Pro-gramme chart"). ...
Page 77 - Maintenance; Cleaning the water inlet filter; The plastic housing of the water
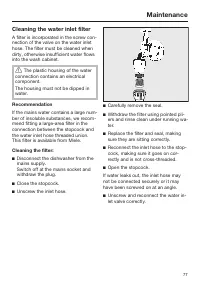
Maintenance 77 Cleaning the water inlet filter A filter is incorporated in the screw con-nection of the valve on the water inlethose. The filter must be cleaned whendirty, otherwise insufficient water flowsinto the wash cabinet. The plastic housing of the water connection contains an electricalcom...
Page 78 - Ensure that the catch engages
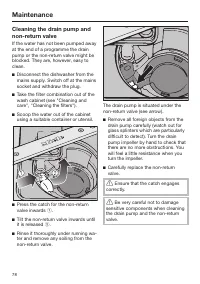
Maintenance 78 Cleaning the drain pump andnon-return valve If the water has not been pumped awayat the end of a programme the drainpump or the non-return valve might beblocked. They are, however, easy toclean. Disconnect the dishwasher from themains supply. Switch off at the mainssocket and withdr...
Page 79 - After sales service; Repairs; – your Miele Dealer, or; Guarantee
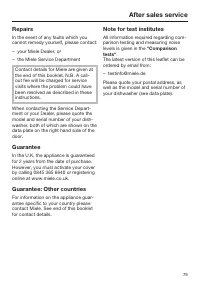
After sales service 79 Repairs In the event of any faults which youcannot remedy yourself, please contact: – your Miele Dealer, or – the Miele Service Department Contact details for Miele are given atthe end of this booklet. N.B. A call-out fee will be charged for servicevisits where the problem cou...
Page 80 - Detergent tabs
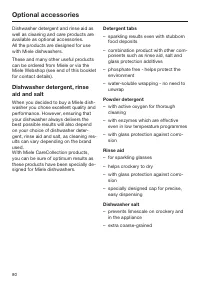
Optional accessories 80 Dishwasher detergent and rinse aid aswell as cleaning and care products areavailable as optional accessories.All the products are designed for usewith Miele dishwashers. These and many other useful productscan be ordered from Miele or via theMiele Webshop (see end of this boo...
Page 81 - Dishwasher care products
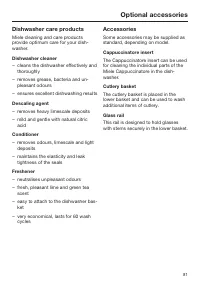
Optional accessories 81 Dishwasher care products Miele cleaning and care productsprovide optimum care for your dish-washer. Dishwasher cleaner – cleans the dishwasher effectively and thoroughly – removes grease, bacteria and un- pleasant odours – ensures excellent dishwashing results Descaling agent...
Page 82 - Electrical connection; The electrical socket must be
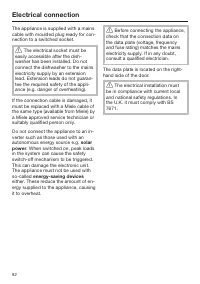
Electrical connection 82 The appliance is supplied with a mainscable with moulded plug ready for con-nection to a switched socket. The electrical socket must be easily accessible after the dish-washer has been installed. Do notconnect the dishwasher to the mainselectricity supply by an extensionle...
Page 83 - Plumbing; Connection to the water supply
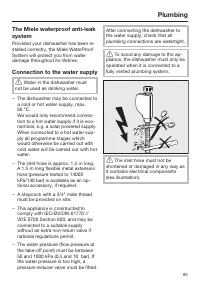
Plumbing 83 The Miele waterproof anti-leaksystem Provided your dishwasher has been in-stalled correctly, the Miele WaterProofSystem will protect you from waterdamage throughout its lifetime. Connection to the water supply Water in the dishwasher must not be used as drinking water. – The dishwasher...
Page 84 - Drainage; Venting the drainage system
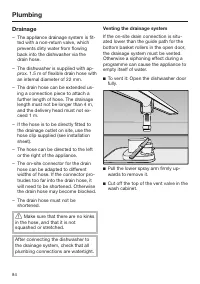
Plumbing 84 Drainage – The appliance drainage system is fit- ted with a non-return valve, whichprevents dirty water from flowingback into the dishwasher via thedrain hose. – The dishwasher is supplied with ap- prox. 1.5 m of flexible drain hose withan internal diameter of 22 mm. – The drain hose can...
Page 85 - Technical data; Dishwasher model
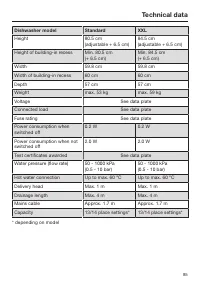
Technical data 85 Dishwasher model Standard XXL Height 80.5 cm(adjustable + 6.5 cm) 84.5 cm(adjustable + 6.5 cm) Height of building-in recess Min. 80.5 cm(+ 6.5 cm) Min. 84.5 cm(+ 6.5 cm) Width 59.8 cm 59.8 cm Width of building-in recess 60 cm 60 cm Depth 57 cm 57 cm Weight max. 53 kg max. 59 kg Vol...


 Miele 11695330 User Manual
 Miele G5000SCCLST User Manual
 Miele G5000SCUCLST User Manual
 Miele G 5008 SCU User Manual
 Miele G 5058 SCVI SFP User Manual
 Miele G5210SCCLST User Manual
 Miele G5210SCUCLST User Manual
 Miele G7164SCVI User Manual
 Miele G 7176 SCVI SF User Manual
 Miele G 7460 SCVi User Manual
 Miele G 7660 SCVi User Manual
 Miele G 7855 Manual