Page 3 - Contents
Contents 3 Warning and safety instructions ...................................................................... 7 Notes on the operating instructions ................................................................ 17 Notes on the layout ...............................................................
Page 4 - Caring for the environment
Contents 4 EcoStart............................................................................................................... 41Consumption (EcoFeedback) .............................................................................. 43Display brightness ............................................
Page 5 - Timer
Contents 5 Selecting a programme ....................................................................................... 70Display of programme duration ........................................................................... 71Starting the programme .................................................
Page 6 - Service
Contents 6 Spray arm fault .................................................................................................... 107General problems with the dishwasher ............................................................... 108Noises..............................................................
Page 7 - Warning and safety instructions
Warning and safety instructions 7 This dishwasher conforms to current safety requirements. Inappro-priate use can, however, lead to personal injury and material dam-age. Please observe the installation sheet and read the operating in-structions carefully before setting up the dishwasher and using it...
Page 8 - Appropriate use
Warning and safety instructions 8 Appropriate use This dishwasher is intended for use in domestic households and similar working and residential environments. This dishwasher is not intended for outdoor use. This dishwasher is intended for use at altitudes of up to 4000 m above sea level. Th...
Page 9 - Safety with children
Warning and safety instructions 9 Safety with children Children under 8 years of age must be kept away from the dish- washer unless they are constantly supervised. Children aged 8 and older may only use the dishwasher without supervision if they have been shown how to use it in a safe manner.Chi...
Page 10 - Technical safety; Unauthorised installation, maintenance and repairs can cause
Warning and safety instructions 10 Technical safety Unauthorised installation, maintenance and repairs can cause considerable danger for the user. Installation, maintenance and re-pairs must only be carried out by a qualified technician. Damage to the dishwasher can compromise your safety. Befor...
Page 13 - Correct installation
Warning and safety instructions 13 We recommend replacing defective components with original spare parts. If original Miele spare parts are installed correctly, Mieleensures full compliance with safety requirements and the warrantyremains valid. During installation, maintenance and repair work, ...
Page 14 - Correct use
Warning and safety instructions 14 A sink in the adjacent cabinet of the dishwasher must be carefully sealed. Regularly check for leaks to avoid damage to the dish-washer. The dishwasher must only be built into a tall unit if additional safety precautions are taken. In order to safely install th...
Page 16 - Accessories and spare parts
Warning and safety instructions 16 Please observe the information given in the “Technical data” chapter regarding the capacity of the dishwasher. Accessories and spare parts Only use original Miele accessories. If other parts are used, war- ranty, performance and, if applicable, product liabilit...
Page 17 - Notes on the operating instructions; Notes on the layout; Warnings
Notes on the operating instructions 17 These operating instructions apply toseveral different dishwasher models ofdifferent heights. The different dishwasher models will benamed as follows: normal = dishwasher measuring80.5 cm high (built-in appliance) or84.5 cm high (freestanding appliance) XXL = d...
Page 18 - Scope
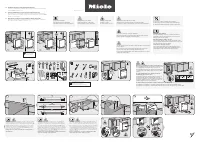
Scope 18 The appliance is supplied with: - Dishwasher - Operating instructions for operating the dishwasher - Installation sheet for installing the dishwasher - Other installation accessories for in- stalling the dishwasher (see installa-tion sheet) - Funnel for filling the dishwasher salt - Additio...
Page 19 - Guide to the appliance; Appliance overview
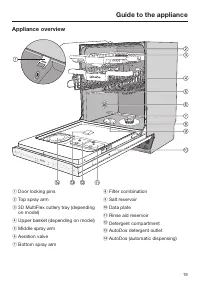
Guide to the appliance 19 Appliance overview a Door locking pins b Top spray arm c 3D MultiFlex cutlery tray (dependingon model) d Upper basket (depending on model) e Middle spray arm f Aeration valve g Bottom spray arm h Filter combination i Salt reservoir j Data plate k Rinse aid reservoir l Deter...
Page 20 - Control panel
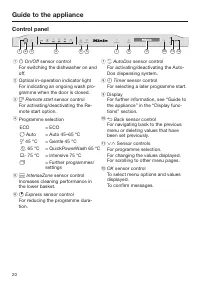
Guide to the appliance 20 Control panel AutoDos Express Intense Zone Auto Timer ECO 1 2 3 4 5 6 7 8 9 10 11 12 a On/Off sensor control For switching the dishwasher on andoff. b Optical in-operation indicator lightFor indicating an ongoing wash pro-gramme when the door is closed. c Remote st...
Page 21 - Display functions; OK
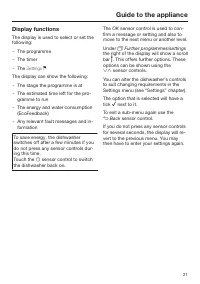
Guide to the appliance 21 Display functions The display is used to select or set thefollowing: - The programme - The timer - The Settings The display can show the following: - The stage the programme is at - The estimated time left for the pro- gramme to run - The energy and water consumption (Eco...
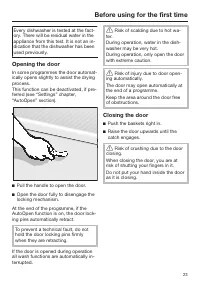
Page 23 - Before using for the first time; Opening the door; Pull the handle to open the door.; Closing the door; Push the baskets right in.
Before using for the first time 23 Every dishwasher is tested at the fact-ory. There will be residual water in theappliance from this test. It is not an in-dication that the dishwasher has beenused previously. Opening the door In some programmes the door automat-ically opens slightly to assist the d...
Page 24 - In order to use it you will need:
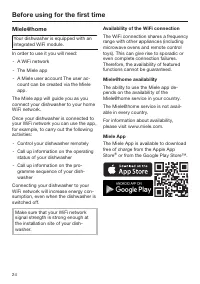
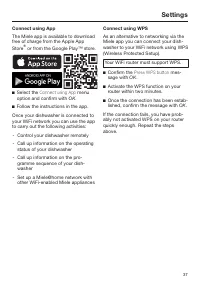
Before using for the first time 24 Miele@home Your dishwasher is equipped with anintegrated WiFi module. In order to use it you will need: - A WiFi network - The Miele app - A Miele user account The user ac- count can be created via the Mieleapp. The Miele app will guide you as youconnect your dishw...
Page 25 - Basic settings; Switching on the dishwasher
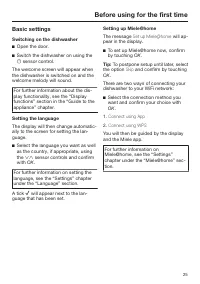
Before using for the first time 25 Basic settings Switching on the dishwasher Open the door. Switch the dishwasher on using the sensor control. The welcome screen will appear whenthe dishwasher is switched on and thewelcome melody will sound. For further information about the dis-play functio...
Page 26 - Setting the time of day
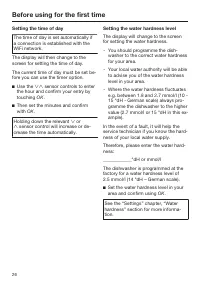
Before using for the first time 26 Setting the time of day The time of day is set automatically ifa connection is established with theWiFi network. The display will then change to thescreen for setting the time of day. The current time of day must be set be-fore you can use the timer option. Use t...
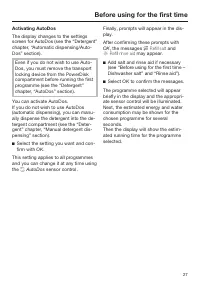
Page 27 - Activating AutoDos; and; Select
Before using for the first time 27 Activating AutoDos The display changes to the settingsscreen for AutoDos (see the “Detergent”chapter, “Automatic dispensing/Auto-Dos” section). Even if you do not wish to use Auto-Dos, you must remove the transportlocking device from the PowerDiskcompartment before...
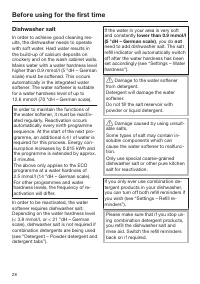
Page 28 - Dishwasher salt; not
Before using for the first time 28 Dishwasher salt In order to achieve good cleaning res-ults, the dishwasher needs to operatewith soft water. Hard water results inthe build-up of calcium deposits oncrockery and on the wash cabinet walls. Mains water with a water hardness levelhigher than 0.9 mmol/l...
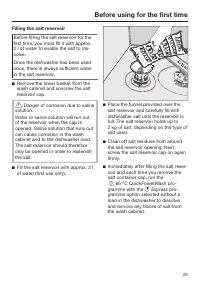
Page 29 - Filling the salt reservoir
Before using for the first time 29 Filling the salt reservoir Before filling the salt reservoir for thefirst time, you must fill it with approx.2 l of water to enable the salt to dis-solve. Once the dishwasher has been usedonce, there is always sufficient waterin the salt reservoir. Remove the low...
Page 30 - Refilling the salt; Confirm with
Before using for the first time 30 Refilling the salt When Refill salt appears in the dis- play, wait until the end of the pro-gramme and then refill the salt reser-voir. Confirm with OK . The salt refill indicator will go out. Risk of corrosion due to saline solution.Saline solution that ...
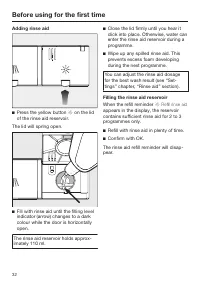
Page 31 - Rinse aid; Washing-up liquid or detergent
Before using for the first time 31 Rinse aid Rinse aid is necessary to ensure thatwater does not cling and leave markson crockery during the drying phase,and helps crockery dry faster after ithas been washed. Rinse aid is poured into the containerand the amount set is dispensed auto-matically. Was...
Page 32 - Adding rinse aid
Before using for the first time 32 Adding rinse aid Press the yellow button on the lid of the rinse aid reservoir. The lid will spring open. Fill with rinse aid until the filling levelindicator (arrow) changes to a darkcolour while the door is horizontallyopen. The rinse aid reservoir holds a...
Page 33 - Settings; Opening the settings menu; Changing settings; Closing the settings menu
Settings 33 You can alter the dishwasher’s con-trols to suit changing requirements byadjusting the settings. The settings can be altered at anytime. Opening the settings menu Switch the dishwasher on with the sensor control if it is switched off. Touch the sensor control “Further programme...
Page 34 - Language; Time of day; Setting the clock format
Settings 34 Language The display can be set to appear in oneof several different languages. You can change the language used inthe display and also the country via the Language sub-menu. The flag after the word Language serves as a guide if a language thatyou do not understand has been set....
Page 35 - Water hardness; - Your local water authority will be able; tion and confirm with
Settings 35 Water hardness Your dishwasher is fitted with a watersoftener. - You should programme the dish- washer to the correct water hardnessfor your area. - Your local water authority will be able to advise you of the water hardnesslevel in your area. - Where the water hardness fluctuates e.g. b...
Page 39 - Remote control
Settings 39 Reset This menu option only appears if youhave already connected your dish-washer to your WiFi network. You can use this menu option to resetall WiFi module settings to the factorydefault settings. The network configuration should be re-set whenever a dishwasher is being dis-posed of or ...
Page 40 - RemoteUpdate; Activating/deactivating
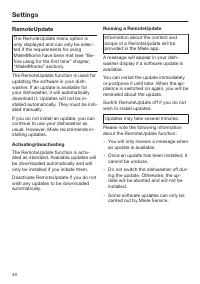
Settings 40 RemoteUpdate The RemoteUpdate menu option isonly displayed and can only be selec-ted if the requirements for usingMiele@home have been met (see “Be-fore using for the first time” chapter,“Miele@home” section). The RemoteUpdate function is used forupdating the software in your dish-washer...
Page 41 - SmartStart
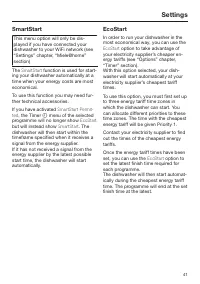
Settings 41 SmartStart This menu option will only be dis-played if you have connected yourdishwasher to your WiFi network (see“Settings” chapter, “Miele@home”section) The SmartStart function is used for start- ing your dishwasher automatically at atime when your energy costs are mosteconomical. To ...
Page 42 - Setting the electricity tariff times; Changing the electricity tariff times
Settings 42 Setting the electricity tariff times Before you can use the EcoStart option, you must set at least one electricity tar-iff time. Use the sensor controls to select an electricity tariff time T1–T3 andconfirm with OK . The start of the electricity tariff time se-lected will appear i...
Page 43 - Deleting the electricity tariff times
Settings 43 Deleting the electricity tariff times You can delete the settings for an elec-tricity tariff time and in doing so deac-tivate the EcoStart option for this time zone. Use the sensor controls to select an electricity tariff time T1–T3 thatyou wish to delete and confirm with OK . F...
Page 44 - Display brightness; Buzzer in the event of a fault
Settings 44 Display brightness You can set the display brightness toone of seven different levels. Volume A sequence of buzzer tones will soundat the end of the programme or if thereis a fault as long as the buzzer se-quence has been activated. Buzzer in the event of a fault In the event of a fault,...
Page 45 - Refill reminders; Risk of damage due to steam.; Extra clean; Extra dry; ECO
Settings 45 Refill reminders If you only ever use combination deter-gent products or automatic dispensingusing Miele PowerDisks (if available),you can switch off the refill remindersfor dishwasher salt and rinse aid if youwish. Please make sure that if you stop us-ing combination detergents, you ref...
Page 46 - nd interim rinse; BrilliantLight; Select State; The process starts straight away.
Settings 46 2nd interim rinse You can choose this function to in-crease the cleaning performance of theprogrammes with a second interimrinse. When this function is activated, waterconsumption may increase. If this function is switched on, it will beapplied to all programmes until it isswitched off a...
Page 47 - Software version; For demonstration purposes only.; Factory default; and confirm with
Settings 47 Software version You can call up the electronic softwareversion of your dishwasher for technicalsupport purposes. Showroom For demonstration purposes only. The dishwasher is equipped with ademo mode for showroom use. Factory default You can reset all dishwasher settings tothe factory def...
Page 48 - Economical dishwashing
Caring for the environment 48 Economical dishwashing This dishwasher is exceptionally eco-nomical in its use of water and electri-city. You can make the most of your appli-ance by following these tips: - Washing in a dishwasher generally uses less water and energy thanwashing by hand. - There is no ...
Page 49 - Consumption estimate
Caring for the environment 49 EcoFeedback consumption in-dicator The Consumption function is used forcalling up information about the energyand water consumption of your dish-washer (see “Settings” chapter, “Con-sumption” section). The following information can be shownon the display: - An estimate ...
Page 50 - Heat accumulator; sensor control, the display; . Other functions will be unavailable
Caring for the environment 50 Heat accumulator This dishwasher is equipped with a heataccumulator, in which fresh water forthe programme is pre-heated andstored in order to save energy. The heataccumulator is refilled with fresh watertowards the end of each rinse cycle.The water is held here ready f...
Page 51 - Loading the dishwasher; General information; Damage can be caused by ash,
Loading the dishwasher 51 General information Remove coarse food residues fromcrockery. There is no need to pre-rinse items un-der running water. Damage can be caused by ash, sand, wax, lubricating grease orpaint.These substances will contaminatethe dishwasher and can then nolonger be removed.Do n...
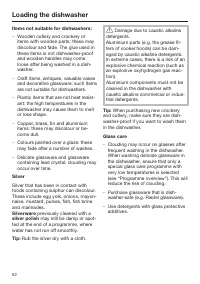
Page 52 - Items not suitable for dishwashers:
Loading the dishwasher 52 Items not suitable for dishwashers: - Wooden cutlery and crockery or items with wooden parts: these maydiscolour and fade. The glue used inthese items is not dishwasher-proofand wooden handles may comeloose after being washed in a dish-washer. - Craft items, antiques, valua...
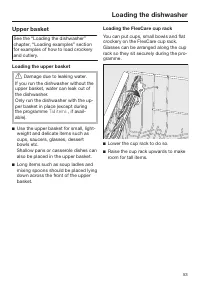
Page 53 - Upper basket; Loading the upper basket; Loading the FlexCare cup rack
Loading the dishwasher 53 Upper basket See the “Loading the dishwasher”chapter, “Loading examples” sectionfor examples of how to load crockeryand cutlery. Loading the upper basket Damage due to leaking water. If you run the dishwasher without theupper basket, water can leak out ofthe dishwasher.On...
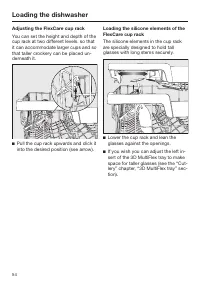
Page 54 - Adjusting the FlexCare cup rack
Loading the dishwasher 54 Adjusting the FlexCare cup rack You can set the height and depth of thecup rack at two different levels. so thatit can accommodate larger cups and sothat taller crockery can be placed un-derneath it. Pull the cup rack upwards and click itinto the desired position (see arr...
Page 55 - Lower the spikes
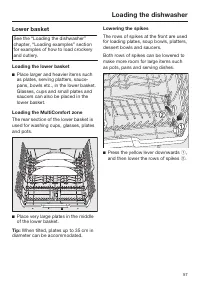
Loading the dishwasher 55 Lower the spikes On both right-hand rows of spikes, youcan lower every other spike to make iteasier to arrange larger crockery, likecereal bowls. Press the yellow lever downwards , and then lower the dark grey spikes . Place the bowls vertically in the rowof spikes.
Page 56 - Adjusting the upper basket; Pull out the upper basket.
Loading the dishwasher 56 Adjusting the upper basket In order to gain more space for tallerpieces of crockery in the lower basketor upper basket, the upper basket canbe adjusted on 3 levels with 2 cmbetween each level. The upper basket can also be set at anangle so that water can run off freelyfrom ...
Page 57 - Lower basket; Loading the lower basket
Loading the dishwasher 57 Lower basket See the “Loading the dishwasher”chapter, “Loading examples” sectionfor examples of how to load crockeryand cutlery. Loading the lower basket Place larger and heavier items suchas plates, serving platters, sauce-pans, bowls etc., in the lower basket. Glasses, ...
Page 58 - Fold up the MultiClips.
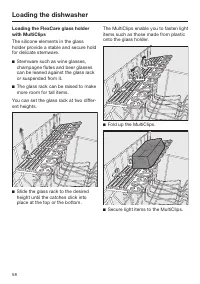
Loading the dishwasher 58 Loading the FlexCare glass holderwith MultiClips The silicone elements in the glassholder provide a stable and secure holdfor delicate stemware. Stemware such as wine glasses,champagne flutes and beer glassescan be leaned against the glass rackor suspended from it. The ...
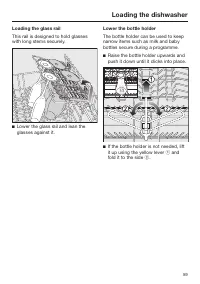
Page 59 - Loading the glass rail
Loading the dishwasher 59 Loading the glass rail This rail is designed to hold glasseswith long stems securely. Lower the glass rail and lean theglasses against it. Lower the bottle holder The bottle holder can be used to keepnarrow items such as milk and babybottles secure during a programme. R...
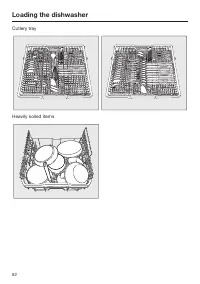
Page 60 - Cutlery tray; Loading the 3D MultiFlex tray
Loading the dishwasher 60 Cutlery tray See the “Loading the dishwasher”chapter, “Loading examples” sectionfor examples of how to load crockeryand cutlery. Load the cutlery into the 3D MultiFlextray. Loading the 3D MultiFlex tray To make unloading easier, cutleryshould be grouped in zones, one fork...
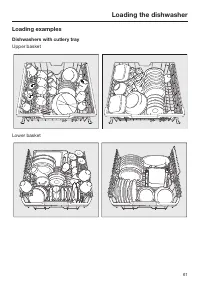
Page 61 - Loading examples; Dishwashers with cutlery tray
Loading the dishwasher 61 Loading examples Dishwashers with cutlery tray Upper basket Lower basket
Page 63 - Detergent; Active ingredients
Detergent 63 Active ingredients Damage caused by using unsuit- able detergents.Detergents that are not suitable fordomestic dishwashers can causedamage to the dishwasher or to theload.Only use detergents formulated fordomestic dishwashers. Modern detergents contain various act-ive ingredients, the...
Page 64 - Risk of chemical burns from de-; Detergent dosage
Detergent 64 Risk of chemical burns from de- tergent.Dishwasher detergents can causeburning on the skin and in the eyes,nose, mouth and throat.Avoid contact with detergents. Do not inhale powder detergents. Donot swallow dishwasher detergents.Seek medical attention immediately ifdetergent has been...
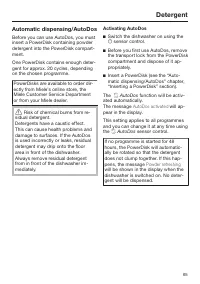
Page 65 - Automatic dispensing/AutoDos; Risk of chemical burns from re-; AutoDos
Detergent 65 Automatic dispensing/AutoDos Before you can use AutoDos, you mustinsert a PowerDisk containing powderdetergent into the PowerDisk compart-ment. One PowerDisk contains enough deter-gent for approx. 20 cycles, dependingon the chosen programme. PowerDisks are available to order dir-ectly f...
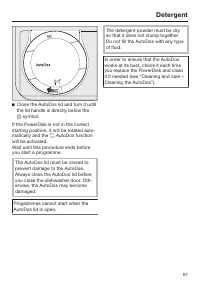
Page 66 - Inserting a PowerDisk; Turn the AutoDos lid to; Remove the empty PowerDisk.
Detergent 66 Inserting a PowerDisk Switch on the dishwasher before youreplace the PowerDisk so that thedishwasher recognises it. Only replace the PowerDisk when themessage PowerDisk empty. Deactivate AutoDos with OK appears. Turn the AutoDos lid to and open it. The message AutoDos lid open will...
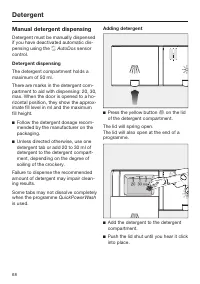
Page 68 - Manual detergent dispensing
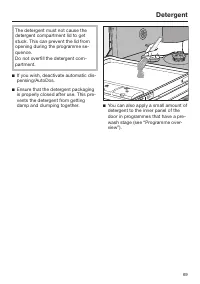
Detergent 68 Manual detergent dispensing Detergent must be manually dispensedif you have deactivated automatic dis-pensing using the AutoDos sensor control. Detergent dispensing The detergent compartment holds amaximum of 50 ml. There are marks in the detergent com-partment to aid with dispensi...
Page 70 - Operation; Touch the; Selecting a programme; “Programme
Operation 70 Switching on the dishwasher Open the stopcock, if it is closed. Open the door. Make sure the spray arms can rotatefreely. Touch the sensor control. If the dishwasher has been switchedoff for longer than 1 minute, you willneed to hold the sensor control for a bit longer (wi...
Page 71 - Display of programme duration
Operation 71 Display of programme duration The estimated duration of the selectedprogramme appears on the display be-fore the programme begins. If the dooris opened during the programme, thetime left until the end of the programmeis displayed. Symbols appear to indicate which stagethe programme is a...
Page 72 - End of programme; If the; Energy management; sensor control for a bit
Operation 72 End of programme At the end of a programme, the opticalin-operation indicator light will flashslowly with the door shut. The buzzermight also sound. The optical in-operation indicator lightwill go out 10 minutes after the end ofthe programme if the door is closed. The programme has ende...
Page 73 - Switching off the dishwasher; Confirm the query; with; Unloading the dishwasher
Operation 73 Switching off the dishwasher Open the door. The dishwasher can be switched offat any time using the sensor con- trol. Confirm the query Switch appliance off with OK . Switching the dishwasher off during aprogramme stops the programme. You can also do this to stop an ongoingtime...
Page 74 - Interrupting a programme; Risk of scalding due to hot wa-
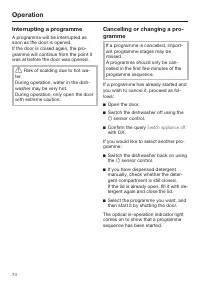
Operation 74 Interrupting a programme A programme will be interrupted assoon as the door is opened. If the door is closed again, the pro-gramme will continue from the point itwas at before the door was opened. Risk of scalding due to hot wa- ter.During operation, water in the dish-washer may be ve...
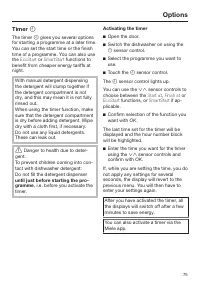
Page 75 - Options; Activating the timer
Options 75 Timer The timer gives you several options for starting a programme at a later time.You can set the start time or the finishtime of a programme. You can also usethe EcoStart or SmartStart functions to benefit from cheaper energy tariffs atnight. With manual detergent dispensingthe d...
Page 76 - Setting “Start at”
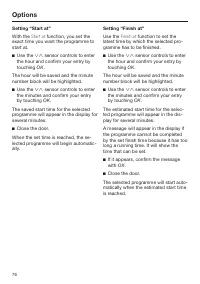
Options 76 Setting “Start at” With the Start at function, you set the exact time you want the programme tostart at. Use the sensor controls to enter the hour and confirm your entry bytouching OK . The hour will be saved and the minutenumber block will be highlighted. Use the sensor cont...
Page 77 - Setting EcoStart
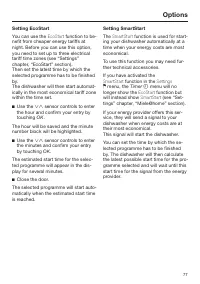
Options 77 Setting EcoStart You can use the EcoStart function to be- nefit from cheaper energy tariffs atnight. Before you can use this option,you need to set up to three electricaltariff time zones (see “Settings”chapter, “EcoStart” section). Then set the latest time by which theselected programme...
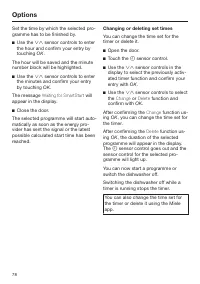
Page 78 - Changing or deleting set times
Options 78 Set the time by which the selected pro-gramme has to be finished by. Use the sensor controls to enter the hour and confirm your entry bytouching OK . The hour will be saved and the minutenumber block will be highlighted. Use the sensor controls to enter the minutes and confirm...
Page 79 - Activating Remote start
Options 79 Activating Remote start You can start your dishwasher remotelyusing the Miele app. To do this, you firstneed to install the app on your mobiledevice, connect the dishwasher to yourWiFi network (see “Settings” chapter,“Miele@home” section) and, if applic-able, activate the Remote contro...
Page 80 - Guide for selecting a programme; Crockery
Guide for selecting a programme 80 Pots, pans, everyday crockery and cutlery Standard dried-on normal food deposits Stubborn dried-on, burnt-on food deposits containing starch or protein 1 Water and energy saving programme Maximum cleaning performance Crockery Food deposits Programme features Temper...
Page 81 - QuickPowerWash 65 °C
Guide for selecting a programme 81 Gentle 45 °C Auto 45–65 °C QuickPowerWash 65 °C ECO Intensive 75 °C Programme 2 Consumption estimate 3 QuickPowerWash 65 °C + Express 2 The programmes can be combined with the “Express” or “IntenseZone” programme options (see “Programme options”). You c...
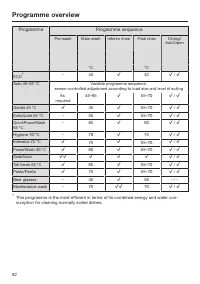
Page 82 - Programme overview; Programme
Programme overview 82 Programme Programme sequence Pre-wash Main wash Interim rinse Final rinse Drying/ AutoOpen °C °C ECO 1 - 43 42 / Auto 45–65 °C Variable programme sequence, sensor-controlled adjustment according to load size and level of soiling As required 45–65 55–70 / Gentle 45 °...
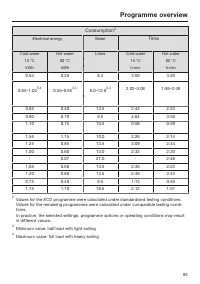
Page 83 - Values for the
Programme overview 83 Consumption 2 Electrical energy Water Time Cold water Hot water Litres Cold water Hot water 15 °C 60 °C 15 °C 60 °C kWh kWh h:min h:min 0.54 0.29 8.4 3:50 3:40 0.65–1.00 3,4 0.55–0.65 3,4 6.0–13.0 3,4 2:02–3:06 1:59–2:49 0.85 0.40 13.5 2:42 2:23 0.90 0.70 9.5 4:04 3:50 1.10 0.7...
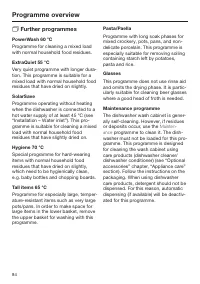
Page 84 - Further programmes
Programme overview 84 Further programmes PowerWash 60 °C Programme for cleaning a mixed loadwith normal household food residues. ExtraQuiet 55 °C Very quiet programme with longer dura-tion. This programme is suitable for amixed load with normal household foodresidues that have dried on slightly. ...
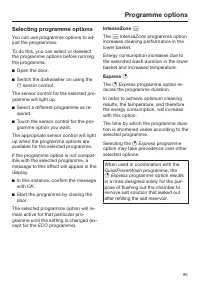
Page 85 - Programme options; Selecting programme options; IntenseZone
Programme options 85 Selecting programme options You can use programme options to ad-just the programmes. To do this, you can select or deselectthe programme options before runningthe programme. Open the door. Switch the dishwasher on using the sensor control. The sensor control for the selec...
Page 86 - Cleaning and care; Damage due to unsuitable clean-; Cleaning the wash cabinet; programme once per month; programme to clean the
Cleaning and care 86 Check the condition of your dish-washer regularly (approx. every 4–6months). In this way, faults and prob-lems can be avoided. Damage due to unsuitable clean- ing agents.All surfaces are susceptible toscratching. Contact with unsuitablecleaning agents can alter or discol-our t...
Page 87 - Hygiene cycle; Intensive 75 °C; Cleaning the control panel; The control panel should; Cleaning the reflector panel
Cleaning and care 87 Hygiene cycle If you mainly use low temperature pro-grammes, there is a risk of bacteria andunpleasant odours building up in thewash cabinet. If you repeatedly use lowtemperature programmes, you shouldregularly run a high temperature pro-gramme. This is to prevent the build-upof...
Page 88 - Cleaning the appliance front
Cleaning and care 88 Cleaning the appliance front Damage due to soiling. Soiling that is left too long might be-come impossible to remove andcould cause the external surfaces toalter or discolour.It is therefore best to remove anysoiling immediately. Clean the appliance front with a cleansoft sp...
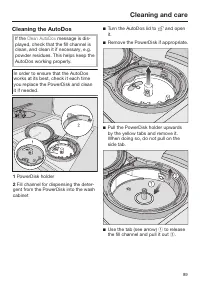
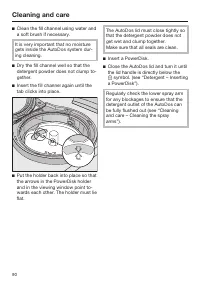
Page 89 - Cleaning the AutoDos
Cleaning and care 89 Cleaning the AutoDos If the Clean AutoDos message is dis- played, check that the fill channel isclean, and clean it if necessary, e.g.powder residues. This helps keep theAutoDos working properly. In order to ensure that the AutoDosworks at its best, check it each timeyou replace...
Page 91 - Cleaning the spray arms; Damage due to soiling entering
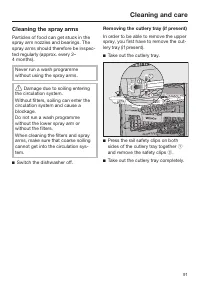
Cleaning and care 91 Cleaning the spray arms Particles of food can get stuck in thespray arm nozzles and bearings. Thespray arms should therefore be inspec-ted regularly (approx. every 2–4 months). Never run a wash programmewithout using the spray arms. Damage due to soiling entering the circulati...
Page 92 - Removing the top spray arm
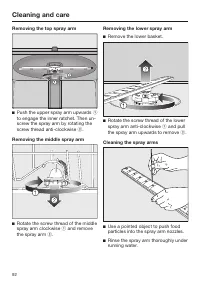
Cleaning and care 92 Removing the top spray arm Push the upper spray arm upwards to engage the inner ratchet. Then un-screw the spray arm by rotating thescrew thread anti-clockwise . Removing the middle spray arm Rotate the screw thread of the middlespray arm clockwise and remove the sp...
Page 93 - Inserting the upper spray arm
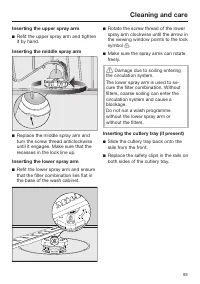
Cleaning and care 93 Inserting the upper spray arm Refit the upper spray arm and tightenit by hand. Inserting the middle spray arm Replace the middle spray arm andturn the screw thread anticlockwiseuntil it engages. Make sure that therecesses in the lock line up. Inserting the lower spray arm ...
Page 94 - Cleaning the filters
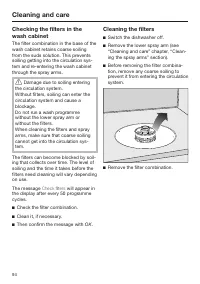
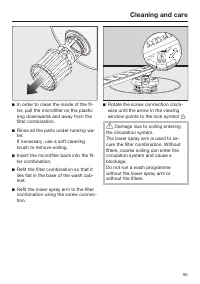
Cleaning and care 94 Checking the filters in thewash cabinet The filter combination in the base of thewash cabinet retains coarse soilingfrom the suds solution. This preventssoiling getting into the circulation sys-tem and re-entering the wash cabinetthrough the spray arms. Damage due to soiling e...
Page 96 - Cleaning the water inlet filter; Never
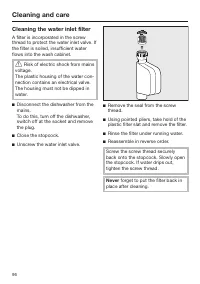
Cleaning and care 96 Cleaning the water inlet filter A filter is incorporated in the screwthread to protect the water inlet valve. Ifthe filter is soiled, insufficient waterflows into the wash cabinet. Risk of electric shock from mains voltage.The plastic housing of the water con-nection contains ...
Page 97 - Cleaning the drain pump
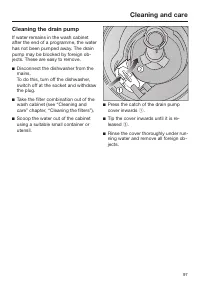
Cleaning and care 97 Cleaning the drain pump If water remains in the wash cabinetafter the end of a programme, the waterhas not been pumped away. The drainpump may be blocked by foreign ob-jects. These are easy to remove. Disconnect the dishwasher from themains. To do this, turn off the dishwasher...
Page 98 - Risk of injury from glass splin-
Cleaning and care 98 The drain pump (see arrow) is under-neath the cover. Risk of injury from glass splin- ters.It is especially difficult to see glasssplinters in the drain pump.Take care when cleaning the drainpump. Carefully remove all foreign objectsfrom the drain pump. Check the drainpump i...
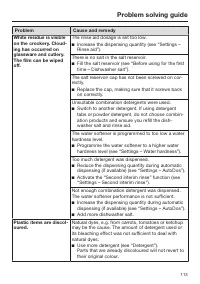
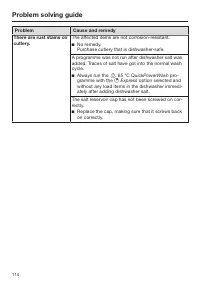
Page 99 - Problem solving guide; Technical problems; Problem
Problem solving guide 99 Many malfunctions and faults that can occur in daily operation can be easilyremedied. Time and money will be saved because a service call will not beneeded. The following guide may help you to find the reason for a malfunction or a fault,and to correct it. This section only ...
Page 101 - Fault messages
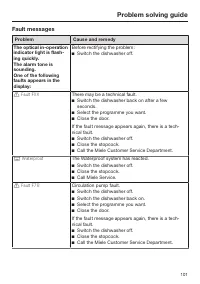
Problem solving guide 101 Fault messages Problem Cause and remedy The optical in-operationindicator light is flash-ing quickly. The alarm tone issounding. One of the followingfaults appears in thedisplay: Before rectifying the problem: Switch the dishwasher off. Fault FXX There may be a techni...
Page 102 - Door release; Switch the dishwasher back on.
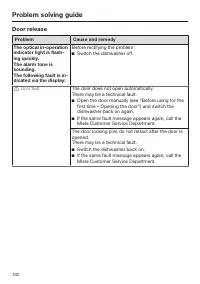
Problem solving guide 102 Door release Problem Cause and remedy The optical in-operationindicator light is flash-ing quickly. The alarm tone issounding. The following fault is in-dicated via the display: Before rectifying the problem: Switch the dishwasher off. Door fault The door does not ope...
Page 103 - Water inlet fault
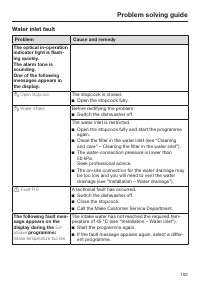
Problem solving guide 103 Water inlet fault Problem Cause and remedy The optical in-operationindicator light is flash-ing quickly. The alarm tone issounding. One of the followingmessages appears inthe display: Open stopcock The stopcock is closed. Open the stopcock fully. Water intake Befo...
Page 104 - Water drainage fault; appears in the display
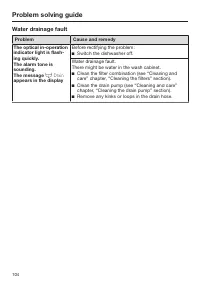
Problem solving guide 104 Water drainage fault Problem Cause and remedy The optical in-operationindicator light is flash-ing quickly. The alarm tone issounding. The message Drain appears in the display Before rectifying the problem: Switch the dishwasher off. Water drainage fault.There might ...
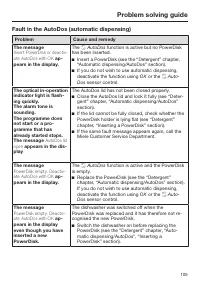
Page 105 - Fault in the AutoDos (automatic dispensing)
Problem solving guide 105 Fault in the AutoDos (automatic dispensing) Problem Cause and remedy The message Insert PowerDisk or deactiv-ate AutoDos with OK ap- pears in the display. The AutoDos function is active but no PowerDisk has been inserted. Insert a PowerDisk (see the “Detergent” chap...
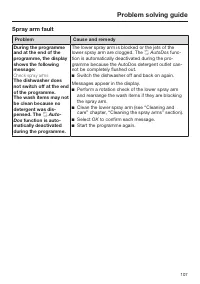
Page 107 - Spray arm fault; Dos
Problem solving guide 107 Spray arm fault Problem Cause and remedy During the programmeand at the end of theprogramme, the displayshows the followingmessage: Check spray arms The dishwasher doesnot switch off at the endof the programme. The wash items may notbe clean because nodetergent was dis-pens...
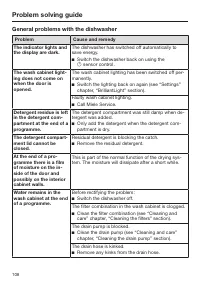
Page 108 - General problems with the dishwasher
Problem solving guide 108 General problems with the dishwasher Problem Cause and remedy The indicator lights andthe display are dark. The dishwasher has switched off automatically tosave energy. Switch the dishwasher back on using the sensor control. The wash cabinet light-ing does not come onw...
Page 110 - Noises
Problem solving guide 110 Noises Problem Cause and remedy Knocking noise in thewash cabinet A spray arm is knocking against a wash item. Carefully open the door and rearrange the washitems that are obstructing the spray arm. Rattling noise in thewash cabinet Wash items are insecure in the wash cab...
Page 111 - Unsatisfactory washing result
Problem solving guide 111 Unsatisfactory washing result Problem Cause and remedy The crockery is notclean. The crockery was not loaded correctly. See notes under “Loading the dishwasher” for ex-amples on how to load crockery and cutlery. The programme was not powerful enough. Select a more power...
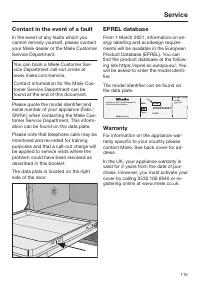
Page 115 - Contact in the event of a fault; Warranty
Service 115 Contact in the event of a fault In the event of any faults which youcannot remedy yourself, please contactyour Miele dealer or the Miele CustomerService Department. You can book a Miele Customer Ser-vice Department call-out online atwww.miele.com/service. Contact information for the Miel...
Page 116 - Note for test institutes; “Comparison
Service 116 Note for test institutes All relevant information for comparisontesting is provided in the “Comparison tests” booklet. You can download this booklet from theMiele website. You will find the bookletunder “Downloads” on the page for therelevant dishwasher model.
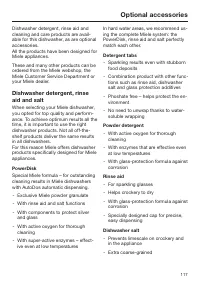
Page 117 - Optional accessories; PowerDisk
Optional accessories 117 Dishwasher detergent, rinse aid andcleaning and care products are avail-able for this dishwasher, as are optionalaccessories. All the products have been designed forMiele appliances. These and many other products can beordered from the Miele webshop, theMiele Customer Servic...
Page 118 - Appliance care; Dishwasher cleaner; Descaling agent
Optional accessories 118 Appliance care Miele cleaning and care productsprovide optimum care for your Mieledishwasher. Dishwasher cleaner - For use with the Maintenance pro- gramme without detergent dispens-ing - Cleans the dishwasher effectively and thoroughly - Removes grease, bacteria, and asso-...
Page 119 - Installation; The Miele Waterproof system; Health risk due to wash water.
Installation *INSTALLATION* 119 The Miele Waterproof system Provided that your dishwasher hasbeen installed correctly, the Miele Wa-terproof system will protect you fromwater damage throughout its lifetime. Water inlet Health risk due to wash water. Water in the dishwasher is not drink-ing water.D...
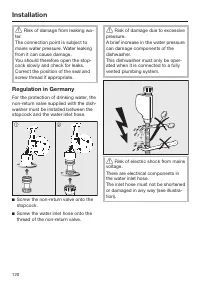
Page 120 - Risk of damage from leaking wa-; Regulation in Germany; Risk of damage due to excessive
Installation *INSTALLATION* 120 Risk of damage from leaking wa- ter.The connection point is subject tomains water pressure. Water leakingfrom it can cause damage.You should therefore open the stop-cock slowly and check for leaks.Correct the position of the seal andscrew thread if appropriate. Regu...
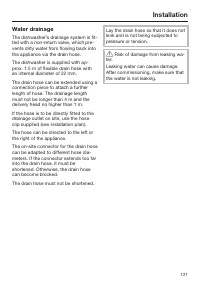
Page 121 - Water drainage; The drain hose must not be shortened.
Installation *INSTALLATION* 121 Water drainage The dishwasher’s drainage system is fit-ted with a non-return valve, which pre-vents dirty water from flowing back intothe appliance via the drain hose. The dishwasher is supplied with ap-prox. 1.5 m of flexible drain hose withan internal diameter of 22...
Page 122 - Venting the water drain
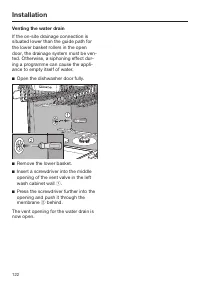
Installation *INSTALLATION* 122 Venting the water drain If the on-site drainage connection issituated lower than the guide path forthe lower basket rollers in the opendoor, the drainage system must be ven-ted. Otherwise, a siphoning effect dur-ing a programme can cause the appli-ance to empty itself...
Page 123 - Electrical connection; Risk of fire from overheating.
Installation *INSTALLATION* 123 Electrical connection The dishwasher is “connector-ready” asstandard for connection to an earthedsocket. The socket must be easily accessibleafter the dishwasher has been installed.If that is not possible, ensure that asuitable means of disconnection isprovided on the...
Page 124 - Technical data; Dishwasher model
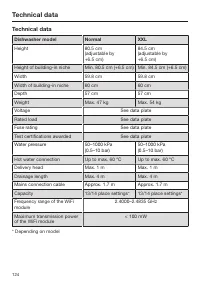
Technical data 124 Technical data Dishwasher model Normal XXL Height 80.5 cm(adjustable by+6.5 cm) 84.5 cm(adjustable by+6.5 cm) Height of building-in niche Min. 80.5 cm (+6.5 cm) Min. 84.5 cm (+6.5 cm) Width 59.8 cm 59.8 cm Width of building-in niche 60 cm 60 cm Depth 57 cm 57 cm Weight Max. 47 kg ...
Page 125 - EU Conformity declaration; enter the name of the product or the serial number
Technical data 125 EU Conformity declaration Miele hereby declares that this dishwasher complies with Directive 2014/53/EU. The complete text of the EU declaration of conformity is available from one of thefollowing internet addresses: - Products, Download from www.miele.ie - For service, informatio...
Page 127 - United Kingdom
United Kingdom Miele Co. Ltd., Fairacres, Marcham Road, Abingdon, Oxon, OX14 1TWTel: 0330 160 6600, Internet: www.miele.co.uk/service, E-mail: [email protected] Australia Miele Australia Pty. Ltd.ACN 005 635 398ABN 96 005 635 398Level 4, 141 Camberwell RoadHawthorn East, VIC 3123Tel: 1300 464 353Int...


 Miele 11695330 User Manual
 Miele G5000SCCLST User Manual
 Miele G5000SCUCLST User Manual
 Miele G 5008 SCU User Manual
 Miele G 5058 SCVI SFP User Manual
 Miele G5210SCCLST User Manual
 Miele G5210SCUCLST User Manual
 Miele G6060 SCVi User Manual
 Miele G7164SCVI User Manual
 Miele G 7176 SCVI SF User Manual
 Miele G 7460 SCVi User Manual
 Miele G 7855 Manual