Page 2 - Table of Contents; TABLE OF CONTENTS
1 2 3 4 5 5 6 7 8 9 10 10 11 12 13 14 15 16 16 17 18 Table of Contents TABLE OF CONTENTS For additional support, visit http://Lockly.com/help or email [email protected] Section 1 - Product Highlights 1.1 Product Features Section 2 - Product Overview 2.1 Product Overview - Exterior 2.2 Product Overvi...
Page 6 - Understanding Your New Lock
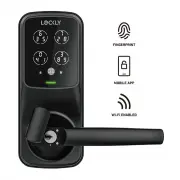
2.3 Understanding Your New Lock After the installation of your new Lockly, understanding some key functions of operating your smart lock is important. The following guides will walk you through resetting a lock, adding/ deleting Access Codes, adding/deleting fingerprints, adding/deleting RFID cards,...
Page 7 - Keypad Display Switch
SECTION 2.4~2.5 5 2.4 Reset Button If you need to reset, you must have your Activation Code available. The Activation Code can be found on the Activation Code Card that came with your smart lock. Once the smart lock has been reset, all the data previously stored will be deleted. See below which Rese...
Page 8 - Rebooting Your Lock; Reboot Button; NOTICE; Reboot Lockly in case of dead battery or malfunction. No settings
6 2.6 Rebooting Your Lock Reboot Button NOTICE Reboot Lockly in case of dead battery or malfunction. No settings will be changed and all Access Codes will still be stored within Lockly. SECTION 2.6 Press and release the reboot button when you want to reboot the lock. Your Lockly will beep once after...
Page 9 - V Battery; Condition
7 SECTION 2.7 9V Battery - + 2.7 Low Battery When the battery is in seriously low condition, Lockly will make continuous beeping sounds in addition to the flashing low battery icon on the touch screen. You should replace batteries immediately to avoid your smart lock from shutting down. When your sm...
Page 10 - Changing The Battery
8 SECTION 2.8 2.8 Changing The Battery 1 2 AA 1.5V X 4 3 + + - + - - + - Screw Under normal use, the Lockly battery will last up to a year. Please check battery levels regularly and change your batteries when the low battery notification is issued. For best practice, always use new batteries by a ma...
Page 11 - Configuring Access; The Default Access Code is; OK Button
SECTION 3.1 9 3.1 Configuring Access The Default Access Code is NOTICE 1 2 3 4 5 6 Your new Lockly Access Code can be any combination of 6 to 8 digits. Once a new Access Code is entered, the Default Access Code of 123456 would be deleted. A maximum of 52 sets of Access Codes can be stored for use at...
Page 12 - Adding an Access Code
10 SECTION 3.2 ~ 3.3 3.2 Adding an Access Code Enter the App Access Management settings then tap "Add New User". Select the the type of user you wish to add access, “Trusted User”, “Guests”, “One-Time Access”. For example, select Trusted User, enter the user’s name and set the Access Code. R...
Page 13 - Adding a Fingerprint; OK
SECTION 3.4 11 3.4 Adding a Fingerprint Fingerprint Pattern with Cross Intersection Lines Concentric or Parallel Pattern with no Cross Intersection Lines Fingerprint with Scars or Worn Out Ridges OK Not OK Not OK We are using an advanced biometric sensor, providing the most secure fingerprint authen...
Page 15 - Fingerprint Scanning Directions; Sensor; Top View; Correct; Incorrect
13 SECTION 3.6 3.6 Fingerprint Scanning Directions The fingerprint sensor equipped in your smart lock is loaded with powerful fingerprint algorithms to extract only metadata from fingers, even in poor conditions. Placing your finger on the sensor correctly helps consistency in fingerprint recognitio...
Page 16 - Fingerprint Scanning Tips & Troubleshoot
14 SECTION 3.7 3.7 Fingerprint Scanning Tips & Troubleshoot Tips for Fingerprint Enrollment and Recognition • Place your finger to completely cover the sensor with maximum contact surface. • Position the center of your finger (core) to the center of the sensor. • Hold your finger still for more ...
Page 18 - Adding Secure Link
16 SECTION 3.9 ~ 3.10 3.10 Adding Secure Link Lockly Secure Link¹ adds live status monitoring and voice control capabilities to your Lockly Smart Lock. If you purchased a Secure Pro model, the Secure Link is included in your package. For all other Lockly products, the Secure Link can be purchased an...
Page 19 - Unlocking using Access Codes; PIN Genie
17 SECTION 4.1 4.1 Unlocking using Access Codes Slide your hand across the screen to activate the keypad. Enter your 6 to 8 digit Access Code followed by the OK button. Press OK anytime to reset if you entered the wrong digit. If the Access Code entered is correct, the door will unlock. If the Acces...
Page 20 - Unlocking Lockly using Fingerprints; Unlocking
18 SECTION 4.2 4.2 Unlocking Lockly using Fingerprints Place a registered finger to the fingerprint scanner located on the exterior side of the lock to the right. To register a fingerprint, please see Section 3.6. If your fingerprint is registered and acknowledged, you will hear a “beep” sound and a...
Page 21 - Scan or visit
SECTION 4.3 19 4.3 Locking/Unlocking using App You must have the Lockly iOS or Android ™ app installed in order to lock and unlock with smartphone and connect with your Amazon Alexa or Google Assistant-enabled devices. Please download the app by visiting the link below or search “Lockly” from the co...
Page 23 - Exterior View; Unlock with QR Code
4.5 Locking/Unlocking using Physical Key Exterior View To unlock your lock using the physical key (included), open the key cover by sliding the cover on either clockwise or counterclockwise to reveal the keyhole. Insert key and turn clockwise (right swing door) or counterclockwise (left swing door) ...
Page 24 - Locking/Unlocking using Voice Assistants
22 Once your Lockly Smart Lock and Secure Link¹ Wi-Fi Hub has been installed and configured correctly, make sure you enable the Lockly Action on Google or the Amazon Alexa Skill before you can configure your voice to perform voice commands. You can ask your questions such as door status or request f...
Page 26 - Disabling Safe Mode
4.8 Disabling Safe Mode There are five (5) ways to disable Safe Mode. Option 1 - Entering Correct Access Code Activate the keypad by pressing and holding for 3 seconds. Enter the correct Access Code twice (2) when the keypad is available, pressing after every time the Access Code is entered. Option ...
Page 27 - RAIN MODE ON
25 SECTION 4.9 Like other digital electronic products water can trigger to activate the touchscreen and fingerprint sensor which may cause the batteries to drain. To protect the lock and extend battery life, you can setup your Lockly to enter Rain Mode to shut off keypad and fingerprint reader whene...
Page 29 - Offline Access Code
The Offline Access Code ™ (OAC) is a unique feature of our smart lock. It allows you to grant access to guests remotely without guests needing to download the app. To use the OAC feature, make sure you download the Lockly app for iOS or Android ™ first, and sync your smart lock to your mobile device...
Page 32 - Calibrating the Lock
30 SECTION 8.1 ~ 8.2 8.1 Cleaning Making sure your Lockly is clean is best practice to ensure optimal product use. Follow the DOs and DON’Ts below. DON’T DO • Rinse the touchscreen with warm water prior to cleaning. • Use the application of soap with a damp, lukewarm cloth. • Air dry or wipe dry wit...
Page 33 - Safety Precautions; Read the following instructions for your own safety
9.1 Safety Precautions Read the following instructions for your own safety Do not attempt to disassemble the smart lock by yourself. It can cause product damage, void warranty, and cause injuries. Do not use any inappropriate tools that can cause damages or malfunction to your lock. Always make sure...
Page 36 - SECURE; The Bluetooth
We’re here to help! [email protected] https://Lockly.com/help SECURE UMPGD62820230424 For digital versions and instructional videos, please visit the following link: http://Lockly.com/help © Copyright 2023 Lockly All rights reservedUS Patent NO. US 9,881,146 B2 | US Patent NO. US 9,853,815 B2 | US P...