Page 2 - Safety Information; CAUTION
1 Getting Started Getting Started 2 Getting Star ted 1 Safety Information CAUTION RISK OF ELECTRIC SHOCK DO NOT OPEN CAUTION: TO REDUCE THE RISK OF ELECTRIC SHOCK DO NOT REMOVE COVER (OR BACK) NO USER-SERVICEABLE PARTS INSIDE REFER SERVICING TO QUALIFIED SERVICE PERSONNEL. This lightning flash with ...
Page 3 - IMPORTANT SAFETY
Getting Started 3 Getting Star ted 1 This device is equipped with a portable battery or accumulator. Safety way to remove the battery from the equipment: Remove the old battery or battery pack, follow the steps in reverse order than the assembly. To prevent contamination of the environment and bring...
Page 5 - Table of Contents; Getting Started
Table of Contents 5 1 2 3 4 5 Table of Contents 1 Getting Started 2 Safety Information 6 Unique features 6 – Auto power down 6 – Portable In 6 Introduction6 – Symbols used in this manual 6 Accessories7 Remote control 8 Front panel 8 Rear panel 9 Installing the sound bar 10 Mounting the main unit on ...
Page 6 - Unique features; Auto power down; Introduction; Symbols used in this manual; Accessories
Getting Started 6 Getting Star ted 1 Unique features Auto power down This unit supports to turn off by itself for saving energy consumption. Portable In Listen to music from your portable device. (MP3 player, Notebook, Smart phone, etc..) Introduction Symbols used in this manual , Note Indicates spe...
Page 7 - Remote control
Getting Started 7 Getting Star ted 1 Remote control Replacement of battery Remove the battery cover on the rear of the Remote Control, and insert two (size AAA) battery with and matched correctly. • • • • • • • • • • • • • • a • • • • • • • • • • • • • 1 (Power): Switches the unit ON or OFF. F : Cha...
Page 8 - Front panel
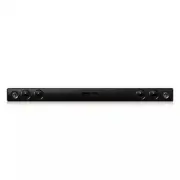
Getting Started 8 Getting Star ted 1 A 1/! (Standby/On) B F (Function) Selects the function and input source. C p / o (Volume) Adjusts volume level. D Standby LED It lights up in red on standby mode. E Remote sensor F Function LED y You can check current function through the LED. y This unit turns o...
Page 9 - Installing the sound bar
Getting Started 9 Getting Star ted 1 Installing the sound bar You can hear the sound by connecting the unit to the other device : TV, Blu-ray disc player, DVD player, etc.Place the unit in front of the TV and connect it to the device you want. (Refer to pages 13 - 14.) For best performance of wirele...
Page 10 - Mounting the main unit
Getting Started 10 Getting Star ted 1 Mounting the main unit on a wall You can mount the main unit on a wall. Because it is difficult to make a connection after installing this unit, you should connect the cables before installation. > Caution Prepare screws and brackets. Unit Wall bracket Wall B...
Page 12 - Connecting to your TV; Using an OPTICAL cable
2 Connecting Connecting 12 Connecting 2 Connecting to your TV Using an OPTICAL cable 1. Connect the OPTICAL IN jack on the back of the unit to OPTICAL OUT jack on the TV using an OPTICAL cable. Optical cable 2. Set the input source to OPTICAL. Press F button repeatedly until the function is selected...
Page 13 - Optional equipment; OPTICAL IN connection
Connecting 13 Connecting 2 Optional equipment connection OPTICAL IN connection Connect an optical output jack of external devices to the OPTICAL IN jack. To the digital optical output jack of external device 1. Connect the OPTICAL IN jack on the back of the unit to optical out jack of your TV (or di...
Page 14 - Operations; Turn off the sound temporarily
3 Operating Operating 14 Oper ating 3 Operations DRC (Dynamic range control) Make the sound clear when the volume is turned down and prevent sudden increase of sound (Dolby Digital only). This function turns on or off you press DRC ON/OFF. Turn off the sound temporarily Press (Mute) to mute your uni...
Page 15 - Auto function change
Operating 15 Oper ating 3 AUTO POWER On/Off This unit automatically turns on by an input source : Optical or Bluetooth . When you turn on your TV or an external device connected to this unit, this unit recognizes the input signal and select the suitable function. You can hear the sound from your dev...
Page 16 - Using BLUETOOTH®; Listening to music stored on the
Operating 16 Oper ating 3 Using BLUETOOTH® technology About BLUETOOTH Bluetooth is wireless communication technology for short range connection. The sound may be interrupted when the connection interfered by the other electronic wave or you connect the Bluetooth in the other rooms. Connecting indivi...
Page 17 - Sound adjustment; Setting the surround mode
Operating 17 Oper ating 3 y When using Bluetooth technology, you have to make a connection between the unit and the Bluetooth device as close as possible and keep the distance. However it may not work well in the case below : - There is a obstacle between the unit and the Bluetooth device. - There i...
Page 18 - Troubleshooting; General
4 Troubleshooting Troubleshooting 18 Troubleshoo ting 4 Troubleshooting General PROBLEM CAUSE & CORRECTION The unit does not work properly. y Turn off the power of this unit and the connected external device (TV, Woofer, DVD-player, Amplifier, etc.) and turn it on again. y Disconnect the power c...
Page 19 - NOTES to use wireless
Troubleshooting 19 Troubleshoo ting 4 PROBLEM CAUSE & CORRECTION When you feel the output sound of the unit is low. Check the details below and adjust the unit according to them. y Switch [ON] state of DRC function to [OFF] by using remote controller. y With the sound bar connected with TV, chan...
Page 20 - Trademarks and licenses
5 Appendix Appendix 20 Appendix 5 Trademarks and licenses All other trademarks are trademarks of their respective owners. Manufactured under license from Dolby Laboratories. Dolby and the double-D symbol are trademarks of Dolby Laboratories. For DTS patents, see http://patents.dts.com. Manufactured ...
Page 21 - Specifications
Appendix 21 Appendix 5 Specifications General Power requirements Refer to the main label. Power consumption Refer to the main label. Dimensions (W x H x D) Approx. 950 mm x 71 mm x 47 mm (37.4 inches x 2.8 inches x 1.9 inches) Net Weight Approx. 2.47 kg (5.4 lb) Operating temperature 41 °F to 95 °F ...
Page 22 - Maintenance; Handling the unit
Appendix 22 Appendix 5 Maintenance Handling the unit When shipping the unit Please save the original shipping carton and packing materials. If you need to ship the unit, for maximum protection, re-pack the unit as it was originally packed at the factory. Keeping the exterior surfaces clean y Do not ...