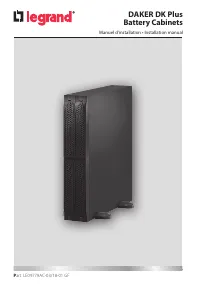
Page 2 - FRANÇAIS 3; DAKER DK Plus
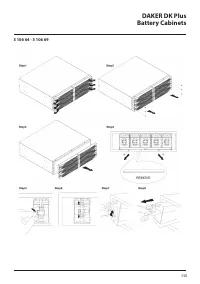
2 FRANÇAIS 3 ENGLISH 19 ITALIANO 35 DEUTSCH 51 SPANISH 67 PУСCKИЙ 83 DAKER DK Plus Battery Cabinets FR DE ES RU IT EN
Page 3 - Introduction
Table des matières DAKER DK Plus Armoire batterie FR 3 1 Introduction 4 1.1 Utilisation du manuel 4 1.2 Conditions de garantie 4 1.3 Copyright 4 2. Consignes de Sécurité 5 3. Installation 7 3.1 Contenu de l’emballage 7 3.2 Configuration Tower 8 3.2.1 Armoire batteries 9 3.2.2 Onduleur + armoire batt...
Page 4 - ATTENTION; Utilisation du manuel; INDICATION; Conditions de garantie; Introduction
4 Nous vous félicitons d’avoir fait l’achat d’un produit LEGRAND ! ATTENTION Il est nécessaire de lire intégralement le présent manuel avant d’effectuer quelque opéra- tion que ce soit. DAKER DK Plus doit être utilisé exclusivement dans un environnement résiden- tiel, commercial et industriel. 1.1 U...
Page 5 - Utiliser exclusivement les accessoires de la marque Legrand.
DAKER DK Plus Armoire batterie 5 FR 2 Consignes de Sécurité La présente section du manuel contient des consignes de sécurité importantes qui doivent être respectées lors de l’installation, de l’utilisation et de l’entretien de l’armoire batterie. • Ce produit doit être installé conformément aux règl...
Page 6 - Consignes de Sécurité; risque d’électrocution.
6 2 Consignes de Sécurité f. Établir si la batterie n’est pas reliée à la terre par inadvertance. Si c’est le cas, débrancher la source de la terre. Tout contact avec une partie d’une batterie reliée à la terre expose à un risque d’électrocution. La probabilité de ce risque d’électrocution peut être...
Page 7 - Contenu de l’emballage; Contrôler le contenu de l’emballage :
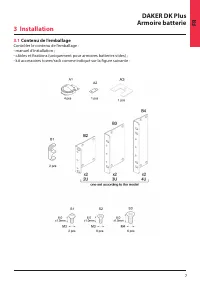
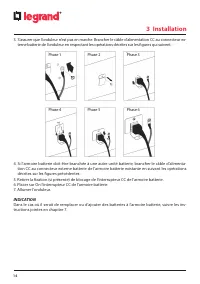
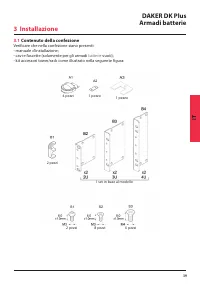
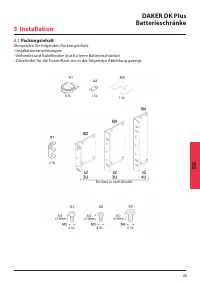
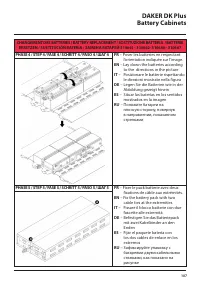
DAKER DK Plus Armoire batterie 7 FR 3 Installation 3.1 Contenu de l’emballage Contrôler le contenu de l’emballage : - manuel d’installation ; - câbles et fixations (uniquement pour armoires batteries vides) ; - kit accessoires tower/rack comme indiqué sur la figure suivante :
Page 8 - Installation; Configuration Tower
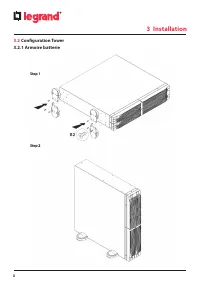
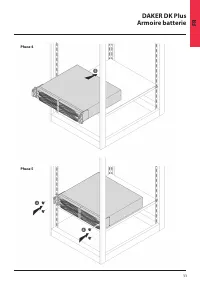
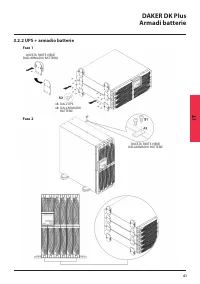
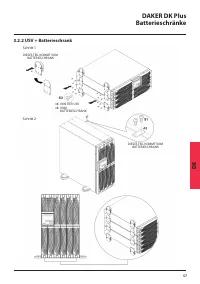
8 3 Installation 3.2 Configuration Tower 3.2.1 Armoire batterie
Page 10 - Configuration Rack
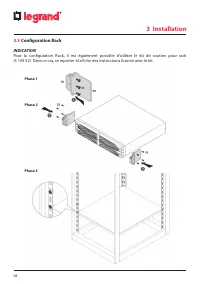
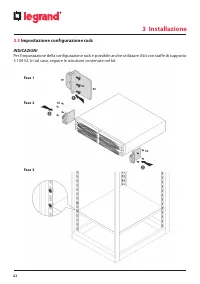
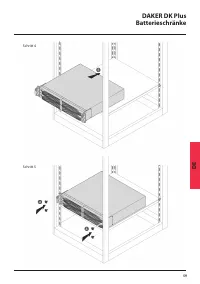
10 3.3 Configuration Rack INDICATION Pour la configuration Rack, il est également possible d’utiliser le kit de soutien pour rack (3 109 52). Dans ce cas, se reporter à la fiche des instructions fournie avec le kit. 3 Installation Phase 1 Phase 2 Phase 3
Page 12 - Panneau arrière; Connecteur batteries
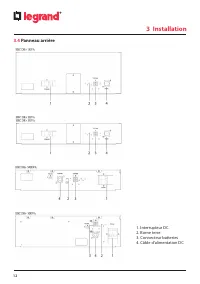
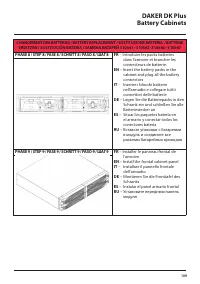
12 3.4 Panneau arrière 1. Interrupteur DC 2. Borne terre 3. Connecteur batteries 4. Câble d’alimentation DC 3 Installation
Page 13 - Procédure d’installation; armoires de batterie.
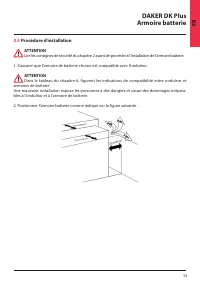
DAKER DK Plus Armoire batterie 13 FR 3.5 Procédure d’installation ATTENTION Lire les consignes de sécurité du chapitre 2 avant de procéder à l’installation de l’armoire batterie. 1. S’assurer que l’armoire de batterie choisie est compatible avec l’onduleur. ATTENTION Dans le tableau du chapitre 6, f...
Page 15 - Réglages
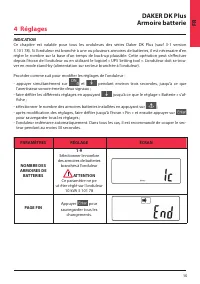
DAKER DK Plus Armoire batterie 15 FR INDICATION Ce chapitre est valable pour tous les onduleurs des séries Daker DK Plus (sauf 3-1 version 3 101 78). Si l’onduleur est branché à une ou plusieurs armoires de batteries, il est nécessaire d’en régler le nombre sur la base d’un temps de back-up plausibl...
Page 16 - Stockage; Démontage; DANGER; où l’équipement est utilisé.; Stockage et démontage
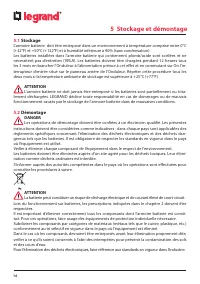
16 5.1 Stockage L’armoire batterie doit être entreposé dans un environnement à température comprise entre 0°C (+32°F) et +50°C (+122°F) et à humidité inférieure à 90% (sans condensation). Les batteries installées dans l’armoire batterie qui contiennent plomb/acide sont scellées et ne nécessitent pas...
Page 17 - Caractéristiques générales
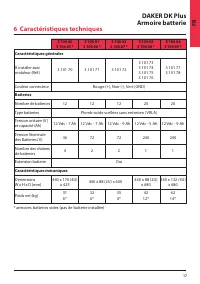
DAKER DK Plus Armoire batterie 17 FR 6 Caractéristiques techniques 3 106 60 3 106 65 * 3 106 61 3 106 66 * 3 106 62 3 106 67 * 3 106 63 3 106 68 * 3 106 64 3 106 69 * Caractéristiques générales À installer avec onduleur (Réf.) 3 101 70 3 101 71 3 101 72 3 101 73 3 101 74 3 101 75 3 101 76 3 101 77 3...
Page 18 - Changement des batteries
18 7 Changement des batteries La batterie peut constituer un risque de décharge électrique et de courant élevé de court-cir- cuit. Sur un électricien et un personnel d’entretien qualifiés sont autorisés à changer les batteries. Les batteries doivent être remplacées en nombre identique et doivent êtr...
Page 19 - Use of the manual; Safety Instructions; Tower configuration setup; Warehousing and dismantling
19 Table of Contents DAKER DK Plus Battery Cabinets EN 1. Introduction 20 1.1 Use of the manual 20 1.2 Guarantee terms 20 1.3 Copyright 20 2. Safety Instructions 21 3. Installation 23 3.1 Package content 23 3.2 Tower configuration setup 24 3.2.1 Battery cabinet 24 3.2.2 UPS + battery cabinet 25 3.3 ...
Page 20 - Congratulations on your recent LEGRAND purchase!; Use of the manual; Guarantee terms; specifications in the installation manual; Copyright; wholly or in part without previous written authorisation.
20 1 Introduction Congratulations on your recent LEGRAND purchase! ATTENTION It is necessary to read the whole manual carefully before doing any operation. DAKER DK Plus must be used only in residential, commercial and industrial environments. 1.1 Use of the manual This manual must be kept in a safe...
Page 21 - stallation, use and maintenance of the battery cabinet.
21 DAKER DK Plus Battery Cabinets EN 2 Safety Instructions This section contains important safety instructions that should always be followed during the in- stallation, use and maintenance of the battery cabinet. • This product should be installed in compliance with installation rules, preferably by...
Page 22 - Safety Instructions
22 The likelihood of such shock can be reduced if such grounds are removed during installa- tion and maintenance (applicable to equipment and remote battery supplies not having a grounded supply circuit). CAUTION: Do not dispose of batteries in a fire. The batteries may explode. CAUTION: Do not open...
Page 23 - Package content; Check for the following package content:
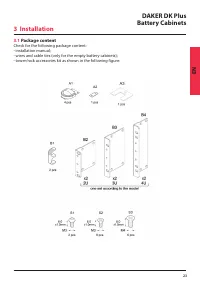
23 DAKER DK Plus Battery Cabinets EN 3.1 Package content Check for the following package content: - installation manual; - wires and cable ties (only for the empty battery cabinets); - tower/rack accessories kit as shown in the following figure: 3 Installation
Page 24 - Tower configuration setup
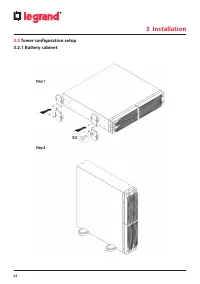
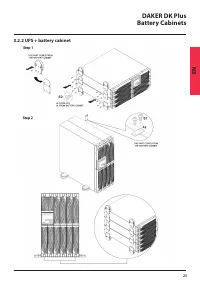
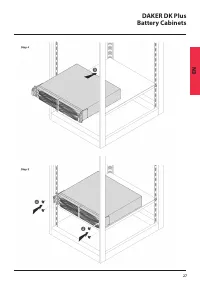
24 3.2 Tower configuration setup 3.2.1 Battery cabinet 3 Installation
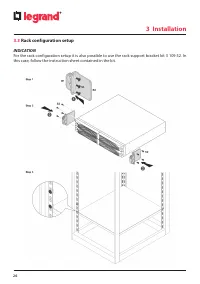
Page 26 - Rack configuration setup
26 3.3 Rack configuration setup INDICATION For the rack configuration setup it is also possible to use the rack support bracket kit 3 109 52. In this case, follow the instruction sheet contained in the kit. 3 Installation
Page 28 - Rear panel; Battery connector
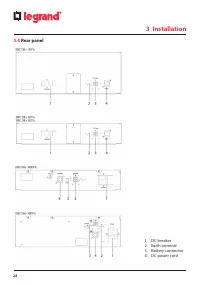
28 3.4 Rear panel 1. DC breaker 2. Earth terminal 3. Battery connector 4. DC power cord 3 Installation
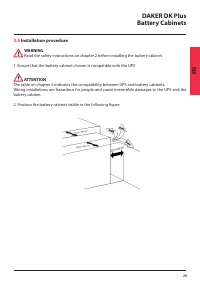
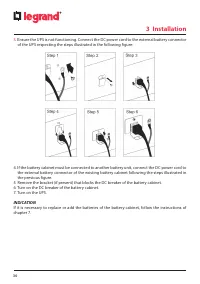
Page 29 - Installation procedure; WARNING; Position the battery cabinet visible in the following figure:
29 DAKER DK Plus Battery Cabinets EN 3.5 Installation procedure WARNING Read the safety instructions on chapter 2 before installing the battery cabinet. 1. Ensure that the battery cabinet chosen is compatible with the UPS ATTENTION The table on chapter 6 indicates the compatibility between UPS and b...
Page 31 - Setting
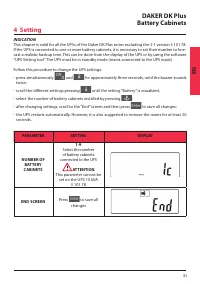
31 DAKER DK Plus Battery Cabinets EN INDICATION This chapter is valid for all the UPSs of the Daker DK Plus series excluding the 3-1 version 3 101 78. If the UPS is connected to one or more battery cabinets, it is necessary to set their number to fore- cast a realistic backup time. This can be done ...
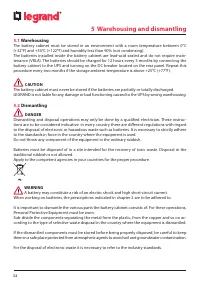
Page 32 - Warehousing; CAUTION; Dismantling; traditional rubbish is not allowed.; Personal Protective Equipment must be worn.; Warehousing and dismantling
32 5.1 Warehousing The battery cabinet must be stored in an environment with a room temperature between 0°C (+32°F) and +50°C (+122°F) and humidity less than 90% (not condensing). The batteries installed inside the battery cabinet are lead-acid sealed and do not require main- tenance (VRLA). The bat...
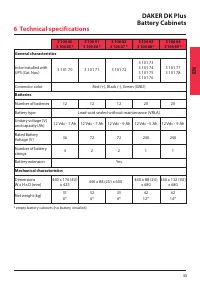
Page 33 - General characteristics; Technical specifications
33 DAKER DK Plus Battery Cabinets EN 3 106 60 3 106 65 * 3 106 61 3 106 66 * 3 106 62 3 106 67 * 3 106 63 3 106 68 * 3 106 64 3 106 69 * General characteristics to be installed with UPS (Cat. Nos.) 3 101 70 3 101 71 3 101 72 3 101 73 3 101 74 3 101 75 3 101 76 3 101 77 3 101 78 Connector color Red (...
Page 34 - Battery replacement; the replacement, it is mandatory the reading of chapter 2.
34 7 Battery replacement A battery can present a risk of electrical shock and high short circuit current. Only electrical hazard authorized personnel and service personnel are authorized to replace the batteries. Before the replacement, it is mandatory the reading of chapter 2. Batteries may only be...
Page 35 - Istruzioni di Sicurezza
35 Indice DAKER DK Plus Armadi batterie IT 1. Introduzione 36 1.1 Uso del manuale 36 1.2 Termini di garanzia 36 1.3 Copyright 36 2. Istruzioni di Sicurezza 37 3. Installazione 39 3.1 Contenuto della confezione 39 3.2 Impostazione configurazione tower 40 3.2.1 Armadio batterie 40 3.2.2 UPS + armadio ...
Page 36 - Introduzione; ATTENZIONE; Uso del manuale; INDICAZIONI; Termini di garanzia; batterie
36 1 Introduzione Complimenti per il nuovo acquisto LEGRAND! ATTENZIONE E’ necessario leggere attentamente l’intero manuale prima di effettuare qualsiasi operazione. DAKER DK Plus deve essere utilizzato solamente in contesti residenziali, commerciali e industriali. 1.1 Uso del manuale Il presente ma...
Page 38 - Istruzioni di sicurezza
38 2 Istruzioni di sicurezza f ) Verificare se la batteria sia stata inavvertitamente collegata a terra. In questo caso, scol- legare la sorgente da terra. Il contatto con una parte qualsiasi della batteria messa a ter- ra può causare una scossa elettrica. La probabilità può essere ridotta se i coll...
Page 39 - Contenuto della confezione; Verificare che nella confezione siano presenti:; Installazione
39 DAKER DK Plus Armadi batterie IT 3.1 Contenuto della confezione Verificare che nella confezione siano presenti: - manuale d’installazione;- cavi e fascette (solamente per gli armadi batterie vuoti); - kit accessori tower/rack come illustrato nella seguente figura: 4 pezzi 2 pezzi 2 pezzi 8 pezzi ...
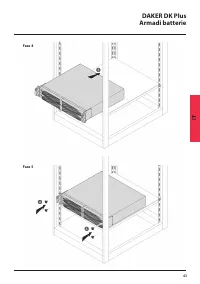
Page 40 - Impostazione configurazione tower
40 3.2 Impostazione configurazione tower 3.2.1 Armadio batterie Fase 1 Fase 2 3 Installazione
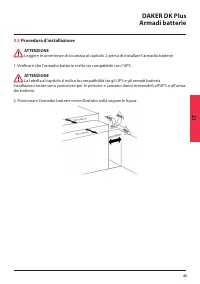
Page 42 - Impostazione configurazione rack
42 3.3 Impostazione configurazione rack INDICAZIONI Per l’impostazione della configurazione rack è possibile anche utilizzare il kit con staffe di supporto 3 109 52. In tal caso, seguire le istruzioni contenute nel kit. Fase 1 Fase 2 Fase 3 3 Installazione
Page 44 - Pannello posteriore; Connettore batteria
44 3 Installazione 3.4 Pannello posteriore 1. Interruttore DC 2. Morsetto di terra 3. Connettore batteria 4. Cavo di alimentazione DC
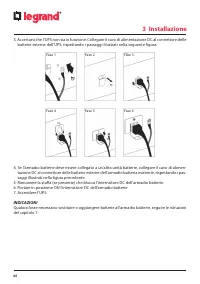
Page 45 - Procedura d’installazione
45 DAKER DK Plus Armadi batterie IT 3.5 Procedura d’installazione ATTENZIONE Leggere le avvertenze di sicurezza al capitolo 2 prima di installare l’armadio batterie. 1. Verificare che l’armadio batterie scelto sia compatibile con l’UPS. ATTENZIONE La tabella al capitolo 6 indica la compatibilità tra...
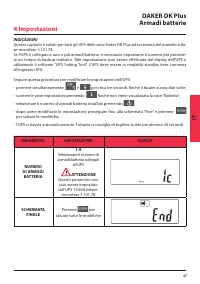
Page 47 - Impostazioni
47 DAKER DK Plus Armadi batterie IT INDICAZIONI Questo capitolo è valido per tutti gli UPS delle serie Daker DK Plus ad eccezione del modello trifa- se-monofase 3 101 78. Se l’UPS è collegato a uno o più armadi batteria, è necessario impostarne il numero per prevede- re un tempo di backup realistico...
Page 48 - Immagazzinamento e smantellamento; Immagazzinamento; Smontaggio; PERICOLO; tire come rifiuto ordinario.; cessario indossare Dispositivi di Protezione Individuale.
48 5 Immagazzinamento e smantellamento 5.1 Immagazzinamento L’armadio batteria deve essere conservato in un ambiente con temperatura tra 0°C (+32°F) e +50°C (+122°F), con un’umidità inferiore a 90% (non condensante). Le batterie installate nell’armadio batteria e contenenti piombo/acido sono sigilla...
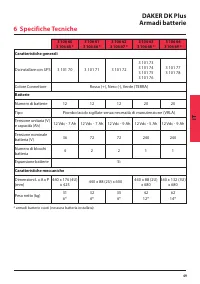
Page 49 - Caratteristiche generali; Specifiche Tecniche
49 DAKER DK Plus Armadi batterie IT 3 106 60 3 106 65 * 3 106 61 3 106 66 * 3 106 62 3 106 67 * 3 106 63 3 106 68 * 3 106 64 3 106 69 * Caratteristiche generali Da installare con UPS 3 101 70 3 101 71 3 101 72 3 101 73 3 101 74 3 101 75 3 101 76 3 101 77 3 101 78 Colore Connettore Rosso (+), Nero (-...
Page 51 - Einleitung; Gebrauch des Handbuchs; Sicherheitshinweise; Tower Konfiguration Setup; Lagern und entsorgen
51 Inhaltsverzeichnis DAKER DK Plus Batterieschränke DE 1 Einleitung 52 1.1 Gebrauch des Handbuchs 52 1.2 Garantiebedingungen 52 1.3 Copyright 52 2. Sicherheitshinweise 53 3. Installation 55 3.1 Packungsinhalt 55 3.2 Tower Konfiguration Setup 56 3.2.1 Batterieschrank 56 3.2.2 USV + Batterieschrank 5...
Page 52 - Einleitung; Wir gratulieren zum den Kauf dieses LEGRAND-Produkts!; ACHTUNG; Gebrauch des Handbuchs; mer zur Verfügung stehen.; Garantiebedingungen; se als im Installationshandbuch angegeben
52 1 Einleitung Wir gratulieren zum den Kauf dieses LEGRAND-Produkts! ACHTUNG Bitte lesen Sie das Handbuch aufmerksam durch, bevor Sie das Gerät benutzen. DAKER DK Plus darf nur in Wohn-, Gewerbe- und Industrieumgebungen eingesetzt werden. 1.1 Gebrauch des Handbuchs Dieses Handbuch muss an einem sic...
Page 54 - Sicherheitshinweise; und anderen Geräten, die Funken erzeugen können.
54 2 Sicherheitshinweise f ) Kontrollieren Sie, ob die Batterie unbeabsichtigt geerdet ist. Sollte dies der Fall sein, trennen Sie die Quelle von der Erde ab. Der Kontakt mit einer geerdeten Batterie stellt Stromschlag- gefahr dar. Die Wahrscheinlichkeit eines Stromschlags kann reduziert werden, wen...
Page 55 - Packungsinhalt; Überprüfen Sie folgenden Packungsinhalt:
55 DAKER DK Plus Batterieschränke DE 3.1 Packungsinhalt Überprüfen Sie folgenden Packungsinhalt: - Installationsanweisungen; - Verbinder und Kabelbinder (nur für leere Batterieschränke) - Zubehörkit für die Tower/Rack wie in der folgenden Abbildung gezeigt: 4 St. 2 St. 2 St. 8 St. 6 St. Ein Satz je ...
Page 56 - Tower Konfiguration Setup
56 3 Installation 3.2 Tower Konfiguration Setup 3.2.1 Batterieschrank Schritt 1 Schritt 2
Page 58 - Rack Konfiguration Setup; HINWEIS
58 3.3 Rack Konfiguration Setup HINWEIS Um den Batterieschrank in ein Rack montieren zu können, sollte das Rack Haltebügel Set (310952) verwendet werden. In diesem Fall folgen Sie der Bedienungsanleitung des Bausatzes. Schritt 1 Schritt 2 Schritt 3 3 Installation
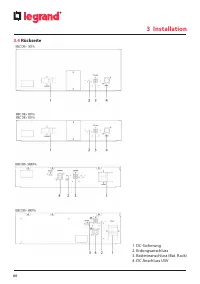
Page 60 - Rückseite
60 3.4 Rückseite 3 Installation 1. DC-Sicherung 2. Erdungsanschluss 3. Batterieanschluss (Bat. Rack) 4. DC Anschluss USV
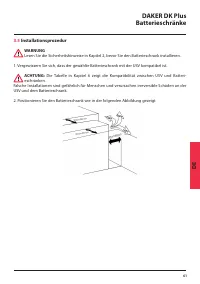
Page 61 - Installationsprozedur; WARNUNG; USV und dem Batterieschrank.
61 DAKER DK Plus Batterieschränke DE 3.5 Installationsprozedur WARNUNG Lesen Sie die Sicherheitshinweise in Kapitel 2, bevor Sie den Batterieschrank installieren. 1. Vergewissern Sie sich, dass der gewählte Batterieschrank mit der USV kompatibel ist. ACHTUNG: Die Tabelle in Kapitel 6 zeigt die Kompa...
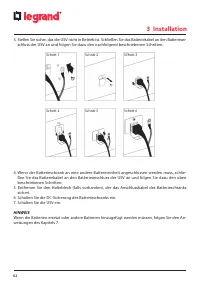
Page 62 - beschriebenen Schritten:
62 3 Installation 3. Stellen Sie sicher, das die USV nicht in Betrieb ist. Schließen Sie das Batteriekabel an den Batteriean- schluss der USV an und folgen Sie dazu den nachfolgend beschriebenen Schritten: Schritt 1 Schritt 4 Schritt 2 Schritt 5 Schritt 3 Schritt 6 4. Wenn der Batterieschrank an ein...
Page 63 - Einstellungen
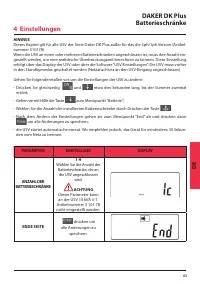
63 DAKER DK Plus Batterieschränke DE HINWEIS Dieses Kapitel gilt für alle USV der Serie Daker DK Plus außer für das die 3ph/1ph Version (Artikel- nummer 310178). Wenn die USV an einen oder mehreren Batterieschränken angeschlossen ist, muss ihre Anzahl ein- gestellt werden, um eine realistische Überb...
Page 64 - Lagern und entsorgen; Lagern; rung der USV verursacht werden.; Demontage; GEFAHR; Werfen Sie keine Bestandteile des Geräts in den Hausmüll.; muss persönliche Schutzausrüstung getragen werden.
64 5 Lagern und entsorgen 5.1 Lagern Der Batterieschrank muss bei einer Raumtemperatur zwischen 0°C (+ 32°F) und +50°C (+122°F) und einer nicht kondensierenden Feuchtigkeit von weniger als 90% gelagert werden. Die Batterien, die im Batterieschrank installiert sind, sind verschlossene Blei-/Säure Bat...
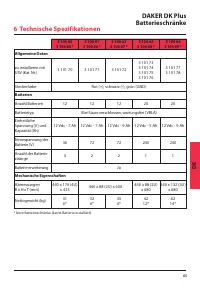
Page 65 - Allgemeine Daten; Technische Spezifikationen
65 DAKER DK Plus Batterieschränke DE 3 106 60 3 106 65 * 3 106 61 3 106 66 * 3 106 62 3 106 67 * 3 106 63 3 106 68 * 3 106 64 3 106 69 * Allgemeine Daten zu installieren mit USV (Kat. Nr.) 3 101 70 3 101 71 3 101 72 3 101 73 3 101 74 3 101 75 3 101 76 3 101 77 3 101 78 Steckerfarbe Rot (+), schwarz ...
Page 66 - Batterie ersetzen; Bevor die Batterien ersetzt werden, unbedingt Kapitel 2 lesen.
66 7 Batterie ersetzen Die Batterie ist wegen Stromschlaggefahr und dem hohen Kurzschlussstrom gefährlich. Die Batterien dürfen nur von zugelassenen Fachleuten oder vom Wartungspersonal ersetzt werden. Bevor die Batterien ersetzt werden, unbedingt Kapitel 2 lesen. Die Batterien dürfen nur mit gleich...
Page 67 - Introducción; Términos de garantía; Instrucciones de seguridad; Contenido del paquete; Almacenaje y desmontaje
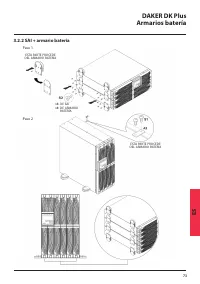
67 DAKER DK Plus Armarios batería ES Índice 1 Introducción 68 1.1 Uso del manual 68 1.2 Términos de garantía 68 1.3 Copyright 68 2. Instrucciones de seguridad 69 3. Instalación 71 3.1 Contenido del paquete 71 3.2 Ajuste de la configuración de la torre 72 3.2.1 Armario batería 72 3.2.2 SAI + armario ...
Page 68 - Introducción; ¡Enhorabuena por su reciente compra LEGRAND!; ATENCIÓN; Uso del manual; INDICACIÓN; Términos de garantía; nes del manual de instalación
68 1 Introducción ¡Enhorabuena por su reciente compra LEGRAND! ATENCIÓN Se ha de leer detenidamente todo el manual antes de efectuar alguna operación. DAKER DK Plus debe usarse solamente en entornos residenciales, comerciales e industriales. 1.1 Uso del manual Este manual se ha de guardar en un luga...
Page 70 - Instrucciones de seguridad; una batería puesta a tierra puede causar un choque eléctrico.
70 2 Instrucciones de seguridad e) Desconectar la fuente de carga antes de conectar o desconectar la batería.f ) Determinar si la batería se ha puesto a tierra de forma involuntariamente. En caso de haber- se puesto a tierra involuntariamente, retirar la fuente de la tierra. El contacto con una part...
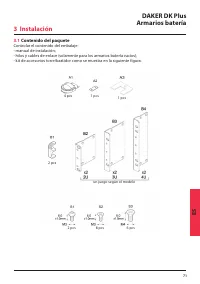
Page 71 - Contenido del paquete; Controlar el contenido del embalaje:; Instalación
71 DAKER DK Plus Armarios batería ES 3.1 Contenido del paquete Controlar el contenido del embalaje: - manual de instalación; - hilos y cables de enlace (solamente para los armarios batería vacíos); - kit de accesorios torre/bastidor como se muestra en la siguiente figura: 4 pcs 2 pcs 2 pcs 8 pcs 6 p...
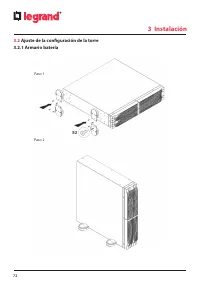
Page 72 - Ajuste de la configuración de la torre
72 3 Instalación 3.2 Ajuste de la configuración de la torre 3.2.1 Armario batería Paso 1 Paso 2
Page 74 - Ajuste de la configuración del bastidor
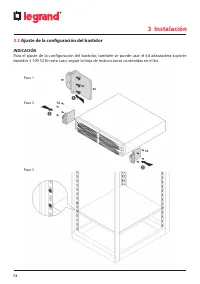
74 3.3 Ajuste de la configuración del bastidor INDICACIÓN Para el ajuste de la configuración del bastidor, también se puede usar el kit abrazadera soporte bastidor 3 109 52 En este caso, seguir la hoja de instrucciones contenidas en el kit. Paso 1 Paso 2 Paso 3 3 Instalación
Page 76 - Panel posterior
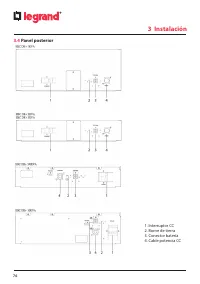
76 3.4 Panel posterior 3 Instalación 1. Interruptor CC 2. Borne de tierra 3. Conector batería 4. Cable potencia CC
Page 77 - Procedimiento de instalación; ADVERTENCIA; al SAI y al armario para la batería.
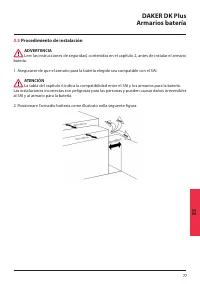
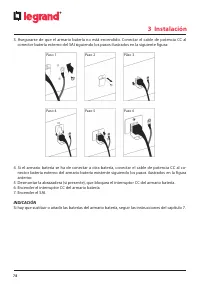
77 DAKER DK Plus Armarios batería ES 3.5 Procedimiento de instalación ADVERTENCIA Leer las instrucciones de seguridad, contenidas en el capítulo 2, antes de instalar el armario batería. 1. Asegurarse de que el armario para la batería elegido sea compatible con el SAI. ATENCIÓN La tabla del capítulo ...
Page 79 - Ajuste
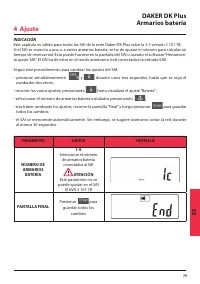
79 DAKER DK Plus Armarios batería ES INDICACIÓN Este capítulo es válido para todos los SAI de la serie Daker DK Plus salvo la 3-1 versión 3 101 78. Si el SAI se conecta a uno o a varios armarios batería, se ha de ajustar el número para calcular un tiempo de reserva real. Esto puede hacerse en la pan...
Page 80 - Almacenaje; almacenaje incorrecto.; Desmontaje; PELIGRO; No tirar componentes del equipo en los residuos ordinarios.; del terreno y de las aguas subterráneas.; Almacenaje y desmontaje
80 5.1 Almacenaje El armario batería se ha de guardar en un entorno con una temperatura ambiente comprendida entre 0°C (+32°F) y +50°C (+122°F) y una humedad inferior al 90% (sin condensación). Las baterías instaladas internamente en el armario batería están selladas contra plomo-ácido y no requiere...
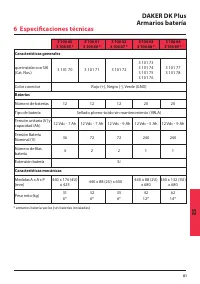
Page 81 - Características generales; Especificaciones técnicas
81 DAKER DK Plus Armarios batería ES 3 106 60 3 106 65 * 3 106 61 3 106 66 * 3 106 62 3 106 67 * 3 106 63 3 106 68 * 3 106 64 3 106 69 * Características generales que instalar con SAI (Cat. Nos.) 3 101 70 3 101 71 3 101 72 3 101 73 3 101 74 3 101 75 3 101 76 3 101 77 3 101 78 Color conector Rojo (+)...
Page 82 - Sustitución de la batería; estimada indicada de la batería en la pantalla del SAI no es fiable.
82 7 Sustitución de la batería Una batería puede presentar un riesgo de choque eléctrico y una corriente de cortocircuito elevada. Solamente personal habilitado para intervenir con riesgos eléctricos y personal de man- tenimiento están autorizados a sustituir las baterías. Antes de la sustitución, e...
Page 83 - Введение; О данном Руководстве; Меры безопасности; Комплект поставки; Хранение и утилизация
83 Содержание ИБП DAKER DK Plus Батарейные модули RU 1 Введение 84 1.1 О данном Руководстве 84 1.2 Гарантийные обязательства 84 1.3 Авторское право 84 2. Меры безопасности 85 3. Монтаж 87 3.1 Комплект поставки 87 3.2 Монтаж в вертикальном положении 88 3.2.1 Батарейный модуль 88 3.2.2 ИБП + батарейны...
Page 84 - Введение; ВНИМАНИЕ; О данном Руководстве; УКАЗАНИЕ; Гарантийные обязательства
84 1 Введение Поздравляем вас с недавним приобретением продукции LEGRAND! ВНИМАНИЕ Перед выполнением любых работ следует внимательно изучить настоящее руководство. ИПБ DAKER DK Plus предназначен для применения только в помещениях жилых, общественных и производственных зданий. 1.1 О данном Руководств...
Page 86 - Меры безопасности; ной к земле, может вызвать поражение электрическим током.
86 2 Меры безопасности е) Убедитесь, что батарея не была непреднамеренно подключена к земле. Если это не так, то отсоедините ее от земли. Прикосновение к любой части батареи, подключен- ной к земле, может вызвать поражение электрическим током. Следует принять меры к исключению возникновения соединен...
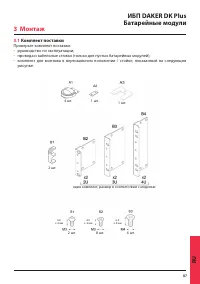
Page 87 - Комплект поставки; Проверьте комплект поставки:; Монтаж
87 ИБП DAKER DK Plus Батарейные модули RU 3.1 Комплект поставки Проверьте комплект поставки: - руководство по эксплуатации; - провода и кабельные стяжки (только для пустых батарейных модулей); - комплект для монтажа в вертикальном положении / стойке, показанный на следующем рисунке: 4 шт. 2 шт. 2 шт...
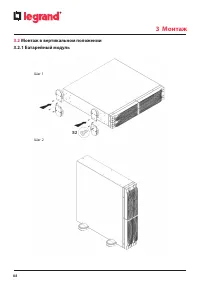
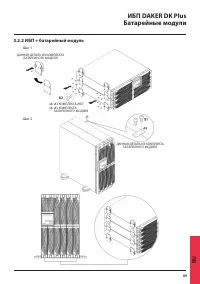
Page 88 - Монтаж в вертикальном положении
88 3 Монтаж 3.2 Монтаж в вертикальном положении 3.2.1 Батарейный модуль Шаг 1 Шаг 2
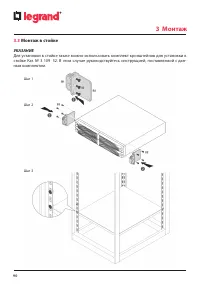
Page 90 - Монтаж в стойке
90 3 Монтаж 3.3 Монтаж в стойке УКАЗАНИЕ Для установки в стойке также можно использовать комплект кронштейнов для установки в стойке Кат. № 3 109 52. В этом случае руководствуйтесь инструкцией, поставляемой с дан- ным комплектом. Шаг 1 Шаг 2 Шаг 3
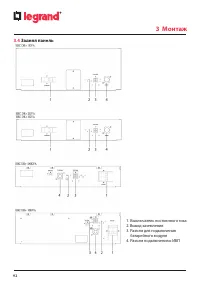
Page 92 - Задняя панель; Выключатель постоянного тока
92 3.4 Задняя панель 3 Монтаж 1. Выключатель постоянного тока 2. Вывод заземления 3. Разъем для подключения батарейного модуля 4. Разъем подключения к ИБП
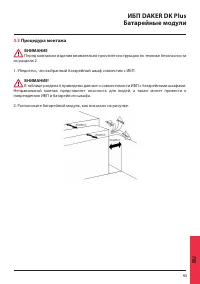
Page 93 - Процедура монтажа; повреждению ИБП и батарейного шкафа.
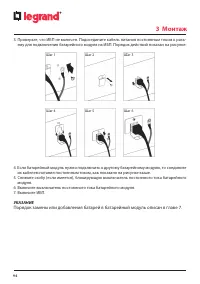
93 ИБП DAKER DK Plus Батарейные модули RU 3.5 Процедура монтажа ВНИМАНИЕ Перед монтажом изделия внимательно прочтите инструкцию по технике безопасности из раздела 2. 1. Убедитесь, что выбранный батарейный шкаф совместим с ИБП. ВНИМАНИЕ! В таблице раздела 6 приведены данные о совместимости ИБП с бата...
Page 94 - их кабелем питания постоянным током, как показано на рисунке выше.
94 3 Монтаж 3. Проверьте, что ИБП не включен. Подсоедините кабель питания постоянным током к разъ- ему для подключения батарейного модуля на ИБП. Порядок действий показан на рисунке: Шаг 1 Шаг 4 Шаг 2 Шаг 5 Шаг 3 Шаг 6 4. Если батарейный модуль нужно подключить к другому батарейному модулю, то соеди...
Page 95 - Настройка
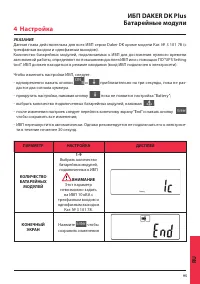
95 ИБП DAKER DK Plus Батарейные модули RU УКАЗАНИЕ Данная глава действительна для всех ИБП серии Daker DK кроме модели Кат. № 3 101 78 (с трехфазным входом и однофазным выходом). Количество батарейных модулей, подключаемых к ИБП для достижения нужного времени автономной работы, определяют по показан...
Page 96 - Хранение и утилизация; Хранение; ОСТРОЖНО; Утилизация
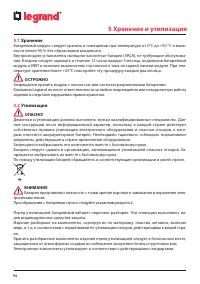
96 5 Хранение и утилизация 5.1 Хранение Батарейный модуль следует хранить в помещении при температуре от 0°C до +50 °C и влаж- ности менее 90 % без образования конденсата. Внутри модуля установлены свинцово-кислотные батареи (VRLA), не требующие обслужива- ния. Батареи следует заряжать в течение 12 ...
Page 97 - Общие характеристики; Технические характеристики
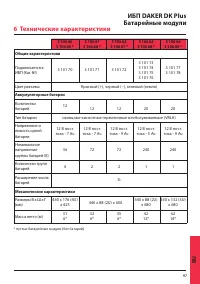
97 ИБП DAKER DK Plus Батарейные модули RU 3 106 60 3 106 65 * 3 106 61 3 106 66 * 3 106 62 3 106 67 * 3 106 63 3 106 68 * 3 106 64 3 106 69 * Общие характеристики Подключается к ИБП (Кат. №) 3 101 70 3 101 71 3 101 72 3 101 73 3 101 74 3 101 75 3 101 76 3 101 77 3 101 78 Цвет разъема Красный (+), че...
Page 98 - Замена батарей; ющий допуск по электробезопасности.
98 7 Замена батарей Батарея представляет риск с точки зрения поражения электрическим током и коротко- го замыкания. Обслуживать батареи разрешается только персоналу, имеющему соответству- ющий допуск по электробезопасности. Перед заменой батарей следует обязательно изучить главу 2. Батареи следует з...
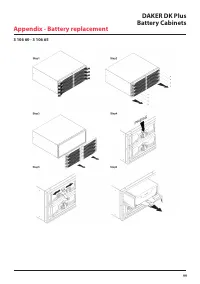
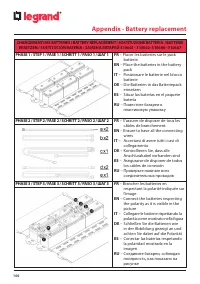
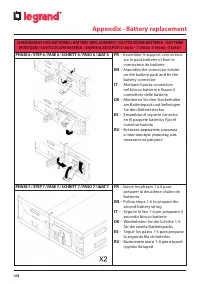
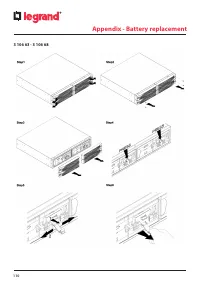
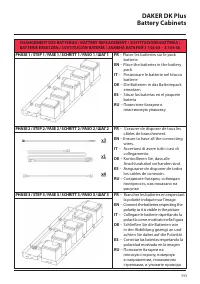
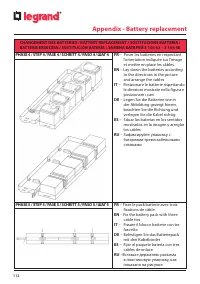
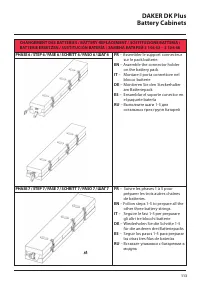
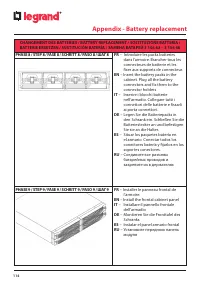
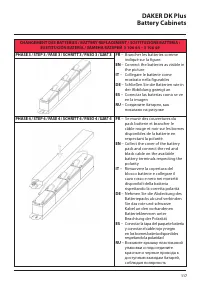
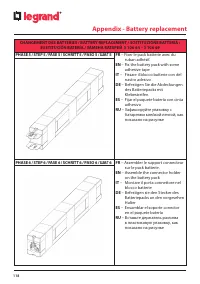
Page 100 - Appendix - Battery replacement
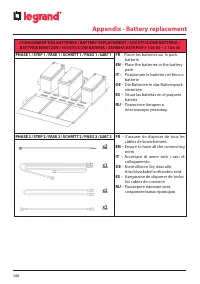
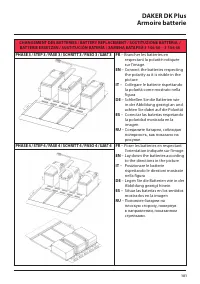
100 Appendix - Battery replacement CHANGEMENT DES BATTERIES / BATTERY REPLACEMENT / SOSTITUZIONE BATTERIA / BATTERIE ERSETZEN / SUSTITUCIÓN BATERÍA / ЗАМЕНА БАТАРЕЙ 3 106 60 – 3 106 65 PHASE 1 / STEP 1 / FASE 1 / SCHRITT 1 / PASO 1 / ШАГ 1 FR – Placer les batteries sur le pack batterie. EN – Place t...