KitchenAid KUIX535HPA - Manual

KitchenAid KUIX535HPA Ice Maker – Manual, read for free online in PDF format. We hope this helps you resolve any issues you may have. If you have further questions, please contact us through the contact form.


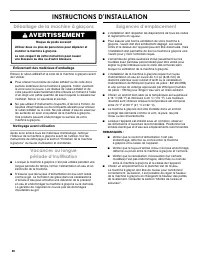
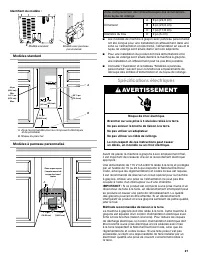
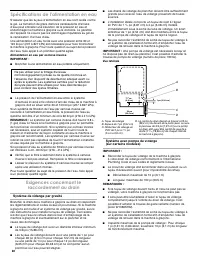
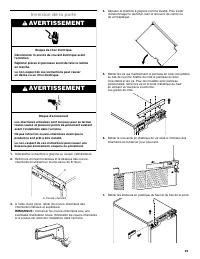
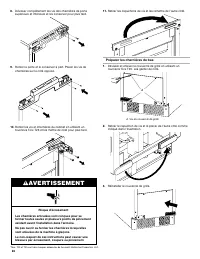
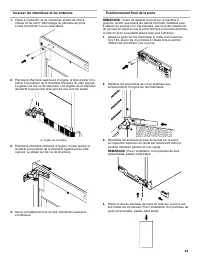
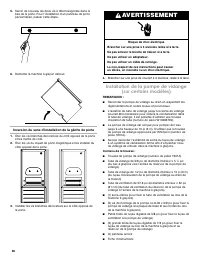
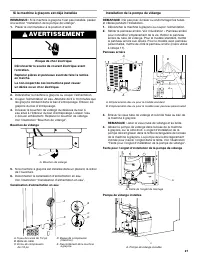
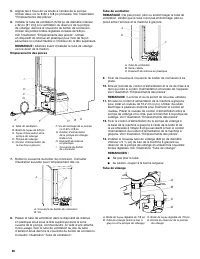
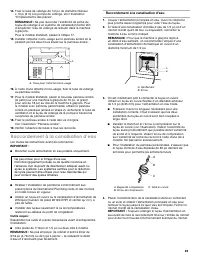
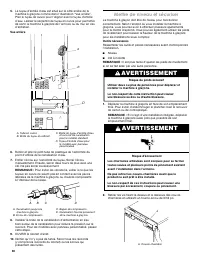
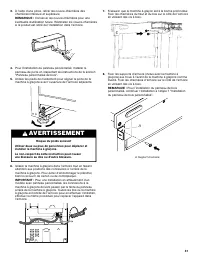
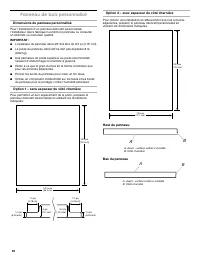
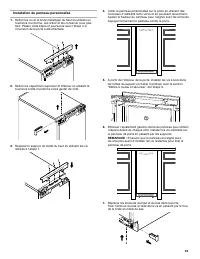
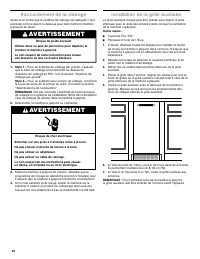
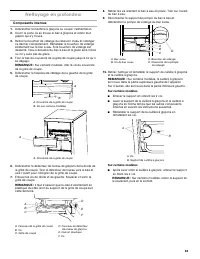
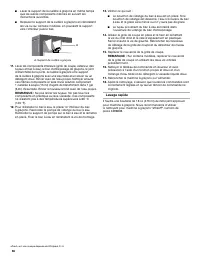


Table of Contents:
- Page 2 – INSTALLATION INSTRUCTIONS; Unpack the Ice Maker; Removing Packaging Materials; Vacation or Extended Time Without Use; IMPORTANT SAFETY INSTRUCTIONS; precautions; SAVE THESE INSTRUCTIONS; WARNING; Excessive Weight Hazard
- Page 3 – Model Identification:; Standard Model Utilities; Electrical Requirements; Recommended Grounding Method; Electrical Shock Hazard
- Page 4 – Gravity Drain System; Side View
- Page 5 – Door Reversal
- Page 6 – Preparing the Bottom Hinges; Crush Hazard
- Page 8 – Reverse Door Catch; Drain Pump Installation
- Page 9 – If Ice Maker Is Currently Installed; Drain Cap; Rear Panel
- Page 11 – Connect Water Supply; Connecting the Water Line
- Page 12 – Rear View; Leveling and Securing; Tools Needed
- Page 14 – Custom Wood Panel; Custom Panel Dimensions
- Page 15 – Custom Panel Installation
- Page 16 – Connecting the Drain; Style 2—; Auxiliary Grill Installation
- Page 17 – Deep Clean; Interior Components; On Some Models
- Page 18 – Quick Clean
- Page 19 – SÉCURITÉ DE LA MACHINE À GLAÇONS; Risque possible de décès ou de blessure grave si vous ne; Votre sécurité et celle des autres est très importante.; AVERTISSEMENT; IMPORTANTES INSTRUCTIONS DE SÉCURITÉ
- Page 20 – INSTRUCTIONS D’INSTALLATION; Déballage de la machine à glaçons; Enlèvement des matériaux d’emballage; Vacances ou longue
- Page 21 – Identifiant du modèle :; Modèles standard; Spécifications électriques; Méthode recommandée de liaison à la terre; Risque de choc électrique
- Page 22 – Système de vidange par gravité; Vue latérale; Système avec pompe de vidange
- Page 23 – Inversion de la porte; Risque d’écrasement
- Page 24 – Préparer les charnières du bas
- Page 26 – Inversion du sens d’installation de la gâche de porte; Installation de la pompe de vidange; Contenu de la trousse :
- Page 27 – Si la machine à glaçons est déjà installée; Bouchon de vidange; Panneau arrière
- Page 29 – Raccordement à la canalisation d’eau
- Page 30 – Vue arrière; Mettre de niveau et sécuriser; Outils nécessaires
- Page 32 – Panneau de bois personnalisé; Dimensions du panneau personnalisé
- Page 33 – Installation du panneau personnalisé
- Page 34 – Raccordement de la vidange; Style 2 –; Installation de la grille auxiliaire
- Page 35 – Nettoyage en profondeur; Composants internes; Sur certains modèles
- Page 36 – Lavage rapide
- Page 37 – SEGURIDAD DE LA FÁBRICA DE HIELO; Si no sigue las instrucciones de inmediato, usted puede; Su seguridad y la seguridad de los demás es muy importante.; ADVERTENCIA; INSTRUCCIONES IMPORTANTES DE SEGURIDAD; de hielo, siga estas precauciones básicas:; GUARDE ESTAS INSTRUCCIONES
- Page 38 – INSTRUCCIONES DE INSTALACIÓN; Cómo desempacar la máquina; Cómo quitar los materiales de empaque; Vacaciones o tiempo; Peligro de Peso Excesivo
- Page 39 – Identificación de modelo:; Servicios en el modelo estándar; Requisitos eléctricos; Método de conexión a tierra recomendado; Peligro de Choque Eléctrico
- Page 40 – Sistema de desagüe por gravedad; Vista lateral; Sistema de la bomba de desagüe (en algunos modelos)
- Page 42 – Cómo preparar las bisagras inferiores; Peligro de aplastamiento
- Page 44 – Cómo invertir el seguro de la puerta; Instalación de la bomba de desagüe
- Page 45 – Si la fábrica de hielo ya se encuentra instalada; Tapa de desagüe; Instalación de bomba de desagüe; Panel posterior
- Page 47 – Herramientas necesarias:; Conexión del suministro de agua
- Page 48 – Vista posterior; Nivelado y asegurado; Herramientas necesarias
- Page 50 – Panel de madera personalizado; Dimensiones del panel personalizado
- Page 51 – Instalación del panel personalizado
- Page 52 – Conexión del desagüe; Estilo 2; Instalación de la rejilla auxiliar
- Page 53 – Limpieza intensa; Piezas interiores; En algunos modelos
- Page 54 – Limpieza rápida
ICE MAKER INSTALLATION INSTRUCTIONS
INSTRUCTIONS D’INSTALLATION DE LA MACHINE À GLAÇONS
INSTRUCCIONES DE INSTALACIÓN DE LA FÁBRICA DE HIELO
W11246206B
ICE MAKER SAFETY
You can be killed or seriously injured if you don't immediately
You
can be killed or seriously injured if you don't follow
All safety messages will tell you what the potential hazard is, tell you how to reduce the chance of injury, and tell you what can
happen if the instructions are not followed.
Your safety and the safety of others are very important.
We have provided many important safety messages in this manual and on your appliance. Always read and obey all safety
messages.
This is the safety alert symbol.
This symbol alerts you to potential hazards that can kill or hurt you and others.
All safety messages will follow the safety alert symbol and either the word “DANGER” or “WARNING.”
These words mean:
follow instructions.
instructions.
DANGER
WARNING
CONTENTS / TABLE DES MATIÈRES / ÍNDICE
ICE MAKER SAFETY ..................................1
INSTALLATION INSTRUCTIONS ...............2
Unpack the Ice Maker ..............................2
Vacation or Extended
Time Without Use .....................................2
Location Requirements ............................2
Electrical Requirements ...........................3
Water Supply Requirements ....................4
Drain Connection Requirements ..............4
Door Reversal ...........................................5
Drain Pump Installation
(on some models) .....................................8
Connect Water Supply ...........................11
Leveling and Securing ............................12
Custom Wood Panel ..............................14
Connecting the Drain .............................16
Auxiliary Grill Installation ........................16
Deep Clean .............................................17
À GLAÇONS ..............................................19
INSTRUCTIONS D’INSTALLATION .........20
Déballage de la machine à glaçons .......20
Vacances ou longue période
d’inutilisation ..........................................20
Exigences d’emplacement .....................20
Spécifications électriques ......................21
Spécifications de l’alimentation
en eau .....................................................22
Exigences concernant le
raccordement au drain ...........................22
Inversion de la porte ...............................23
Installation de la pompe de vidange
(sur certains modèles) ............................26
Raccordement à la canalisation d’eau ..29
Mettre de niveau et sécuriser .................30
Panneau de bois personnalisé ...............32
Raccordement de la vidange .................34
Installation de la grille auxiliaire ..............34
Nettoyage en profondeur .......................35
DE HIELO ..................................................37
INSTRUCCIONES DE INSTALACIÓN .....38
de hielo ...................................................38
Vacaciones o tiempo prolongado
sin uso ....................................................38
Requisitos de ubicación .........................38
Requisitos eléctricos ..............................39
Requisitos del suministro de agua .........40
Requisitos para la conexión del
desagüe ..................................................40
Cambio del sentido de apertura
de la puerta ............................................41
Instalación de la bomba de desagüe
(en algunos modelos) .............................44
Conexión del suministro de agua ..........47
Nivelado y asegurado ............................48
Panel de madera personalizado ............50
Conexión del desagüe ...........................52
Instalación de la rejilla auxiliar ................52
Limpieza intensa ....................................53
"Loading the manual" means you need to wait until the file loads and becomes available for online reading. Some manuals are very large, and the time they take to appear depends on your internet speed.
Was this manual helpful?
About this manual
- Brand
- KitchenAid
- Model
- KUIX535HPA
- Document type
- Manual
- Category
- Ice Maker
- Language(s)
- English, Spanish, French
- Pages
- 56
- File size
- 5.4 MB
- Format
Other Manuals for KitchenAid KUIX535HPA
Summary
2 INSTALLATION INSTRUCTIONS Unpack the Ice Maker Removing Packaging Materials Remove tape and glue from your ice maker before using. ■ To remove any remaining tape or glue from the exterior of the ice maker, rub the area briskly with your thumb. Tape or glue residue can also be easily removed by rub...
3 Model Identification: Standard Model Utilities Custom Panel Model Utilities Utility Slot/Cutout Location Zone Dimension A 9" (22.9 cm) B 8" (20.3 cm) C 7" (17.8 cm) Diameter of the hole D 2" (5 cm) ■ Custom Panel ice maker models have been designed for flush install in instances wh...
4 Water Supply Requirements Check that the water supply lines are insulated against freezing conditions. Ice formations in the supply lines can increase water pressure and damage your ice maker or home. Damage from frozen supply lines is not covered by the warranty.A cold water supply with water pre...
Ask a question
Related manuals
More KitchenAid Ice Makers models
Other KitchenAid appliances
 KitchenAid 4KFP720OB2 Manual
 KitchenAid 4KFP720WH1 Manual
 KitchenAid 4KFP750CR0 Manual
 KitchenAid 5 SPEED ULTRA POWER BLENDER Manual
 KitchenAid 5FVSFGA User Manual
 KitchenAid 5K45SS Manual
 KitchenAid 5KCG100 Manual
 KitchenAid 5KEK1222ASX User Manual
 KitchenAid 5KEK1522 Manual
 KitchenAid 5KEK1835AER User Manual
 KitchenAid 5KFP1335 Manual
 KitchenAid 5KFP1644 Manual
 KitchenAid 5KFP1644EER0 User Manual
 KitchenAid 5KFPM770 Manual
 KitchenAid 5KHB2571 Manual