Page 2 - PARTS AND FEATURES; PARTS AND ACCESSORIES
PARTS AND FEATURES PARTS AND ACCESSORIES Heavy-duty base Power cord and cord storage (not shown) Lid latch Drive pin Lid hinge Handle hinge Reversible slicing/shredding disc Drive adapter Multipurpose stainless steel blade Work bowl cover with 2-in-1 feed tube 2-piece food pusher 7-cup (1.7 L) work ...
Page 3 - FOOD PROCESSOR SAFETY; IMPORTANT SAFEGUARDS
ENGLISH FOOD PROCESSOR SAFETY | 3 FOOD PROCESSOR SAFETY IMPORTANT SAFEGUARDS When using electrical appliances, basic safety precautions should always be followed, including the following: 1. Read all instructions. 2. To protect against risk of electrical shock, do not put Food Processor in water or ...
Page 4 - SAVE THESE INSTRUCTIONS; ELECTRICAL REQUIREMENTS; This product is designed for household use only.
4 | FOOD PROCESSOR SAFETY FOOD PROCESSOR SAFETY 8. Do not use outdoors.9. Do not let cord hang over edge of table or counter. 10. Keep hands and utensils away from moving blades or discs while processing food to reduce the risk of severe injury to persons or damage to the Food Processor. A scraper m...
Page 5 - USING THE FOOD PROCESSOR; ACCESSORIES SELECTION GUIDE
ENGLISH USING THE FOOD PROCESSOR | 5 USING THE FOOD PROCESSOR ACCESSORIES SELECTION GUIDE ACTION SETTING FOOD ACCESSORY Chop Low or Pulse Cheese Chocolate Fruits Fresh herbs Nuts Tofu Vegetables Multipurpose stainless steel blade + Mince or Purée High or Pulse Mix Low Pasta Sauce Pesto Salsa Sauces ...
Page 6 - BEFORE FIRST USE
6 | USING THE FOOD PROCESSOR USING THE FOOD PROCESSOR Before using your Food Processor for the first time, wash all parts and accessories either by hand or in the dishwasher (see the “Cleaning the Food Processor” section). Your Food Processor is designed so that all accessories may be stored inside ...
Page 7 - INSTALLING THE MULTIPURPOSE BLADE
ENGLISH USING THE FOOD PROCESSOR | 7 USING THE FOOD PROCESSOR NOTE: For ease of assembly, install the desired blade or disc before attaching the work bowl cover. NOTE: Your Food Processor will not operate unless the work bowl cover is fully closed and the work bowl is properly seated on the base. 3 ...
Page 8 - INSTALLING THE REVERSIBLE SLICING/SHREDDING DISC
8 | USING THE FOOD PROCESSOR USING THE FOOD PROCESSOR INSTALLING THE REVERSIBLE SLICING/SHREDDING DISC 1 To slice: Turn the disc so that the raised slicing blade is facing up. To shred: Turn the disc so that the small, raised shredding blades are facing up. The disc can be placed in two different po...
Page 9 - OPERATING THE FOOD PROCESSOR; Rotating Blade Hazard
ENGLISH USING THE FOOD PROCESSOR | 9 OPERATING THE FOOD PROCESSOR Before operating the Food Processor, be sure the work bowl, blades/disc and work bowl cover are properly assembled on the base (see the “Assembling the Food Processor” section). Rotating Blade Hazard Always use food pusher.Keep finger...
Page 11 - REMOVING PROCESSED FOODS
ENGLISH USING THE FOOD PROCESSOR | 11 1 Turn the Food Processor off: Press the OFF/PULSE button and unplug the Food Processor before disassembling. 2 Lift the lid latch to unlock the work bowl cover, then lift cover to remove. REMOVING PROCESSED FOODS USING THE FOOD PROCESSOR 3 If using the disc, re...
Page 12 - USING THE MULTIPURPOSE BLADE; TIPS FOR GREAT RESULTS
12 | TIPS FOR GREAT RESULTS USING THE MULTIPURPOSE BLADE TIPS FOR GREAT RESULTS To chop fresh fruits or vegetables: Peel, core, and/or remove seeds. For more consistent results, cut food in 1 to 1½-inch (2.5-3.75 cm) pieces. Process food to desired size, using Pulse or Low speed. Scrape sides of bow...
Page 13 - USING THE REVERSIBLE SLICING/SHREDDING DISC
ENGLISH TIPS FOR GREAT RESULTS | 13 To slice or shred fruits and vegetables that are small, such as strawberries, mushrooms, and radishes: Position food vertically or horizontally in layers within the feed tube. Fill feed tube in order to keep food positioned properly. Process using even pressure wi...
Page 14 - HELPFUL HINTS
14 | TIPS FOR GREAT RESULTS • To avoid damage to the blade or motor, do not process food that is so hard or firmly frozen that it cannot be pierced with the tip of a sharp knife. If a piece of hard food, such as a carrot, becomes wedged or stuck on the blade, stop the processor and remove the blade....
Page 15 - CARE AND CLEANING; CLEANING THE FOOD PROCESSOR
ENGLISH CARE AND CLEANING | 15 1 Press the OFF/PULSE button, then unplug the Food Processor before cleaning. 4 You can store up to two blades and two discs as well as the drive adapter inside of the work bowl when the Food Processor is not in use. Wrap the power cord around the cord storage on the b...
Page 16 - TROUBLESHOOTING; If your Food Processor should; Food Processor not shredding
16 | TROUBLESHOOTING TROUBLESHOOTING If your Food Processor should malfunction or fail to operate, check the following: 1. Is the Food Processor plugged in? 2. Make sure that the bowl and lid are properly aligned and locked in place. 3. Have you pressed more than one button at the same time? 4. Unpl...
Page 17 - WARRANTY AND SERVICE; KITCHENAID
ENGLISH WARRANTY AND SERVICE | 17 WARRANTY AND SERVICE KITCHENAID ® FOOD PROCESSOR WARRANTY FOR THE 50 UNITED STATES, THE DISTRICT OF COLUMBIA, PUERTO RICO, AND CANADA This warranty extends to the purchaser and any succeeding owner for Food Processors operated in the 50 United States, the District o...
Page 18 - HASSLE-FREE REPLACEMENT WARRANTY – CANADA
18 | WARRANTY AND SERVICE ®/™ ©2017 KitchenAid. All rights reserved. KITCHENAID and the design of the stand mixer are trademarks in the U.S. and elsewhere. Used under license in Canada. In the United States and Puerto Rico: For service information, or to order accessories or replacement parts, call ...
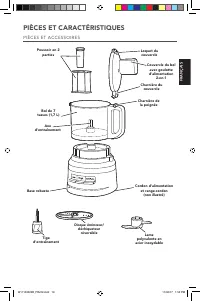
Page 19 - PIÈCES ET CARACTÉRISTIQUES; PIÈCES ET ACCESSOIRES
FRANÇAIS PIÈCES ET CARACTÉRISTIQUES PIÈCES ET ACCESSOIRES Base robuste Cordon d’alimentation et range-cordon (non illustré) Loquet du couvercle Axe d'entraînement Charnière du couvercle Charnière de la poignée Disque éminceur/ déchiqueteur réversible Tige d'entraînement Lame polyvalente en acier ino...
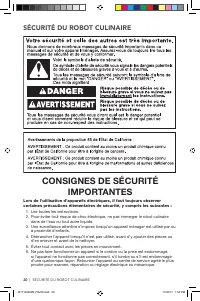
Page 20 - SÉCURITÉ DU ROBOT CULINAIRE; CONSIGNES DE SÉCURITÉ
20 | SÉCURITÉ DU ROBOT CULINAIRE SÉCURITÉ DU ROBOT CULINAIRE CONSIGNES DE SÉCURITÉ IMPORTANTES Lors de l’utilisation d’appareils électriques, il faut toujours observer certaines précautions élémentaires de sécurité, y compris les suivantes : 1. Lire toutes les instructions. 2. Pour éviter tout risqu...
Page 21 - CONSERVER CES INSTRUCTIONS; SPÉCIFICATIONS ÉLECTRIQUES; Ce produit est conçu uniquement pour un usage domestique.
SÉCURITÉ DU ROBOT CULINAIRE | 21 FRANÇAIS SÉCURITÉ DU ROBOT CULINAIRE 7. L’utilisation d’accessoires non recommandés ou non vendus par KitchenAid peut causer un incendie, un choc électrique ou des blessures. 8. Ne pas utiliser à l’extérieur.9. Ne pas laisser le cordon pendre par dessus le bord d’une...
Page 22 - UTILISATION DU ROBOT CULINAIRE; GUIDE DE SÉLECTION DES ACCESSOIRES
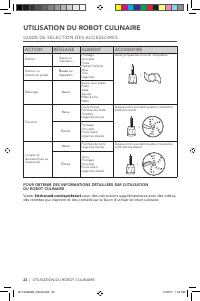
22 | UTILISATION DU ROBOT CULINAIRE UTILISATION DU ROBOT CULINAIRE GUIDE DE SÉLECTION DES ACCESSOIRES ACTION RÉGLAGE ALIMENT ACCESSOIRE Hacher Basse ou impulsion Fromage Chocolat Fruits Herbes fraîches Noix Tofu Légumes Lame polyvalente en acier inoxydable + Hacher ou réduire en purée Élevée ou impu...
Page 23 - AVANT LA PREMIÈRE UTILISATION
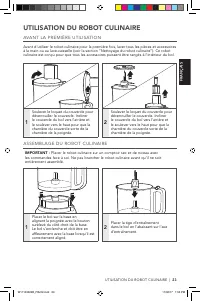
UTILISATION DU ROBOT CULINAIRE | 23 FRANÇAIS UTILISATION DU ROBOT CULINAIRE Avant d’utiliser le robot culinaire pour la première fois, laver tous les pièces et accessoires à la main ou au lave-vaisselle (voir la section “Nettoyage du robot culinaire”). Ce robot culinaire est conçu pour que tous les ...
Page 24 - MONTAGE DE LA LAME POLYVALENTE
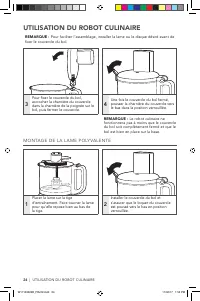
24 | UTILISATION DU ROBOT CULINAIRE UTILISATION DU ROBOT CULINAIRE REMARQUE : Pour faciliter l’assemblage, installer la lame ou le disque désiré avant de fixer le couvercle du bol. REMARQUE : Le robot culinaire ne fonctionnera pas à moins que le couvercle du bol soit complètement fermé et que le bol...
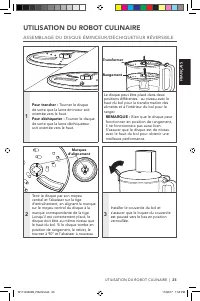
Page 25 - ASSEMBLAGE DU DISQUE ÉMINCEUR/DÉCHIQUETEUR RÉVERSIBLE
UTILISATION DU ROBOT CULINAIRE | 25 FRANÇAIS UTILISATION DU ROBOT CULINAIRE ASSEMBLAGE DU DISQUE ÉMINCEUR/DÉCHIQUETEUR RÉVERSIBLE 1 Pour trancher : Tourner le disque de sorte que la lame éminceur soit orientée vers le haut. Pour déchiqueter : Tourner le disque de sorte que la lame déchiqueteur soit ...
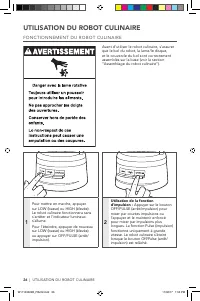
Page 26 - FONCTIONNEMENT DU ROBOT CULINAIRE
26 | UTILISATION DU ROBOT CULINAIRE FONCTIONNEMENT DU ROBOT CULINAIRE Avant d’utiliser le robot culinaire, s’assurer que le bol du robot, la lame/le disque, et le couvercle du bol sont correctement assemblés sur la base (voir la section “Assemblage du robot culinaire”). UTILISATION DU ROBOT CULINAIR...
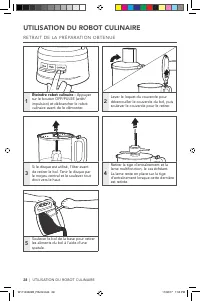
Page 28 - RETRAIT DE LA PRÉPARATION OBTENUE
28 | UTILISATION DU ROBOT CULINAIRE UTILISATION DU ROBOT CULINAIRE 3 Si le disque est utilisé, l’ôter avant de retirer le bol. Tenir le disque par le moyeu central et le soulever tout droit vers le haut. 4 Retirer la tige d'entraînement et la lame multifonction, le cas échéant. La lame reste en plac...
Page 29 - UTILISATION DE LA LAME POLYVALENTE; CONSEILS D‘UTILISATION POUR
CONSEILS D‘UTILISATION POUR DES RÉSULTATS IMPECCABLES | 29 FRANÇAIS UTILISATION DE LA LAME POLYVALENTE CONSEILS D‘UTILISATION POUR DES RÉSULTATS IMPECCABLES Pour hacher les fruits et les légumes frais : Peler, évider et/ou épépiner les aliments. Pour des résultats plus consistants, couper les alimen...
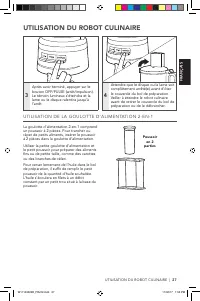
Page 30 - UTILISATION DU DISQUE ÉMINCEUR/DÉCHIQUETEUR RÉVERSIBLE
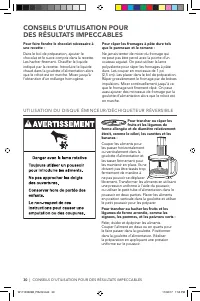
30 | CONSEILS D‘UTILISATION POUR DES RÉSULTATS IMPECCABLES Pour trancher ou râper les fruits et les légumes de forme allongée et de diamètre relativement étroit, comme le céleri, les carottes et les bananes : Couper les aliments pour les passer horizontalement ou verticalement dans la goulotte d’ali...
Page 31 - CONSEILS UTILES
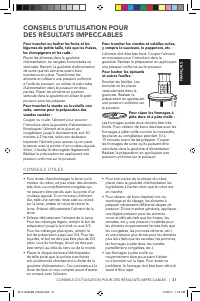
CONSEILS D‘UTILISATION POUR DES RÉSULTATS IMPECCABLES | 31 FRANÇAIS Pour trancher ou hacher les fruits et les légumes de petite taille, tels que les fraises, les champignons et les radis : Placer les aliments dans la goulotte d’alimentation, en rangées horizontales ou verticales. Remplir la goulotte...
Page 33 - ENTRETIEN ET NETTOYAGE; NETTOYAGE DU ROBOT CULINAIRE
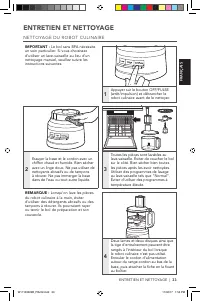
ENTRETIEN ET NETTOYAGE | 33 FRANÇAIS 1 Appuyer sur le bouton OFF/PULSE (arrêt/impulsion) et débrancher le robot culinaire avant de le nettoyer. 2 Essuyer la base et le cordon avec un chiffon chaud et humide. Bien sécher avec un linge doux. Ne pas utiliser de nettoyants abrasifs ou de tampons à récur...
Page 34 - DÉPANNAGE
34 | DÉPANNAGE DÉPANNAGE En cas de dysfonctionnement ou de non fonctionnement du robot culinaire, vérifier les points suivants : 1. Le robot culinaire est-il branché? 2. S’assurer que le bol et le couvercle sont correctement alignés et bien verrouillés. 3. L’utilisateur a-t-il appuyé sur plus d'un b...
Page 35 - GARANTIE ET DÉPANNAGE; GARANTIE ET DÉPANNAGE DU ROBOT CULINAIRE KITCHENAID
GARANTIE ET DÉPANNAGE | 35 FRANÇAIS GARANTIE ET DÉPANNAGE GARANTIE ET DÉPANNAGE DU ROBOT CULINAIRE KITCHENAID ® POUR LES 50 ÉTATS DES ÉTATS-UNIS, LE DISTRICT FÉDÉRAL DE COLUMBIA, PORTO RICO ET LE CANADA La présente garantie couvre l’acheteur et les propriétaires suivants du robot culinaire lorsqu’il...
Page 36 - GARANTIE DE REMPLACEMENT SANS DIFFICULTÉ – CANADA
36 | GARANTIE ET DÉPANNAGE ®/™ ©2017 KitchenAid. Tous droits réservés. KITCHENAID et la forme du batteur sur socle sont des marques de commerce aux É.-U. et dans d’autres pays. Utilisé sous licence au Canada. Aux États-Unis et à Porto Rico : Pour des informations sur le service de dépannage ou pour ...
Page 37 - PIEZAS Y CARACTERÍSTICAS; PIEZAS Y ACCESORIOS
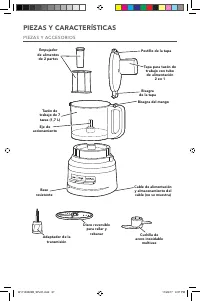
PIEZAS Y CARACTERÍSTICAS PIEZAS Y ACCESORIOS Base resistente Cable de alimentación y almacenamiento del cable (no se muestra) Pestillo de la tapa Eje de accionamiento Bisagra de la tapa Bisagra del mango Disco reversible para rallar y rebanar Adaptador de la transmisión Cuchilla de acero inoxidable ...
Page 38 - SEGURIDAD DEL PROCESADOR DE ALIMENTOS; SALVAGUARDIAS IMPORTANTES; seguridad, entre las que se incluyen las siguientes:
38 | SEGURIDAD DEL PROCESADOR DE ALIMENTOS SEGURIDAD DEL PROCESADOR DE ALIMENTOS SALVAGUARDIAS IMPORTANTES Al utilizar aparatos eléctricos, se deben seguir las precauciones básicas de seguridad, entre las que se incluyen las siguientes: 1. Lea todas las instrucciones. 2. Para protegerse contra el ri...
Page 39 - puede provocar un incendio, choque eléctrico o lesiones.; GUARDE ESTAS INSTRUCCIONES; REQUISITOS ELÉCTRICOS; Este producto ha sido diseñado únicamente para
SEGURIDAD DEL PROCESADOR DE ALIMENTOS | 39 ESP AÑOL SEGURIDAD DEL PROCESADOR DE ALIMENTOS 7. El uso de aditamentos no recomendados o no vendidos por KitchenAid puede provocar un incendio, choque eléctrico o lesiones. 8. No lo use al aire libre.9. No deje que el cable cuelgue del borde de la mesa o d...
Page 40 - USO DEL PROCESADOR DE ALIMENTOS; GUÍA DE SELECCIÓN DE ACCESORIOS
40 | USO DEL PROCESADOR DE ALIMENTOS USO DEL PROCESADOR DE ALIMENTOS GUÍA DE SELECCIÓN DE ACCESORIOS ACCIÓN AJUSTE ALIMENTO ACCESORIO Picar Bajo o pulso Queso Chocolate Frutas Hierbas frescas Nueces Tofu Verduras Cuchilla de acero inoxidable multiuso + Triturar o hacer puré Alto o pulso Mezclar Bajo...
Page 41 - ANTES DEL PRIMER USO
USO DEL PROCESADOR DE ALIMENTOS | 41 ESP AÑOL USO DEL PROCESADOR DE ALIMENTOS Antes de usar el procesador de alimentos por primera vez, lave todas las piezas y los accesorios a mano o en la lavavajillas (vea la sección “Limpieza del procesador de alimentos”). Su procesador de alimentos está diseñado...
Page 42 - CÓMO INSTALAR LA CUCHILLA MULTIUSO
42 | USO DEL PROCESADOR DE ALIMENTOS USO DEL PROCESADOR DE ALIMENTOS NOTA: Para un montaje simple, instale la cuchilla o el disco deseado antes de fijar la cubierta del tazón de trabajo. NOTA: Su procesador de alimentos no funcionará a menos que la cubierta del tazón de trabajo esté completamente ce...
Page 43 - INSTALACIÓN DEL DISCO REVERSIBLE PARA RALLAR Y REBANAR
USO DEL PROCESADOR DE ALIMENTOS | 43 ESP AÑOL USO DEL PROCESADOR DE ALIMENTOS INSTALACIÓN DEL DISCO REVERSIBLE PARA RALLAR Y REBANAR 1 Para rebanar: Gire el disco, de manera que la cuchilla para rebanar elevada esté mirando hacia arriba. Para rallar: Gire el disco, de manera que las cuchillas pequeñ...
Page 45 - CÓMO USAR EL TUBO DE ALIMENTACIÓN 2 EN 1
USO DEL PROCESADOR DE ALIMENTOS | 45 ESP AÑOL CÓMO USAR EL TUBO DE ALIMENTACIÓN 2 EN 1 USO DEL PROCESADOR DE ALIMENTOS El tubo de alimentación 2 en 1 incluye un empujador de alimentos de 2 partes. Para rebanar o rallar artículos pequeños, inserte el empujador de alimentos de 2 piezas en el tubo de a...
Page 46 - EXTRACCIÓN DE LOS ALIMENTOS PROCESADOS
46 | USO DEL PROCESADOR DE ALIMENTOS USO DEL PROCESADOR DE ALIMENTOS 3 Si usó el disco, retírelo antes de retirar el tazón. Tome el disco por el eje central; levántelo en sentido recto hacia arriba. 4 Retire el adaptador de transmisión y la cuchilla multipropósito, si corresponde. La cuchilla se man...
Page 47 - USO DE LA CUCHILLA MULTIUSO; CONSEJOS PARA OBTENER RESULTADOS ÓPTIMOS
CONSEJOS PARA OBTENER RESULTADOS ÓPTIMOS | 47 ESP AÑOL USO DE LA CUCHILLA MULTIUSO CONSEJOS PARA OBTENER RESULTADOS ÓPTIMOS Para picar frutas o verduras frescas: Pele, retire el centro y/o las semillas. Para obtener resultados constantes, corte los alimentos en trozos de 1 a 1½ pulgadas (2,5 a 3,75 ...
Page 48 - CÓMO USAR EL DISCO REVERSIBLE PARA RALLAR Y REBANAR
48 | CONSEJOS PARA OBTENER RESULTADOS ÓPTIMOS Para rebanar o rallar frutas y verduras pequeños, como fresas, hongos y rábanos: Coloque los alimentos vertical u horizontalmente en capas dentro del tubo de alimentación. Llene el tubo de alimentación para mantener los alimentos en la posición correcta....
Page 49 - CONSEJOS ÚTILES
CONSEJOS PARA OBTENER RESULTADOS ÓPTIMOS | 49 ESP AÑOL • Para evitar daños a la cuchilla o al motor, no procese alimentos que se hayan congelado hasta estar tan duros o firmes que no se puedan pinchar con la punta de un cuchillo afilado. Si un trozo de un alimento duro, tal como una zanahoria, se ap...
Page 50 - CUIDADO Y LIMPIEZA; LIMPIEZA DEL PROCESADOR DE ALIMENTOS
50 | CUIDADO Y LIMPIEZA 1 Presione el botón OFF/PULSE (apagado/pulso) y, a continuación, desenchufe el procesador de alimentos antes de limpiarlo. 4 Puede almacenar hasta dos cuchillas y dos discos, además del adaptador de transmisión dentro del tazón de trabajo cuando el procesador de alimentos no ...
Page 51 - SOLUCIÓN DE PROBLEMAS; Si el procesador de alimentos falla o
SOLUCIÓN DE PROBLEMAS | 51 ESP AÑOL SOLUCIÓN DE PROBLEMAS Si el procesador de alimentos falla o no funciona, revise lo siguiente: 1. ¿Está enchufado el procesador de alimentos? 2. Cerciórese de que el tazón y la tapa estén debidamente alineados y trabados en su lugar. 3. ¿Presionó más de un botón al...
Page 52 - GARANTÍA Y SERVICIO; GARANTÍA DEL PROCESADOR DE ALIMENTOS KITCHENAID; Duración de la garantía:
52 | GARANTÍA Y SERVICIO GARANTÍA Y SERVICIO GARANTÍA DEL PROCESADOR DE ALIMENTOS KITCHENAID ® PARA LOS 50 ESTADOS DE ESTADOS UNIDOS, EL DISTRITO DE COLUMBIA, PUERTO RICO Y CANADÁ Esta garantía se extiende al comprador y a cualquier propietario subsiguiente para el procesador de alimentos usadas en ...
Page 53 - GARANTÍA DE REEMPLAZO SIN DIFICULTADES – EN CANADÁ
GARANTÍA Y SERVICIO | 53 ESP AÑOL ®/™ ©2017 KitchenAid. Todos los derechos reservados. KITCHENAID y el diseño de la batidora con base son marcas registradas en EE.UU. y en otras partes. Usada en Canadá bajo licencia. GARANTÍA Y SERVICIO GARANTÍA DE REEMPLAZO SIN DIFICULTADES – EN LOS CINCUENTA ESTAD...