Page 2 - Safety Precautions
Safety Precautions When the equipment is installed in a cabinet or on a shelf, make sure that it has sufficient space on all sides to allow for ventilation (10 cm or more on both sides, on top and at the rear).Do not block the ventilation holes.(If the ventilation holes are blocked by a newspaper, o...
Page 4 - Contents; Verifying the Accessories
Contents Safety Precautions ............................... 2 Verifying the Accessories .................... 4 Names of Parts and Functions ............. 5 Names of Buttons and Functions on the LCD Monitor ........................................ 6 Using the Touch Screen ...................... 7 I G...
Page 5 - Attaching the Core Filter; Names of Parts and Functions
o Attaching the Core Filter Attach the core filter to the power cord of the AC adapter, AV Cable and optional Component Cable as shown in the illustration. The core filter reduces interference when this unit is connected to other devices. . To be connected to this unit Release the stopper. Wind once...
Page 6 - Names of Buttons and Functions on the LCD Monitor
Names of Buttons and Functions on the LCD Monitor The following screens are displayed during the video and still image modes, and operate as the touch screens. (p. 7) Recording Screen (Video/Still Image) 1 6 2 3 4 5 A Face Short Cut Menu Button Displays a short cut screen of face recognition functio...
Page 7 - Using the Touch Screen; NOTE
Index Screen 2011 2011 1 2 4 3 5 6 7 A Date Button B Recording/Playback Mode Button Switches between recording and playback modes. C Index Screen Switching Button (p. 16) D Delete Button (p. 16) E Playback Media Button Switches between SD card and built-in memory. F Menu Button (p. 25) G Page Forwar...
Page 8 - Charging the Battery Pack; To detach the battery pack; Connect the DC connector.; Attach the battery pack.; Getting Started
Charging the Battery Pack (Base) To detach the battery pack Charging finished: Goes out Charging in progress: Blinks Charging Lamp Plug in the power. AC Adapter To AC Outlet(110 V 㨪 240 V) Cover Connect the DC connector. Mark Align the top of the battery with the mark on this unit, and slide in unti...
Page 9 - Grip Adjustment; Inserting an SD Card; Close the LCD monitor.; To remove the card
Grip Adjustment Pad Attach the pad Adjust the length of the belt Pull back the pad Inserting an SD Card To record to the card, it is necessary to perform media settings. (p. 11) When no card is available, set media settings to “BUILT-IN MEMORY” for recording. By default, it is set to “BUILT-IN MEMOR...
Page 11 - To use an SD card; To use SD cards that have been; All data on the card will be deleted
o To use an SD card Recording can be performed on a card when “REC MEDIA FOR VIDEO” or “REC MEDIA FOR IMAGE” of “COMMON” menu is set to “SD CARD”. A Open the LCD monitor. 0 The unit turns on. B Tap “MENU”. C Tap “ Q ”. D Tap “REC MEDIA FOR VIDEO” or “REC MEDIA FOR IMAGE”. REC MEDIA FOR IMAGE REC MED...
Page 12 - Clock Setting; To reset the clock; Open the LCD monitor.; To change the display language; Perform steps
Clock Setting 1 Open the LCD monitor. . 0 The unit turns on. When the LCD monitor is closed, the unit turns off. 2 Tap “YES” when “SET DATE/TIME!” is displayed. . NO YES SET DATE/TIME! 3 Set the date and time. . 1 2011 1 10 00 SET TIME DATE CLOCK SETTING 0 When the year, month, day, hour, or minute ...
Page 13 - Video Recording; Indications during video recording; Recording
Video Recording You can record without worrying about the setting details by using the Intelligent Auto mode. Settings such as exposure and focus will be adjusted automatically to suit the shooting conditions. 0 In case of specific shooting scenes such as person etc., its icon is displayed on the sc...
Page 14 - Face registration
NOTE 0 The estimated recording time of the supplied battery pack is approximately 40 minutes. (p. 26) 0 Do not remove the battery pack, AC adapter, or SD card when the access lamp is lighted. The recorded data may become unreadable. o Face registration By registering the face of a person beforehand,...
Page 15 - Still Image Recording; Press fully; Indications during still image recording
Still Image Recording Lights up during still image recording Press fully Take a still image. Lights up in green when focused Press halfway Set the focus on the subject. Select still image mode. 0 You can also tap Q on the touch screen to record. However, focus cannot be set by pressing halfway. o In...
Page 16 - Playing Back/Deleting Files on this Unit; Playback
Playing Back/Deleting Files on this Unit Select and play back the recorded videos or still images from an index screen (thumbnail display). . 2011 2011 REL ALL SEL ALL DELETE Tap “OK”. Tap “EXECUTE” when the confirma-tion message appears. A delete mark appears on the selected file. To remove the del...
Page 17 - To capture a still image during playback
o To capture a still image during playback Pause the playback and press the SNAPSHOT button. o Usable operation buttons during playback (*) During video playback During still image playback d / e Playback/pause Start/pause slideshow u Stop (returns to index screen) Stop (returns to index screen) g A...
Page 18 - Playing Back on TV; Playing back in HD quality; Connecting to the HDMI connector
Playing Back on TV 1 Connect to a TV. * Refer also to the instruction manual of the TV in use. 0 Turn off the camcorder by pressing the M button for about 2 seconds. o Playing back in HD quality If you are using an HDTV, you can play back in HD quality by connecting to the HDMI mini connector. Conne...
Page 19 - Playing back in standard quality; Connecting to the AV connector; When images look unnatural on the TV
o Playing back in standard quality If you are using a conventional TV, you can play back in standard quality by connecting to the AV connector. Connecting to the AV connector . AV Red White Yellow TV Audio Input (R) Audio Input (L) Video Input Video Input AV Cable (Provided) To AV Connector 2 Connec...
Page 20 - Copying Files; Copying
Copying Files You can create discs or copy the files on this unit by connecting it to various devices. I : Recordable and playable F : Playable only — : Not applicable Media Selection Standard Quality HD Quality Page . (VHS Tape) . (DVD Disc) . (DVD Disc) . (Blu-ray Disc) . (Device’s internal HDD) D...
Page 21 - Connect the USB cable provided with; To play back the created disc
Creating Discs with a DVD Writer or External Blu-ray Drive While a DVD writer is used in the following explanation, the same operations apply for an external Blu-ray drive. 1 Connect the USB cable and the AC adapter. 0 Turn off the camcorder by pressing the M button for about 2 seconds. A Connect th...
Page 22 - Copying All Files; “YES”; When “DO YOU WANT TO
Copying All Files Select video or still image mode. 1 Tap “CREATE FROM ALL” (video) or “SAVE ALL” (still image). . CREATE FROM ALL VIDEO BACKUP You can change the media to save to by selecting “CHANGE REC. MEDIA”. (For details, refer to the Detailed User Guide.) 0 Selecting “Blu-ray DISC” enables yo...
Page 23 - Selecting Files to Copy; CREATE BY DATE/SAVE BY; Tap to select a recording date.; SELECT FROM SCENES/SELECT; After selecting all the files, tap “SAVE”.; To check the disc created
Selecting Files to Copy Select video or still image mode. 1 Tap “SELECT AND CREATE” (video) or “SELECT AND SAVE” (still image). . SELECT AND CREATE VIDEO BACKUP 0 You can change the media to save to by selecting “CHANGE REC. MEDIA”. (For details, refer to p. 22 or the Detailed User Guide.) 2 Tap on ...
Page 24 - Preparation on TV and VCR/DVD recorder
Dubbing Files by Connecting to a DVD Recorder or VCR You can dub videos in standard quality by connecting to a DVD recorder or VCR. Refer also to the instruction manuals of the TV, DVD recorder, VCR, etc. 1 Connect to a VCR/DVD recorder. 0 Turn off the camcorder by pressing the M button for about 2 ...
Page 25 - Operating the Menu; To exit the screen; For more information on the settings,; Further Information
Operating the Menu You can configure various settings using the menu. 1 Tap “MENU”. 0 The menu differs according to the mode in use. 0 Tap “ V ” to display the face short cut menu. 2 Tap the desired menu. . FOCUS ASSIST COLOR FOCUS ASSIST FOCUS SCENE SELECT VIDEO 0 Tap “ Q ” to display the “COMMON” ...
Page 26 - Recordable Time/Number of Images
Recordable Time/Number of Images You can check the video recording time by pressing the INFO button. Approximate Video Recording Time Quality Built-in Memory SDHC/SDXC Card 16 GB 4 GB 8 GB 16 GB 32 GB 48 GB 64 GB UXP 1 h 20 m 20 m 40 m 1 h 20 m 2 h 50 m 4 h 20 m 5 h 50 m XP 2 h 30 m 1 h 2 h 4 h 10 m...
Page 27 - Troubleshooting; Refer to the FAQ of new products on JVC’s website.
Troubleshooting If you encounter problems with this unit, check the following before requesting service. 1 Refer to “Trouble” below.2 Refer to the “Troubleshooting” section in the “Detailed User Guide”. If you have difficulties operating the unit, refer to the detailed descriptions in the “Detailed ...
Page 29 - Cautions
Cautions Battery Pack The supplied battery pack is a lithium-ion battery. Before using the supplied battery pack or an optional battery pack, be sure to read the following cautions: • To avoid hazards ... do not burn. ... do not short-circuit the terminals. Keep it away from metallic objects when no...
Page 31 - Specifications
Specifications Camera Power supply Using AC adapter: DC 5.2 V, Using battery pack: DC 3.6 V Power consumption 3.7W (when “MONITOR BRIGHTNESS” is set to “STANDARD”) Dimensions (W x H x D) 54 mm x 62 mm x 121 mm (W x H x D: excluding grip belt)Mass Approx. 310 g (camera only), Approx. 350 g (including...
Page 32 - Index
Index A AC adapter ................................. 8, 29 AV Connection ......................... 19, 24 B Battery Pack ............................... 8, 29 C Clock Adjust ................................... 12 Component Connection ................. 18 D Date/Time Setting ............................
Page 33 - Краткое руководство пользователя; Доступ к содержимому веб-сайта также можно получить с; RU FR
ВИДЕОКАМЕРА GZ-HM855 F Краткое руководство пользователя Благодарим вас за покупку данного продукта JVC. Перед использованием прочитайте информацию по технике безопасности и мерам предосторожности, которая изложена на стр. 2 и стр. 29, чтобы гарантировать безопасное использование данного продукта. . ...
Page 34 - Техника безопасности
Техника безопасности BHИMAHИE: ДЛЯ ПPEДOTВPAЩEHИЯ OПACHOCTИBOCПЛAMEHEHИЯ ИЛИ ЭЛEKTPИЧECKOГOУДAPA HE ПOДBEPГAЙTE ДAHHЫЙ AППAPATBOЗДEЙCTBИЮ ДOЖДЯ ИЛИ BЛAГИ. ПРИМЕЧАНИЯ: • Табличка с техническими данными и мерыпредосторожности расположены на нижнейи/или задней стороне основного устройства.Пластинка с с...
Page 36 - Содержание; Дополнительная информация; программного обеспечения на данном аппарате.; Проверка комплектующих
Содержание Техника безопасности ...................... 2 Проверка комплектующих ................ 4 Названия частей и функций .............. 5 Названия кнопок и функций на ЖК- мониторе ............................................ 6 Использование сенсорного экрана ........................................
Page 37 - Присоединение ферритового фильтра; Названия частей и функций
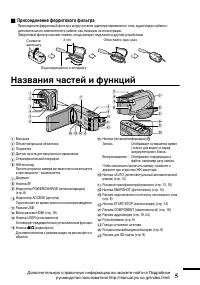
o Присоединение ферритового фильтра Присоедините ферритовый фильтр к шнуру питания адаптера переменного тока, аудио/видео кабеля и дополнительного компонентного кабеля, как показано на иллюстрации. Ферритовый фильтр снижает помехи, когда аппарат подключен к другим устройствам. . Подсоединяется к апп...
Page 38 - Названия кнопок и функций на ЖК-мониторе
Названия кнопок и функций на ЖК-мониторе Следующие экраны отображаются во время режимов видео и фото и функционируют в качестве сенсорных экранов. (стр. 7) Экран записи (видео/фото) 1 6 2 3 4 5 A Кнопка меню ярлыков лиц Отображает экран ярлыков функций распознавания лица. B Кнопка трансфокации C Кно...
Page 39 - Использование сенсорного экрана; ПРИМЕЧАНИЕ
Экран указателя 2011 2011 1 2 4 3 5 6 7 A Кнопка даты B Кнопка режима записи/воспроизведения Для переключения с режима записи на режим воспроизведения и обратно. C Кнопка переключения экрана указателя (стр. 16) D Кнопку удалить (стр. 16) E Кнопка носителя воспроизведения Переключает между SD-картой ...
Page 40 - Зарядка аккумуляторного блока; Отсоединение аккумуляторного блока; Подключите шнур питания к сети.; Приступая к работе
Зарядка аккумуляторного блока (Низ камеры) Отсоединение аккумуляторного блока Зарядка завершена: Гаснет Идет зарядка: Мигает Индикатор зарядки Подключите шнур питания к сети. Сетевой адаптер к сетевой розетке(110 V 㨪 240 V) Крышка Подключите камеру к источнику постоянного тока. Значок Выровняйте вер...
Page 41 - Регулировка ручного ремня; Извлечение карты; Приступая к
Регулировка ручного ремня Подушечка Прикрепите подушечку Отрегулируйте длину ремня Откиньте подушечку Установка SD-карты Чтобы активировать запись на карту, необходимо настроить выбор носителя. (стр. 11) Если карты нет, установите выбор носителя на „ВСТРОЕННАЯ ПАМЯТЬ“ для записи. По умолчанию устано...
Page 43 - Использование SD-карты; которые использовались на
o Использование SD-карты Запись на карту может быть осуществлена, когда „НОСИТЕЛЬ ДЛЯ ВИДЕО“ или „НОСИТЕЛЬ ДЛЯ ФОТО“ в меню „ОБЩЕЕ“ установлены на „SD- КАРТА“. A Откройте ЖК-монитор. 0 Аппарат включится. B Нажмите „MENU“. C Нажмите „ Q “. D Нажмите „НОСИТЕЛЬ ДЛЯ ВИДЕО“ или „НОСИТЕЛЬ ДЛЯ ФОТО“. НОСИТ...
Page 44 - Настройка часов; Переустановка часов
Настройка часов 1 Откройте ЖК-монитор. . 0 Аппарат включится. При закрытии ЖК- монитора аппарат автоматически выключается. 2 Нажмите „ДА“, когда отобразится „УСТАНОВ. ДАТУ/ВРЕМЯ!“. . НЕТ ДА УСТАНОВ. ДАТУ/ВРЕМЯ! 3 Установите дату и время. . 1 2011 1 10 00 УСТАН. ВРЕМЯ ДАТА НАСТРОЙКА ЧАСОВ 0 При нажат...
Page 45 - Видеосъемка; Обозначения во время видеозаписи; Запись
Видеосъемка Вы можете производить съемку, не устанавливая настройки, используя интеллектуальный автоматический режим. Такие настройки, как экспозиция и фокус будут автоматически отрегулированы в соответствии с условиями съемки. 0 В случае особых условий съемки, например съемки человека и т.д., соотв...
Page 46 - Регистрация лиц
ПРИМЕЧАНИЕ 0 Приблизительное время видеозаписи при использовании прилагающегося аккумуляторного блока – около 40 мин. (стр. 26) 0 Не отсоединяйте аккумуляторный блок, адаптер переменного тока или SD-карту, когда индикатор доступа горит. Записанные данные могут стать непригодными для последующего вос...
Page 47 - Фотосъемка; Нажмите полностью; Установите фокус на необходимом объекте.; Обозначения во время фотосъемки
Фотосъемка Загорается во время фотосъемки Нажмите полностью Сделайте фото. Загорается зеленым, когда фокусировка завершена Нажмите наполовину Установите фокус на необходимом объекте. Выберите режим фотосъемки. 0 Также можно нажать Q на сенсорном экране, чтобы начать запись. Однако, фокус не может бы...
Page 48 - Воспроизведение/удаление файлов на аппарате; Воспроизведение
Воспроизведение/удаление файлов на аппарате Выберите и начните воспроизведение записанных видеофайлов или фотографий с экрана указателя (отображаются эскизы). . 2011 2011 СНЯТЬ ВСЕ ВЫБР. ВСЕ УДАЛИТЬ Нажмите „OK“. Когда появится подтверждающее сообщение, нажмите „ВЫПОЛНИТЬ“. На выбранном файле появит...
Page 49 - Фотосъемка во время воспроизведения
o Фотосъемка во время воспроизведения Установите камеру в режим паузы при воспроизведении и нажмите кнопку SNAPSHOT. o Действующие кнопки операций во время воспроизведения (*) Во время воспроизведения видео Во время воспроизведения фото d / e Воспроизведение/пауза Пуск/пауза слайд-шоу u Остановка (в...
Page 50 - Воспроизведение на экране телевизора; Воспроизведение с высоким разрешением; Подключение к разъему HDMI
Воспроизведение на экране телевизора 1 Подключите камеру к телевизору. * Также обратитесь к руководству по эксплуатации телевизора. 0 Выключите питание камеры, нажав кнопку M и удерживая ее около 2 секунд. o Воспроизведение с высоким разрешением Если у вас есть телевизор с высоким разрешением, можно...
Page 51 - Воспроизведение в стандартном качестве; Подключение к разъему аудио/видео; Если изображение на экране телевизора выглядит ненатурально
o Воспроизведение в стандартном качестве Если вы используете стандартный телевизор, можно воспроизвести запись в стандартном качестве, подключив его к разъему аудио/видео. Подключение к разъему аудио/видео . AV Красный Белый Желтый Телевизор Вход аудиосигнала (правый) Вход аудиосигнала (левый) Вход ...
Page 52 - Копирование файлов; Копирование
Копирование файлов Вы можете записывать диски или копировать файлы с этой камеры, подсоединив ее к различным устройствам. I : Запись и воспроизведение F : Только воспроизведение — : Неприменимо Выбор носителя Стандартное качество Высокое разрешение Страница . (Кассета VHS) . (Диск DVD) . (Диск DVD) ...
Page 53 - к записывающему устройству DVD.; Воспроизведение созданного; Совместимые записывающие
Создание дисков на записывающем устройстве DVD или внешнем дисководе Blu-ray Хотя в следующем описании используется записывающее устройство DVD, те же операции применимы к внешнему дисководу Blu-ray. 1 Подключите USB-кабель и адаптер переменного тока. 0 Выключите питание камеры, нажав кнопку M и уде...
Page 54 - Копирование всех файлов; При появлении „ВЫ ХОТИТЕ
Копирование всех файлов Выберите режим видео или фото. 1 Нажмите „СОЗДАТЬ ИЗ ВСЕГО“ (видео) или „СОХРАНИТЬ ВСЕ“ (фото). . СОЗДАТЬ ИЗ ВСЕГО РЕЗЕРВ. КОПИР. ВИДЕО Вы можете выбрать носитель, на который нужно сохранить, выбрав „ИЗМЕН. НОСИТЕЛЬ ЗАП.“. (Дополнительную справочную информацию вы можете найти...
Page 55 - Выбор файлов для копирования; СОЗДАТЬ ПО ДАТЕ/СОХРАНИТЬ ПО ДАТЕ; Нажмите, чтобы выбрать дату; ВЫБРАТЬ ИЗ СЦЕН/ВЫБРАТЬ; После выбора всех файлов нажмите; Проверка созданного диска
Выбор файлов для копирования Выберите режим видео или фото. 1 Нажмите „ВЫБРАТЬ И СОЗДАТЬ“ (видео) или „ВЫБРАТЬ И СОХРАНИТЬ“ (фото). . ВЫБРАТЬ И СОЗДАТЬ РЕЗЕРВ. КОПИР. ВИДЕО 0 Вы можете выбрать носитель, на который нужно сохранить, выбрав „ИЗМЕН. НОСИТЕЛЬ ЗАП.“. (Дополнительную справочную информацию ...
Page 56 - Копирование файлов с подключением к; Подготовка телевизора и; Подготовка данного аппарата
Копирование файлов с подключением к видеомагнитофону/DVD-рекордеру Вы можете копировать видео стандартного качества с этого устройства, подсоединив его к видеомагнитофону/DVD-рекордеру. Также обратитесь к руководствам по эксплуатации телевизора, DVD-рекордера, видеомагнитофона и т.д. 1 Подсоедините ...
Page 57 - Управление меню; Выход из экрана; Дополнительную справочную; JVC
Управление меню Вы можете настроить различные установки с использованием меню. 1 Нажмите „MENU“. 0 Меню выглядит по-разному в зависимости от используемого режима. 0 Нажмите „ V “, чтобы отобразить меню ярлыков лиц. 2 Нажмите желаемое меню. . ЦВЕТ КОНТУРА ФОКУС. ПОМОЩЬ ПРИ ФОКУС. ФОКУСИРОВКА ВЫБОР СЦ...
Page 58 - Время записи/количество фотографий
Время записи/количество фотографий Проверить время записи можно, нажав кнопку INFO. Приблизительное время видеозаписи Качество Встроенная память SDHC/SDXC-карта 16 ГБ 4 ГБ 8 ГБ 16 ГБ 32 ГБ 48 ГБ 64 ГБ UXP 1 ч 20 мин 20 мин 40 мин 1 ч 20 мин 2 ч 50 мин 4 ч 20 мин 5 ч 50 мин XP 2 ч 30 мин 1 ч 2 ч 4 ч ...
Page 59 - Поиск и устранение неисправностей; нормальному функционированию.
Поиск и устранение неисправностей Если у вас возникнут проблемы с этим аппаратом, проверьте следующее, прежде чем обращаться в сервис-центр. 1 См. „Неисправность“ ниже.2 См. раздел „Устранение неисправностей“ в „Подробное руководство пользователя“ . Если у вас возникли трудности при работе с аппарат...
Page 61 - Внимание
Внимание Аккумуляторный б лок Прилагаемый аккумуляторныйблок является ионно-литиевой батареей. Передиспользованием прилагаемогоили дополнительногоаккумуляторного блокапрочитайте следующиепредупреждения: Контакты • Во избежание возникновения опасности ... не бросайте в огонь. не допускайте замыкания ...
Page 63 - Технические характеристики
Технические характеристики Камера Питание При использовании адаптера переменного тока: 5,2 В постоянного тока, при использовании аккумуляторного блока: 3,6 В постоянного тока Потребляемая мощность 3,7 Вт (когда „РЕГ. ЯРКОСТИ ДИСПЛЕЯ“ установлена на „СТАНДАРТ“) Размеры (ширина х высота х глубина) 54 ...
Page 64 - Указатель
Указатель А Адаптер переменного тока ...... 8, 29 Аккумуляторный блок .............. 8, 29 В Время записи ................................ 26 Ж ЖК-монитор ................................. 29 К Количество фотографий .............. 26 Копирование (дублирование) ..... 24 Н Настройка часов ...............
Page 65 - Guide de l’utilisateur; Vous pouvez également accéder au site web à partir du logiciel
CAMÉSCOPE GZ-HM855 F Guide de l’utilisateur Merci d’avoir acheté ce produit JVC. Avant toute utilisation, veuillez lire les précautions de sécurité et les mises en garde sur p. 2 et p. 29 pour pouvoir utiliser le produit en toute sécurité. . Manuel d’utilisation Un “Guide de l’utilisateur” (ce manue...
Page 66 - Précautions de sécurité
Précautions de sécurité AVERTISSEMENT : POUR ÉVITERLES RISQUES D’INCENDIE OUD’ÉLECTROCUTION, NE PAS EXPOSERL’APPAREIL À LA PLUIE NI À L’HUMIDITÉ. REMARQUES : • La plaque d’identification et l’avertissement desécurité se trouvent sous l’appareil et/ou au dos.La plaque de numéro de série se trouve sur...
Page 68 - Contenu; Informations supplémentaires; Vérifier les accessoires
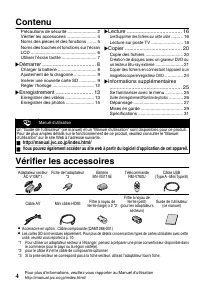
Contenu Précautions de sécurité ....................... 2 Vérifier les accessoires ........................ 4 Noms des pièces et des fonctions ....... 5 Noms des touches et fonctions sur l’écran LCD ..................................................... 6 Utiliser l’écran tactile .......................
Page 69 - Fixer le filtre à noyau de ferrite; Noms des pièces et des fonctions
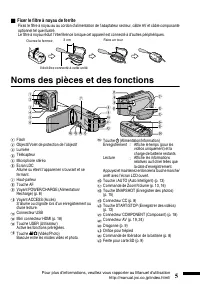
o Fixer le filtre à noyau de ferrite Fixez le filtre à noyau au au cordon d’alimentation de l’adaptateur secteur, câble AV et câble composante optionnel tel que illustré. Le filtre à noyau réduit l’interférence lorsque cet appareil est connecté à d’autres périphériques. . Il doit être connecté à cet...
Page 70 - Noms des touches et fonctions sur l’écran LCD
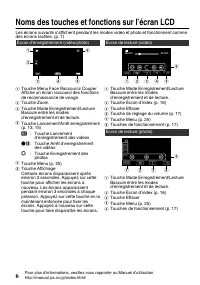
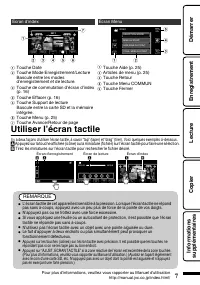
Noms des touches et fonctions sur l’écran LCD Les écrans suivants s’affichent pendant les modes vidéo et photo et fonctionnent comme des écrans tactiles. (p. 7) Écran d’enregistrement (vidéo/photo) 1 6 2 3 4 5 A Touche Menu Face Raccourcir Couper Affiche un écran raccourci des fonctions de reconnais...
Page 71 - Utiliser l’écran tactile; REMARQUE
Écran d’index 2011 2011 1 2 4 3 5 6 7 A Touche Date B Touche Mode Enregistrement/Lecture Bascule entre les modes d’enregistrement et de lecture. C Touche de commutation d’écran d’index (p. 16) D Touche Effacer (p. 16) E Touche Support de lecture Bascule entre la carte SD et la mémoire intégrée. F To...
Page 72 - Charger la batterie; Pour retirer la batterie; Branchez le connecteur CC.; Démarrer
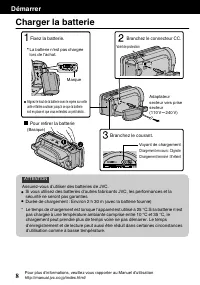
Charger la batterie (Basique) Pour retirer la batterie Chargement terminé : S’éteint Chargement en cours : Clignote Voyant de chargement Branchez le courant. Adaptateur secteur vers prise secteur(110 V 㨪 240 V) Volet de protection Branchez le connecteur CC. Marque Alignez le haut de la batterie avec...
Page 73 - Ajustement de la dragonne; Insérer une nouvelle carte SD; Pour retirer la carte
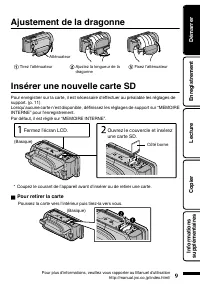
Ajustement de la dragonne Atténuateur Fixez l’atténuateur Ajustez la longueur de la dragonne Tirez l’atténuateur Insérer une nouvelle carte SD Pour enregistrer sur la carte, il est nécessaire d’effectuer au préalable les réglages de support. (p. 11) Lorsqu’aucune carte n’est disponible, définissez l...
Page 75 - Toutes les données de la carte
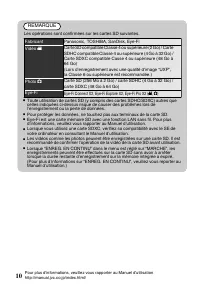
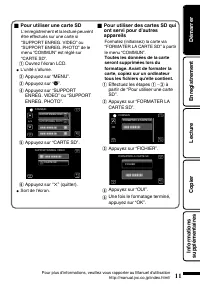
o Pour utiliser une carte SD L’enregistrement et la lecture peuvent être effectués sur une carte si “SUPPORT ENREG. VIDEO” ou “SUPPORT ENREG. PHOTO” de le menu “COMMUN” est réglé sur “CARTE SD”. A Ouvrez l’écran LCD. 0 L’unité s’allume. B Appuyez sur “MENU”. C Appuyez sur “ Q ”. D Appuyez sur “SUPPO...
Page 76 - Régler l’horloge; Pour réinitialiser l’horloge
Régler l’horloge 1 Ouvrez l’écran LCD. . 0 L’unité s’allume. Lorsque l’écran LCD est fermé, l’unité s’éteint. 2 Appuyez sur “OUI” lorsque “REGLER DATE/HEURE !” est affiché. . NON OUI REGLER DATE/HEURE ! 3 Réglez la date et l’heure. . 1 2011 1 10 00 REGLER HEURE DATE REGLAGE DE L'HORLOGE 0 Lorsque l’...
Page 77 - Enregistrer des vidéos; Enregistrement
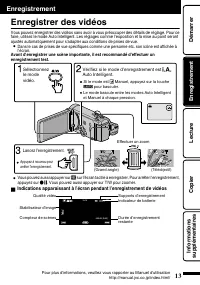
Enregistrer des vidéos Vous pouvez enregistrer des vidéos sans avoir à vous préoccuper des détails de réglage. Pour ce faire, utilisez le mode Auto Intelligent. Les réglages comme l’exposition et la mise au point seront ajustés automatiquement pour s’adapter aux conditions de prises de vue. 0 Dans l...
Page 78 - Inscription de visage
REMARQUE 0 La durée d’enregistrement restante de la batterie fournie est d’environ 40 minutes. (p. 26) 0 Ne retirez pas la batterie, l’adaptateur secteur ou la carte SD lorsque le voyant d’accès est allumé. Les données enregistrées peuvent devenir illisibles. o Inscription de visage En enregistrant ...
Page 79 - Enregistrer des photos; Appuyez entièrement; Effectuez la mise au point du sujet.; Indications apparaissant à l’écran lors de l’enregistrement d’une
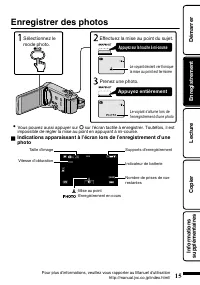
Enregistrer des photos Le voyant s’allume lors de l’enregistrement d’une photo Appuyez entièrement Prenez une photo. Le voyant devient vert lorsque la mise au point est terminée Appuyez sur la touche à mi-course Effectuez la mise au point du sujet. Sélectionnez le mode photo. 0 Vous pouvez aussi app...
Page 80 - Lire/Supprimer des fichiers sur cette unité; Lecture
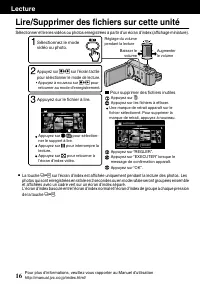
Lire/Supprimer des fichiers sur cette unité Sélectionner et lire les vidéos ou photos enregistrées à partir d’un écran d’index (affichage miniature). . 2011 2011 EFF. TOUT SEL. TOUT SUPPRIMER Appuyez sur “OK”. Appuyez sur “EXECUTER” lorsque le message de confirmation apparaît. Une marque de retrait ...
Page 81 - Pour capturer une photo durant la lecture
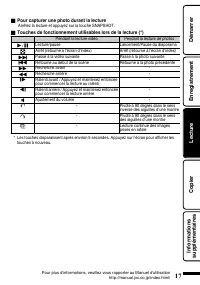
o Pour capturer une photo durant la lecture Arrêtez la lecture et appuyez sur la touche SNAPSHOT. o Touches de fonctionnement utilisables lors de la lecture (*) Pendant la lecture vidéo Pendant la lecture de photos d / e Lecture/pause Lancement/Pause du diaporama u Arrêt (retourne à l’écran d’index)...
Page 82 - Lecture sur poste TV; Lecture en qualité HD; Connecter au connecteur HDMI
Lecture sur poste TV 1 Branchez l’appareil à la TV. * Pour plus de détails, consultez le manuel d’utilisation de votre téléviseur. 0 Éteignez le caméscope en appuyant sur la touche M pendant environ 2 secondes. o Lecture en qualité HD Si vous utilisez un HDTV, vous pouvez lire en qualité HD, en le c...
Page 83 - Lecture en qualité standard; Connecter au connecteur AV; Lorsque les photos ne rendent pas un aspect naturel sur la TV
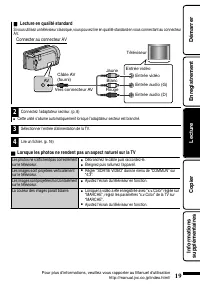
o Lecture en qualité standard Si vous utilisez un téléviseur classique, vous pouvez lire en qualité standard en vous connectant au connecteur AV. Connecter au connecteur AV . AV Rouge Blanc Jaune Téléviseur Entrée audio (D) Entrée audio (G) Entrée vidéo Entrée vidéo Câble AV (fourni) Vers connecteur...
Page 84 - Copie des fichiers; Copier
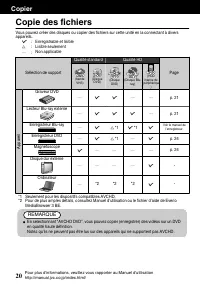
Copie des fichiers Vous pouvez créer des disques ou copier des fichiers sur cette unité en la connectant à divers appareils. I : Enregistrable et lisible F : Lisible seulement — : Non applicable Sélection de support Qualité standard Qualité HD Page . (bande VHS) . (Disque DVD) . (Disque DVD) . (Disq...
Page 85 - Raccordez le câble USB fourni au; Pour lire le disque créé
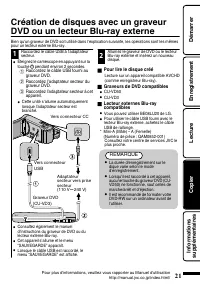
Création de disques avec un graveur DVD ou un lecteur Blu-ray externe Bien qu’un graveur de DVD soit utilisé dans l’explication suivante, les opérations sont les mêmes pour un lecteur externe Blu-ray. 1 Raccordez le câble USB à l’adaptateur secteur. 0 Éteignez le caméscope en appuyant sur la touche ...
Page 86 - Copier tous les fichiers; “OUI”; Lorsque “FINALISER ?” apparaît
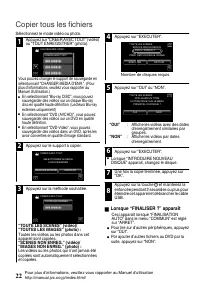
Copier tous les fichiers Sélectionnez le mode vidéo ou photo. 1 Appuyez sur “CREER AVEC TOUT” (vidéo) ou “TOUT ENREGISTRER” (photo). . CREER AVEC TOUT SAUVEGARDE VIDEO Vous pouvez changer le support de sauvegarde en sélectionnant “CHANGER MEDIA D'ENR.”. (Pour plus d’informations, veuillez vous rappo...
Page 87 - Sélectionner les fichiers à copier; CREER PAR DATE/ENREGISTRER PAR DATE; Appuyez sur sélectionner la date; SELECTION VIA SCENES/CHOISIR DES; Sélectionnez un fichier.; Vérification d’un disque créé
Sélectionner les fichiers à copier Sélectionnez le mode vidéo ou photo. 1 Appuyez sur “CHOISIR ET CREER” (vidéo) ou “CHOISIR/ENREGISTRER” (photo). . CHOISIR ET CREER SAUVEGARDE VIDEO 0 Vous pouvez changer le support de sauvegarde en sélectionnant “CHANGER MEDIA D'ENR.”. (Pour plus d’informations, ve...
Page 88 - Préparation de la TV et du magnétoscope/
Copier des fichiers en connectant l’appareil à un magnétoscope/enregistreur DVD Vous pouvez copier des vidéos en qualité standard en connectant l’appareil à magnétoscope ou à un enregistreur DVD. Pour plus de détails, consultez le manuel d’utilisation du téléviseur, de l’enregistreur DVD, du magnéto...
Page 89 - Se familiariser avec le menu; Pour quitter l’écran; Pour plus d’informations concernant
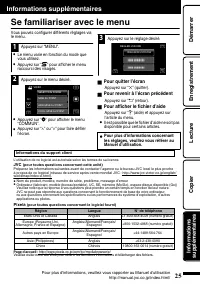
Se familiariser avec le menu Vous pouvez configurer différents réglages via le menu. 1 Appuyez sur “MENU”. 0 Le menu varie en fonction du mode que vous utilisez. 0 Appuyez sur “ V ” pour afficher le menu raccourci des visages. 2 Appuyez sur le menu désiré. . COUL. MISE AU POINT AIDE MISE AU POINT MI...
Page 90 - Durée d’enregistrement/Nombre de photos
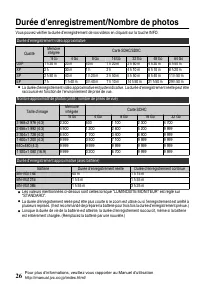
Durée d’enregistrement/Nombre de photos Vous pouvez vérifier la durée d’enregistrement de vos vidéos en cliquant sur la touche INFO. Durée d’enregistrement vidéo approximative Qualité Mémoire intégrée Carte SDHC/SDXC 16 Go 4 Go 8 Go 16 Go 32 Go 48 Go 64 Go UXP 1 h 20 m 20 m 40 m 1 h 20 m 2 h 50 m 4 ...
Page 91 - Dépannage; LCD et cet appareil se rallume automatiquement.
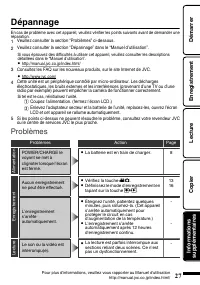
Dépannage En cas de problème avec cet appareil, veuillez vérifier les points suivants avant de demander une réparation. 1 Veuillez consulter la section “Problèmes” ci-dessous.2 Veuillez consulter la section “Dépannage” dans le “Manuel d’utilisation”. Si vous éprouvez des difficultés à utiliser cet a...
Page 93 - Mises en garde
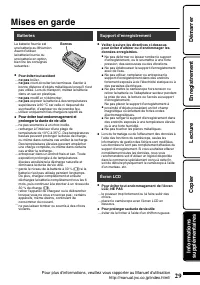
Mises en garde Support d’enregistrement • Veiller à suivre les directives ci-dessouspour éviter d’altérer ou d’endommager lesdonnées enregistrées. • Lors du formatage ou de l’effacement des données àl’aide des fonctions du caméscope, seules lesinformations de gestion des fichiers sont modifiées.Les ...
Page 95 - Spécifications
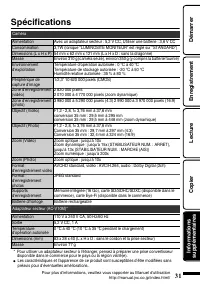
Spécifications Caméra Alimentation Avec un adaptateur secteur : 5,2 V CC, Utiliser une batterie : 3,6 V CC Consommation 3,7W (lorsque “LUMINOSITE MONITEUR” est réglé sur “STANDARD”) Dimensions (L x H x P) 54 mm x 62 mm x 121 mm (L x H x D : sans la dragonne)Masse Environ 310 g (caméra seule), enviro...