JennAir JIC4536KB - User Manual

JennAir JIC4536KB Hob – User Manual, read for free online in PDF format. We hope this helps you resolve any issues you may have. If you have further questions, please contact us through the contact form.


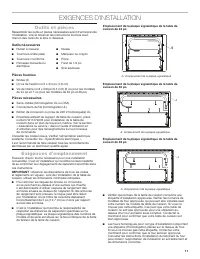
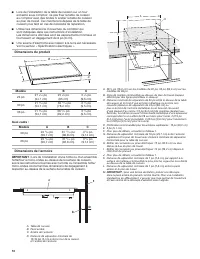


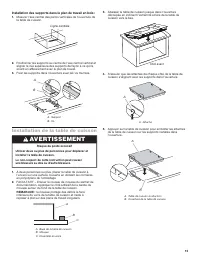


Table of Contents:
- Page 2 – COOKTOP SAFETY
- Page 3 – INSTALLATION REQUIREMENTS; Tools and Parts; Tools Needed; Location Requirements
- Page 4 – Product Dimensions; Cabinet Dimensions
- Page 5 – Flush Installation - Frameless; Electrical Requirements; WARNING
- Page 6 – Before You Make the Electrical Connection:; INSTALLATION INSTRUCTIONS; Prepare Location; Install Brackets; To Install Brackets into Marble Countertop:
- Page 7 – To Install Brackets into Wood Countertop:; Install Cooktop
- Page 8 – Make Electrical Connection; -Wire Cable from Home Power Supply
- Page 9 – Complete Installation; If you need Assistance or Service:
- Page 10 – SÉCURITÉ DE LA TABLE DE CUISSON; Votre sécurité et celle des autres est très importante.; AVERTISSEMENT
- Page 11 – EXIGENCES D’INSTALLATION; Outils et pièces; Outils nécessaires; Exigences d’emplacement
- Page 12 – Dimensions du produit; Dimensions de l’armoire
- Page 13 – Installation en affleurement – sans cadre; Spécifications électriques
- Page 14 – Avant d’établir la connexion électrique :; INSTRUCTIONS D’INSTALLATION; Préparation de l’emplacement; Installation des supports dans le plan de travail en
- Page 15 – Installation des supports dans le plan de travail en bois :; Installation de la table de cuisson
- Page 16 – Raccordement électrique; Câble à 4 conducteurs depuis l’alimentation
- Page 17 – Câble à 3 conducteurs depuis l’alimentation; Terminer l’installation; Pour obtenir de l’assistance ou une visite de service :
- Page 18 – SEGURIDAD DE LA SUPERFICIE DE COCCIÓN; Su seguridad y la seguridad de los demás es muy importante.; ADVERTENCIA
- Page 19 – REQUISITOS DE INSTALACIÓN; Herramientas y piezas; Herramientas necesarias; Requisitos de ubicación
- Page 20 – Medidas del producto; Dimensiones del gabinete
- Page 21 – Instalación al ras - Sin marco; Requisitos eléctricos
- Page 22 – INSTRUCCIONES DE INSTALACIÓN; Preparación de la ubicación; Para instalar los soportes en un mostrador de mármol:; Instalación de la superficie
- Page 23 – Conexión eléctrica
- Page 24 – Cable de 4 hilos desde el suministro eléctrico; Finalización de la instalación; Si necesita ayuda o servicio técnico:
INSTALLATION INSTRUCTIONS
24", 30" AND 36"
ELECTRIC INDUCTION COOKTOP
INSTRUCTIONS D’INSTALLATION
TABLE DE CUISSON ÉLECTRIQUE À INDUCTION
DE 24 PO, 30 PO ET 36 PO
INSTRUCCIONES DE INSTALACIÓN
SUPERFICIE DE COCCIÓN POR INDUCCIÓN ELÉCTRICA
DE 24", 30" Y 36"
Table of Contents / Table des matières / Índice
W11362914D
COOKTOP SAFETY ....................................2
INSTALLATION REQUIREMENTS .............3
Tools and Parts ........................................3
Location Requirements ............................3
Electrical Requirements ...........................5
INSTALLATION INSTRUCTIONS ...............6
Prepare Location ......................................6
Install Brackets .........................................6
Install Cooktop .........................................7
Make Electrical Connection .....................8
Complete Installation ...............................9
SÉCURITÉ DE LA TABLE DE CUISSON ..10
EXIGENCES D’INSTALLATION ...............11
Outils et pièces .......................................11
Exigences d’emplacement .....................11
Spécifications électriques
......................13
INSTRUCTIONS D’INSTALLATION ........14
Préparation de l’emplacement ...............14
Installation des supports ........................14
Installation de la table de cuisson ..........15
Raccordement électrique .......................16
Terminer l’installation .............................17
SEGURIDAD DE LA SUPERFICIE
DE COCCIÓN ............................................18
REQUISITOS DE INSTALACIÓN .............19
Herramientas y piezas ............................19
Requisitos de ubicación .........................19
Requisitos eléctricos ..............................21
INSTRUCCIONES DE INSTALACIÓN .....22
Preparación de la ubicación ..................22
Instalación de los soportes ....................22
Instalación de la superficie de cocción
...22
Conexión eléctrica .................................23
Finalización de la instalación .................24
IMPORTANT: READ AND SAVE THESE INSTRUCTIONS.
FOR RESIDENTIAL USE ONLY.
IMPORTANT : LIRE ET CONSERVER CES INSTRUCTIONS.
POUR UTILISATION RÉSIDENTIELLE UNIQUEMENT.
IMPORTANTE: LEA Y GUARDE ESTAS INSTRUCCIONES.
SOLO PARA USO RESIDENCIAL.
"Loading the manual" means you need to wait until the file loads and becomes available for online reading. Some manuals are very large, and the time they take to appear depends on your internet speed.
Summary
3 INSTALLATION REQUIREMENTS Tools and Parts Gather the required tools and parts before starting installation. Read and follow the instructions provided with any tools listed here. Tools Needed Parts Supplied ■ Brackets (2) ■ #6 x 3/4" (1.9 cm) clamping screws (4) ■ #8 x 3/8" (9.5 mm) sheet m...
4 ■ When installing cooktop over an undercounter built-in oven, do not fasten cooktop to countertop with clamps or seal cooktop to countertop. This will make the cooktop easier to remove if future servicing becomes necessary. ■ Use the countertop opening dimensions that are given with these Installa...