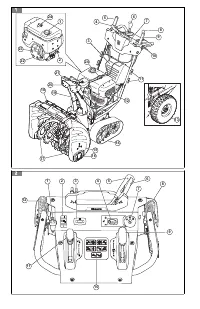
Page 10 - Product overview
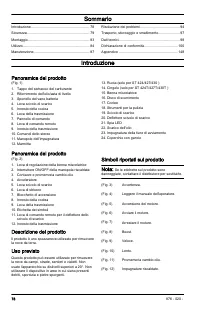
Contents Introduction............................................................. 10Safety...................................................................... 11Assembly................................................................ 14Operation.......................................................
Page 11 - Safety; Safety definitions
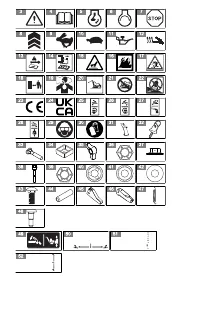
(Fig. 14) Remove spark plug cable before maintenance. (Fig. 15) Hot surface. (Fig. 16) Risk of fire. (Fig. 17) Beware of thrown objects. (Fig. 18) Keep distance to bystanders. (Fig. 19) Do not breathe in exhaust fumes. (Fig. 20) Move slowly rearward. (Fig. 21) Risk of falling. (Fig. 22) No operation...
Page 12 - Safety instructions for operation
• Disconnect the spark plug cable before you assemble the product, put the product into storage or do maintenance. • Do not use the product if it is changed from its initial specification. Do not change a part of the product without approval from the manufacturer. Only use parts that are approved by...
Page 14 - Safety instructions for maintenance; Assembly; To remove the product from the
• Tighten the fuel tank cap fully. If the fuel tank cap is not tightened, there is a risk of fire. • Move the product a minimum of 3 m / 10 ft from the position where you filled the tank before a start. • Do not fill the fuel tank fully. Heat causes the fuel to expand. Keep a space at the top of the...
Page 16 - Operation
Operation Before you start the product • Keep persons and animals away from the work area. • Do daily maintenance. See Maintenance schedule on page 18. • Make sure the ignition lead fits correctly on the spark plug. • Add oil or gasoline, if necessary. See To fill fuel on page 16. To fill the engine...
Page 18 - Maintenance; Introduction
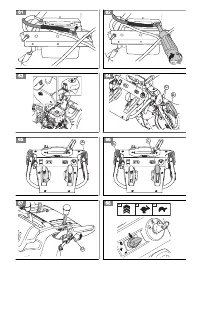
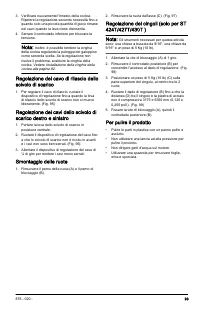
1. Loosen the adjustment nuts (A) on both sides of the product to allow each drift cutter (B) to be raised to its highest position. (Fig. 75) 2. Tighten the nuts.3. Lower the drift cutters after use. To adjust the height of the auger bucket (for ST 424T/427T/430T only) 1. Push the lever (A) down. (F...
Page 20 - Muffler
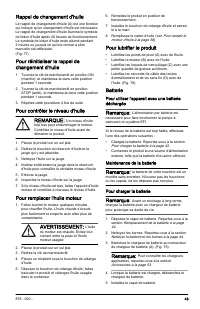
WARNING: The engine oil is hot. Avoid skin contact with the used engine oil. 2. Put the product on level ground.3. Remove the ON/OFF key.4. Put a container below the oil drain plug.5. Remove the oil drain plug, tip the product and drain the used oil in the container. 6. Put the product back to the o...
Page 22 - Drive belts
Drive belts WARNING: The v-belts on your product are of special construction and should be replaced by original equipment manufacturer (OEM) belts available from your nearest service center. To use other belts than OEM can cause personal injury or damage to the product. WARNING: The belt replacement...
Page 24 - To clean the product; Troubleshooting
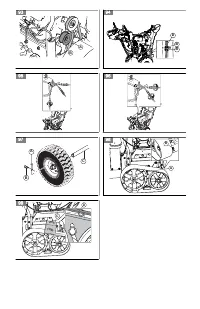
3. Put a 5 kg (10 lbs) weight (C) on top of the continuous track, in the center between the 2 wheels. 4. Turn the adjustment nut (B) until the distance (D) between the continuous track and the steel plate is between 3.175 and 6.350 mm (0.125 and 0.250 in). wide. (Fig. 99) 5. Attach the locking screw...
Page 27 - Transportation, storage and disposal; Transportation and storage
Error code Error names Error indicator continu- ously flashes times P0261 Injection error. 1 P0230 Fuel pump error. 4 P0350 Ignition coil error. 8 P0650 Error indicator fault. It is only possible to use OBD to read the error code. P0123 Electrically short circuit in the throttle position sensor. 7 P...
Page 28 - Disposal; Technical data
• Charge the battery during long-term storage. Examine and clean the battery terminals before long-term storage. Disposal • Obey the local recycling requirements and applicable regulations. • Discard all chemicals, such as engine oil or antifreeze, at a service center or at an applicable disposal lo...
Page 29 - Accessories
ST 424 ST 427 ST 430 ST 424T ST 427T ST 430T Vibration level on the handle, m/s 2 ≤ 5.56 ≤ 4.23 ≤ 3.14 ≤ 5.56 ≤ 4.23 ≤ 3.14 Accessories Approved accessories Type Article number Battery Charger Automatic 585445101 5 Husqvarna Interface box Service tool 598072804 6 Diagnostic Adapter Harness Tool for ...
Page 30 - Declaration of Conformity; EU Declaration of Conformity
Declaration of Conformity EU Declaration of Conformity We, Husqvarna AB, SE 561 82 Huskvarna, SWEDEN, declare under our sole responsibility that the represented product: Description Snow thrower Brand Husqvarna Platform / Type / Model ST 424, ST 427, ST 430, ST 424T, ST 427T, ST 430T Batch Serial nu...
Page 31 - UK Declaration of Conformity
UK Declaration of Conformity We, Husqvarna AB, SE-561 82 Huskvarna, Sweden, tel: +46-36-146500, declare on our sole responsibility that the product: Description Snow thrower Brand Husqvarna Type / Model ST 424, ST 427, ST 430, ST 424T, ST 427T, ST 430T Identification Serial numbers dating 2021 and o...
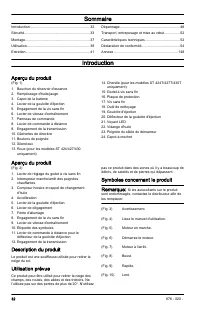
Page 32 - Aperçu du produit
Sommaire Introduction............................................................. 32Sécurité................................................................... 33Montage.................................................................. 37Utilisation.....................................................
Page 33 - Sécurité; Définitions de sécurité
(Fig. 11) Rappel de changement d'huile. (Fig. 12) Poignées chauffantes. (Fig. 13) Déposez la clé avant l'entretien. (Fig. 14) Débranchez le câble de la bougie avant l'entretien. (Fig. 15) Surface chaude. (Fig. 16) Risque d'incendie. (Fig. 17) Prenez garde aux projections d'objets. (Fig. 18) Tenez-vo...
Page 36 - Consignes de sécurité pour
Laissez un revendeur ou un centre d'entretien agréé régulièrement examiner le produit pour effectuer des réglages ou des réparations. • N'utilisez pas un produit dont les équipements de protection sont endommagés. Si le produit est endommagé, contactez un centre d'entretien agréé. SilencieuxLe silen...
Page 37 - Montage; Pour retirer le produit du carton
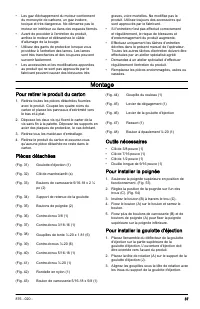
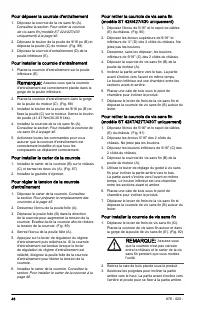
• Les gaz d'échappement du moteur contiennent du monoxyde de carbone, un gaz inodore, toxique et très dangereux. Ne démarrez pas le moteur en intérieur ou dans des espaces fermés. • Avant de procéder à l'entretien du produit, arrêtez le moteur et débranchez le câble d'allumage de la bougie. • Utilis...
Page 38 - Utilisation
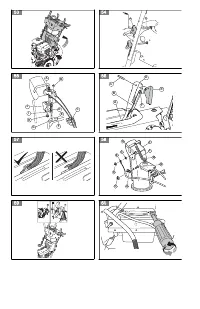
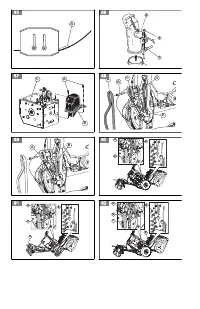
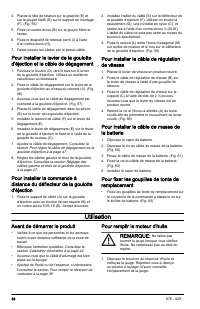
4. Placez la tête de rotation sur la goupille (E) et sur le goujon fileté (G) sur le support de montage (F). (Fig. 55) 5. Fixez un contre-écrou (B) sur le goujon fileté et serrez. 6. Fixez le dispositif de retenue carré (I) à l'aide d'un contre-écrou (H). 7. Faites passer les câbles par le passe-câb...
Page 41 - Entretien
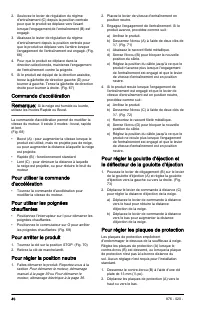
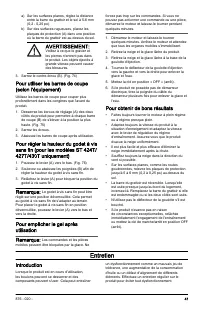
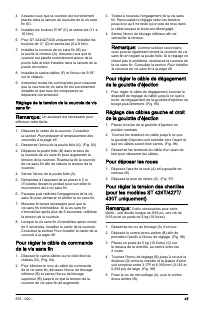
a) Sur les surfaces planes, réglez la distance entre la barre du grattoir et le sol à 5-6 mm (0,2 - 0,25 po). b) Sur des surfaces rugueuses, placez les plaques de protection (A) dans une position où la barre du grattoir est au-dessus du sol. AVERTISSEMENT: Veillez à ce que le gravier et les pierres ...
Page 48 - Pour nettoyer le produit; Dépannage
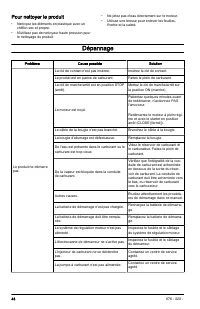
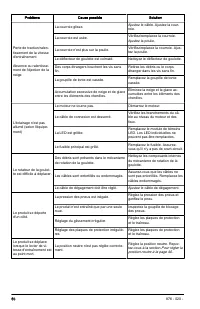
Pour nettoyer le produit • Nettoyez les éléments en plastique avec un chiffon sec et propre. • N'utilisez pas de nettoyeur haute pression pour le nettoyage du produit. • Ne jetez pas d'eau directement sur le moteur.• Utilisez une brosse pour enlever les feuilles, l'herbe et la saleté. Dépannage Prob...
Page 52 - Transport, entreposage et mise au rebut; Transport et stockage; Caractéristiques techniques
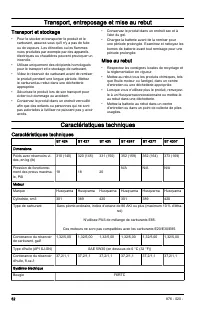
Transport, entreposage et mise au rebut Transport et stockage • Pour le stocker et transporter le produit et le carburant, assurez-vous qu'il n'y a pas de fuite ou de vapeurs. Les étincelles ou les flammes nues produites par exemple par des appareils électriques ou chaudières peuvent provoquer un in...
Page 53 - Accessoires
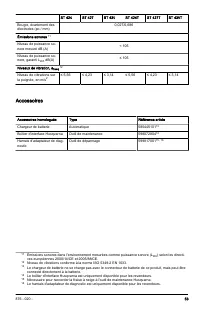
ST 424 ST 427 ST 430 ST 424T ST 427T ST 430T Bougie, écartement des électrodes (po / mm) 0,027/0,686 Émissions sonores 11 Niveau de puissance so- nore mesuré dB (A) < 105 Niveau de puissance so- nore, garanti L WA dB(A) ≤ 105 Niveaux de vibration, a hveq 12 Niveau de vibrations sur la poignée, en...
Page 54 - Déclaration de conformité; Déclaration de conformité UE
Déclaration de conformité Déclaration de conformité UE Nous, Husqvarna AB, SE 561 82 Huskvarna, SUÈDE, déclarons sous notre responsabilité exclusive que le produit représenté : Description Fraise à neige Marque Husqvarna Plate-forme / Type / Modèle ST 424, ST 427, ST 430, ST 424T, ST 427T, ST 430T L...
Page 55 - Productoverzicht
Inhoud Inleiding...................................................................55Veiligheid................................................................ 56Montage.................................................................. 60Werking..........................................................
Page 56 - Schade aan het product; Veiligheid; Veiligheidsdefinities
(Fig. 12) Verwarmde handgrepen. (Fig. 13) Verwijder de sleutel voor onderhoud. (Fig. 14) Verwijder bougie voordat u onderhoud uitvoert. (Fig. 15) Warm oppervlak. (Fig. 16) Risico op brand. (Fig. 17) Pas op voor wegschietende voorwerpen. (Fig. 18) Houd afstand tot omstanders. (Fig. 19) Adem geen uitlaa...
Page 57 - Veiligheidsinstructies voor bediening
onderhoudswerkzaamheden uit waarvoor u in deze handleiding een instructie aantreft. Alle overige onderhoudswerkzaamheden moeten door een erkend servicepunt worden uitgevoerd. • Deze handleiding kan niet alle situaties beschrijven die zich voor kunnen doen wanneer u dit product gebruikt. Wees voorzich...
Page 59 - Veiligheidsinstructies voor
GeluiddemperDe uitlaatdemper is bedoeld om het geluidsniveau zo laag mogelijk te houden en om de uitlaatgassen weg te voeren van de gebruiker.Gebruik het product niet als de geluiddemper ontbreekt of beschadigd is. Een beschadigde geluiddemper laat het geluidniveau stijgen en vergroot het risico van b...
Page 61 - Werking
2. Bevestig de ontgrendelkabel aan de hendel van de uitworptrechter bij verbindingspunt (A). (Fig. 56) 3. Controleer of de ontgrendelkabel correct op de uitworptrechter is bevestigd. (Fig. 57) 4. Plaats de ontgrendelkabel in de groef (B) op de hendel van de uitworptrechter. 5. Monteer de kabelcilinde...
Page 64 - Een goed resultaat verkrijgen; Onderhoud; Inleiding
1. Start de motor en laat deze enkele minuten draaien. Stop de motor en wacht totdat alle bewegende delen tot stilstand zijn gekomen. 2. Verwijder sneeuw en los ijs van het product.3. Verwijder sneeuw en los ijs van de onderkant van de uitworptrechter. 4. Draai de deflector van de uitworptrechter naar li...
Page 66 - Batterij; Geluiddemper
Batterij Starten met een lege accu Let op: Accuvermogen is nodig om de brandstofpomp voor het EFI-systeem te laten draaien. Voer 1 van de volgende stappen uit als het accuvermogen te laag is:• Laad de accu op, zie De accu opladen op pagina 66. • Sluit het product aan op een externe voedingsbron, zoal...
Page 70 - De spanning van de rupsbanden; Product reinigen
De spanning van de rupsbanden afstellen (alleen voor ST 424T/427T/ 430T )Let op: Gereedschappen die nodig zijn voor deze taak: een diepe dop van 9/16", een 9/16"-sleutel en een gewicht van 5 kg (10 lbs). 1. Draai de borgschroef (A) 1 slag los.2. Verwijder de achterste borgmoer (B) om toegang t...
Page 71 - Probleemoplossing
Probleemoplossing Probleem Mogelijke oorzaak Oplossing Het product start niet De veiligheidscontactsleutel is niet ingesto- ken. Plaats de veiligheidscontactsleutel. Het product bevat geen brandstof meer. Vul de brandstoftank met nieuwe, schone benzine. De AAN/UIT-sleutel is UIT. Zet de AAN/UIT-sleut...
Page 74 - Vervoer, opslag en verwerking; Transport en opslag
Foutcode Foutnamen Aantal keer knipperen van foutindicator P0230 Fout brandstofpomp. 4 P0350 Fout ontstekingsspoel. 8 P0650 Fout foutindicator. Het is alleen mogelijk om OBD te gebruiken om de foutcode te lezen. P0123 Elektrische kortsluiting in de gaskleppositiesensor. 7 P0122 Elektrische kortsluiti...
Page 75 - Technische gegevens
• Voer alle chemicaliën, zoals olie of antivries, af via een servicecentrum of een geschikte verwijderingslocatie. • Wanneer het product niet langer in gebruik is, stuur het dan naar een Husqvarna dealer of voer het af via een recyclingslocatie. • Lever de accu in bij een servicecentrum of bij een bedr...
Page 77 - Verklaring van overeenstemming; EU-verklaring van overeenstemming
Verklaring van overeenstemming EU-verklaring van overeenstemming Wij, Husqvarna AB, SE 561 82 Huskvarna, ZWEDEN, verklaren onder onze alleenverantwoordelijkheid dat het gerepresenteerde product: Beschrijving Sneeuwblazer Merk Husqvarna Platform / Type / Model ST 424, ST 427, ST 430, ST 424T, ST 427T, S...
Page 78 - Panoramica del prodotto
Sommario Introduzione............................................................ 78Sicurezza................................................................ 79Montaggio............................................................... 83Utilizzo............................................................
Page 79 - Sicurezza; Definizioni di sicurezza
(Fig. 13) Rimuovere la chiave prima della manutenzione. (Fig. 14) Smontare il cavo della candela prima della manutenzione. (Fig. 15) Superficie calda. (Fig. 16) Rischio di incendio. (Fig. 17) Prestare attenzione agli oggetti lanciati. (Fig. 18) Mantenere la distanza dalle altre persone presenti nell...
Page 82 - Istruzioni di sicurezza per la
prossimità di materiali infiammabili e/o fumi per evitare incendi. Sicurezza nell'uso del carburante AVVERTENZA: Leggere le seguenti avvertenze prima di utilizzare il prodotto. • Non avviare il prodotto nel caso in cui vi sia carburante o olio motore su di esso. Rimuovere il carburante/olio indeside...
Page 83 - Montaggio
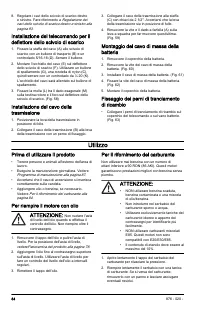
Montaggio Per rimuovere il prodotto dalla confezione 1. Rimuovere le parti sfuse incluse con il prodotto. Tagliare i quattro angoli del cartone e posare i pannelli terminali in piano. 2. Rimuovere le due viti che fissano il carter della coclea al pallet. Rimuovere le staffe in acciaio dalle piastre ...
Page 84 - Utilizzo
8. Regolare i cavi dello scivolo di scarico destro e sinistro. Fare riferimento a Regolazione dei cavi dello scivolo di scarico destro e sinistro alla pagina 93. Installazione del telecomando per il deflettore dello scivolo di scarico 1. Fissare la staffa del cavo (A) allo scivolo di scarico con un ...
Page 87 - Manutenzione; Introduzione
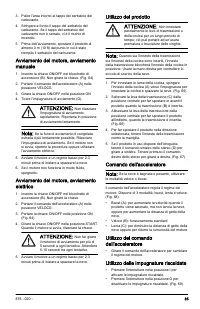
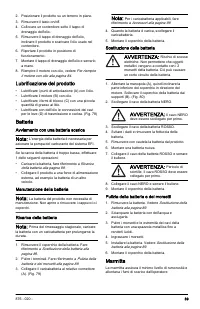
Per evitare il congelamento dopo l'usoNota: I comandi e le parti mobili possono essere ostruite da ghiaccio. Non esercitare forza eccessiva sui comandi. Se non è possibile azionare un comando o una parte, avviare il motore e lasciarlo in funzione per alcuni minuti. 1. Avviare il motore e lasciarlo g...
Page 89 - Marmitta
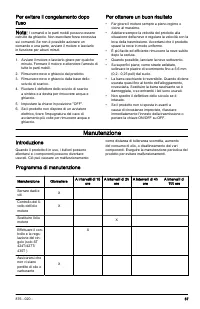
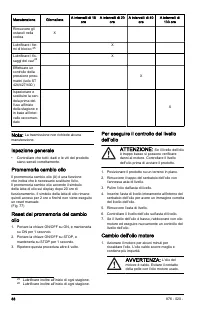
2. Posizionare il prodotto su un terreno in piano.3. Rimuovere il tasto on/off.4. Collocare un contenitore sotto il tappo di drenaggio dell'olio. 5. Rimuovere il tappo di drenaggio dell'olio, inclinare il prodotto e scaricare l'olio usato nel contenitore. 6. Riportare il prodotto in posizione di fun...
Page 92 - Regolazione del cavo di comando
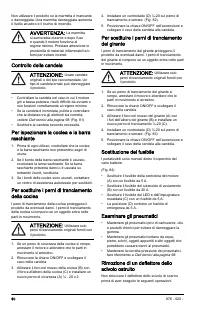
3. Allentare senza rimuovere i bulloni inferiori 5/16" (C) sui 2 lati del telaio. 4. Rimuovere la cinghia della coclea (B) dalla puleggia del motore (A). 5. Inclinare la parte posteriore verso il basso. La parte anteriore si inclina in avanti allo stesso tempo. Il bullone inferiore è una cernier...
Page 94 - Risoluzione dei problemi
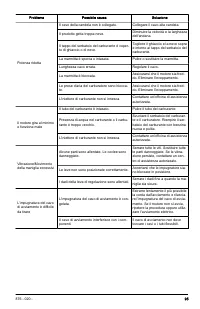
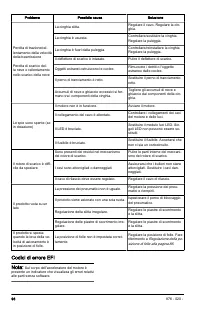
Risoluzione dei problemi Problema Possibile causa Soluzione Il prodotto non si avvia La chiave di accensione di sicurezza non è inserita. Inserire la chiave di accensione di sicurezza. Il prodotto ha esaurito il carburante. Riempire il serbatoio del carburan- te con benzina nuova e pulita. L'interru...
Page 97 - Trasporto, stoccaggio e smaltimento; Trasporto e conservazione
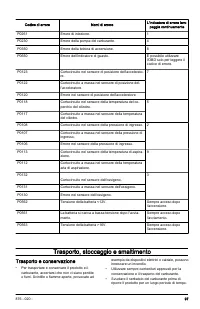
Codice di errore Nomi di errore L'indicatore di errore lam- peggia continuamente P0261 Errore di iniezione. 1 P0230 Errore della pompa del carburante. 4 P0350 Errore della bobina di accensione. 8 P0650 Errore dell'indicatore di guasto. È possibile utilizzare l'OBD solo per leggere il codice di error...
Page 98 - Smaltimento; Dati tecnici
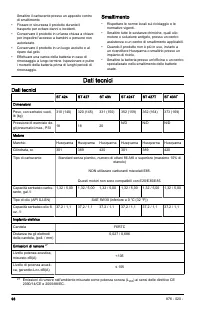
Smaltire il carburante presso un apposito centro di smaltimento • Fissare in sicurezza il prodotto durante il trasporto per evitare danni o incidenti. • Conservare il prodotto in un'area chiusa a chiave per impedire l'accesso a bambini o persone non autorizzate. • Conservare il prodotto in un luogo ...
Page 99 - Accessori
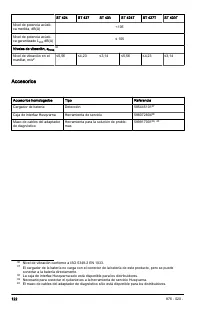
ST 424 ST 427 ST 430 ST 424T ST 427T ST 430T Livelli di vibrazioni, a hveq 28 Livello di vibrazioni sul- l'impugnatura, m/s 2 ≤ 5,56 ≤ 4,23 ≤ 3,14 ≤ 5,56 ≤ 4,23 ≤ 3,14 Accessori Accessori omologati Tipo Codice articolo Caricabatterie Automatico 585445101 29 Husqvarna Modulo interfaccia Utensile per ...
Page 100 - Dichiarazione di conformità; Dichiarazione di conformità UE
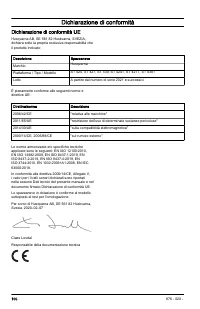
Dichiarazione di conformità Dichiarazione di conformità UE Husqvarna AB, SE 561 82 Huskvarna, SVEZIA, dichiara sotto la propria esclusiva responsabilità che il prodotto indicato: Descrizione Spazzaneve Marchio Husqvarna Piattaforma / Tipo / Modello ST 424, ST 427, ST 430, ST 424T, ST 427T, ST 430T L...
Page 101 - Descripción del producto
Contenido Introducción.......................................................... 101Seguridad..............................................................102Montaje................................................................. 106Funcionamiento.......................................................
Page 102 - Seguridad; Definiciones de seguridad
(Fig. 13) Quite la llave antes de realizar cualquier trabajo de mantenimiento. (Fig. 14) Retire el cable de la bujía antes del mantenimiento. (Fig. 15) Superficie caliente. (Fig. 16) Riesgo de incendio. (Fig. 17) Tenga cuidado con los objetos que puedan salir despedidos. (Fig. 18) Mantenga la distan...
Page 105 - Instrucciones de seguridad para el
ADVERTENCIA: El silenciador se calienta mucho durante el uso y también cuando el motor se encuentra al ralentí. Tenga cuidado cuando se encuentre cerca de materiales o gases inflamables para evitar incendios. Seguridad en el uso del combustible ADVERTENCIA: Lea las siguientes instrucciones de advert...
Page 106 - Montaje
deben llevarse a cabo en un taller de servicio autorizado. • Lleve el producto a un taller de servicio autorizado para realizar el mantenimiento de forma regular. • Cambie las piezas dañadas, desgastadas o rotas. Montaje Extracción del producto de su embalaje 1. Saque las piezas sueltas que acompaña...
Page 107 - Funcionamiento
2. Conecte el cable liberador a la palanca del conducto de expulsión en la conexión (A). (Fig. 56) 3. Asegúrese de que el cable liberador esté conectado al conducto de expulsión correcto. (Fig. 57) 4. Coloque el cable liberador en la ranura (B) de la palanca del conducto de expulsión. 5. Coloque el ...
Page 110 - Mantenimiento; Introducción
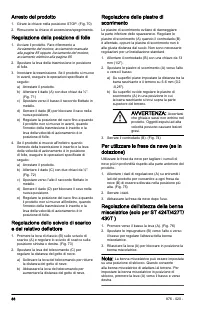
3. Baje los accesorios para ventisqueros después de usarlos. Ajuste de la altura de la tolva del sinfín (solo para ST 424T/427T/ 430T ) 1. Tire de la palanca (A) hacia abajo. (Fig. 76)2. Mueva el manillar (B) hacia arriba o hacia abajo para ajustar la altura de la tolva del sinfín. 3. Suelte la pala...
Page 117 - Detección de averías
Detección de averías Problema Causa posible Solución El producto no arranca La llave de encendido de seguridad no está insertada. Introduzca la llave de encendido de seguridad. El producto no tiene combustible. Llene el depósito de combustible con gasolina nueva y limpia. La llave de encendido/apaga...
Page 120 - Transporte, almacenamiento y eliminación; Transporte y almacenamiento
Código de error Nombre del error N.º de parpadeos del in- dicador de error P0261 Error de inyección. 1 P0230 Error de la bomba de combustible. 4 P0350 Error de la bobina de encendido. 8 P0650 Fallo del indicador de errores. Sólo es posible utilizar OBD para leer el código de error. P0123 Cortocircui...
Page 121 - Eliminación; Datos técnicos
• Vacíe el depósito de combustible antes de poner el producto en almacenamiento durante un largo periodo de tiempo. Deseche el combustible en una ubicación adecuada para su eliminación. • Asegure el producto durante el transporte para evitar daños y accidentes. • Mantenga el producto en un área cerr...
Page 122 - Accesorios
ST 424 ST 427 ST 430 ST 424T ST 427T ST 430T Nivel de potencia acústi- ca medida, dB(A) <105 Nivel de potencia acústi- ca garantizado L WA dB(A) ≤ 105 Niveles de vibración, a hveq 36 Nivel de vibración en el manillar, m/s 2 ≤5,56 ≤4,23 ≤3,14 ≤5,56 ≤4,23 ≤3,14 Accesorios Accesorios homologados Tip...
Page 123 - Declaración de conformidad; Declaración de conformidad CE
Declaración de conformidad Declaración de conformidad CE Nosotros, Husqvarna AB, SE 561 82 Huskvarna, SUECIA, declaramos bajo nuestra exclusiva responsabilidad que el producto representado: Descripción Quitanieves Marca Husqvarna Plataforma/tipo/modelo ST 424, ST 427, ST 430, ST 424T, ST 427T, ST 43...
Page 124 - Geräteübersicht
Inhalt Einleitung.............................................................. 124Sicherheit.............................................................. 125Montage................................................................ 129Betrieb..............................................................
Page 125 - Sicherheit; Sicherheitsdefinitionen
(Abb. 12) Beheizte Handgriffe. (Abb. 13) Schlüssel vor der Wartung entfernen. (Abb. 14) Entfernen Sie das Zündkerzenkabel vor der Wartung. (Abb. 15) Heiße Oberfläche. (Abb. 16) Brandgefahr. (Abb. 17) Achten Sie auf hochgeschleuderte Gegenstände. (Abb. 18) Halten Sie Abstand zu umstehenden Personen. ...
Page 126 - Sicherheitshinweise für den Betrieb
Sie ausschließlich zugelassene Anbaugeräte und Zubehörteile. • Verwenden Sie das Gerät nicht, wenn es beschädigt ist. Halten Sie sich an den Wartungsplan. Führen Sie nur diejenigen Wartungsarbeiten aus, die Sie in den Anweisungen in dieser Bedienungsanleitung finden. Alle sonstigen Wartungsarbeiten ...
Page 131 - Betrieb
Betrieb Bevor Sie das Produkt starten • Sorgen Sie dafür, dass sich im Arbeitsbereich keine Unbefugten oder Tiere aufhalten. • Warten Sie das Gerät täglich. Siehe Wartungsplan auf Seite 134. • Stellen Sie sicher, dass das Zündkabel ordnungsgemäß mit der Zündkerze verbunden ist. • Füllen Sie Öl oder ...
Page 134 - Wartung; Einleitung
• Passen Sie die Drehzahl des Geräts immer den Schneeverhältnissen und regeln Sie die Drehzahl mit dem Drehzahlregelungshebel. Stellen Sie sicher, dass das Gerät den Schnee gleichmäßig auswirft. • Es ist einfacher und effizienter, den Schnee sofort zu räumen, nachdem er gefallen ist. • Achten Sie da...
Page 136 - Akku; Schalldämpfer
Akku So starten Sie mit einem entladenen Akku Hinweis: Für den Betrieb der Kraftstoffpumpe für das EFI-System ist Akkustrom erforderlich. Wenn die Akkuleistung zu niedrig ist, führen Sie 1 der folgenden Schritte aus:• Laden Sie den Akku auf, siehe So laden Sie den Akku auf Seite 136. • Schließen Sie...
Page 141 - Fehlersuche
Fehlersuche Problem Mögliche Ursache Lösung Das Gerät springt nicht an Der Sicherheitszündschlüssel ist nicht einge- steckt. Den Sicherheitszündschlüssel ein- stecken. Das Gerät erhält keinen Kraftstoff. Frischen sauberen Kraftstoff in den Kraftstofftank füllen. Der EIN-/AUS-Schlüssel befindet sich ...
Page 144 - Transport, Lagerung und Entsorgung; Transport und Lagerung
EFI-FehlercodesHinweis: Am Gehäuse des Gashebels befindet sich eine Fehleranzeige, um Fehler für Teile ohne Software anzuzeigen. Fehlercode Fehlernamen Fehleranzeige blinkt kon- tinuierlich P0261 Fehler beim Einspritzen. 1 P0230 Fehler bei Kraftstoffpumpe. 4 P0350 Fehler bei Zündspule. 8 P0650 Fehle...
Page 145 - Entsorgung; Technische Angaben; Technische Daten
• Verwenden Sie für die Lagerung und den Transport von Kraftstoff immer zugelassene Behälter. • Leeren Sie den Kraftstofftank, bevor Sie das Produkt über einen längeren Zeitraum einlagern. Entsorgen Sie den Kraftstoff in einer geeigneten Abfallentsorgungsstelle. • Sichern Sie das Produkt während des...
Page 146 - Zubehör
ST 424 ST 427 ST 430 ST 424T ST 427T ST 430T Schallleistungspegel, ga- rantiert L WA dB (A) ≤ 105 Schwingungsniveau, a hveq 44 Vibrationspegel am Griff, m/s 2 ≤ 5,56 ≤ 4,23 ≤ 3,14 ≤ 5,56 ≤ 4,23 ≤ 3,14 Zubehör Zugelassenes Zubehör Typ Artikelnummer Ladegerät Automatisch 585445101 45 Husqvarna-Interfa...
Page 147 - Konformitätserklärung; EU-Konformitätserklärung
Konformitätserklärung EU-Konformitätserklärung Wir, Husqvarna AB, SE 561 82 Huskvarna, SCHWEDEN, erklären in alleiniger Verantwortung, dass das beschriebene Gerät: Beschreibung Schneefräse Marke Husqvarna Plattform/Typ/Modell ST 424, ST 427, ST 430, ST 424T, ST 427T, ST 430T Charge Seriennummer ab 2...
Page 148 - UPPER
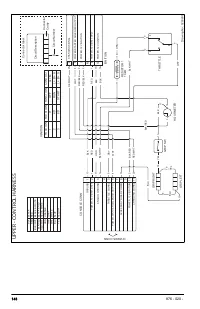
C O N SO L E C O N N CHASSIS C ON N H O U R MET ER G R IP R IG H T G R IP L EF T G R IP SW R ESI ST O R 1 1 4 k Ω T H R O T T L E 1 3 2 BL K BLK BL K BL K R ED R ED G R Y WH T W H T BLU BLU YEL YEL O R N R ED /BL K R ED /BL K BLK/WH T R ED /WH T R ED /W H T BL K/ W H T BLK/R ED G R Y O R N IG N IT I...
Page 149 - OWER - CHASSIS EFI HARNESS
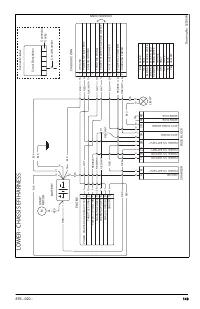
EN G IN E C H AR G ER BA T T ER Y L IG H T ST AR T MO T O R 1 2 4 5 6 8 1 2 C H ASSI S C O N N 1 2 3 4 5 6 7 8 9 1 0 1 1 CHASSIS C ON N 1 A 1 B 2 A 2 B 3 A 3 B 4 A A B 4 B M F U SE BL O C K 10 2 0 2 3 1 4 2 1 0 7 2 0 4 6 2 3 3 1 1 24 4 2 1 R ED /BL K R ED /W H T 1 9 1 9 15 16 21 15 14 BLK W H T G R ...
Page 150 - ENGINE HARNESS; GND
TROTTLE SIGNAL GROUND ECU GROUND IGNITION GROUND ENGING STOP SIGNAL- GROUNDED ANALOG THROTTLE SIGNAL (0-5v) ECU SWITCH FAILURE LIGHT DRIVE CAN PROTOCOL L CAN PROTOCOL H FUEL PUMP INJECTOR CRANKSHAFT POSITION SENSOR IGNITION CRANKCASE TEMP SENSOR REGULATOR (POWER MODULE) CHARGING COIL SPARK PLUG RPM ...


 Husqvarna ST 330 User Manual
 Husqvarna ST 330P User Manual
 Husqvarna ST 330T Manual
 Husqvarna ST 424T User Manual
 Husqvarna ST 427T User Manual
 Husqvarna ST 430 User Manual
 Husqvarna ST624E Manual
 Husqvarna ST724 Manual
 Husqvarna T85HX Manual
 Husqvarna T 255 Manual
 Husqvarna T300 Manual