Page 2 - Installation; Positioning; COMPARTMENT
2 GB Installation ! Before operating your new appliance please read this instruction booklet carefully. It contains important information concerning the safe operation, installation and maintenance of the appliance. ! Please keep these operating instructions for future reference. Pass them on to any...
Page 3 - Electrical connection
3 GB supporting surface. Any deformities caused by improper fixing could affect the features and operation of the hob.The thickness of the supporting surface should be taken into account when choosing the length of the screws for the fixing hooks:• 30 mm thick: 17.5 mm screws• 40 mm thick: 7.5 mm sc...
Page 5 - Switching on the glass ceramic hob
5 GB Description of the appliance C A A B A E D A A C D G F E E E Switching on the glass ceramic hob Traditional cooking zones Traditional cooking zones (A) consist of circular heating elements. They turn red approximately ten seconds after they have been switched on. Each cooking zone is fitted wit...
Page 6 - Precautions and tips; Practical advice on using the appliance; Disposal
6 GB Precautions and tips ! This appliance has been designed and manufactured in compliance with international safety standards. The following warnings are provided for safety reasons and must be read carefully. Practical advice on using the appliance In addition, to obtain the best results from you...
Page 7 - Care and maintenance; Switching the appliance off; Disassembling the hob
7 GB Care and maintenance Switching the appliance off Disconnect your appliance from the electricity supply before carrying out any work on it. Cleaning the appliance ! Do not use abrasive or corrosive detergents (for example, products in spray cans for cleaning barbecues and ovens), stain removers,...
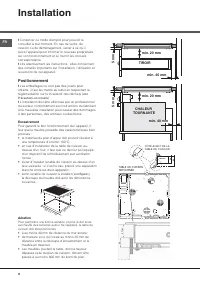
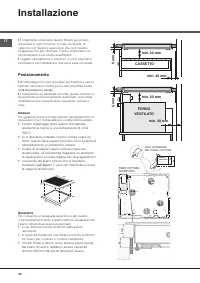
Page 8 - Positionnement; TIROIR
8 FR Installation ! Conserver ce mode d’emploi pour pouvoir le consulter à tout moment. En cas de vente, de cession ou de déménagement, veiller à ce qu’il suive l’appareil pour informer le nouveau propriétaire sur son fonctionnement et lui fournir les conseils correspondants. ! Lire attentivement le...
Page 9 - FR; Raccordement électrique
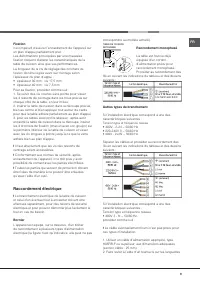
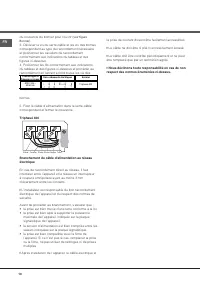
9 FR Fixation Il est impératif d’assurer l’encastrement de l’appareil sur un plan d’appui parfaitement plat. Les déformations provoquées par une mauvaise fixation risquent d’altérer les caractéristiques de la table de cuisson ainsi que ses performances.La longueur de la vis de réglage des crochets d...
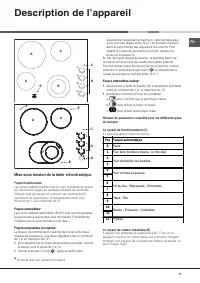
Page 11 - Description de l’appareil; Mise sous tension de la table vitrocéramique
11 FR Description de l’appareil C A A B A E D A A C D G F E E E Mise sous tension de la table vitrocéramique Foyers traditionnels Les foyers radiants traditionnels (A) sont constitués de spires qui deviennent rouges en quelques dizaines de secondes. Chaque foyer est équipé d’un bouton de commande (D...
Page 12 - Précautions et conseils; Conseils d’utilisation de l’appareil; Mise au rebut
12 FR Précautions et conseils ! Cet appareil a été conçu et fabriqué conformément aux normes internationales de sécurité. Ces consignes de sécurité sont très importantes et doivent être lues attentivement. Conseils d’utilisation de l’appareil Pour obtenir de meilleures performances de la table de cu...
Page 13 - Nettoyage et entretien; Mise hors tension; Démontage de la table
13 FR Nettoyage et entretien Mise hors tension Avant toute opération de nettoyage ou d’entretien couper l’alimentation électrique de l’appareil. Nettoyage de l’appareil ! Ne jamais utiliser de détergents abrasifs ou corrosifs, tels que des bombes aérosols pour grilloirs et fours, des détacheurs et d...
Page 14 - Instalación; Colocación; CAJÓN
14 ES Instalación ! Es importante conservar este manual para poder consultarlo en todo momento. En el caso de venta, de cesión o de mudanza, verifique que permanezca junto al aparato para informar al nuevo propietario sobre su funcionamiento y sobre las advertencias correspondientes. ! Lea atentamen...
Page 15 - Conexión eléctrica
15 ES situados a 600 mm., como mínimo, del borde de la misma. Fijación La instalación del aparato se debe realizar sobre una superficie de apoyo perfectamente plana. Las deformaciones que se podrían provocar por una mala fijación, pueden alterar las características y las prestaciones de la encimera....
Page 17 - Descripción del aparato; Encendido de la placa de vitrocerámica
17 ES Descripción del aparato C A A B A E D A A C D G F E E E Encendido de la placa de vitrocerámica Zonas de cocción tradicionales Los elementos radiantes tradicionales (A) están compuestos por resistencias circulares y se vuelven rojos después de algunos segundos de su encendido.Cada zona de cocci...
Page 18 - Precauciones y consejos; Consejos prácticos para el uso del aparato; Eliminación
18 ES Precauciones y consejos ! El aparato ha sido proyectado y fabricado en conformidad con las normas internacionales sobre seguridad. Estas advertencias se suministran por razones de seguridad y deben ser leídas atentamente. Consejos prácticos para el uso del aparato Además, para obtener las mejo...
Page 19 - Mantenimiento y cuidados; Limpiar el aparato; Desmontar la encimera
19 ES Mantenimiento y cuidados Interrumpir el suministro de corriente eléctrica Antes de realizar cualquier operación, desconecte el aparato de la red de alimentación eléctrica. Limpiar el aparato ! Evite el uso de detergentes abrasivos o corrosivos, como aerosoles para barbacoas y hornos, quitamanc...
Page 20 - Instalação; Posicionamento; GAVETA
20 PT Instalação ! É importante guardar este folheto para poder consultá-lo a qualquer momento. No caso de venda, cessão ou mudança, assegure-se que o mesmo permanece com o aparelho para informar o novo proprietário sobre o funcionamento e sobre as respectivas advertências. ! Leia com atenção as ins...
Page 21 - Ligação eléctrica
21 PT menos 600 mm do bordo do mesmo plano. Fixação A instalação do aparelho deve ser realizada sobre uma superfície de apoio perfeitamente plana. As deformações eventualmente provocadas por uma fixação errada poderão alterar as características e as performances do plano de cozedura.O comprimento do...
Page 23 - Descrição do aparelho; Acender a placa de vitrocerâmica
23 PT Descrição do aparelho C A A B A E D A A C D G F E E E Acender a placa de vitrocerâmica Zonas de cozedura tradicionais Os elementos radiantes tradicionais (A) são constituídos por resistências circulares e tornam-se vermelhos somente algumas dezenas de segundos depois de acessos.Cada zona de co...
Page 24 - Precauções e conselhos; Segurança geral; Eliminação
24 PT Precauções e conselhos ! Este aparelho foi projectado e fabricado em conformidade com as normas internacionais de segurança. Estas advertências são fornecidas por razões de segurança e devem ser lidas com atenção. Conselhos práticos para utilizar esta aparelhagem Para obter as melhores perform...
Page 25 - Manutenção e cuidados; Desligar a corrente eléctrica; Desmontar o plano
25 PT Manutenção e cuidados Desligar a corrente eléctrica Antes de realizar qualquer operação, desligue o aparelho da alimentação eléctrica. Limpeza do aparelho ! Evite o emprego de detergentes abrasivos ou corrosivos, tais como sprays para churrasqueiras e fornos, tira-manchas e produtos contra fer...
Page 26 - Posizionamento; WÄRMEFACH
26 DE Installation ! Bewahren Sie diese Bedienungsanleitung bitte sorgfältig auf, damit Sie sie jederzeit zu Rate ziehen können. Sorgen Sie dafür, dass sie im Falle eines Verkaufs, eines Umzugs oder einer Übergabe an einen anderen Benutzer das Gerät stets begleitet, damit auch der Nachbesitzer die M...
Page 27 - Elektroanschluss
27 DE vom Rand der Kochmulde von mindestens 600 mm aufweisen. Befestigung Das Kochfeld muss auf einer perfekt ebenen Stütz- bzw. Auflagefläche installiert werden. Durch unsachgemäße Befestigung hervorgerufene Verformungen könnten die Eigenschaften und Leistungen des Kochfeldes beeinträchtigen.Die Lä...
Page 29 - Einschalten des Glaskeramik-Kochfeldes
29 DE Beschreibungdes Gerätes C A A B A E D A A C D G F E E E Einschalten des Glaskeramik-Kochfeldes Traditionelle Kochzonen Bei den traditionellen Heizelementen (A) handelt es sich um Ringheizkörper mit extrem kurzer Aufglühzeit (nur wenige Sekunden nach dem Einschalten).Jede Kochzone hat ihren eig...
Page 30 - Allgemeine Sicherheit; Entsorgung
30 DE Vorsichtsmaßregeln und Hinweise ! Das Gerät wurde entsprechend den strengsten internationalen Sicherheitsvorschriften entworfen und gebaut. Nachstehende Hinweise werden aus Sicherheitsgründen geliefert und sollten aufmerksam gelesen werden. Praktische Ratschläge zum Einsatz des Gerätes So gibt...
Page 31 - Reinigung und Pflege; Abschalten Ihres Gerätes vom Stromnetz; Demontage des Kochfeldes
31 DE Reinigung und Pflege Abschalten Ihres Gerätes vom Stromnetz Vor jeder Reinigung und Pflege ist das Gerät vom Stromnetz zu trennen. Reinigung des Gerätes ! Der Einsatz von Scheuermitteln oder scharfen oder chemischen Reinigungsmitteln wie Backofensprays, Fleckenentferner, Rostentfernungsmittel,...
Page 32 - Installazione; CASSETTO
32 IT Installazione ! È importante conservare questo libretto per poterlo consultare in ogni momento. In caso di vendita, di cessione o di trasloco, assicurarsi che resti insieme all’apparecchio per informare il nuovo proprietario sul funzionamento e sui relativi avvertimenti. ! Leggere attentamente...
Page 33 - Collegamento elettrico
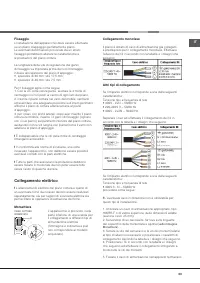
IT 33 Fissaggio L’installazione dell’apparecchio deve essere effettuata su un piano d’appoggio perfettamente piano. Le eventuali deformazioni provocate da un errato fissaggio potrebbero alterare le caratteristiche e le prestazioni del piano cottura. La lunghezza della vite di regolazione dei ganci d...
Page 35 - Accensione del piano vetroceramica
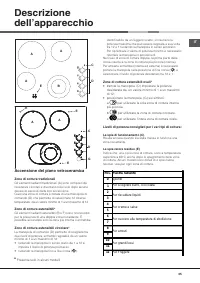
IT 35 Descrizione dell’apparecchio C A A B A E D A A C D G F E E E Accensione del piano vetroceramica Zone di cottura tradizionali Gli elementi radianti tradizionali (A) sono composti da resistenze circolari e diventano rossi solo dopo alcune decine di secondi dalla loro accensione.Ciascuna zona di ...
Page 36 - Precauzioni e consigli; Consigli pratici per l’uso dell’apparecchio; Smaltimento
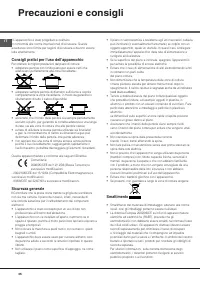
36 IT Precauzioni e consigli ! L’apparecchio è stato progettato e costruito in conformità alle norme internazionali di sicurezza. Queste avvertenze sono fornite per ragioni di sicurezza e devono essere lette attentamente. Consigli pratici per l’uso dell’apparecchio Per ottenere le migliori prestazio...
Page 37 - Manutenzione e cura; Escludere la corrente elettrica; Smontare il piano
IT 37 Manutenzione e cura Escludere la corrente elettrica Prima di ogni operazione isolare l’apparecchio dalla rete di alimentazione elettrica. Pulire l’apparecchio ! Evitare l’uso di detergenti abrasivi o corrosivi, quali i prodotti in bombolette spray per barbecue e forni, smacchiatori e prodotti ...
Page 38 - Installatie; Plaatsing; LADE
38 NL Installatie ! Bewaar dit instructieboekje zorgvuldig voor eventuele raadpleging in de toekomst. Wanneer u het product weggeeft, verkoopt, of wanneer u verhuist, dient u dit boekje bij het apparaat te bewaren zodat waarschuwingen en informatie betreffende werking voorhanden blijven. ! Lees de i...
Page 39 - Elektrische aansluiting
39 NL van de rand van de plaat staan. Bevestigen Het apparaat moet op een absoluut horizontaal oppervlak worden geïnstalleerd. Eventuele door onjuiste installatie veroorzaakte vervormingen kunnen de eigenschappen en de prestaties van de kookplaat aantasten.De lengte van de regelschroef van de bevest...
Page 41 - Aanzetten glaskeramische kookplaat
41 NL Beschrijving van het apparaat C A A B A E D A A C D G F E E E Aanzetten glaskeramische kookplaat Traditionele kookzones De traditionele straalelementen (A) bestaan uit cirkelvormige weerstanden die pas zo’n tiental seconden na ontsteking rood worden.Iedere kookzone heeft zijn eigen bedieningsk...
Page 42 - Voorzorgsmaatregelen en advies; Algemene veiligheidsmaatregelen; Afvalverwijdering
42 NL Voorzorgsmaatregelen en advies ! Dit apparaat is ontwikkeld en gefabriceerd volgens de geldende internationale veiligheidsvoorschriften. Deze aanwijzingen zijn geschreven voor uw veiligheid en u dient ze derhalve goed door te nemen. Praktische tips voor het gebruik van het apparaat Om optimale...
Page 43 - Onderhoud en verzorging; De elektrische stroom afsluiten; De kookplaat verwijderen
43 NL Onderhoud en verzorging De elektrische stroom afsluiten Sluit altijd eerst de stroom af voordat u tot enige handeling overgaat. Reinigen van het apparaat ! Vermijd het gebruik van schuurmiddelen of bijtende middelen, zoals sprays voor barbecues en ovens, vlekkenmiddelen, roestverwijderende pro...
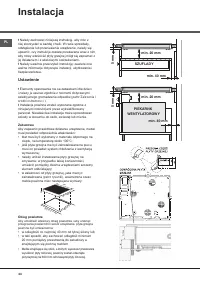
Page 44 - Instalacja; Ustawienie; SZUFLADY
44 PL Instalacja ! Nale ż y zachowa ć niniejsz ą instrukcj ę , aby móc z niej skorzysta ć w ka ż dej chwili. W razie sprzeda ż y, odst ą pienia lub przeniesienia urz ą dzenia, nale ż y si ę upewni ć , czy instrukcja zosta ł a przekazana wraz z nim, aby nowy w ł a ś ciciel p ł yty grzejnej móg ł si ę...
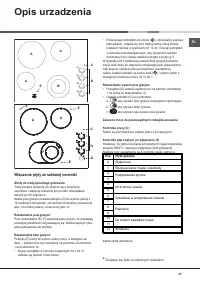
Page 47 - Opis urzadzenia
47 PL Opis urzadzenia C A A B A E D A A C D G F E E E W łą czenie p ł yty ze szklanej ceramiki Strefy do tradycjonalnego gotowania Tradycjonalne elementy (A) z ł o ż one s ą z okr ęż nych oporników i staj ą si ę czerwone ju ż po kilku dziesi ą tkach sekund po ich w łą czeniu. Ka ż de pole grzejne po...
Page 49 - Konserwacja i utrzymanie
49 PL Konserwacja i utrzymanie Od łą czenie pr ą du elektrycznego Przed ka ż d ą czynno ś ci ą nale ż y od łą czy ć urz ą dzenie od sieci zasilania elektrycznego. Mycie urz ą dzenia ! Unika ć stosowania ś rodków czyszcz ą cych o w ł a ś ciwo ś ciach ś ciernych lub korozyjnych, takich jak produkty w ...
Page 50 - RS; Монтаж; Расположение; Ящик
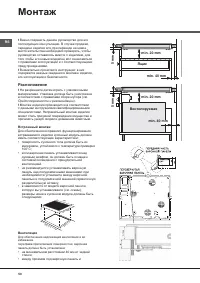
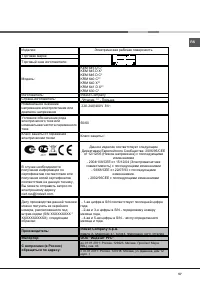
50 RS Монтаж ! Важно сохранить данное руководство для его последующих консультации . В случае продажи , передачи изделия или при переезде на новое место жительства необходимо проверить , чтобы руководство оставалось вместе с изделием , для того чтобы его новыи владелец мог ознакомиться с правилами э...
Page 51 - Электрическое
51 RS расположенным снизу кухонным элементом должно быть расстояние не менее 20 мм . • Кухонные элементы , расположенные рядом с кухонной плитой , высота которых превышает уровень варочной панели , должны находиться на расстояние не менее 600 мм от края варочной панели . Крепление Изделие должно быт...
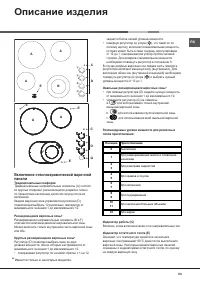
Page 53 - Описание; Включение
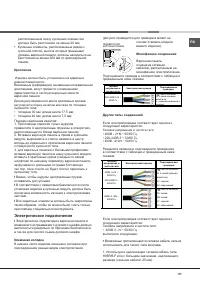
53 RS Описание изделия C A A B A E D A A C D G F E E E Включение стеклокерамической варочной панели Традициональные конфорки Традициональные нагревательные элементы ( А ) состоят из круглых спиралей , раскаляющихся докрасна только по прошествии нескольких десятков секунд после их включения . Каждая ...
Page 54 - Предосторожности
54 RS Предосторожности и рекомендации ! Изделие спроектировано и изготовлено в соответствии с международными нормативами по безопасности . Необходимо внимательно прочитать настоящие предупреждения , составленные в целях вашеи безопасности . Практические советы по эксплуатации изделия Кроме того для ...
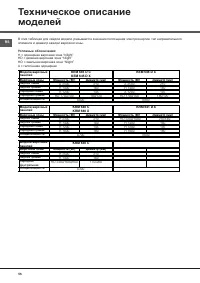
Page 55 - Техническое
55 RS Техническое обслуживани и уход Отключение электропитания Перед началом какои - либо операции по обслуживанию или чистке отсоедините изделие от сети электропитания . Чистка изделия ! Не следует пользоваться абразивными или коррозивными чистящими средствами такими как спраи для чистки духовок и ...
Page 58 - Розташування; ВІДДІЛЕННЯ; ДУХОВКА З
UA Монтаж ! Перш ніж розпочати використання приладу , будь ласка , уважно ознайомтеся з цим керівництвом . В ньому міститься важлива інформація щодо небезпечної роботи , монтажу і технічного обслуговування приладу . ! Будь ласка , збережіть це керівництво з інструкціями для майбутніх консультацій . ...
Page 61 - Увімкнення
UA Опис приладу Увімкнення склокерамічної варильної поверхні Традиційні зони нагріву ( конфорки ) Традиційні зони нагріву (A) складаються з кругових нагрівальних елементів . Після увімкнення вони набувають червоного кольору приблизно на 10 секунд . Кожна зона нагріву оснащена ручкою управління (D), ...
Page 62 - Загальна; Утилізація
UA Запобіжні заходи і поради ! Цей прилад спроектований і вироблений згідно з вимогами міжнародних стандартів з безпеки . В цьому керівництві наведені важливі повідомлення щодо безпеки . Уважно ознайомтеся з ними . Практичні поради з використання приладу Щоб найкраще використати всі можливості варил...
Page 63 - Демонтаж
UA Догляд і обслуговування Вимкнення приладу Відключити прилад від електромережі перед проведенням будь - яких робіт на ньому . Очищення приладу ! Не використовувати абразивні або агресивні миючі засоби ( наприклад , продукцію в аерозольній упаковці для чищення мангалів або духовок ), засоби для вив...