Honeywell TH8321WF1001 - Installation Manual

Honeywell TH8321WF1001 Thermostat – Installation Manual, read for free online in PDF format. We hope this helps you resolve any issues you may have. If you have further questions, please contact us through the contact form.
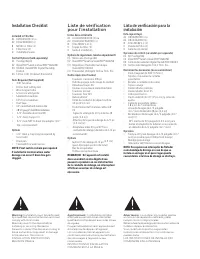


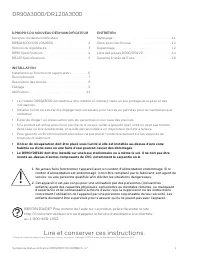
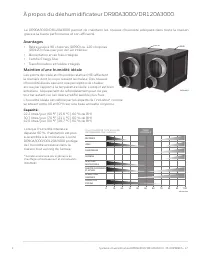
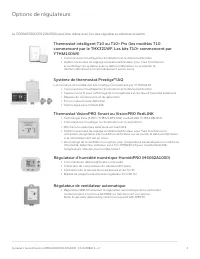
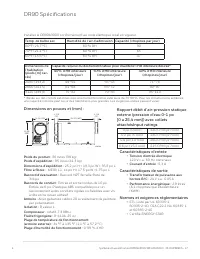
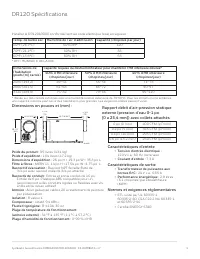
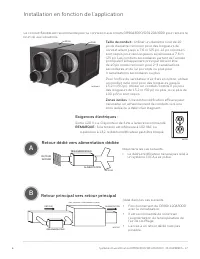
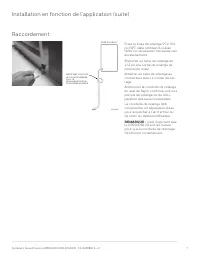
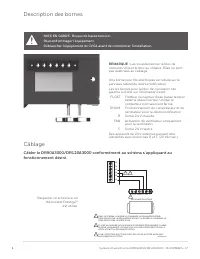
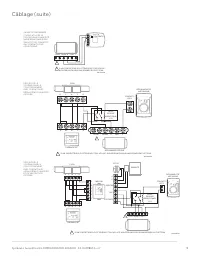
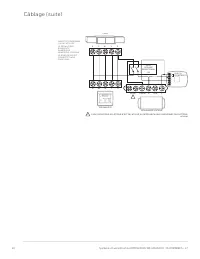
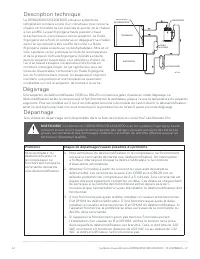
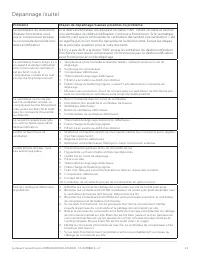
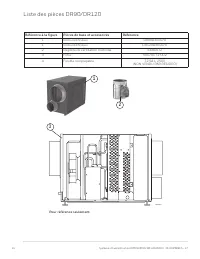


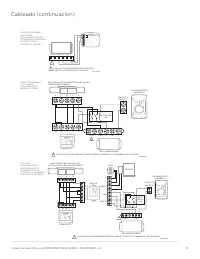
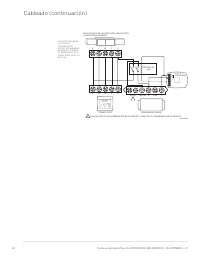


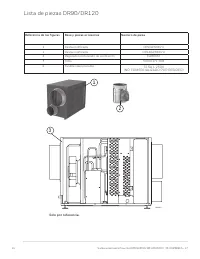


Table of Contents:
- Page 3 – Read and save these instructions.; ABOUT YOUR DEHUMIDIFIER; and that it is plugged into a ground fault interrupt (GFI) outlet.; water leakage could cause damage.
- Page 4 – Benefits; per day from the indoor air; Maintaining Ideal Humidity
- Page 5 – Control Options; Automatic Ventilation Controls; • Automatic W8150 ventilation control to ASHRAE standard, or for; T10 or T10+ Pro Smart Thermostat (T10 models begin with; Prestige IAQ Thermostat Kit; VisionPRO Smart or VisionPRO RedLINK® Thermostat; dehumidifier or lock out dehumidifier if cooling is running.
- Page 6 – DR90 Specifications; Install DR90A3000 according to National Electric Codes.; Operating Humidity Range:; • ENERGY STAR rated.; Home Size
- Page 8 – Install to Fit Your Application; Electrical requirements:; Dedicated Return to Dedicated Supply
- Page 9 – It is important that the; Plumbing
- Page 14 – Troubleshooting
- Page 16 – Dehumidifier
- Page 18 – -Year Limited Warranty
- Page 19 – Lire et conserver ces instructions.; À PROPOS DU NOUVEAU DÉSHUMIDIFICATEUR; structure du bâtiment.
- Page 20 – Avantages; • Retire jusqu’à 90 chopines (DR90) ou 120 chopines; Maintien d’une humidité idéale
- Page 21 – Options de régulateurs
- Page 22 – DR90 Spécifications; Raccord NPT femelle fileté de; Caractéristiques d’entrée; • Certifié ENERGY STAR.; Rapport débit d’air-pression statique
- Page 24 – Installation en fonction de l’application; Retour dédié vers alimentation dédiée; Retour principal vers retour principal; Exigences électriques :; Si la tension est inférieure à 102 VAC ou
- Page 25 – Il est important que; Raccordement
- Page 26 – fonctionnement désiré.
- Page 30 – Dépannage
- Page 31 – Le ventilateur du déshumid-
- Page 32 – Registre de ventilation motorisé; Pour référence seulement.
- Page 34 – Garantie limitée de 5 ans
- Page 35 – ¿NECESITA AYUDA? Para obtener ayuda sobre este producto, visite; Lea y guarde estas instrucciones.; SOBRE SU NUEVO DESHUMIDIFICADOR; la lluvia y de inundaciones.; otros componentes HVAC, como la bobina A.
- Page 36 – Beneficios; l) de agua al día del aire de interiores; Mantenimiento de la humedad ideal
- Page 37 – Opciones de control; Control automático de ventilación
- Page 38 – DR90 Especificaciones; Flujo de aire versus presión estática
- Page 39 – DR120 Especificaciones
- Page 40 – Realice la instalación según sus necesidades; Retorno especial a suministro principal; Retorno especial a suministro especial; Requisitos eléctricos:; Si el voltaje es inferior a 102 VCA o superior a 132, es; Dimensiones del conducto:
- Page 41 – Es importante que el DR90/; Plomería
- Page 42 – miento que usted desee.
- Page 46 – Localización y solución de problemas
- Page 47 – realizar más pruebas.; Localización y solución de problemas (continuación)
- Page 50 – Poliza de garantia
DR90A3000 (1) or
DR120A3000 (1)
MERV 11 Filter (1)
Filter Door (2)
Installation Guide
Prestige™ IAQ Kit
VisionPRO™ Smart or VisionPRO RedLINK
H6062 HumidiPRO Digital Humidity Control
T10 or T10+ Pro Smart thermostat
Tools required to install DR90A3000/DR120A3000
Dehumidifier
3/8” hex drive
Drill or duct cutting tool
Wire stripper/cutter
Scissors or utility knife
Standard screwdriver
T25 Torx screwdriver
Duct tape
10” round duct and starter collar
3/4” male NPT to drain line adaptor (1/2” Dia.
recommended)
1/2” diameter drain line (8’)
1/2” drain clamps (2)
Options
1/2” drain p-trap (may be required by local code)
Drain pan
Float switch or water sensor
A
1
D
C
A
2
B
E
2
E
3
E
4
E
1
(or)
PROFESSIONAL INSTALLATION GUIDE
GUIDE D’INSTALLATION PROFESSIONNELLE
GUÍA DE INSTALACIÓN PROFESIONAL
DR90A3000/DR120A3000
INCLUDED IN THIS BOX
D
A
1
A
2
C
B
OPTIONAL CONTROLS SOLD SEPARATELY
E
33-00298EFS-17
DR90A3000 (1) or
DR120A3000 (1)
MERV 11 Filter (1)
Filter Door (2)
Installation Guide
Prestige™ IAQ Kit
VisionPRO™ Smart or VisionPRO RedLINK
H6062 HumidiPRO Digital Humidity Control
T10 or T10+ Pro Smart thermostat
Tools required to install DR90A3000/DR120A3000
Dehumidifier
3/8” hex drive
Drill or duct cutting tool
Wire stripper/cutter
Scissors or utility knife
Standard screwdriver
T25 Torx screwdriver
Duct tape
10” round duct and starter collar
3/4” male NPT to drain line adaptor (1/2” Dia.
recommended)
1/2” diameter drain line (8’)
1/2” drain clamps (2)
Options
1/2” drain p-trap (may be required by local code)
Drain pan
Float switch or water sensor
A
1
D
C
A
2
B
E
2
E
3
E
4
E
1
(or)
PROFESSIONAL INSTALLATION GUIDE
GUIDE D’INSTALLATION PROFESSIONNELLE
GUÍA DE INSTALACIÓN PROFESIONAL
DR90A3000/DR120A3000
INCLUDED IN THIS BOX
D
A
1
A
2
C
B
OPTIONAL CONTROLS SOLD SEPARATELY
E
33-00298EFS-13
DR90A3000 (1) or
DR120A3000 (1)
MERV 11 Filter (1)
Filter Door (2)
Installation Guide
Prestige IAQ Kit
H8908 Manual Dehumidistat
VisionPRO™ Smart or VisionPRO™ RedLINK
H6062 HumidiPRO Digital Humidity Control
T10 Pro Smart
Tools required to install DR90A3000/DR120A3000
Dehumidifier
3/8” hex drive
Drill or duct cutting tool
Wire stripper/cutter
Scissors or utility knife
Standard screwdriver
T25 Torx screwdriver
Duct tape
10” round duct and starter collar
3/4” male NPT to drain line adaptor (1/2” Dia.
recommended)
1/2” diameter drain line (8’)
1/2” drain clamps (2)
Options
1/2” drain p-trap (may be required by local code)
Drain pan
Float switch or water sensor
A1
D
C
A2
B
E2
E3
E4
E5
E1
(or)
PROFESSIONAL INSTALLATION GUIDE
GUIDE D’INSTALLATION PROFESSIONNELLE
GUÍA DE INSTALACIÓN PROFESIONAL
DR90A3000/DR120A3000
INCLUDED IN THIS BOX
D
A1
A2
C
B
OPTIONAL CONTROLS SOLD SEPARATELY
E
33-00298EFS-11
DR90A3000 (1) or
DR120A3000 (1)
MERV 11 Filter (1)
Filter Door (2)
Installation Guide
Prestige IAQ Kit
DG115 IAQ Control
H8908 Manual Dehumidistat
VisionPRO™ Smart or VisionPRO™ RedLINK
H6062 HumidiPRO Digital Humidity Control
T10 Pro Smart
Tools required to install DR90A3000/DR120A3000
Dehumidifier
3/8” hex drive
Drill or duct cutting tool
Wire stripper/cutter
Scissors or utility knife
Standard screwdriver
T25 Torx screwdriver
Duct tape
10” round duct and starter collar
3/4” male NPT to drain line adaptor (1/2” Dia.
recommended)
1/2” diameter drain line (8’)
1/2” drain clamps (2)
Options
1/2” drain p-trap (may be required by local code)
Drain pan
Float switch or water sensor
A
D
C
A
B
E
E
E
E
E
E
(or)
PROFESSIONAL INSTALLATION GUIDE
GUIDE D’INSTALLATION PROFESSIONNELLE
GUÍA DE INSTALACIÓN PROFESIONAL
DR90A3000/DR120A3000
INCLUDED IN THIS BOX
D
A
A
C
B
OPTIONAL CONTROLS SOLD SEPARATELY
E
E
E
E
E
E
E
E2
E3
E1
E4
E5
E
2
E
3
E
1
E
4
E
2
E
3
E
1
E
4
"Loading the manual" means you need to wait until the file loads and becomes available for online reading. Some manuals are very large, and the time they take to appear depends on your internet speed.
Other Manuals for Honeywell TH8321WF1001
Summary
DR90A3000/DR120A3000 NEED HELP? For assistance with this product please visit http://customer.resideo.com or call Customer Care toll-free at 1-800-468-1502. Read and save these instructions. ® U.S. Registered Trademark. Patents pending. Copyright © 2023 Resideo Technologies, Inc. All rights reserved...
About the DR90A3000/DR120A3000 Dehumidifier The DR90A3000/DR120A3000 ensures the home is maintained at proper humidity levels through its high performance and efficiency. When indoor humidity exceeds 60%, the home is more susceptible to mold and mildew growth. DR90A3000/DR120A3000 safeguards against...
Control Options The DR90A3000/DR120A3000 may be used with one of the following external controls: HumidiPRO Digital Control (H6062A1000) • Manual dehumidification control• Dehumidifier compressor protection• RH% and outdoor temperature calibration• Adjustable high and low range stops (10-90%) Automa...