Honeywell HSF600B - User Manual
Honeywell HSF600B – User Manual, read for free online in PDF format. We hope this helps you resolve any issues you may have. If you have further questions, please contact us through the contact form.


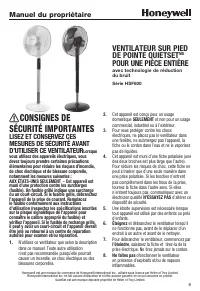
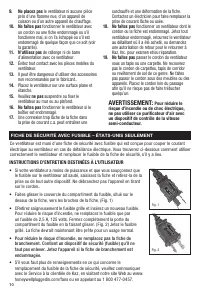

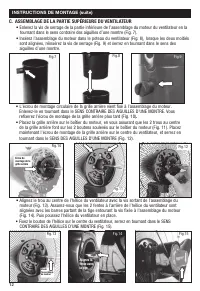
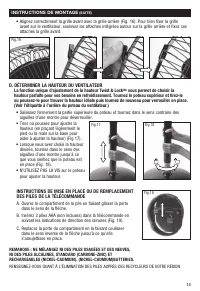
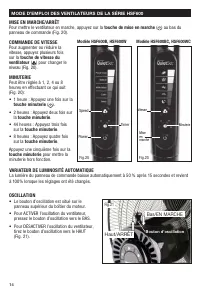
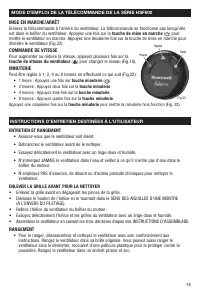


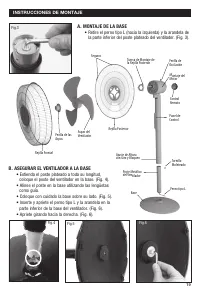


Table of Contents:
- Page 2 – To Reduce The Risk of Fire
- Page 3 – B. SECURING THE FAN TO THE BASE; • Extend the silver pole to its full length, place the
- Page 4 – C. ASSEMBLING THE UPPER PORTION OF THE FAN
- Page 5 – D. DETERMINING THE HEIGHT OF THE FAN; The unique Twist & Lock; REMOTE CONTROL BATTERY INSTALLATION/REPLACEMENT INSTRUCTIONS; SEE RECYCLERS IN YOUR AREA FOR PROPER DISPOSAL OF BATTERIES.
- Page 6 – HSF600 SERIES FAN OPERATION; AUTO DIM LIGHT FEATURE; Oscillation knob
- Page 7 – USER SERVICING INSTRUCTIONS; STORAGE; • 1 hour: Press the; • 2 hours: Press the; Timer button; • 4 hours: Press the; Timer button; • 8 hours: Press the; Timer button; Press the; Timer button; CONSUMER RELATIONS; Please be sure to specify model number.
- Page 8 – YEAR LIMITED WARRANTY; . This 1 year limited warranty applies; KAZ IS; At its option, Kaz will repair or replace
- Page 9 – VENTILATEUR SUR PIED; MD; POUR UNE PIÈCE ENTIÈRE; Manuel du propriétaire
- Page 10 – FICHE DE SÉCURITÉ AVEC FUSIBLE – ÉTATS-UNIS SEULEMENT; Pour réduire le; • S’il vous faut plus de renseignements en ce qui concerne le
- Page 11 – INSTRUCTIONS DE MONTAGE; A. ASSEMBLAGE DE LA BASE; • Enlevez le boulon en L (dans le sens contraire des; B. FIXER LE VENTILATEUR À LA BASE; • Allongez le poteau en argent jusqu’à sa pleine
- Page 12 – C. ASSEMBLAGE DE LA PARTIE SUPÉRIEURE DU VENTILATEUR
- Page 13 – D. DÉTERMINER LA HAUTEUR DU VENTILATEUR; La fonction unique d’ajustement de la hauteur Twist & Lock; vous permet de choisir la; aiguilles d’une montre pour déverrouiller.
- Page 14 – MODE D’EMPLOI DES VENTILATEURS DE LA SÉRIE HSF600; OSCILLATION; Bouton d’oscillation
- Page 15 – INSTRUCTIONS D’ENTRETIEN DESTINÉES À L’UTILISATEUR; touche de mise en marche; COMMANDE DE VITESSE; touche de vitesse du ventilateur; MINUTERIE; • 1 heure : Appuyez une fois sur; • 2 heures : Appuyez deux fois sur la; touche minuterie; • 4 heures : Appuyez trois fois sur la; touche minuterie; • 8 heures : Appuyez quatre fois sur la; touche minuterie; Appuyez une cinquième fois sur la; touche minuterie; ENTRETIEN ET RANGEMENT; • Assurez-vous que le ventilateur soit éteint.; ENLEVER LA GRILLE AVANT POUR LA NETTOYER; RANGEMENT
- Page 16 – GARANTIE LIMITÉE DE 1 AN; KAZ DÉCLINE; SERVICE À LA CLIENTÈLE; Ou visitez notre site Web au :; Veuillez préciser le numéro du modèle.
- Page 17 – IMPORTANTES; ADVANCED QUIET SET; Manual del Usuario
- Page 18 – ENCHUFE DE SEGURIDAD CON FUSIBLE - SOLO PARA MODELOS DE EUA; INSTRUCCIONES DE MANTENIMIENTO; • Si su ventilador pierde potencia y sospecha que se ha fundido el; No; Para Reducir el
- Page 19 – INSTRUCCIONES DE MONTAJE; B. ASEGURAR EL VENTILADOR A LA BASE; • Extienda el poste plateado a toda su longitud,; A. MONTAJE DE LA BASE; • Retire el perno tipo L (hacia la izquierda) y la arandela de
- Page 20 – C. MONTAJE DE LA PARTE SUPERIOR DEL VENTILADOR
- Page 21 – D. DETERMINAR LA ALTURA DEL VENTILADOR; La característica única de Ajuste de Altura con Giro y Bloqueo; • Sujete firmemente la parte superior
- Page 22 – OPERACIÓN DEL VENTILADOR DE LAS SERIES HSF600; FUNCIÓN DE ATENUACIÓN AUTOMÁTICA DE LUZ; Perilla de Oscilación
- Page 23 – Presione el; Botón del Temporizador; ALMACENAMIENTO; ATENCIÓN AL CLIENTE; Por favor, asegúrese de especificar el número de modelo.
- Page 24 – GARANTÍA LIMITADA DE 1 AÑO; . La presente garantía limitada de 1 año; KAZ NO; A su discreción, Kaz reparará o; Llámenos Lada Gratuita al:; Para registrar su producto, por favor visite
IMPORTANT
SAFETY INSTRUCTIONS
READ AND SAVE THESE SAFETY
INSTRUCTIONS BEFORE USING
THIS FAN
When using electrical appliances, basic
precautions should always be followed to
reduce the risk of fire, electric shock, and
injury to persons, including the following:
FOR US MODELS ONLY - This product
employs overload protection (fuse). A blown
fuse indicates an overload or short-circuit
situation. If the fuse blows, unplug the
product from the outlet. Replace the fuse as
per the user servicing instructions (follow
product marking for proper fuse rating)
and check the product. If the replacement
fuse blows, a short-circuit may be present
and the product should be discarded or
returned to an authorized service facility
for examination and/or repair.
1.
Use this fan only as described in this
manual. Other use not recommended
as it may cause fire, electric shock or
injury to persons.
2.
This product is intended for household
use
ONLY
and not for commercial,
industrial or outdoor use.
3.
To protect against electric shock, do not
place fan in window, immerse unit, plug
or cord in water or spray with liquids.
4.
This appliance has a polarized plug
(one blade is wider than the other). To
reduce the risk of shock, this plug is
intended to fit only one way in a polarized
outlet. If the plug does not fit fully in the
outlet, reverse the plug. If it still does
not fit, contact a qualified electrician.
DO NOT
attempt to defeat this safety
feature.
5.
Close supervision is necessary when any
appliance is used by or near children.
6.
Turn the fan
OFF
and unplug the fan from
the outlet when not in use, when moving
the fan from one location to another and
before cleaning.
7.
To disconnect the fan, first turn the unit
OFF
, grip the plug and pull it from the wall
outlet. Never pull the plug by the cord.
8.
Do not
operate the fan in the presence
of explosive and/or flammable fumes.
9.
Do not
place the fan or any parts near
an open flame, cooking or other heating
appliance.
10.
Do not
operate the fan with a
damaged cord or plug or if the product
malfunctions, is dropped or damaged in
any manner (see warranty).
ADVANCED QUIET SET
®
WHOLE ROOM STAND FAN
with Noise Reduction Technology
HSF600 Series
Owner’s Manual
Honeywell is a trademark of Honeywell International Inc., used under license by Helen of Troy Limited.
Honeywell International Inc. makes no representation or warranties with respect to this product.
QuietSet is a registered trademark owned by Helen of Troy Limited.
"Loading the manual" means you need to wait until the file loads and becomes available for online reading. Some manuals are very large, and the time they take to appear depends on your internet speed.
Was this manual helpful?
About this manual
- Brand
- Honeywell
- Model
- HSF600B
- Document type
- User Manual
- Language(s)
- English, Spanish, French
- Pages
- 29
- File size
- 392.5 KB
- Format
Summary
2 FUSED SAFETY PLUG - FOR US MODELS ONLY USER SERVICING INSTRUCTIONS • If your fan loses power and you suspect that the fuse on your fan has blown, grasp plug and remove from the receptacle or other outlet device. Do not unplug by pulling on cord. • Slide fuse cover, located on the top of the plug t...
3 ASSEMBLY INSTRUCTIONS A. BASE ASSEMBLY • Remove the L shaped bolt (counter clockwise) and washer from the bottom of the silver fan pole. (Fig. 3). Fig.3 Fig.5 Fig.6 Fig.4 Base Control Panel Rear Grille Mounting Nut Motor Assembly Oscillation Knob Remote Control Twist and Lock Height Adjustment Bla...
4 ASSEMBLY INSTRUCTIONS (continued) Fig.15 Fig.14 Align slot with pin • Align hole in center of Fan Blade with the screw extending from the Motor Assembly (Fig. 13). Make sure that the 2 slots on the back of the Fan Blade align with the bars extending from the shaft surrounding the screw attached to...
Ask a question
Related manuals
Popular Honeywell Other
More Honeywell Other models
 Honeywell HPA5300B User Manual
 Honeywell HR230 User Manual
 Honeywell HRF AP1 User Manual
- Honeywell HRF R2 User Manual
 Honeywell HRXD16 Manual
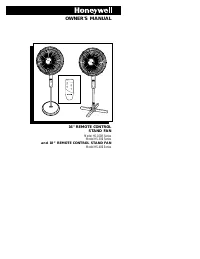 Honeywell HS-160R User Manual
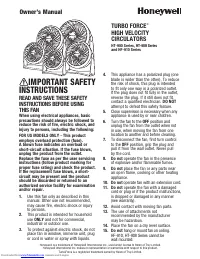 Honeywell HT 900 User Manual
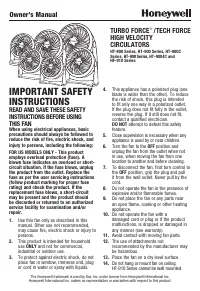 Honeywell HT908 User Manual
 Honeywell HTF210B User Manual
 Honeywell HUL520B Manual
 Honeywell HUL530 User Manual
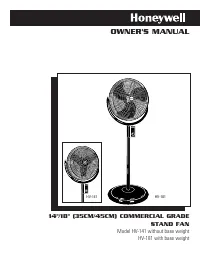 Honeywell HV-141 User Manual