Honeywell CT3611 - Manual

Honeywell CT3611 – Manual, read for free online in PDF format. We hope this helps you resolve any issues you may have. If you have further questions, please contact us through the contact form.


Table of Contents:
- Page 2 – Keeps you comfortable; MERCURY NOTICE
- Page 5 – STEP 1. PREPARE FOR INSTALLATION; Package Contents; STEP 2. REMOVE OLD THERMOSTAT
- Page 6 – STEP 3. MOUNT THERMOSTAT WALLPLATE; Tighten mounting screws.
- Page 7 – STEP 4. WIRE WALLPLATE TERMINALS; IMPORTANT
- Page 8 – Table 1. Terminal Designations on Old and New Thermostats.
- Page 9 – You can change any or all of these settings.
- Page 10 – Smart ResponseTM Technology (Feature Number 13)
- Page 11 – STEP 7. SET THE CLOCK; Set Current Day and Time
- Page 13 – Program the First Day
- Page 14 – Copy a Day
- Page 15 – Clear a Program Period; STEP 9. OPERATING YOUR THERMOSTAT
- Page 17 – Usage Key; STEP 10. SET THE FAN AND SYSTEM SWITCHES
- Page 18 – IF YOU HAVE A PROBLEM; Then...
- Page 19 – Toll-Free Customer Assistance
- Page 20 – SMART RESPONSETM TECHNOLOGY; The time of day when you want the comfort temperature established.; In Recovery
- Page 21 – WIRING DIAGRAMS; See Table 1 on page 8 for additional wiring assistance.; Typical hookup of CT3611 with isolated
- Page 22 – Limited One-Year Warranty; If the product is defective,
- Page 24 – Home and Building Control Home and Building Control
69- 1081- 3
OWNER’S GUIDE
® U.S. Registered Trademark
Copyright © 2001 Honeywell •
•All Rights Reserved
Honeywell CT3611
PROGRAMMABLE THERMOSTAT
Seven Day
Programmable Heat Pump
Low Voltage (20 to 30 Vac) Thermostat and Wallplate
Model CT3611
Para pedir estas instrucciones en español, llame al 1-800-468-1502.
Pour obtenir ce ode demploi en français, composer le 1-800-468-1502.
Table of Contents
Step 7. Set the Clock ................................................................................................................................................. 11
Step 8. Programming ................................................................................................................................................. 12
Step 9. Operating Your Thermostat ........................................................................................................................... 15
Step 10. Set the Fan and System Switches .............................................................................................................. 17
If You Have a Problem ............................................................................................................................................... 18
Smart Response™ Technology ................................................................................................................................. 20
Wiring Diagrams ........................................................................................................................................................ 21
69-1081.fm Page 1 Wednesday, May 18, 2005 9:03 AM
"Loading the manual" means you need to wait until the file loads and becomes available for online reading. Some manuals are very large, and the time they take to appear depends on your internet speed.
Was this manual helpful?
About this manual
- Brand
- Honeywell
- Model
- CT3611
- Document type
- Manual
- Language(s)
- English
- Pages
- 24
- File size
- 967.8 KB
- Format
Summary
69-1081—3 2 TOTAL COMFORT TEMPERATURE MANAGEMENT WITH SMART RESPONSE™ TECHNOLOGY. Congratulations! You made a smart choice by purchasing your new Honeywell thermostat; the smart thermostat that;• Keeps you comfortable by automatically calculating exactly when the heat pump should go on to have the h...
5 69-1081—3 STEP 1. PREPARE FOR INSTALLATION q This thermostat is designed to work with multistage heat pumps (heat pumps with Auxiliary and/or Emergency Heat). Check Table 1 in Step 4 to make sure the CT3611 is compatible with your system. If you have compatibility questions, contact Honeywell at w...
69-1081—3 6 STEP 3. MOUNT THERMOSTAT WALLPLATE q Separate the wallplate from the thermostat by placing your thumb or fingers between the bottom of the wallplate and the thermostat, and pulling the wallplate up and away from the thermostat. See illustration at right. q Position the wallplate on the w...
Ask a question
Related manuals
Popular Honeywell Other
More Honeywell Other models
 Honeywell CT87B Manual
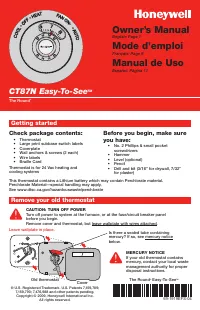 Honeywell CT87N1001 User Manual
 Honeywell CT3200 Manual
 Honeywell CT3455 Manual
 Honeywell CT3600 Manual
 Honeywell D Manual
 Honeywell D770 User Manual
 Honeywell D780 User Manual
 Honeywell D7900 Manual
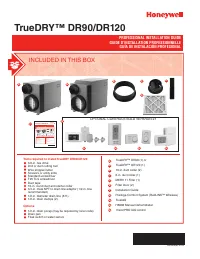 Honeywell Dehumidifier DR90 User Manual
 Honeywell DH-835 Manual
 Honeywell DH50W User Manual