Page 3 - CONTENTS; SAVE THESE INSTRUCTIONS
1 CONTENTS Safety and warnings 3 Introduction 12 The control panel 13 Setting the clock and first use 14 Using your oven 16 Oven functions 17 Using the rotisserie 18 Using the timer 20 Automatic cooking 21 Baking chart 23 User preference settings 24 Sabbath setting 26 Care and cleaning 28 Using the ...
Page 4 - SAFETY AND WARNINGS; Electrical Shock Hazard
2 Your oven has been carefully designed to operate safely during normal cooking procedures. Please keep the following safety instructions in mind when you are using it: SAFETY AND WARNINGS WARNING! Electrical Shock Hazard Turn the oven off at the wall before replacing the oven lamp. Failure to follo...
Page 7 - Cut Hazard
5 SAFETY AND WARNINGS WARNING! Cut Hazard Take care - some edges are sharp. Failure to use caution could result in injury or cuts. !
Page 8 - IMPORTANT SAFETY INSTRUCTIONS
6 SAFETY AND WARNINGS IMPORTANT SAFETY INSTRUCTIONS To reduce the risk of fire, electrical shock, injury to persons or damage when using the oven, follow the important safety instructions listed below: • Read all the instructions before using the oven. Use the oven only for its intended purpose as d...
Page 14 - Before you start; INTRODUCTION
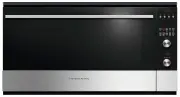
12 1 Oven vent louvres 2 Control panel 3 Stainless steel strip 4 Side racks 5 Grill tray and rotisserie 6 Oven door and handle 7 Oven seal 2 4 3 5 6 7 1 Congratulations on your new purchase. Your oven has a number of features to make cooking a great experience for you: ● a choice of eight oven funct...
Page 15 - THE CONTROL PANEL; Locking the control panel; To lock the control panel
13 THE CONTROL PANEL - + Locking the control panel You can lock the control panel to prevent unintended use (eg children playing with the oven). Doing so will disable the dials and all the buttons. To lock the control panel 1 Make sure the oven is not in use (the function dial is turned to Off) and ...
Page 16 - FIRST USE; Setting the Clock
14 FIRST USE Setting the Clock When your oven is first turned on, or after a power cut, the display will flash . You willneed to set the clock in order to use the oven. 1 The display will flash 2 Press the right scroll button to scroll between and 3 Press the select button to confi...
Page 17 - To change the time
15 FIRST USE To change the time You set the clock within the user preference menu. 5 Press the left and right scroll buttons to set the time. 6 Press the select button to confirm. 3 Press the right scroll button to scroll between , or to turn the display off (see ‘Setting User prefe...
Page 18 - USING YOUR OVEN
16 - + 1 Slide in the shelves you will need, making sure that: ● they are between the two wires of a shelf position ● the stop notches point down ● the guard rail is at the back. ● Note: the grill tray should be positioned on the sliding shelf supports, or between the two wires of a shelf position a...
Page 19 - OVEN FUNCTIONS; Selecting this will turn the oven off.
17 OVEN FUNCTIONS Off Selecting this will turn the oven off. Bake This is the traditional method of baking. It is best to bake on only one shelf at a time in this function. Ideal for large cakes and dishes that bake for several hours. Fan Bake Ideal for dishes like lasagne that need to brown on top ...
Page 20 - USING THE ROTISSERIE; Prepare the rotisserie supports.
18 USING THE ROTISSERIE Note: If sliding shelf supports have been fitted to shelf position 1, these will need to be removed before using the rotisserie. See ‘Care and cleaning’ for instructions. 1 Prepare the rotisserie supports. ● Place the grill tray on the benchtop. ● Insert the supports into the...
Page 21 - When you have finished using the rotisserie
19 USING THE ROTISSERIE When you have finished using the rotisserie 1 Turn the oven off. 2 Using oven mitts, carefully disengage the right end of the skewer from the rotisserie drive hole. 3 Slide out the grill tray and place it on a heat-resistant surface. 4 Twist the handle onto the left end of th...
Page 22 - USING THE TIMER; The timer does NOT turn the oven off.; To modify the timer setting
20 USING THE TIMER ● You can use the timer at any time, even if you are not using the oven. ● If the time is more than an hour, the display will count down in minutes (hr:min). If it is less than an hour, it will count down in seconds (min:sec). ● You can set the timer for up to 23 hours 59 minutes....
Page 23 - AUTOMATIC COOKING; Set the cooking time
21 AUTOMATIC COOKING ● You can set the oven to automatically turn on later, cook for a preset time (cooking time), then automatically turn off at a preset stop time. See the example and instructions below (steps 1 to 7). ● If you start cooking manually and only want the oven to turn off automaticall...
Page 24 - Select function and temperature
22 AUTOMATIC COOKING !1 Set the temperature. When automatic cooking is set ● The oven and the lights will stay off, the halos will be unlit, but your oven is now set for automatic cooking. It will automatically turn on at the required time. ● In a few seconds, the display will show the time of day w...
Page 25 - BAKING CHART; FOOD
23 BAKING CHART Please note: ● The settings in the following chart are guidelines only. Follow the instructions in your recipe or on food packaging and be prepared to adjust the oven settings and baking times to achieve the best possible results for you. ● Shelf positions are counted from the base u...
Page 26 - USER PREFERENCE SETTINGS; How to change preference settings
24 USER PREFERENCE SETTINGS You can set your oven to: ● display the temperature in degrees Celsius or Fahrenheit ● give audio feedback (tones and beeps) or operate quietly ● display time as 12-hr or 24-hr ● operate with the display off ● have its lights on or off during cooking ● operate in Sabbath ...
Page 27 - SETTING; TEMPERATURE SCALE; CELSIUS
25 USER PREFERENCE SETTINGS 5 Press the right scroll button to scroll through the options for that particular setting. Refer to the table below. 6 Press the select button to save the new option. 7 For all options except ‘Display off’ : press the cancel button to quit the user preference menu. SETTIN...
Page 28 - SABBATH SETTING; While your oven is in Sabbath setting
26 SABBATH SETTING This setting is designed for religious faiths that observe a ‘no work’ requirement on the Sabbath. While your oven is in Sabbath setting ● The display, dial halos and indicators will be unlit, the buttons will be unresponsive. ● No tones or beeps will sound. ● No alert codes or te...
Page 29 - To quit Sabbath setting
27 SABBATH SETTING The display, indicators and dial halos will be unlit and unresponsive, but the oven will bake until you quit Sabbath setting. To quit Sabbath setting Press and hold the cancel button until the time of day appears in the display and the oven turns off. 3 Press the right scroll butt...
Page 30 - Never use a steam cleaner.; Glass surfaces; Clean with a solution of mild; CARE AND CLEANING
28 Manual cleaning ALWAYS NEVER ● Before any manual cleaning or maintenance, first wait for the oven to cool down to a safe temperature to touch, then turn its power supply off at the wall. ● Read these cleaning instructions and the ‘Safety and warnings’ section before you start cleaning your oven. ...
Page 31 - Wipe with a damp cloth and a; Oven seal; Do not clean this part.
29 Manual cleaning WHAT? HOW? IMPORTANT! Dials Clean with a solution of mild detergent and hot water, then wipe dry. Do not use stainless steel or oven cleaner on the dials, as doing so may damage their coating. Stainless steel strip/handle on the front of the oven door ● Clean with a solution of mi...
Page 32 - Removing and replacing the side racks; When refitting the sliding shelf supports, make sure that you fit:
30 CARE AND CLEANING Removing and replacing the side racks ● Use a flat-head screwdriver or a small coin to loosen the fixing screws. ● When replacing the side racks, make sure that you tighten the fixing screws. Removing and refitting the sliding shelf supports IMPORTANT! ● Remove the side racks fi...
Page 33 - Removing and replacing the door glass panes for cleaning; Make sure you have prepared enough
31 CARE AND CLEANING Removing and replacing the door glass panes for cleaning Make sure you follow the precautions and instructions below very carefully. Replacing the glass panes and the door incorrectly may result in damage to the oven and may void your warranty. IMPORTANT! ● Take care, the oven d...
Page 34 - Remove the inner and middle glass panes (three in total); Gently close the door until the left and
32 CARE AND CLEANING Remove the inner and middle glass panes (three in total) 4 Gently close the door until the left and right hinge levers are hooked to the door. 1 Press down on both tabs (1) to release the glass retainer (2). 6 Lift the door and disengage the hinges. Rest the door on a soft surfa...
Page 35 - Slide the first middle pane (C) slightly; After cleaning, replace the glass panes; When replacing the glass panes, make sure that:
33 CARE AND CLEANING 3 Slide the first middle pane (C) slightly towards yourself (1), then lift (2) and slide out (3). 1 Take either one of the middle panes (B or C) and hold it firmly. Insert it in the lowest pair of grooves (1), push it slightly towards yourself (2) and gently lower into place (3)...
Page 37 - both sides click as they lock the glass retainer in.
35 CARE AND CLEANING 4 Position the glass retainer, as shown. It should sit on the bottom edge of the outer glass (A). Check that the clamps of the glass retainer are not deformed or damaged. 5 Gently push the glass retainer back into place. You should be able to hear the tabs on both sides click as...
Page 38 - Refit the door; Hold the door firmly.
36 CARE AND CLEANING Refit the door 1 Hold the door firmly. 3 Open the door to its full extent. 2 Insert the hinge tongues into the slots, making sure that the notches on both sides drop into place as shown. 4 Fully close the levers on the left and right hinges, as shown. 5 Close the door, turn the ...
Page 39 - Replacing the oven light bulbs; Note: oven bulb replacement is not covered by your
37 CARE AND CLEANING Replacing the oven light bulbs The oven light bulbs (12V/20 W halogen) have a very long life, but if you should need to replace one, use only a replacement bulb purchased from your nearest Fisher & Paykel dealer and follow these steps. Note: oven bulb replacement is not cove...
Page 40 - USING THE SELF CLEAN FUNCTION; There is a choice of Self Clean cycles:; Do not use oven cleaners, any degreasing cleaners, or oven liners.; Remove oven shelves, side racks and all
38 USING THE SELF CLEAN FUNCTION ● During the pyrolytic Self Clean cycle the extremely high temperature burns off and breaks down grime and grease deposits. All that is left is a small amount of grey ash that you can easily remove. ● There is a choice of Self Clean cycles: ● Self Clean (3 hours) (fo...
Page 41 - Self Clean cycle; During the Self Clean cycle
39 USING THE SELF CLEAN FUNCTION 3 Select the Self Clean function. ● The display will flash : 4 Press the right scroll button once for the Self Clean cycle - the display will flash : (3 hours), or Press the right scroll button a second time for the Light Self Clean cycle - the display will...
Page 42 - When a Self Clean cycle has finished
40 USING THE SELF CLEAN FUNCTION When a Self Clean cycle has finished The oven will: ● emit a long tone ● automatically turn off ● automatically unlock the door. In a few seconds, the display will show the time of day. You need to: 1 wait for the oven to cool down completely 2 remove the grey ash wi...
Page 43 - TROUBLESHOOTING; Troubleshooting chart; General
41 TROUBLESHOOTING Troubleshooting chart If there is a problem, check the chart below to see if you can fix it. If the problem cannot be fixed or persists, call your Authorised Repairer or Customer Care. PROBLEM POSSIBLE CAUSES WHAT TO DO General The oven does not work. No power. Check that the main...
Page 44 - PROBLEM
42 TROUBLESHOOTING PROBLEM POSSIBLE CAUSES WHAT TO DO General The oven has reached the set temperature but the temperature dial halo is still red (indicating that the oven is not ready to use). This is normal: when heatingup from cold, your oven isdesigned to initially heat to atemperature somewhat ...
Page 45 - Self Clean function; The display shows; or
43 TROUBLESHOOTING PROBLEM POSSIBLE CAUSES WHAT TO DO Self Clean function During a Self Cleancycle, the oven is louderthan usual. This is normal: the oven’s cooling fans operate at their highest speed. The display shows The door has not been properlyclosed. Make sure you close the doorproperly....
Page 46 - ALERT CODES; automatically suspend all oven functions; What to do if an alert code is displayed; If the beeping hasn’t stopped already, press any button to stop it.
44 ALERT CODES If there is a problem, the oven will: ● automatically suspend all oven functions ● beep five times ● display an alert code. IMPORTANT! Do not turn off the mains power supply to the oven (wall switch) if you get an alert code, unless the instructions in the chart following specifically...
Page 47 - ALERT CODE
45 ALERT CODES ALERT CODE POSSIBLE CAUSES WHAT TO DO The oven has overheated. 1 Allow the oven to cool down. 2 Once the oven has cooled down and the door has unlocked, the alert code will disappear. You can now use the oven again. Door lock error: the door cannot be locked after you have start...
Page 48 - WARRANTY AND SERVICE; Your product is correctly installed.
46 WARRANTY AND SERVICE Before you call for service or assistance ... Check the things you can do yourself. Refer to the installation instructions and your user guide and check that: 1 Your product is correctly installed. 2 You are familiar with its normal operation. If after checking these points y...
Page 49 - In New Zealand and Australia
47 WARRANTY AND SERVICE This oven has been designed and constructed in accordance with the followingcodes and specifications: In New Zealand and Australia ● AS/NZS 60335-1 General Requirements for Domestic electrical appliances ● AS/NZS 60335-2-6 Particular Requirements for Domestic electrical cooki...
Page 50 - ENERGY GUIDELINES; Reducing the environmental impact; Maximise the use of your pre-heated oven – cook or bake in batches.
48 ENERGY GUIDELINES Reducing the environmental impact Reducing energy consumption will reduce the impact of cooking on the environment. The following tips can help you to reduce your energy consumption: ● Do not pre-heat the oven too early. Aim to have the oven hot at the same time as the foodis re...