Page 3 - CONTENTS; SAVE THESE INSTRUCTIONS; Registration; Installation instructions
1 CONTENTS IMPORTANT! SAVE THESE INSTRUCTIONS The models shown in this User guide may not be available in all markets and are subject to change at any time. For current details about model and specification availability in your country, go to our website fisherpaykel.com or contact your local Fisher...
Page 5 - INTRODUCTION; Welcome to your new condenser dryer
3 INTRODUCTION Welcome to your new condenser dryer Thank you for purchasing a Fisher & Paykel clothes dryer. Your new dryer gives you the convenience of tumble drying and your clothes the advantage of not being subjected to the harsh overdrying effects of the sun. Your clothes will feel softer, ...
Page 6 - SAFETY AND WARNINGS; READ AND SAVE THIS GUIDE; Electric Shock Hazard; IMPORTANT SAFETY INSTRUCTIONS; appliance, follow basic precautions, including the following:
4 SAFETY AND WARNINGS READ AND SAVE THIS GUIDE ! WARNING! Electric Shock Hazard Follow the safety precautions outlined in this User guide Failure to do so can result in death or electric shock. IMPORTANT SAFETY INSTRUCTIONS WARNING! To reduce the risk of fire, explosion, electric shock, or injury t...
Page 8 - INSTALLATION INSTRUCTIONS; Before you begin; – Be sure to leave these instructions with the Consumer.; Fire Hazard
6 INSTALLATION INSTRUCTIONS Before you begin Read these instructions completely and carefully. IMPORTANT! Save these instructions for local electrical inspector’s use. IMPORTANT! Observe all governing codes and ordinances. z Install the clothes dryer according to the manufacturer’s instructions and ...
Page 9 - Product dimensions; Overall width of product; Depth to door open; MAXIMUM CAPACITY†; Electrical connection dimensions; Power cords
7 INSTALLATION INSTRUCTIONS Product dimensions DE4024P PRODUCT DIMENSIONS INCHES (MM) A Overall height of product* 33 1/4” (845) B Overall width of product 23 7/16” (595) C Overall depth of product (including dial and door when closed) 25 1/4” (640) D Depth to door open 42” (1067) MAXIMUM CAPACITY† ...
Page 10 - Requirements for alcove or closet installation; ) of open area. If the closet contains both a washer and a; Bathroom or bedroom installation
8 INSTALLATION INSTRUCTIONS Requirements for alcove or closet installation ! WARNING! Explosion Hazard ● Keep flammable materials and vapors, such as gasoline, away from dryer. ● Place dryer at least 18" (46cm) above the floor for a garage installation. ● Failure to do so can result in death, e...
Page 11 - Undercounter installation; If an undercounter installation is desired:; Dryer installed alone
9 INSTALLATION INSTRUCTIONS Undercounter installation If an undercounter installation is desired: z No special dryer installation kit is required. z If the dryer is installed alone, a minimum of 60 square inches (387cm 2 ) of open area is required for ventilation at the front of the dryer. If a wash...
Page 12 - Never leave the access cover off the terminal block.; Dryer power cord kit; Connecting an electric dryer; Level; Materials you will need:; Safety glasses
10 INSTALLATION INSTRUCTIONS Before making the electrical connection, turn off the circuit breaker(s) or remove the dryer’s circuit fuse(s) at the electrical box. Be sure the dryer cord is unplugged from the wall. IMPORTANT! Never leave the access cover off the terminal block. Dryer power cord kit U...
Page 13 - Electrical connection information for electric dryers; new branch-circuit installations
11 INSTALLATION INSTRUCTIONS Electrical connection information for electric dryers For electrical connections using a power cord: ! WARNING! Fire Hazard z Use a new UL-listed 240V 30 amp dryer power supply cord with closed ring terminals or spade terminals with upturned ends. z Use a UL-listed stra...
Page 15 - Never leave the cover off of the terminal block.
13 INSTALLATION INSTRUCTIONS Connecting dryer using 4-wire connection (must be used for mobile home installation) Note: Since January 1, 1996, the National Electrical Code requires that new constructions use a 4-wire connection to an electric dryer. A 4-wire cord must also be used where local codes ...
Page 16 - Connecting dryer using 3-wire connection; Three-wire connection
14 INSTALLATION INSTRUCTIONS Connecting dryer using 3-wire connection If required, by local code, install external ground (not provided) to grounded metal, cold water pipe, or other established ground determined by a qualified electrician. L1 N L2 Cover Ground strap 3/4” Strain relief and bracket 3 ...
Page 17 - Connecting the drain hose; Draining water without using the water tank
15 INSTALLATION INSTRUCTIONS Back view A A B Drain hose Hose guide Cable ties 58” (147cm) Max. EN Connecting the drain hose Draining water without using the water tank You can use the dryer without using the water tank by following the procedures below. To connect the drain hose: 1 Disconnect the dr...
Page 18 - Final setup; Level the dryer
16 INSTALLATION INSTRUCTIONS Final setup Level the dryer 1 Stand the dryer upright near the final location and adjust the four leveling legs at the corners to ensure that the dryer is level from side to side and front to rear. Plug dryer in 2 Note: stacking installations may require a power cord up ...
Page 19 - Completing the installation; Installation test cycle
17 INSTALLATION INSTRUCTIONS Completing the installation Installation test cycle IMPORTANT! Ensure the installation test cycle is completed before you dry any items in your dryer. This is to check that your dryer is installed correctly and that it is functioning properly prior to use. 1 Turn your dr...
Page 20 - OPERATING INSTRUCTIONS; IMPORTANT SAFETY INSTRUCTIONS before operating this appliance.; are replaced correctly before using your dryer.; Condenser dryer control panel
18 OPERATING INSTRUCTIONS WARNING! To reduce the risk of fire, electric shock, or injury to persons, read the IMPORTANT SAFETY INSTRUCTIONS before operating this appliance. z Check the lint filter is clean and the water tank is empty before every load. Ensure both are replaced correctly before using...
Page 21 - If you make an invalid selection the dryer will beep to alert you.
19 OPERATING INSTRUCTIONS z If you make an invalid selection the dryer will beep to alert you. z When the cycle finishes, your dryer will beep and then turn off automatically. If the ‘Wrinkle Free’ option has been selected the machine will rotate the drum periodically blowing cool air into the drum ...
Page 22 - CYCLE
20 OPERATING INSTRUCTIONS Your dryer has a number of drying cycles to suit your laundry needs. Selecting the most appropriate cycle for each particular load will help ensure you get the best result. CYCLE DESIGNED FOR DESCRIPTION Cottons Cottons and most linens. A high heat cycle for cottons and lin...
Page 23 - Dryness Level
21 OPERATING INSTRUCTIONS All drying cycles default to the recommended options for that cycle based on the average expected load size to be dried using that cycle. You can vary the options (eg ‘Dryness Level’, ‘Dry Temp’) to create your desired cycle. Note: some options are not available on some cyc...
Page 24 - Wrinkle Free; Touch and hold the button for 2 seconds.
22 OPERATING INSTRUCTIONS Wrinkle Free If you wish to minimize wrinkling, select one of the ‘Wrinkle Free’ options. At the end of the cycle, the drum will rotate periodically and cool air will be circulated through the load to minimize wrinkling and creasing. This is particularly useful if you canno...
Page 25 - Delay Start; To customize a cycle:; Factory reset; Turn the dial to select the ‘Freshen’ cycle.
23 OPERATING INSTRUCTIONS Delay Start The ‘Delay Start’ option enables you to delay the start of the drying cycle from between 5 minutes and 12 hours. Times you can select are 5 min, 15 min, 30 min, 1 hour, then hourly up to 12 hours. This can be useful to time your drying to finish when you arrive ...
Page 26 - Always follow fabric manufacturer’s care label when laundering.; Fabric care labels; Tumble dry
24 OPERATING INSTRUCTIONS Always follow fabric manufacturer’s care label when laundering. Fabric care labels Below are fabric care label “symbols” that affect the clothing you will be laundering. DRY LABELS Tumble dry Dry Normal Permanent Press/wrinkle resistant Gentle/ delicate Do not tumble dry Do...
Page 27 - This wastes energy and causes wrinkling.
25 OPERATING INSTRUCTIONS Sorting and loading hints ! WARNING! Fire Hazard ● Keep flammable materials and vapors, such as gasoline, away from dryer. ● DO NOT dry anything that has ever had anything flammable on it (even after washing). ● No washer can completely remove oil. ● DO NOT dry anything th...
Page 28 - CARING FOR YOUR DRYER; Cleaning your dryer; Cleaning the control panel and outer surfaces of the dryer; Drum lamp
26 CARING FOR YOUR DRYER Cleaning your dryer Cleaning the control panel and outer surfaces of the dryer Use a soft damp cloth to wipe all surfaces, then wipe dry. Avoid using chemical or scouring cleaners, as these will damage the paint and plastic surfaces of your dryer. Cleaning the inside of your...
Page 29 - Emptying the water collection tank; To empty the water tank:; Never run the dryer without the water tank in place.; To clean the condenser:
27 CARING FOR YOUR DRYER Emptying the water collection tank During the drying cycle steam condenses into water and is collected in the water tank, located at the top left of the dryer. It is important to empty the water tank after every load. There is an indicator light that will illuminate when the...
Page 30 - BEFORE YOU CALL FOR SERVICE
28 User warnings Your dryer is capable of diagnosing a number of its own problems. It will sound a continuous series of beeps and display a code when it has a problem that you can correct yourself. All control panel lights will turn off and a code will be displayed to inform you what the problem is....
Page 31 - FAULT CODES; panel and a number appears on the display, a fault has occurred.
29 FAULT CODES When a continuous series of beeps is sounded, all the lights turn off on the control panel and a number appears on the display, a fault has occurred. The dryer will automatically enter this mode if a fault occurs. The fault code will be displayed as followed by a number on the digital...
Page 32 - TROUBLESHOOTING; PROBLEM; Dryer shakes or
30 TROUBLESHOOTING The following is a list of problems you may encounter when using this appliance and some suggestions that may help to correct the problem. If you still have problems, please contact a properly trained installer. PROBLEM POSSIBLE CAUSES WHAT TO DO Dryer shakes or makes noise. Some ...
Page 33 - The ‘Dry’ dryness
31 TROUBLESHOOTING PROBLEM POSSIBLE CAUSES WHAT TO DO The ‘Dry’ dryness level was chosen but load is still damp. Load consists of a mixture of heavy and light fabrics. When combining heavy and light fabrics in a load, choose a higher dryness level. Lint filter, condenser, and/or air intake vent loca...
Page 34 - Press
32 TROUBLESHOOTING PROBLEM POSSIBLE CAUSES WHAT TO DO No numbers displayed during cycle, only lights. Dryer is continuously monitoring the amount of moisture in the clothes. This is normal. When the dryer senses a low level of moisture in the load, the dryer will display the dry time remaining. ‘TIM...
Page 35 - Clothes are still
33 TROUBLESHOOTING PROBLEM POSSIBLE CAUSES WHAT TO DO Clothes are still wet and dryer shut off after a short time. The door was opened mid-cycle. The load was then removed from the dryer and a new load put in without selecting a new cycle. A dry cycle must be reselected each time a new load is put i...
Page 37 - LIMITED WARRANTY; How long does this limited warranty last?
35 LIMITED WARRANTY When you purchase any new at retail Fisher & Paykel product for personal or consumer use you automatically receive a two year limited warranty covering parts and labor for servicing within the United States & Canada. If there is no authorized Fisher & Paykel service c...
Page 38 - This limited warranty does not cover:
36 LIMITED WARRANTY This limited warranty does not cover: A Service calls that are not related to any defect in the product. The cost of a service call will be charged if the problem is not found to be a defect of the product. For example: 1 Correcting faulty installation of the product. 2 Instructi...
Page 39 - How to get service; USA and Canada; Commercial use
37 LIMITED WARRANTY How to get service Please read your User guide. If you then have any questions about operating the product, need the name of your local Fisher & Paykel trained and supported service technician, or believe the product is defective and wish service under this limited warranty, ...
Page 40 - Complete and keep for safe reference:
38 LIMITED WARRANTY Complete and keep for safe reference: Model Serial No. Purchase Date Purchaser Dealer City State Zip Country
Page 43 - TABLE DES MATIÈRES; Enregistrement; CONSERVEZ CES INSTRUCTIONS; Instructions d’installation
TABLE DES MATIÈRES Enregistrement Enregistrez votre produit afin que nous puissions vous offrir un service de la meilleure qualité possible. Pour enregistrer votre produit, visitez notre site Web : www.fisherpaykel.com 41 IMPORTANT! CONSERVEZ CES INSTRUCTIONS Les modèles illustrés dans ce Guide d’ut...
Page 46 - CONSIGNES DE SÉCURITÉ ET MISES EN GARDE; Risque de choc électrique; CONSIGNES DE SÉCURITÉ IMPORTANTES; Lisez toutes les instructions avant d’utiliser l’appareil.
44 CONSIGNES DE SÉCURITÉ ET MISES EN GARDE Lisez toutes les instructions avant d’utiliser l’appareil. ! MISE EN GARDE! Risque de choc électrique Suivez les consignes de sécurité indiquées dans ce Guide d’utilisation. Le fait de ne pas respecter cette consigne peut causer la mort ou un choc électriqu...
Page 48 - Lisez toutes ces instructions attentivement.; INSTRUCTIONS D’INSTALLATION
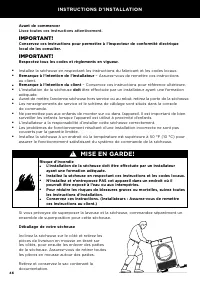
46 Avant de commencer Lisez toutes ces instructions attentivement. IMPORTANT! Conservez ces instructions pour permettre à l’inspecteur de conformité électrique local de les consulter. IMPORTANT! Respectez tous les codes et règlements en vigueur. ● Installez la sécheuse en respectant les instructions...
Page 49 - Profondeur jusqu’à la porte ouverte; † La capacité désigne le poids; à sec; maximal des articles que l’appareil peut sécher à la fois.; Cordons d’alimentation; disponible uniquement sur le modèle
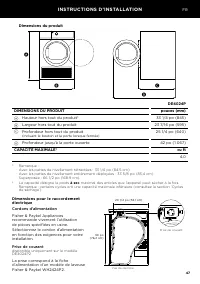
47 Dimensions du produit DE4024P DIMENSIONS DU PRODUIT pouces (mm) A Hauteur hors tout du produit* 33 1/4 po (845) B Largeur hors tout du produit 23 7/16 po (595) C Profondeur hors tout du produit (incluant le bouton et la porte lorsque fermée) 25 1/4 po (640) D Profondeur jusqu’à la porte ouverte 4...
Page 50 - ) pour laisser pénétrer l’air extérieur dans la pièce de la sécheuse.
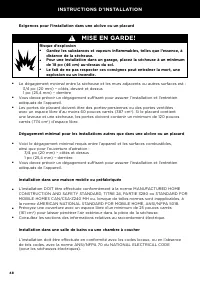
48 Exigences pour l’installation dans une alcôve ou un placard ! MISE EN GARDE! Risque d’explosion ● Gardez les substances et vapeurs inflammables, telles que l’essence, à distance de la sécheuse. ● Pour une installation dans un garage, placez la sécheuse à un minimum de 18 po (46 cm) au-dessus du s...
Page 51 - Installation sous le comptoir; Si une installation sous le comptoir est souhaitée :; Sécheuse installée seule
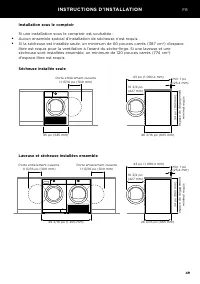
49 Installation sous le comptoir Si une installation sous le comptoir est souhaitée : ● Aucun ensemble spécial d’installation de sécheuse n’est requis. ● Si la sécheuse est installée seule, un minimum de 60 pouces carrés (387 cm 2 ) d’espace libre est requis pour la ventilation à l’avant du sèche-li...
Page 52 - Raccordement d’une sécheuse électrique; Niveau; Ne laissez jamais le bloc de jonction sans couvercle d’accès.
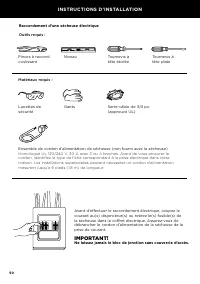
50 Raccordement d’une sécheuse électrique Outils requis : Pinces à raccord coulissant Tournevis à tête étoilée Tournevis à tête plate Niveau Matériaux requis : Lunettes de sécurité Gants Serre-câble de 3/4 po(approuvé UL) Ensemble de cordon d’alimentation de sécheuse (non fourni avec la sécheuse) Ho...
Page 54 - TITLE TO GO HERE; Pour le raccordement direct des fils :
52 TITLE TO GO HERE Informations relatives au raccordement électrique pour les sécheuses électriques Pour le raccordement direct des fils : ! MISE EN GARDE! Risque d’incendie ● Utilisez du fil de cuivre de calibre 10. ● Utilisez un serre-câble homologué UL. ● Déconnectez l’alimentation avant d’effec...
Page 55 - Branchement de la sécheuse à l’aide d’un raccordement à 4 fils; Remarque : depuis le 1; janvier 1996, le National Electrical Code exige que les nouvelles; dans le coffret électrique.; Ne laissez jamais le bloc de jonction sans couvercle.
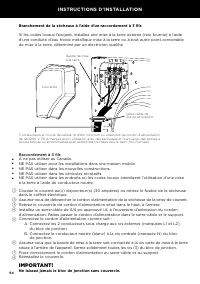
53 TITLE TO GO HERE Branchement de la sécheuse à l’aide d’un raccordement à 4 fils (doit être utilisé pour l’installation dans une maison mobile) Remarque : depuis le 1 er janvier 1996, le National Electrical Code exige que les nouvelles constructions utilisent un raccordement à 4 fils pour le branc...
Page 56 - Branchement de la sécheuse à l’aide d’un raccordement à 3 fils; Raccordement à 3 fils
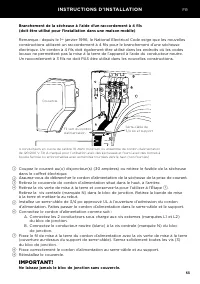
54 Branchement de la sécheuse à l’aide d’un raccordement à 3 fils Si les codes locaux l’exigent, installez une mise à la terre externe (non fournie) à l’aide d’une conduite d’eau froide métallique mise à la terre ou à tout autre point convenable de mise à la terre, déterminé par un électricien quali...
Page 57 - Raccordement du tuyau d’évacuation; Évacuation de l’eau sans utiliser le réservoir d’eau
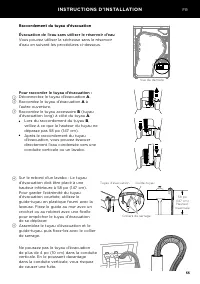
55 Raccordement du tuyau d’évacuation Évacuation de l’eau sans utiliser le réservoir d’eau Vous pouvez utiliser la sécheuse sans le réservoir d’eau en suivant les procédures ci-dessous. Pour raccorder le tuyau d’évacuation : 1 Déconnectez le tuyau d’évacuation A . 2 Raccordez le tuyau d’évacuation A...
Page 58 - Configuration finale; Mettez la sécheuse de niveau
56 Configuration finale 1 Mettez la sécheuse de niveau Placez la sécheuse à la verticale près de l’emplacement final et ajustez les quatre pattes de nivellement dans les coins afin que la sécheuse soit de niveau de droite à gauche et d’avant en arrière. 2 Branchez la sécheuse Remarque : les installa...
Page 59 - Pour terminer l’installation; Cycle de test d’installation
57 Pour terminer l’installation Cycle de test d’installation IMPORTANT! Assurez-vous que le cycle de test d’installation soit terminé avant de sécher des articles dans votre sécheuse. Cela permet de vérifier que la sécheuse est installée correctement et qu’elle fonctionne adéquatement avant l’utilis...
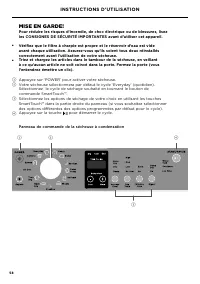
Page 60 - INSTRUCTIONS D’UTILISATION; correctement avant l’utilisation de votre sécheuse.; Appuyez sur ‘POWER’ pour activer votre sécheuse.
58 INSTRUCTIONS D’UTILISATION MISE EN GARDE! Pour réduire les risques d’incendie, de choc électrique ou de blessures, lisez les CONSIGNES DE SÉCURITÉ IMPORTANTES avant d’utiliser cet appareil. ● Vérifiez que le filtre à charpie est propre et le réservoir d’eau est vide avant chaque utilisation. Assu...
Page 61 - peuvent être extrêmement chauds.
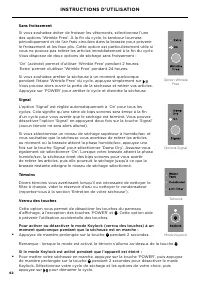
59 INSTRUCTIONS D’UTILISATION ● Lorsque vous effectuez une sélection invalide, la sécheuse émet un bip sonore pour vous avertir. ● Une fois le cycle terminé, votre sécheuse émet un bip sonore, puis elle s’éteint automatiquement. Lorsque l’option ‘Wrinkle Free’ (sans froissement) est sélectionnée, le...
Page 63 - Niveau de séchage
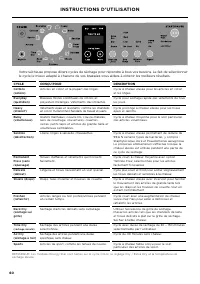
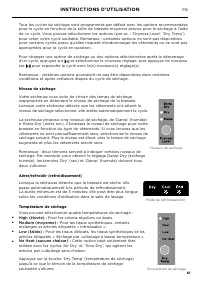
61 INSTRUCTIONS D’UTILISATION Tous les cycles de séchage sont programmés par défaut avec les options recommandées pour le cycle en fonction de la taille de brassée moyenne prévue pour le séchage à l’aide de ce cycle. Vous pouvez sélectionner les options (par ex. : ‘Dryness Level’, ‘Dry Temp’) pour c...
Page 64 - Sans froissement; Pour activer ou désactiver le mode Keylock (verrou des touches) à un; Si le mode Keylock est activé pendant que l’appareil est éteint :
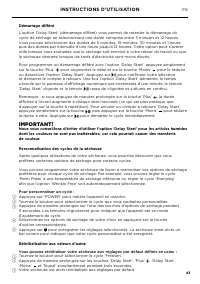
62 INSTRUCTIONS D’UTILISATION Sans froissement Si vous souhaitez éviter de froisser les vêtements, sélectionnez l’une des options ‘Wrinkle Free’. À la fin du cycle, le tambour tournera périodiquement et de l’air frais circulera dans la brassée pour prévenir le froissement et les faux plis. Cette opt...
Page 65 - Démarrage différé; Pour personnaliser un cycle :; Réinitialisation aux valeurs d’usine
63 INSTRUCTIONS D’UTILISATION Démarrage différé L’option ‘Delay Start’ (démarrage différé) vous permet de retarder le démarrage du cycle de séchage en sélectionnant une durée comprise entre 5 minutes et 12 heures. Vous pouvez sélectionner des durées de 5 minutes, 15 minutes, 30 minutes et 1 heure, p...
Page 66 - Étiquettes d’entretien des tissus
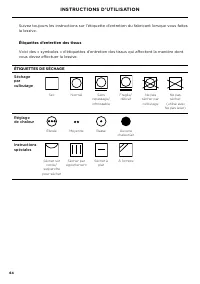
64 INSTRUCTIONS D’UTILISATION Suivez toujours les instructions sur l’étiquette d’entretien du fabricant lorsque vous faites la lessive. Étiquettes d’entretien des tissus Voici des « symboles » d’étiquettes d’entretien des tissus qui affectent la manière dont vous devez effectuer la lessive. ÉTIQUETT...
Page 67 - Cela entraîne une perte d’énergie et cause le froissement.
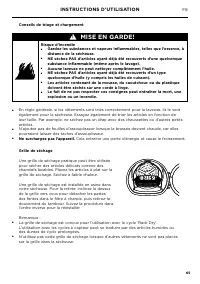
65 INSTRUCTIONS D’UTILISATION Conseils de triage et chargement ! MISE EN GARDE! Risque d’incendie ● Gardez les substances et vapeurs inflammables, telles que l’essence, à distance de la sécheuse. ● NE séchez PAS d’articles ayant déjà été recouverts d’une quelconque substance inflammable (même après ...
Page 68 - ENTRETIEN DE VOTRE SÉCHEUSE; Nettoyage de votre sécheuse; Nettoyage de l’intérieur de votre sécheuse; Lumière du tambour
66 ENTRETIEN DE VOTRE SÉCHEUSE Nettoyage de votre sécheuse Nettoyage du panneau de commande et des surfaces externes de la sécheuse Utilisez un chiffon doux et humide pour nettoyer toutes les surfaces, puis essuyez pour sécher. Évitez d’utiliser des nettoyants chimiques ou abrasifs, car ces derniers...
Page 69 - Pour vider le réservoir d’eau :
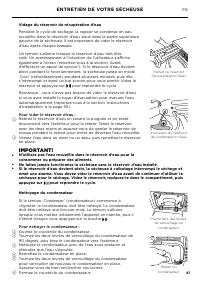
67 ENTRETIEN DE VOTRE SÉCHEUSE Vidage du réservoir de récupération d’eau Pendant le cycle de séchage, la vapeur se condense en eau recueillie dans le réservoir d’eau, situé dans la partie supérieure gauche de la sécheuse. Il est important de vider le réservoir d’eau après chaque brassée. Un témoin s...
Page 70 - AVANT D’EFFECTUER UN APPEL DE SERVICE
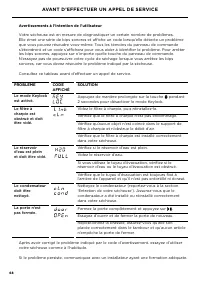
68 Avertissements à l’intention de l’utilisateur Votre sécheuse est en mesure de diagnostiquer un certain nombre de problèmes. Elle émet une série de bips sonores et affiche un code lorsqu’elle détecte un problème que vous pouvez résoudre vous-même. Tous les témoins du panneau de commande s’éteindro...
Page 71 - CODES DE DÉFAILLANCE; et qu’un numéro apparaît sur l’afficheur.
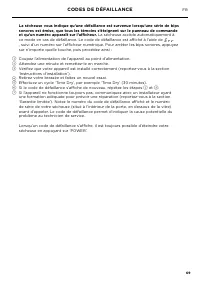
69 CODES DE DÉFAILLANCE La sécheuse vous indique qu’une défaillance est survenue lorsqu’une série de bips sonores est émise, que tous les témoins s’éteignent sur le panneau de commande et qu’un numéro apparaît sur l’afficheur. La sécheuse accède automatiquement à ce mode en cas de défaillance. Le co...
Page 72 - DÉPANNAGE; PROBLÈME; La sécheuse
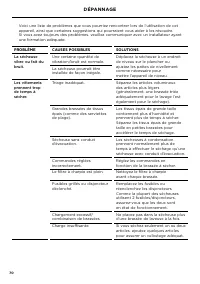
70 DÉPANNAGE Voici une liste de problèmes que vous pourriez rencontrer lors de l’utilisation de cet appareil, ainsi que certaines suggestions qui pourraient vous aider à les résoudre. Si vous avez toujours des problèmes, veuillez communiquer avec un installateur ayant une formation adéquate. PROBLÈM...
Page 73 - Le réservoir d’eau est plein.
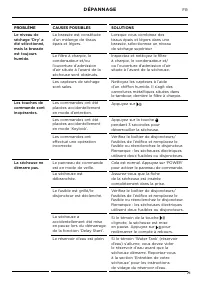
71 DÉPANNAGE PROBLÈME CAUSES POSSIBLES SOLUTIONS Le niveau de séchage ‘Dry’ a été sélectionné, mais la brassée est toujours humide. La brassée est constituée d’un mélange de tissus épais et légers. Lorsque vous combinez des tissus épais et légers dans une brassée, sélectionnez un niveau de séchage s...
Page 76 - Le filtre à charpie est plein.
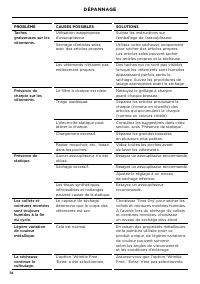
74 DÉPANNAGE PROBLÈME CAUSES POSSIBLES SOLUTIONS Taches graisseuses sur les vêtements. Utilisation inappropriée d’assouplisseur. Suivez les instructions sur l’emballage de l’assouplisseur. Séchage d’articles sales avec des articles propres. Utilisez votre sécheuse uniquement pour sécher des articles...
Page 77 - GARANTIE LIMITÉE; d’entretien à l’endroit où se trouve le produit.; Quelle est la durée de cette garantie limitée?; partir de la date d’achat.
75 GARANTIE LIMITÉE Lorsque vous achetez au détail un nouveau produit Fisher & Paykel destiné à un usage personnel ou celui d’un consommateur, vous bénéficiez automatiquement d’une garantie limitée de deux ans s’appliquant aux pièces et à la main-d’œuvre pour le service aux États-Unis et au Cana...
Page 78 - Cette garantie limitée ne couvre pas :
76 GARANTIE LIMITÉE Cette garantie limitée ne couvre pas : A Les demandes de réparation pour tout problème non lié à une défectuosité du produit. Le coût de la demande de réparation sera facturé s’il se trouve que le problème n’est pas dû à une défectuosité du produit. Par exemple : 1 Correction d’u...
Page 79 - Comment obtenir du service; SANS FRAIS; Utilisation commerciale
77 GARANTIE LIMITÉE Comment obtenir du service Veuillez lire votre Guide d’utilisation. Si vous avez des questions concernant l’utilisation du produit, souhaitez trouver le nom d’un agent de service autorisé Fisher & Paykel local ou pensez que le produit est défectueux et désirez le faire répare...
Page 80 - Remplir et conserver pour référence ultérieure :
78 GARANTIE LIMITÉE Remplir et conserver pour référence ultérieure : Modèle N° de série Date d’achat Acheteur Détaillant Ville État/Province Code postal Pays