Page 2 - CUSTOMER CARE AND SERVICE; Visit our website to:; Register your product for better service:
CONTENTS WE’RE THINKING OF YOU CUSTOMER CARE AND SERVICE 2 www.electrolux.com SAFETY INFORMATION PRODUCT DESCRIPTIONCONTROL PANELBEFORE FIRST USEDAILY USE - WASHING WASHING HINTSINTERNATIONAL WASH CODE SYMBOLSCARE AND CLEANINGTROUBLESHOOTING .............................................................
Page 3 - SAFETY INFORMATION; Conditions of use
ENGLISH 3 SAFETY INFORMATION In the interest of your safety and to ensure the correct use, before installing and first using the appliance, read this user manual carefully, including its hints and warnings. This appliance is intended to be used in household and similar applications such as: Farm hou...
Page 6 - CHILD SAFETY DEVICE
6 www.electrolux.com This washer-dryer is not intended for use by young children or infirm persons without supervision. Young children should be supervised to ensure that they do not play with the appliance.The packaging components (e.g. plastic film, polystyrene) can be dangerous to children - dang...
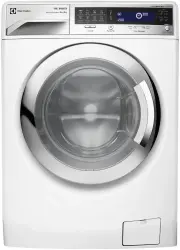
Page 7 - PRODUCT DESCRIPTION; Plastic caps
ENGLISH 7 PRODUCT DESCRIPTION 2. 1 Worktop 2 Detergent/Softener Dispenser 3 Control Panel 4 Door Handle 5 Door 13 Door Blocking button 14 Rating Plate 15 Drain Pump Filter 7 6 Level Adjustment Feet (Front) 8 Mains Cable 9 Water Inlet Hose 10 Water Drain Hose 11 Hose Support 12 Level Adjustment Feet ...
Page 8 - CONTROL PANEL; Program Touchpads
CONTROL PANEL 3. 1 On/Off Button 2 Program Touchpads 3 Favourite Touchpad 4 Temperature Touchpad 5 Spin Selection Touchpad 6 Adjust Time Touchpad 7 Delay Start Touchpad 8 Display 9 10 Dryness Touchpad 11 Dry Time Touchpad 12 Prewash Touchpad 13 Vapour Touchpad 14 Start/Pause TouchpadRinse Plus Optio...
Page 9 - Temperature Touchpad; No Spin; Delay Start Touchpad
ENGLISH 9 If you wish to add laundry in the machine during the delay time, press Start/Pause touchpad to put the machine in pause mode. Add laundry, close the door and press Start/Pause touchpad again. 3.4 Temperature Touchpad Press this touchpad repeatedly to increase or decrease the wash temperatu...
Page 11 - Prewash Touchpad; Select this option
ENGLISH 11 3.12 Vapour Touchpad 3.11 Prewash Touchpad 3.14 Rinse Plus Option This option is recommended for people who are allergic to detergents, and in areas where the water is very soft. To activate this option, press ‘Dry Time’ and ‘Prewash’ touchpads at the same time until the display shows the...
Page 12 - if drying option; Refresh; if drying option
12 www.electrolux.com Wool;40 °C to ( Cold ) More >> Specially tested program for woollen garments bearing the ‘pure new woollen, non-shrink, machine washable’ label;max. load 2 Kg ( if drying option combined, please reduce to 1 Kg ) 3.15 Programs + Options Program;Temperature White and colour...
Page 13 - Rinse; Dry; WOOLMARK CERTIFICATE
ENGLISH 13 Program;Temperature Hand Wash40 °C to ( Cold ) Type of load; Max. weight of load Cycle description Options can be combined Machine washable woollen, hand washable woollen and delicate fabrics with hand washing ‘ ’ care symbol;max. load 2 Kg ( if drying option combined, please reduce to 1 ...
Page 14 - Suitable for ironing; Dryness Option Guides; Wool and hand washable wool.; Duration of the drying cycle
14 www.electrolux.com Level of dryness Type of fabric Load Extra Dry Ideal for towelling materials Suitable for items to put away without ironing Cotton and linen (bathrobes, bath towels, etc) up to 6 Kg. Cupboard Dry Suitable for ironing Iron Dry Cotton and linen(bathrobes, bath towels, etc) Synthe...
Page 15 - avoid excessive; Additional drying; The message “; Set dosage; ” comes on in the text bar.; BEFORE FIRST USE; Detergent Quantity Setting; The buzzer sounds operate when:
ENGLISH 15 To prevent the formation of creases or shrinking of fabrics, avoid excessive drying . WARNING! Should the laundry still be too wet at the end of the program, set another short drying cycle. The final part of a washer- dryer cycle occurs without heat (cool down cycle). This ensures the lau...
Page 16 - The relevant light will light up.; Four Steps Start Up Guide; , press the ‘Delay Start ’
16 www.electrolux.com pess the Spin ‘ ’ and the temperature ‘ ’ touchpads repeatedly to change the spin speed and temperature. DAILY USE - WASHING 5. Step 1 - Setting A Program 1. Press the On/Off button to turn on the washer-dryer. 3. If you want your laundry to be spun or use temperature different...
Page 17 - - Loading The Laundry
ENGLISH 17 Make sure that no laundry remains between the seal and the door. 4. Close the door. 5. Step 2 - Loading The Laundry 1. Before loading the laundry, please make sure: Empty pockets. Tie the cords. Fasten buttons. Close zippers. Open the door by carefully pulling the door handle outwards. Ch...
Page 18 - - Using Detergent And Additives; down; Position; up
18 www.electrolux.com Measure out the amount of detergent required, pour it into the main wash compartment ( ). Step 3 - Using Detergent And Additives Detergent Dispenser Drawer 1. The detergent dispenser is divided into three compartments. Compartment ‘SOFTENER’ Compartment ‘PREWASH’ This compartme...
Page 19 - Close the drawer gently.; - Starting a program
ENGLISH 19 If you wish to carry out the “Prewash” phase, pour it into the compartment marked . If required, pour fabric softener into the compartment marked (the amount used must not exceed the “MAX” mark in the drawer). - Close the drawer gently. - - The appliance will automatically adjust the sele...
Page 20 - you have to switch the; At The End Of The Program
20 www.electrolux.com When the program is completed and the door lock indicator ‘ ’ goes off, you can open the door. While a program or the Delay Start is operating, the appliance door is locked and the display shows the indicator ‘ ’. First set the machine to PAUSE by pressing the “Start/Pause” tou...
Page 21 - Child Lock Option; Setting Child Lock option:; Washing & Automatic Drying; Press to start the program.; Washing & Timed Drying
ENGLISH 21 5.9 Child Lock Option Your appliance is provided with CHILD SAFETY LOCK which permits you to leave the appliance unsupervised with the door closed without having to worry that children might be injured by or cause damage to the appliance.Set this option before pressing the Start/Pause and...
Page 22 - Automatic Dryness Levels:
22 www.electrolux.com To achieve the best drying results the appliance will not allow you to set spin speed lower than minimum required. In the display the indicator ‘ ’ comes on. The door is locked. Some drying level options are not available for some drying programs. The display shows a time value...
Page 23 - WASHING HINTS; Sorting The Laundry; Blood; : treat fresh stains with cold; Oil based paint
ENGLISH 23 WASHING HINTS 8. Follow the wash code symbols on each garment label and the manufacturer’s washing instructions. Sort the laundry as follows: whites, coloureds, synthetics, delicates, woollens. 8.1 Sorting The Laundry 8.2 Temperatures 90°C 60°C50°C40°C 30°CCold For normally soiled, colour...
Page 24 - Detergents and Additives
24 www.electrolux.com Rust : oxalic acid dissolved in hot water or a rust removing product used in cold water. Be careful with rust stains which are not recent since the cellulose structure will already have been damaged and the fabric tends to hole. Mould stains : treat with bleach, rinse well (whi...
Page 25 - reduced washing effect,
ENGLISH 25 the washload to turn grey,greasy clothes. sudsing, inadequate rinsing. reduced washing effect, Any fabric softener or starching additives must be poured into the compartment marked ‘ ’ before starting the wash program.Follow the product manufacturer’s recommendations on quantities to use ...
Page 26 - INTERNATIONAL WASH CODE SYMBOLS
26 www.electrolux.com INTERNATIONAL WASH CODE SYMBOLS 9. These symbols appear on fabric labels, in order to help you choose the best way to treat your laundry. Bleach in cold water DO NOT bleach Bleaching Energetic wash Delicate wash Hand wash Max. wash temperature 95 °C Hot iron max. 200 °C Dry cle...
Page 27 - CARE AND CLEANING; External Cleaning; To run a maintenance wash:
ENGLISH 27 CARE AND CLEANING 10. You must DISCONNECT the appliance from the electricity supply, before you can carry out any cleaning or maintenance work. The water we use normally contains lime. It is a good idea to periodically use a water softening powder in the machine. Clean the appliance only ...
Page 28 - Disconnect the mains plug
28 www.electrolux.com To aid cleaning, the top part of the additive compartment should be removed. Having removed the drawer, use a small brush to clean the recess, ensuring that all washing powder residue is removed from the upper and lower part of the recess. Replace the drawer and run the rinse p...
Page 29 - To clean the drain pump:; Put a container below the recess
ENGLISH 29 To clean the drain pump: 1. Open the drain pump door. 2. Pull the flap down. 3. Put a container below the recess of the drain pump to collect the water that flows out. 4. Press the two levers and pull forward the drainage duct to let the water flow out. 5. When the container is full of wa...
Page 31 - Cleaning The Water Inlet Filter
ENGLISH 31 10. Put the filter back in the pump into the special guides. Make sure that you tighten correctly the filter to prevent leakages. 11. Put the flap back and close the drain pump door. If your water is very hard or contains traces of lime deposit, the water inlet filter may become clogged. ...
Page 32 - The Dangers Of Freezing; Turn off the water tap.
32 www.electrolux.com 6. Install again the inlet hose. Make sure that the couplings aretight to prevent leakages. 7. Open the water tap. If the machine is exposed to temperatures below 0°C, certain precautions should be taken. 10.9 The Dangers Of Freezing Turn off the water tap. 1.2. Unscrew the inl...
Page 33 - Clean the drain filter.; TROUBLESHOOTING; Slelect spin program.; Malfunction
ENGLISH 33 The door has not been closed. (Error code: ) The plug is not properly inserted in the power socket.There is no power at the socket. Insert the plug into the power socket.Please check your domestic electrical installation. The Start/Pause button has not been pressed. Press the Start/Pause ...
Page 35 - Machine not installed properly.
ENGLISH 35 If you are unable to identify or solve the problem, contact our service centre. Before telephoning, make a note of the model, serial number and purchase date of your machine: the Service Centre will require this information. Malfunction Possible cause Solution The electronic unbalance det...
Page 36 - TECHNICAL DATA
36 www.electrolux.com TECHNICAL DATA 12. Dimensions (Width / Height / Depth) Maximum load Spin speed (Maximum / Minimum) 1400 rpm / 400 rpm 59.6 X 84.8 X 66.5 cm Power supply (Voltage / Frequency) Total power absorbed Water supply pressure (Maximum / Minimum) 0.8 MPa / 0.05 MPa 220-240 V/50 Hz 2200 ...
Page 37 - INSTALLATION
ENGLISH 37 INSTALLATION 13. 13.1 Unpacking You are advised to keep all transit devices so that they can be refitted if the machine ever has to be transported again. Use gloves. Remove the external film. If necessary, use a cutter. Remove the polystyrene packaging materials.Remove the plastic bag whi...
Page 41 - Electrical Connection
ENGLISH 41 13.5 Electrical Connection “An incorrect power supply may void your warranty.” Check that your domestic electrical installation can take the maximum load required (2.2 kW), also taking into account any other appliances in use. The manufacturer declines any responsibility for damage or inj...
Page 42 - ENVIRONMENT CONCERNS
42 www.electrolux.com The materials marked with the symbol are recyclable. >PE<=polyethylene>PS<=polystyrene>PP<=polypropylene This means that they can be recycled by disposing of them properly in appropriate collection containers. To save water, energy and to help protect the envi...