Page 2 - Safety Warning
Safety Warning 1. The UPS utilizes voltages that may be hazardous. Do not attempt to disassemble the unit. The unit contains no user serviceable parts. Only factory service personnel may perform repairs. 2. Internal battery voltage is 12Vdc. sealed, lead-acid, 6 cells battery. 3. Connection to any o...
Page 5 - SPECIFICATION
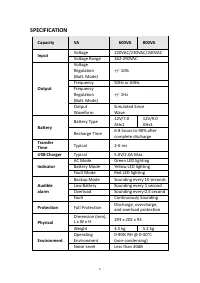
SPECIFICATION Capacity VA 600VA 800VA Input Voltage 220VAC/230VAC/240VAC Voltage Range 162-290VAC Output Voltage Regulation (Batt. Mode) +/- 10% Frequency 50Hz or 60Hz Frequency Regulation (Batt. Mode) +/- 1Hz Output Waveform Simulated Since Wave Battery Battery Type 12V/7.0 AHx1 12V/9.0 AHx1 Rechar...
Page 6 - SYSTEM DESCRIPTION
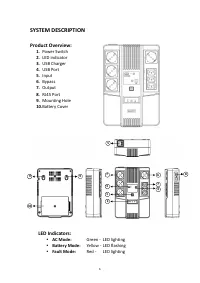
SYSTEM DESCRIPTION Product Overview: 1. Power Switch 2. LED indicator 3. USB Charger 4. USB Port 5. Input 6. Bypass 7. Output 8. RJ45 Port 9. Mounting Hole 10. Battery Cover LED Indicators: AC Mode: Green - LED lighting Battery Mode: Yellow - LED flashing Fault Mode: Red - LED lighting 7 9 6 3...
Page 8 - Connection
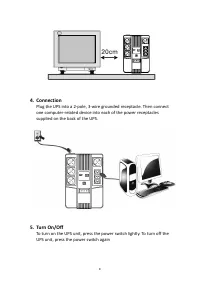
4. Connection Plug the UPS into a 2-pole, 3-wire grounded receptacle. Then connect one computer-related device into each of the power receptacles supplied on the back of the UPS. 5. Turn On/Off To turn on the UPS unit, press the power switch lightly. To turn off the UPS unit, press the power switch ...
Page 9 - DC start; TROUBLE SHOOTING; Power Switch
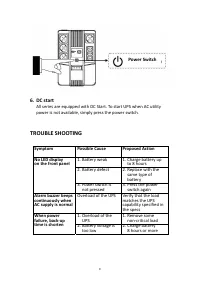
6. DC start All series are equipped with DC Start. To start UPS when AC utility power is not available, simply press the power switch. TROUBLE SHOOTING Symptom Possible Cause Proposed Action No LED display on the front panel 1. Battery weak 1. Charge battery up to 8 hours 2. Battery defect 2. Replac...
Page 11 - Benutzerhandbuch
DIGITUS® All-in-One USV-Anlage Benutzerhandbuch DN-170110 • DN-170111 11
Page 12 - Sicherheitshinweise
Sicherheitshinweise 1. Die USV nutzt Spannungen, die gefährlich sein können. Versuchen Sie nicht, das Gerät zu demontieren. Das Gerät enthält keine vom Benutzer zu wartenden Teile. Reparaturen dürfen nur vom Werkskundendienst durchgeführt werden. 2. Die interne Akkuspannung beträgt 12 V DC. Versiege...
Page 15 - SPEZIFIKATION
SPEZIFIKATION Kapazität VA 600VA 800VA Eingang Spannung 220 VAC/230 VAC/240 VAC Spannungsbereich 162 - 290 V AC Ausgang Spannungsregelung (Akkumodus) +/- 10 % Frequenz 50 Hz oder 60 Hz Frequenzregelung (Akkumodus) +/- 1 Hz Ausgangswellenform Simulierte Sinuswelle Akku Akkutyp 12 V/7,0 Ah x 1 12 V/9,...
Page 16 - SYSTEMBESCHREIBUNG
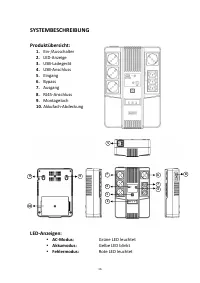
SYSTEMBESCHREIBUNG Produktübersicht: 1. Ein-/Ausschalter 2. LED-Anzeige 3. USB-Ladegerät 4. USB-Anschluss 5. Eingang 6. Bypass 7. Ausgang 8. RJ45-Anschluss 9. Montageloch 10. Akkufach-Abdeckung LED-Anzeigen: AC-Modus: Grüne LED leuchtet Akkumodus: Gelbe LED blinkt Fehlermodus: Rote LED leuchte...
Page 19 - STÖRUNGSBEHEBUNG
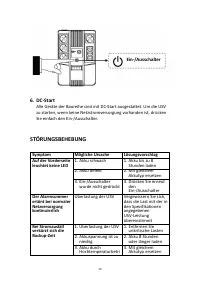
6. DC-Start Alle Geräte der Baureihe sind mit DC-Start ausgestattet. Um die USV zu starten, wenn keine Netzstromversorgung vorhanden ist, drücken Sie einfach den Ein-/Ausschalter. STÖRUNGSBEHEBUNG Symptom Mögliche Ursache Lösungsvorschlag Auf der Vorderseite leuchtet keine LED 1. Akku schwach 1. Akk...
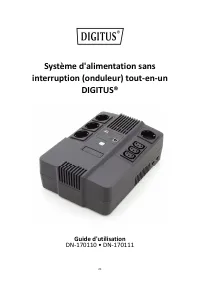
Page 22 - Avertissements de sécurité
Avertissements de sécurité 1. L’onduleur utilise des tensions pouvant être dangereuses. N'essayez pas de démonter l’appareil. Il ne contient aucune pièce réparable par l'usager. Toute réparation doit être effectuée par le fabriquant. 2. La tension de la batterie interne est de 12VDC, il s’agit d’une...
Page 25 - SPÉCIFICATION
SPÉCIFICATION Capacité VA 600VA 800VA Entrée Tension 220 V CA/230 V CA/240 V CA Plage de tensions 162 à 290 V CA Sortie Régulation de tension (mode batterie) +/- 10 % Fréquence 50 Hz ou 60 Hz Régulation de fréquence (mode batterie) +/- 1 Hz Forme d’onde de sortie Onde sinusoïdale simulée Batterie Ty...
Page 26 - DESCRIPTION DU SYSTÈME
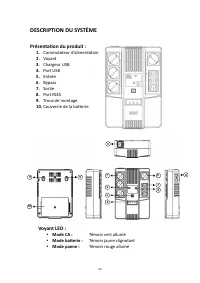
DESCRIPTION DU SYSTÈME Présentation du produit : 1. Commutateur d’alimentation 2. Voyant 3. Chargeur USB 4. Port USB 5. Entrée 6. Bypass 7. Sortie 8. Port RJ45 9. Trous de montage 10. Couvercle de la batterie Voyant LED : Mode CA : Témoin vert allumé Mode batterie : Témoin jaune clignotant Mod...
Page 28 - Connexion
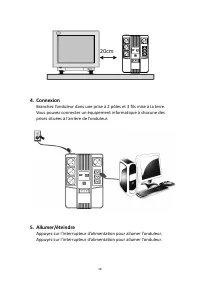
4. Connexion Branchez l’onduleur dans une prise à 2 pôles et 3 fils mise à la terre. Vous pouvez connecter un équipement informatique à chacune des prises situées à l’arrière de l’onduleur. 5. Allumer/éteindre Appuyez sur l’interrupteur d’alimentation pour allumer l’onduleur. Appuyez sur l’interrupt...
Page 29 - Démarrage à froid; DEPANNAGE; Commutateur
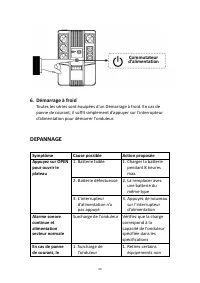
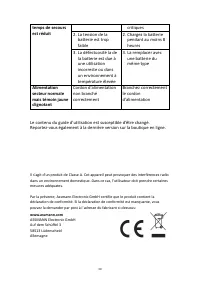
6. Démarrage à froid Toutes les séries sont équipées d'un Démarrage à froid. En cas de panne de courant, il suffit simplement d’appuyer sur l’interrupteur d’alimentation pour démarrer l’onduleur. DEPANNAGE Symptôme Cause possible Action proposée Appuyez sur OPEN pour ouvrir le plateau 1. Batterie fa...
Page 31 - Sistema UPS All In One DIGITUS®
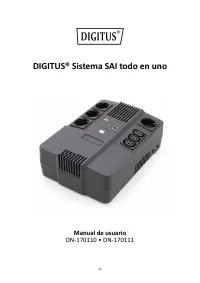
Sistema UPS All In One DIGITUS® Manuale dell'utente DN-170110 • DN-170111 31
Page 32 - Avvertenze per la sicurezza
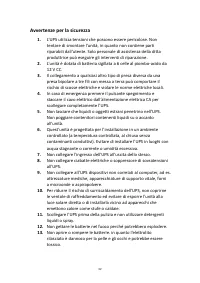
Avvertenze per la sicurezza 1. L’UPS utilizza tensioni che possono essere pericolose. Non tentare di smontare l’unità, in quanto non contiene parti riparabili dall'utente. Solo personale di assistenza della ditta produttrice può eseguire gli interventi di riparazione. 2. L’unità è dotata di batteria...
Page 35 - SPECIFICHE
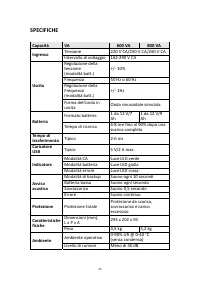
SPECIFICHE Capacità VA 600 VA 800 VA Ingresso Tensione 220 V CA/230 V CA/240 V CA Intervallo di voltaggio 162-290 V CA Uscita Regolazione della tensione (modalità batt.) +/- 10% Frequenza 50 Hz o 60 Hz Regolazione della Frequenza (modalità batt.) +/- 1Hz Forma dell’onda in uscita Onda sinusoidale si...
Page 36 - DESCRIZIONE DEL SISTEMA; Panoramica del prodotto:
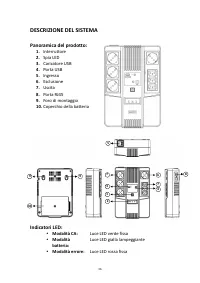
DESCRIZIONE DEL SISTEMA Panoramica del prodotto: 1. Interruttore 2. Spia LED 3. Caricatore USB 4. Porta USB 5. Ingresso 6. Esclusione 7. Uscita 8. Porta RJ45 9. Foro di montaggio 10. Coperchio della batteria Indicatori LED: Modalità CA: Luce LED verde fissa Modalità batteria: Luce LED gialla lam...
Page 39 - Avvio CC; RISOLUZIONE DEI PROBLEMI; Interruttore
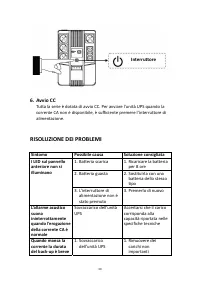
6. Avvio CC Tutta la serie è dotata di avvio CC. Per avviare l’unità UPS quando la corrente CA non è disponibile, è sufficiente premere l’interruttore di alimentazione. RISOLUZIONE DEI PROBLEMI Sintomo Possibile causa Soluzione consigliata I LED sul pannello anteriore non si illuminano 1. Batteria s...
Page 41 - DIGITUS® Sistema SAI todo en uno; Manual de usuario
DIGITUS® Sistema SAI todo en uno Manual de usuario DN-170110 • DN-170111 41
Page 42 - Advertencias de seguridad
Advertencias de seguridad 1. El SAI utiliza tensión que podría ser peligrosa. No intente desmontar la unidad. No contiene piezas reparables por el usuario. Solo el personal de servicio de fábrica puede realizar las reparaciones. 2. La batería interna es de 6 celdas de 12 VCC, ácido de plomo y está s...
Page 45 - ESPECIFICACIONES
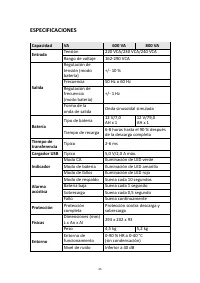
ESPECIFICACIONES Capacidad VA 600 VA 800 VA Entrada Tensión 220 VCA/230 VCA/240 VCA Rango de voltaje 162-290 VCA Salida Regulación de tensión (modo batería) +/- 10 % Frecuencia 50 Hz o 60 Hz Regulación de frecuencia (modo batería) +/- 1 Hz Forma de la onda de salida Onda sinusoidal simulada Batería ...
Page 46 - DESCRIPCIÓN DEL SISTEMA; Vista general del producto:
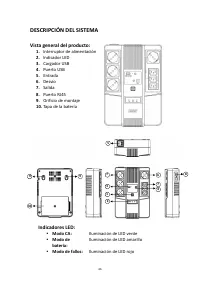
DESCRIPCIÓN DEL SISTEMA Vista general del producto: 1. Interruptor de alimentación 2. Indicador LED 3. Cargador USB 4. Puerto USB 5. Entrada 6. Desvío 7. Salida 8. Puerto RJ45 9. Orificio de montaje 10. Tapa de la batería Indicadores LED: Modo CA: Iluminación de LED verde Modo de batería: Ilumin...
Page 48 - Conexión
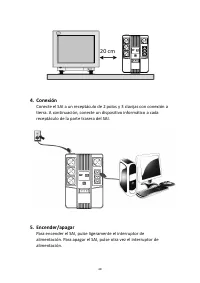
4. Conexión Conecte el SAI a un receptáculo de 2 polos y 3 clavijas con conexión a tierra. A continuación, conecte un dispositivo informático a cada receptáculo de la parte trasera del SAI. 5. Encender/apagar Para encender el SAI, pulse ligeramente el interruptor de alimentación. Para apagar el SAI,...
Page 49 - Arranque CC; SOLUCIÓN DE PROBLEMAS; Interruptor de
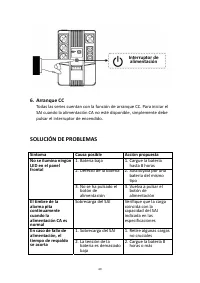
6. Arranque CC Todas las series cuentan con la función de arranque CC. Para iniciar el SAI cuando la alimentación CA no esté disponible, simplemente debe pulsar el interruptor de encendido. SOLUCIÓN DE PROBLEMAS Síntoma Causa posible Acción propuesta No se ilumina ningún LED en el panel frontal 1. B...
Page 51 - DIGITUS® Zasilacz awaryjny UPS; Instrukcja u
DIGITUS® Zasilacz awaryjny UPS Instrukcja u ż ytkowania DN-170110 • DN-170111 51
Page 54 - WPROWADZENIE; ZAWARTO
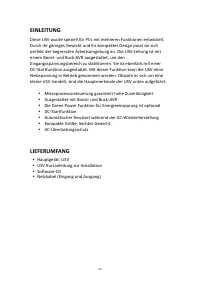
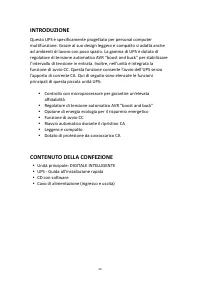
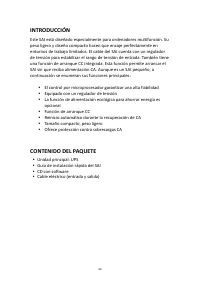
WPROWADZENIE System zasilania awaryjnego UPS to wielofunkcyjne urz ą dzenie zaprojektowane do wspó ł pracy z komputerami osobistymi. Jego niewielka waga i wymiary u ł atwiaj ą zastosowanie go na stanowisku pracy o ograniczonych rozmiarach. Linia produktów UPS zosta ł a wyposa ż ona w automatyczny re...
Page 55 - SPECYFIKACJA
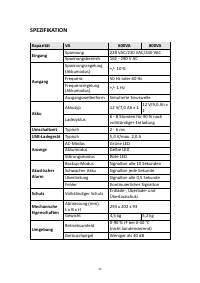
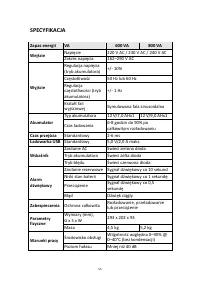
SPECYFIKACJA Zapas energii VA 600 VA 800 VA Wej ś cie Napi ę cie 220 V AC / 230 V AC / 240 V AC Zakres napi ę cia 162–290 V AC Wyj ś cie Regulacja napi ę cia (tryb akumulatora) +/- 10% Cz ę stotliwo ść 50 Hz lub 60 Hz Regulacja cz ę stotliwo ś ci (tryb akumulatora) +/- 1 Hz Kszta ł t fali wyj ś ciow...
Page 56 - Przegl
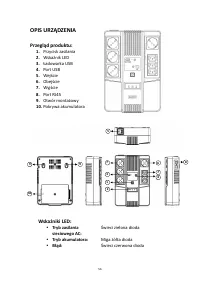
OPIS URZ Ą DZENIA Przegl ą d produktu: 1. Przycisk zasilania 2. Wska ź nik LED 3. Ł adowarka USB 4. Port USB 5. Wej ś cie 6. Obej ś cie 7. Wyj ś cie 8. Port RJ45 9. Otwór monta ż owy 10. Pokrywa akumulatora Wska ź niki LED: Tryb zasilania sieciowego AC: Ś wieci zielona dioda Tryb akumulatora: Mi...
Page 57 - adowanie; Lokalizacja
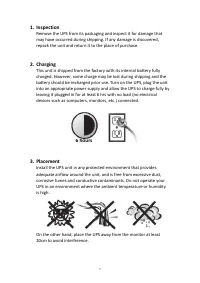
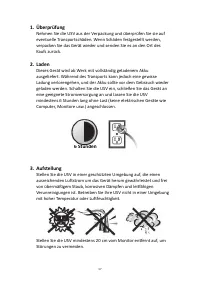
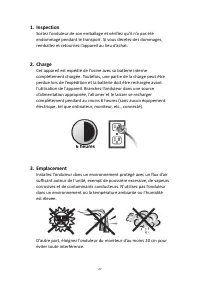
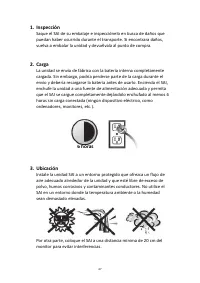
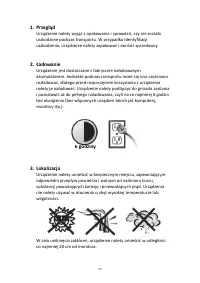
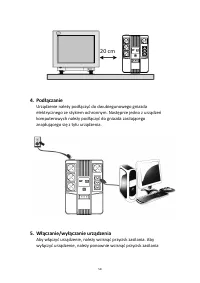
1. Przegl ą d Urz ą dzenie nale ż y wyj ąć z opakowania i sprawdzi ć , czy nie zosta ł o uszkodzone podczas transportu. W przypadku identyfikacji uszkodzenia, urz ą dzenie nale ż y zapakowa ć i zwróci ć sprzedawcy. 2. Ł adowanie Urz ą dzenie jest dostarczane z fabrycznie na ł adowanym akumulatorem. ...
Page 59 - ROZWI; Przycisk zasilania
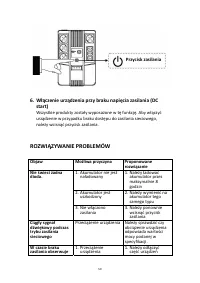
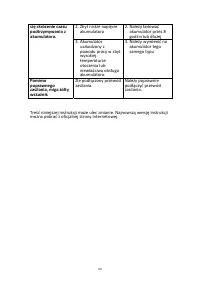
6. W łą czenie urz ą dzenia przy braku napi ę cia zasilania (DC start) Wszystkie produkty zosta ł y wyposa ż one w t ę funkcj ę . Aby w łą czy ć urz ą dzenie w przypadku braku dost ę pu do zasilania sieciowego, nale ż y wcisn ąć przycisk zasilania. ROZWI Ą ZYWANIE PROBLEMÓW Objaw Mo ż liwa przyczyna...