Page 3 - Definitions: Safety Alert Symbols and Words; WALT
English 1 English (original instructions) Definitions: Safety Alert Symbols and Words This instruction manual uses the following safety alert symbols and words to alert you to hazardous situations and your risk of personal injury or property damage. DANGER: Indicates an imminently hazardous situatio...
Page 4 - GENERAL POWER TOOL SAFETY WARNINGS; SAVE ALL WARNINGS AND; ) Electrical Safety
English 2 GENERAL POWER TOOL SAFETY WARNINGS WARNING! Read all safety warnings and all instructions. Failure to follow the warnings and instructions may result in electric shock, fire and/or serious injury. SAVE ALL WARNINGS AND INSTRUCTIONS FOR FUTURE REFERENCE The term “power tool” in the warnings...
Page 5 - ) Battery Tool Use and Care; Nailer Safety Warnings
English 3 into account the working conditions and the work to be performed. Use of the power tool for operations different from those intended could result in a hazardous situation. 5) Battery Tool Use and Care a ) Recharge only with the charger specified by the manufacturer. A charger that is suita...
Page 6 - Sequential/Bump Selector Switch; To Avoid Double Fires:; Additional Safety Information
English 4 • Always use trigger lock-off when tool is not in immediate use. Using the trigger lock-off will prevent accidental discharge. • Do not overreach. Maintain proper footing and balance at all times. Loss of balance may cause personal injury. • Use the tool only for its intended use. Do not d...
Page 7 - BATTERIES AND CHARGERS; READ ALL INSTRUCTIONS
English 5 these chemicals: work in a well ventilated area, and work with approved safety equipment, such as those dust masks that are specially designed to filter out microscopic particles.• Avoid prolonged contact with dust from power sanding, sawing, grinding, drilling, and other construction acti...
Page 8 - Transportation; shipping the; The RBRC® Seal
English 6 Transportation WARNING: Fire hazard. Do not store or carry the battery pack so that metal objects can contact exposed battery terminals. For example, do not place the battery pack in aprons, pockets, tool boxes, product kit boxes, drawers, etc., with loose nails, screws, keys, etc. Transpo...
Page 10 - Charger Operation; Electronic Protection System; Wall Mounting; Important Charging Notes
English 8 3. The completion of charge will be indicated by the red light remaining ON continuously. The battery pack is fully charged and may be used at this time or left in the charger. To remove the battery pack from the charger, push the battery release button 15 on the battery pack. nOTE: To ...
Page 11 - Storage Recommendations; SAVE THESE INSTRUCTIONS FOR; DO nOT; ASSEMBLY AND ADJUSTMENTS; To Remove Belt Hook; OPERATION
English 9 also charge a partially used pack whenever you desire with no adverse effect on the battery pack. 5. Foreign materials of a conductive nature such as, but not limited to, grinding dust, metal chips, steel wool, aluminum foil, or any buildup of metallic particles should be kept away from ch...
Page 12 - Mode Selection; To operate the nailer in sequential actuation mode:; Bump action; Preparing the Tool
English 10 handle. Insert it into the charger as described in the charger section of this manual. Fig. C 14 15 Proper Hand Position (Fig. D) WARNING: To reduce the risk of serious personal injury, ALWAYS use proper hand position as shown. WARNING: To reduce the risk of serious personal injury, ALWAY...
Page 13 - nEVER; Unloading The Tool
English 11 nOTE: The battery pack is not fully charged out of the carton. Follow instructions outlined (see Charging a Battery ). 1. Read the Safety Instruction section of this manual.2. Wear eye and ear protection.3. Ensure magazine is empty of all fasteners.4. Check for smooth and proper operatio...
Page 14 - Cold Weather Operation
English 12 Fig. H 3 13 Headlights (Fig. I) There is a headlight 4 located on each side of the nailer. Headlights turn on upon battery insertion, activation of the trigger, or depressing the contact trip. The lights will automatically shut off after 20 seconds unless tool remains in use. Fig. I 4 ...
Page 15 - Repairs; Register Online
English 13 Cleaning WARNING: Blow dirt and dust out of all air vents with clean, dry air at least once a week. To minimize the risk of eye injury, always wear ANSI Z87.1 approved eye protection when performing this. WARNING: Never use solvents or other harsh chemicals for cleaning the non-metallic p...
Page 16 - Troubleshooting Guide
English 14 Troubleshooting Guide MANY COMMON PROBLEMS CAN BE SOLVED EASILY BY UTILIZING THE CHART BELOW. FOR MORE SERIOUS OR PERSISTENT PROBLEMS, CONTACT A D e WALT SERVICE CENTER OR CALL 1-(800)-4- D e WALT . WARNING: To reduce the risk of serious personal injury, turn unit off and remove the batte...
Page 18 - FRAnçAis; Définitions : symboles et termes d'alarmes sécurité
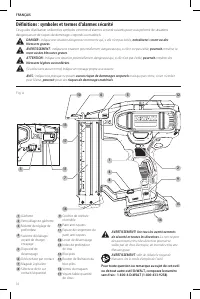
FRAnçAis 16 Définitions : symboles et termes d'alarmes sécurité Ces guides d'utilisation utilisent les symboles et termes d'alarmes sécurité suivants pour vous prévenir de situations dangereuses et de risques de dommages corporels ou matériels. DANGER : indique une situation dangereuse imminente qui...
Page 20 - ) Utilisation et entretien du bloc-piles
FRAnçAis 18 b ) Ne pas utiliser un outil électrique dont l’interrupteur est défectueux. Tout outil électrique dont l’interrupteur est défectueux est dangereux et doit être réparé. c ) Débrancher la fiche de la source d’alimentation et/ou du bloc-piles de l’outil électrique avant de faire tout réglag...
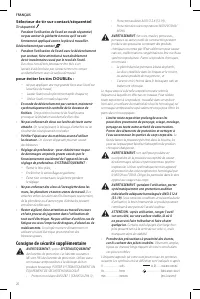
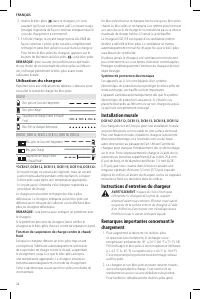
Page 22 - Sélecteur de tir sur contact/séquentiel; pour éviter les tirs DOUBLEs :; Consigne de sécurité supplémentaire
FRAnçAis 20 Sélecteur de tir sur contact/séquentiel Tir séquentiel • Pendant l’utilisation de l’outil en mode séquentiel, ne pas activer la gâchette à moins qu’il ne soit fermement appliqué contre la pièce à travailler. Déclenchement par contact • Pendant l’utilisation de l’outil avec le déclencheme...
Page 23 - BLOCS-PILES ET CHARGEURS; LIRE TOUTES LES CONSIGNES; Transport
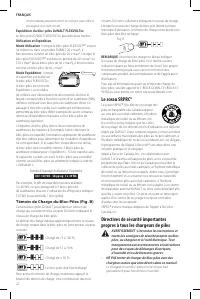
FRAnçAis 21 …/min .............. par minuteBPM .................... battements par minute IPM ..................... impacts par minuteRPM .................... revolutions per minute sfpm ................... pieds linéaires par minute (plpm) SPM (FPM) ......... fréquence par minute A ...................
Page 24 - Le sceau SRPRC®
FRAnçAis 22 tout matériau pouvant entrer en contact avec elles et provoquer un court-circuit. Expédition du bloc-piles D e WALT FlEXVOlT MC Le bloc-piles D e WALT FLEXVOLT MC possède deux modes : Utilisation et Expédition.Mode Utilisation : lorsque le bloc-piles FLEXVOLT MC est par lui-même ou dans ...
Page 26 - Utilisation du chargeur; système de protection électronique; Installation murale
FRAnçAis 24 2. Insérer le bloc-piles 14 dans le chargeur, en vous assurant qu’il y est correctement calé. Le voyant rouge (charge) clignotera de façon continue indiquant que le cycle de chargement a commencé. 3. En fin de charge, le voyant rouge restera ALLUMÉ de façon continue. Le bloc-piles est...
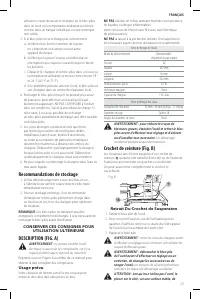
Page 27 - Recommandations de stockage; CONSERVER CES CONSIGNES POUR; nE PAs; Retrait Du Crochet de Suspension
FRAnçAis 25 utilisation, éviter de laisser le chargeur ou le bloc-piles dans un local où la température ambiante est élevée comme dans un hangar métallique ou une remorque non isolée. 3. Si le bloc-piles ne se recharge pas correctement : a. Vérifier le bon fonctionnement de la prise en y branchant u...
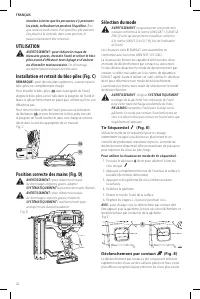
Page 28 - UTILISATION; Sélection du mode; Pour utiliser la cloueuse en mode de tir séquentiel :; Déclenchement par contact
FRAnçAis 26 manière à éviter que les personnes s’y prennent les pieds, trébuchent et perdent l’équilibre. Bien que certains outils munis d’un gros bloc-pile puissent être placés à la verticale, dans cette position, ils peuvent facilement être renversés. UTILISATION AVERTISSEMENT : pour réduire le ri...
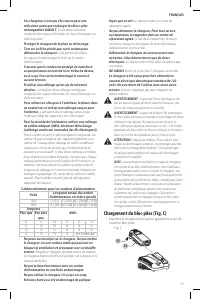
Page 29 - Préparation de l’outil; Méthode de chargement
FRAnçAis 27 En mode de déclenchement par contact, deux méthodes d’utilisation de l’outil sont disponibles : déclenchement posé et déclenchement par contact.Poussez le sélecteur 8 de tir pour afficher l’icône des trois clous . Utilisation de l’outil avec la méthode de déclenchement posé : AVERTISS...
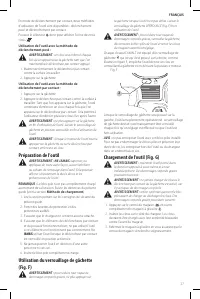
Page 30 - Déchargement de l’outil; Mécanisme anti-tir à vide
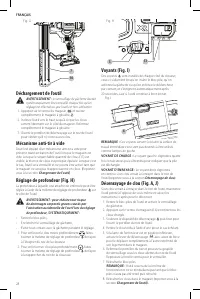
FRAnçAis 28 Fig. G 7 16 Déchargement de l’outil AVERTISSEMENT : le verrouillage de gâchette devrait systématiquement être verrouillé chaque fois qu’un réglage est effectué ou que l’outil est hors utilisation. 1. Appuyez sur le verrou du magasin 16 et ouvrez complètement le magasin à glissière 7...
Page 31 - RÉPARATiOns sOUs gARAnTiE:
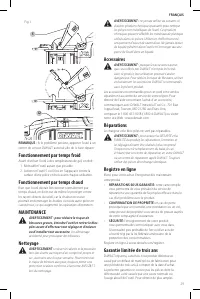
FRAnçAis 29 Fig. J 5 12 REMARQUE : Si le problème persiste, apporter l’outil à un centre de service D e WALT autorisé afin de le faire réparer Fonctionnement par temps froid Avant d’utiliser l’outil à des températures de gel, on doit : 1. Réchauffer l’outil autant que possible.2. Actionner l’outil 5...
Page 33 - Definiciones: Símbolos y palabras de alerta de seguridad
EsPAñOl 31 Español (traducido de las instrucciones originales) ¡ADVERTENCIA! Lea todas las advertencias de seguridad e instrucciones. El incumplimiento de las advertencias e instrucciones puede provocar descargas eléctricas, incendios o lesiones graves. ADVERTENCIA: Para reducir el riesgo de lesione...
Page 34 - EsPAñOl
EsPAñOl 32 ADVERTENCIAS GENERALES DE SEGURIDAD PARA HERRAMIENTAS ELÉCTRICAS ¡ADVERTENCIA! Lea todas las advertencias de seguridad e instrucciones. El incumplimiento de las advertencias e instrucciones puede provocar descargas eléctricas, incendios o lesiones graves. CONSERVE TODAS LAS ADVERTENCIAS E...
Page 35 - ) Uso y Mantenimiento de la; Advertencias de seguridad de la clavadora
EsPAñOl 33 b ) No utilice la herramienta eléctrica si no puede encenderla o apagarla con el interruptor. Toda herramienta eléctrica que no pueda ser controlada mediante el interruptor es peligrosa y debe repararse. c ) Desconecte el enchufe de la fuente de energía o el paquete de baterías de la herr...
Page 37 - Selector De Tope/Secuencial; Instrucción Adicional de Seguridad
EsPAñOl 35 modo de tope si se permite que el activador por contacto vuelva a estar en contacto con la superficie de trabajo antes de soltar el gatillo, se clavará un clavo no deseado en el lugar del disparo. • La elección del método de disparo es importante. Verifique las opciones de disparo en el m...
Page 38 - BATERÍAS Y CARGADORES; LEA TODAS LAS INSTRUCCIONES; Transporte
EsPAñOl 36 • Los orificios de ventilación suelen cubrir piezas en movimiento, por lo que también se deben evitar. Las piezas en movimiento pueden atrapar prendas de vestir sueltas, joyas o el cabello largo. La etiqueta de su herramienta puede incluir los siguientes símbolos. A continuación se indica...
Page 39 - TRAnsPORTE DE lA BATERÍA FlEXVOlTTM DE; El sello RBRC®
EsPAñOl 37 contacto con materiales conductores como llaves, monedas, herramientas manuales y otros por el estilo. El Reglamento sobre Materiales Peligrosos (HMR) del Departamento de Transporte de EE.UU. prohíbe transportar baterías comercialmente o en aviones en el equipaje de mano A MENOS que estén...
Page 41 - Funcionamiento del cargador; Retraso por batería caliente/fría; Montaje en la pared
EsPAñOl 39 Carga de una batería (Fig. C) 1. Enchufe el cargador en una toma de corriente apropiada antes de introducir la batería. 14 15 Fig. C 2. Inserte la batería 14 en el cargador, comprobando esté bien fija. La luz roja (de carga) parpadeará continuamente para indicar que se ha iniciado el p...
Page 42 - Notas importantes sobre la carga; GUARDE ESTAS INSTRUCCIONES PARA; Uso debido; MONTAJE Y AJUSTES
EsPAñOl 40 paño o cepillo suave no metálico. No use agua ni soluciones limpiadoras. Notas importantes sobre la carga 1. Se puede obtener una mayor duración y un mejor rendimiento si la unidad de batería se carga a una temperatura ambiente de 18 – 24 °C (65 – 75 °F). NO cargue la unidad de batería a ...
Page 43 - Para Remover El Gancho Para Colgar; OPERACIÓN; Selección de modos
EsPAñOl 41 Fig. B 9 18 Para Remover El Gancho Para Colgar 1. Extraiga la batería de la herramienta.2. Para hacer el cambio de uso para diestros o zurdos, basta con quitar el tornillo 18 del lado opuesto de la herra-mienta y volver a montarlo en el otro lado. 3. Vuelva a poner la batería. ADVERTE...
Page 44 - Funcionamiento Por Tope; Preparación de la herramienta; Procedimientos
EsPAñOl 42 de funcionamiento secuencial proporciona la máxima prestación de potencia para clavar los clavos más largos. Para operar la clavadora en modo de funcionamiento secuencial: 1. Deslice el interruptor selector 8 para mostrar el icono del clavo . 2. Oprima por completo la tobera contra la ...
Page 45 - Descarga de la herramienta; inDiCADOR DE BATERÍA BAJA:
EsPAñOl 43 AVISO: No guarde la herramienta con la batería instalada. Para evitar daños a la batería y asegurar la mejor vida útil de la misma, guarde las baterías fuera de la herramienta o cargador en un lugar frío y seco. Carga de la herramienta (Fig. G) ADVERTENCIA: No apunte la herramienta a ning...
Page 46 - Para reparación y servicio de sus herramientas
EsPAñOl 44 1. Saque la batería de la herramienta y active el botón de bloqueo del gatillo. 2. Presione el seguro del depósito 16 y retire los clavos cargados. 3. Levante el seguro de desobstrucción 5 y luego tire hacia arriba para abrir la compuerta de la tobera. 4. Saque el clavo doblado con u...
Page 47 - Póliza de Garantía; Excepciones; Registro en línea
EsPAñOl 45 CUliACAn, sin Blvd. Emiliano Zapata 5400-1 Poniente Col. San Rafael (667) 717 89 99 gUADAlAJARA, JAl Av. La Paz #1779 - Col. Americana Sector Juárez (33) 3825 6978 MEXiCO, D.F. Eje Central Lázaro Cárdenas No. 18 - Local D, Col. Obrera (55) 5588 9377 MERiDA, YUC Calle 63 #459-A - Col. Cent...
Page 48 - EsPECiFiCACiOnEs
EsPAñOl 46 momento durante un año a contar de la fecha de compra. Los artículos gastados por la clavadora, tales como la unidad de hoja y retorno del impulsador, no están cubiertas. 2 AñOs DE sERViCiO gRATUiTO PARA UniDADEs DE AliMEnTACiÓn DEWAlT DC9071, DC9091, DC9096, DC9182, DC9280, DC9360, DCB12...
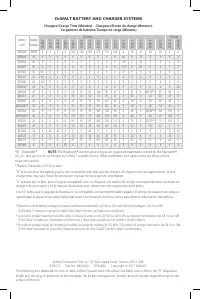
Page 52 - WALT BATTERY AND CHARGER SYSTEMS
D e WALT Industrial Tool Co., 701 East Joppa Road, Towson, MD 21286 (FEB17) Part No. N496636 DCN680 Copyright © 2017 D e WALT The following are trademarks for one or more D e WALT power tools: the yellow and black color scheme, the “D” shaped air intake grill, the array of pyramids on the handgrip, ...