Page 3 - CONTENTS
3 CONTENTS EN 1 / Description of the oven ................................................................4 The controls and display ......................................................................5The accessories....................................................................................
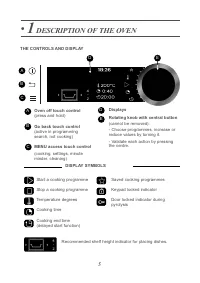
Page 4 - DESCRIPTION OF THE OVEN; Control panel
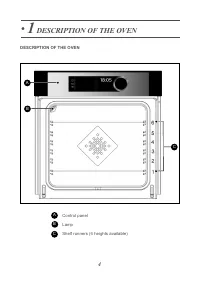
4 C A B • 1 DESCRIPTION OF THE OVEN DESCRIPTION OF THE OVEN A Control panel Lamp Shelf runners (6 heights available) C B
Page 7 - - Sliding rail system
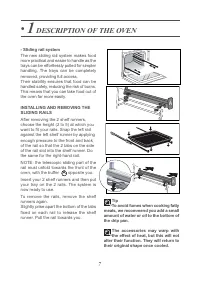
7 • 1 DESCRIPTION OF THE OVEN - Sliding rail system The new sliding rail system makes foodmore practical and easier to handle as thetrays can be effortlessly pulled for simplerhandling. The trays can be completelyremoved, providing full access.Their stability ensures that food can behandled safely, ...
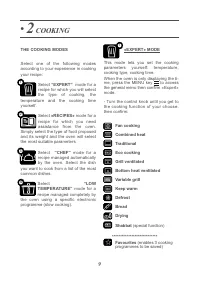
Page 9 - COOKING
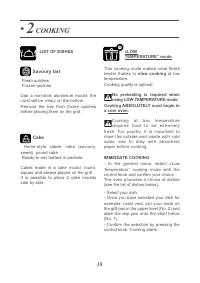
9 THE COOKING MODES • 2 COOKING This mode lets you set the cookingparameters yourself: temperature,cooking type, cooking time. When the oven is only displaying the ti-me, press the MENU key to access the general menu then confirm «Expert»mode. - Turn the control knob until you get tothe cooking func...
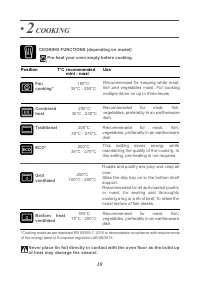
Page 10 - Traditional
10 • 2 COOKING COOKING FUNCTIONS (depending on model) Grillventilated Roasts and poultry are juicy and crisp allover.Slide the drip tray on to the bottom shelfsupport.Recommended for all spit-roasted poultryor meat, for sealing and thoroughlycooking a leg or a rib of beef. To retain themoist texture...
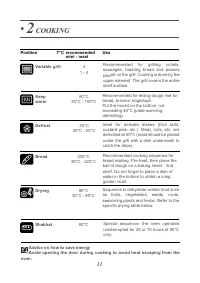
Page 11 - Variable grill
11 • 2 COOKING Variable grill Recommended for grilling cutlets,sausages, toasting bread and prawnsplaced on the grill. Cooking is done by theupper element. The grill covers the entireshelf surface. 4 1 - 4 Keepwarm Recommended for letting dough rise forbread, brioche, kügelhopf. Put the mould on the...
Page 12 - Certain parameters may be; DELAYED START COOKING
Based on the type of cooking youalready selected, the oven willrecommend the ideal cookingtemperature. This can be adjusted as follows: - S e l e c t t h e t e m p e r a t u r e s y m b o l then confirm.- Turn the control knob to change thetemperature then confirm your choice. CHANGING THE TEMPERATU...
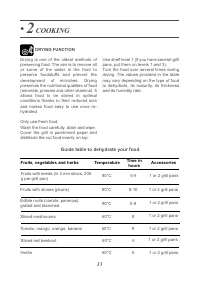
Page 13 - DRYING FUNCTION; Guide table to dehydrate your food; Time in
13 Drying is one of the oldest methods ofpreserving food. The aim is to remove allor some of the water in the food topreserve foodstuffs and prevent thedevelopment of microbes. Dryingpreserves the nutritional qualities of food(minerals, proteins and other vitamins). Itallows food to be stored in opt...
Page 14 - «RECIPES» MODE
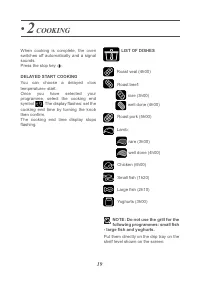
14 • 2 COOKING «RECIPES» MODE This mode selects for you theappropriate cooking parameters basedon the food to be prepared. IMMEDIATE COOKING - Select «RECIPES» mode when you arein the general menu then confirm. The oven suggests several categorieswhich contain a range of dishes (seedetailed list bel...
Page 15 - Turkey; reached its temperature.
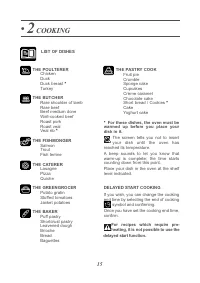
THE PASTRY COOK Fruit pieCrumbleSponge cakeCupcakesCrème caramelChocolate cakeShort bread / Cookies * CakeYoghurt cake THE POULTERER ChickenDuckDuck breast * Turkey THE BUTCHER Rare shoulder of lambRare beefBeef medium doneWell-cooked beefRoast porkRoast vealVeal rib * THE FISHMONGER SalmonTroutFish...
Page 16 - IMMEDIATE COOKING; A first information gathering phase; «CHEF» MODE; A second cooking phase: the oven has
16 • 2 COOKING This mode will completely simplifycooking for you because the oven willautomatically calculate all the cookingparameters (temperature, cooking time,cooking mode) based on the selecteddish thanks to its electronic sensorslocated in the oven that constantlymeasure the moisture level and...
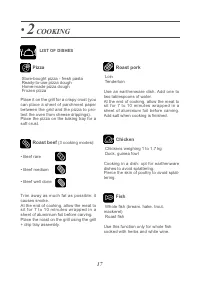
Page 17 - Fish; Roast fish; Pizza; • Beef rare; LIST OF DISHES; Roast pork
Fish Whole fish (bream, hake, trout, mackerel) Roast fish Use this function only for whole fishcooked with herbs and white wine. 17 Pizza Store-bought pizza - fresh pasta Ready-to-use pizza doughHome-made pizza doughFrozen pizza Place it on the grill for a crispy crust (youcan place a sheet of parch...
Page 18 - slow cooking; at low; Savoury tart
18 • 2 COOKING This cooking mode makes meat fibrestender thanks to slow cooking at low temperature.Cooking quality is optimal. No preheating is required whenusing LOW TEMPERATURE mode. Cooking ABSOLUTELY must begin ina cool oven. Cooking at low temperaturerequires food to be extremely fresh. For pou...
Page 20 - SETTINGS; Different settings are proposed:
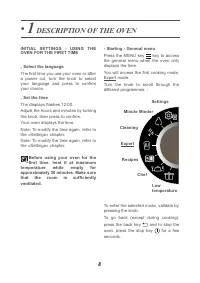
20 • 3 SETTINGS SETTINGS FUNCTIONS In the general menu, select the«SETTINGS» function by turning thecontrol knob and confirm. Different settings are proposed: - The time, the language, the sound,demo mode, lamp management andconnectivity. Select the function you want by turningthe control knob and t...
Page 21 - MINUTE MINDER; LOCKING THE CONTROLS; MINUTE MINDER FUNCTION
21 • 4 MINUTE MINDER LOCKING THE CONTROLS Child safety lock Press the back and menu keys at the same time until the padlock symbol is displayed on the screen. Control locking is accessible duringcooking or when the oven has stopped. NOTE: only the key remains active. To unlock the keypad, press the ...
Page 22 - EXTERNAL SURFACE; CARE; CLEANING AND MAINTENANCE:
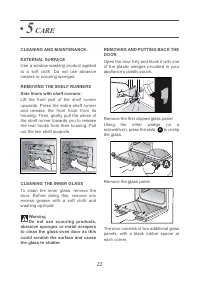
REMOVING AND PUTTING BACK THEDOOR Open the door fully and block it with oneof the plastic wedges provided in yourappliance’s plastic pouch. Remove the first clipped glass panel: Using the other wedge (or ascrewdriver), press the slots to unclip the glass. Remove the glass panel. The door consists of...
Page 23 - If necessary, remove them to clean them.; Do not soak the glass panels in water.
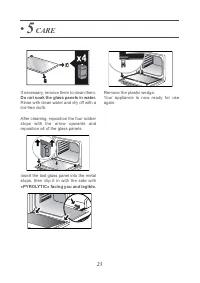
Remove the plastic wedge.Your appliance is now ready for useagain. If necessary, remove them to clean them. Do not soak the glass panels in water. Rinse with clean water and dry off with alint-free cloth. After cleaning, reposition the four rubberstops with the arrow upwards andreposition all of the...
Page 24 - PYROLYTIC SELF-CLEANING; Express Pyro: in 59 minutes; IMMEDIATE SELF CLEANING; symbol is; When the oven is cool, use a
24 PYROLYTIC SELF-CLEANING This oven is equipped with a pyrolyticself-cleaning function:Pyrolysis is a cycle during which theoven cavity is heated to a very hightemperature in order to eliminate soilingfrom splattering and spills.Before starting pyrolysis cleaning,remove any large overspills, if any...
Page 25 - REPLACING THE LIGHT BULB
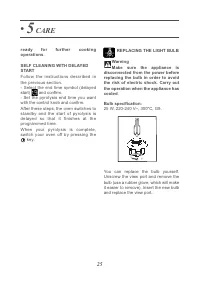
REPLACING THE LIGHT BULB WarningMake sure the appliance is disconnected from the power beforereplacing the bulb in order to avoidthe risk of electric shock. Carry outthe operation when the appliance hascooled . Bulb specification: 25 W, 220-240 V~, 300°C, G9. You can replace the bulb yourself.Unscre...
Page 26 - ANOMALIES AND SOLUTIONS
26 • 6 ANOMALIES AND SOLUTIONS - «AS» is displayed (Auto Stop system). This function stops heating the oven if youforget to switch it off. Turn your oven toSTOP. - Default code starting with «F». Your oven has detected a problem.Stop the oven for 30 minutes. If the fault isstill there, cut off the p...
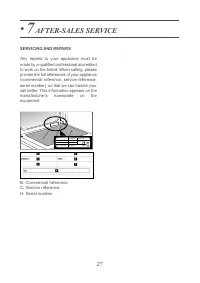
Page 27 - SERVICING AND REPAIRS; Any repairs to your appliance must be; CC
27 • 7 AFTER-SALES SERVICE SERVICING AND REPAIRS Any repairs to your appliance must be made by a qualified professional accreditedto work on the brand. When calling, pleaseprovide the full references of your appliance(commercial reference, service reference,serial number), so that we can handle your...