Page 3 - NOTE; WARNING; or any other appliance.; DANGER; your fire department.; A MESSAGE TO OUR CUSTOMERS
1 Thank you for selecting this DCS Professional “BGC” Series Grill. Because of this appliance’s unique features we have developed this manual. It contains valuable information on how to properly install, operate and maintain your new appliance for years of safe and enjoyable cooking. To help serve y...
Page 4 - CONTENTS
2 S A F E T Y P R A C T I C E S & P R E C A U T I O N S 3-5 G R I L L M O D E L S 6 I N S T A L L A T I O N Locating Grill / Built-in Clearances 7-9 Built-in Construction Details 10-11 Gas Hook-up 12-15 Leak Testing 16 Burner Adjustment 17 Radiant Assembly 18 Installer Checklist 19 U S I N G T H...
Page 5 - IMPORTANT SAFETY NOTICE!; SAFETY PRACTICES & PRECAUTIONS; S T I C K E R
3 IMPORTANT SAFETY NOTICE! Certain Liquid Propane dealers may fill liquid propane cylinders for use in the grill beyond cylinder filling capacity. This “Overfilling” may create a dangerous condition. “Overfilled” tanks can build up excess pressure. As a safety device, the tank pressure relief valve ...
Page 6 - G R I L L P L A C E M E N T
4 For personal safety, wear proper apparel. Loose fitting garments or sleeves should never be worn while using this appliance. Some synthetic fabrics are highly flammable and should not be worn while cooking. Only certain types of glass, heat-proof glass ceramic, earthenware, or other glazed utensil...
Page 7 - This unit is for outdoor use only!
5 away from open edges of the unit to avoid burns associated with unintentional spillovers. Hold the handle of the pan to prevent movement of it when turning or stirring food. For proper lighting and performance of the burners keep the ports clean. It is necessary to clean periodically for optimum p...
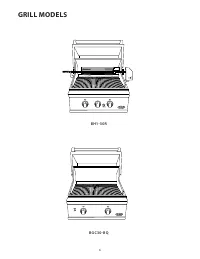
Page 8 - GRILL MODELS
Page 9 - INSTALLATION
7 INSTALLATION LOCATING GRILL/BUILT-IN CLEARANCES L O C A T I O N: When determining a suitable location take into account concerns such as exposure to wind, proximity to traffic paths and keeping any gas or electrical supply lines as short as possible and away from heat sources. Locate the grill onl...
Page 10 - Clearances to Non-Combustible Construction*
8 (7,6cm) (7,6cm) (61,6cm) (5,5cm) 2-3/16” 22-5/16” (56,7cm) (64,77cm) (26,67cm) (25,4cm) 26-5/8”(67,6cm) / 99,06cm FIG. 02 INSTALLATION LOCATING GRILL/BUILT-IN CLEARANCES (BH1-30R illustrated) Clearances to Non-Combustible Construction* Clearances to Combustible Construction**: Minimum of 18” /45,7...
Page 11 - G E N E R A L
9 INSTALLATION LOCATING GRILL/BUILT-IN CLEARANCES (ALL MODELS) Important! It is recommended that a minimum of two 12 1/4x12 1/4” (311 x 311mm) vents be provided in order to safely dis-sipate unburned gas vapors in the event of a gas supply leak. These are to be located on each side of the enclosure ...
Page 12 - BUILT–IN CONSTRUCTION DETAILS
10 INSULATED JACKET Size Part No. 30 70859 grill exhaust 7,6 cm (3") (to non-combustible construction / minimum lid clearance) 45,7 cm (18") (to combustible construction) 25,4 cm (10") 56,7 cm (22-3/16") 64,77 cm (25 1/2") 2,5 cm (1") 5,5 cm= (2-3/16") 34,93 cm (13 3/4�...
Page 13 - Access Drawers
11 FIG. 05 Access Doors Cutout dimensions A 90º B Vent* Cutout for Access Doors MODEL NUMBER A B (+0,-1/8) (+1/8,-0) ADN1-20x48 46” 20” ADN1-20x36 34” 20” ADN1-20x30 28” 20” ADN1-20x24 22” 20” A 90º B Vent* Optimal support location** Access Drawers Cutout dimensions NOTE: The cutout of each corner s...
Page 15 - OFF position and open grill lid.; L P T A N K R E Q U I R E M E N T S:
Connection: LP Hose with a Type 1 quick disconnect and regulator is included. Operating pressure: 11.0” W.C / 2.7kPa. CAUTION! Before connecting LP tank to regulator, check that all grill burners, and rotisserie valves (BH1-30R models) are in the OFF position and open grill lid. To connect the LP re...
Page 16 - L P T A N K R E S T R A I N T F O R B U I L T - I N I N S T A L L A T I O N
14 INSTALLATION GAS HOOK-UP L P T A N K R E S T R A I N T F O R B U I L T - I N I N S T A L L A T I O N If the grill is to be installed in a Built-in application, then the grill must be installed in accordance with the Built–in installation guidelines. If you intend to operate your Built-in grill on...
Page 17 - S T E P 4; S T E P 5
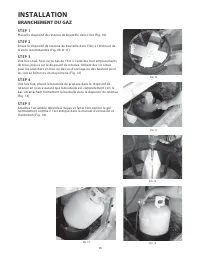
15 S T E P 1 Place the tank restraint in the island (Fig. 10). S T E P 2 Locate the tank restraint in the island within the recommended area (Fig. 09 and 11). S T E P 3 Once located, secure to the bottom of the island using all eight hole locations provided on the restraint. Wood screws can be used ...
Page 18 - LEAK TESTING
16 INSTALLATION G E N E R A L: Although all gas connections on the grill are leak tested at the factory prior to shipment, a complete gas tightness check must be performed at the installation site due to possible mishandling in shipment, or excessive pressure unknowingly being applied to the unit. P...
Page 19 - Be careful as the burner may be very hot.; L O W F L A M E S E T T I N G A D J U S T M E N T:; or abrasion, it must be replaced prior to use.; BURNER ADJUSTMENT
17 G R I L L B U R N E R A I R A D J U S T M E N T: Each grill burner is tested and adjusted at the factory prior to shipment; however, variations in the local gas sup- ply or a conversion from one gas type to another may make it necessary to adjust the burners. The flames of the burners (except the...
Page 20 - RADIANT ASSEMBLY; R A D I A N T A S S E M B L Y I N S T A L L A T I O N:
18 INSTALLATION RADIANT ASSEMBLY R A D I A N T A S S E M B L Y I N S T A L L A T I O N: 1. Unpack ceramic rods and remove radiant (Fig. 19) from the unit. 2. Unlock radiant end cap by pushing it up with two fingers (Fig. 20). 3. Place 17 ceramic rods on the radiant (Fig. 21). 4. Lock radiant end cap...
Page 21 - done correctly, correct before using the unit.; INSTALLER CHECKLIST
19 NOTE: If any of the listed items are missing, contact DCS at (888) 936-7872. Please be prepared with your Model #, Serial # and description of item(s) that are missing. Read all installation instructions in this manual to see if the unit has been properly installed. If not done or done correctly,...
Page 22 - T O L I G H T T H E G R I L L B U R N E R ( B C G30- B Q M O D E L S O N L Y ):; Grill Match Lighting:; USING THE GRILL; LIGHTING INSTRUCTIONS; L I G H T I N G I N S T R U C T I O N S ( B H1-30R M O D E L S O N L Y ); Grill Lighting Instructions:
20 T O L I G H T T H E G R I L L B U R N E R ( B C G30- B Q M O D E L S O N L Y ): Open the grill lid before lighting. Turn all knobs to “OFF”. Turn the main gas supply on slowly. If you smell gas, shut-off gas supply and call for service. Push and hold the ignition button, turn the selected burner ...
Page 23 - GRILLING; D I R E C T/I N D I R E C T C O O K I N G N O T E S:
21 USING THE GRILL GRILLING HEAT HEAT HEAT Burner Off Indirect Heat Grilling FoodGrill Rack Burner Direct Heat Grilling (Hot Dogs, Hamburgers, Typical Thickness Steaks/Chicken) HEAT HEAT HEAT G R I L L: Each grill section consists of a large stainless steel burner, stainless steel heat baffles, a se...
Page 24 - setting near the end of the cooking time.; U S I N G T H E T E M P E R A T U R E G A U G E ( B H1-30R M O D E L S O N L Y ):; G R I L L I N G H I N T S:
22 IMPORTANT - Using the Grill: Season the grates before first use, and then periodically as necessary. Seasoning will protect the grates from corrosion and keep food from sticking. See Care and Maintenance. To season the grates, pour a tablespoon of vegetable oil on a soft cloth and rub on both sid...
Page 25 - USING THE ROTISSERIE; the light bulb when in use. It may be hot enough to cause injury.
23 USING THE ROTISSERIE (BH1-30R MODELS ONLY) The grill rotisserie system is designed to cook items from the back using infrared heat. The location of the burner allows the placement of the rotisserie basting pan (included) beneath the food to collect juices and drippings for basting and gravy. To f...
Page 26 - P R E P A R A T I O N
24 WARNING! Never have the grill burners (bottom burners) on during Rotisserie cooking. It will burn your meat and make it very dry. Use only one section at a time, grill or rotisserie. P R E P A R A T I O N Recommended: Dental floss or butcher string, scissors, broiler pan (bottom only), pliers, in...
Page 27 - T O L I G H T T H E R O T I S S E R I E B U R N E R B E F O R E C O O K I N G:; M A N U A L L I G H T I N G:; Keep hands and face away from front of burner! STAND TO
25 T O L I G H T T H E R O T I S S E R I E B U R N E R B E F O R E C O O K I N G: The location of the rotisserie burner makes it more susceptible to strong wind conditions, more so than the protected grill burners. For this reason, you should avoid operating the rotisserie during windy conditions. A...
Page 28 - C O O K I N G O N R O T I S S E R I E
26 USING THE ROTISSERIE (BH1-30R MODELS ONLY) C O O K I N G O N R O T I S S E R I E 1. Place prepared rod into motor, lay across into the rollers on the other side (Fig. 33). 2. Verify placement as shown in Fig. 34. 3. Ignite burner, start rotisserie motor, and keep on rotisserie valve to the desire...
Page 29 - CARE AND MAINTENANCE; B A T T E R Y R E P L A C E M E N T:; R E G U L A T O R A N D H O S E R E P L A C E M E N T; D R I P P A N A N D G R E A S E T R A Y:; C E R A M I C R O D S:
27 CARE AND MAINTENANCE B A T T E R Y R E P L A C E M E N T: 1. Remove drip pan.2. Open cart door (on cart model only)3. Pull battery downwards (this may require use of pliers).4. Re-install upward and push to snap - Fig. 37. (polarity is shown in Fig. 38). Note: Battery condition should be checked ...
Page 31 - TROUBLESHOOTING; B E F O R E C A L L I N G F O R S E R V I C E:; G R I L L W O N’T L I G H T W H E N T H E C O N T R O L K N O B I S P U S H E D:; L O W H E A T W I T H K N O B I N “H I” P O S I T I O N:
29 TROUBLESHOOTING B E F O R E C A L L I N G F O R S E R V I C E: If the grill does not function properly, use the following checklist before contacting your dealer for service. You may save the cost of a service call. Troubleshooting is for general purposes only. If the problem persists and you fee...
Page 32 - SERVICE; H O W T O O B T A I N S E R V I C E:
30 SERVICE H O W T O O B T A I N S E R V I C E: For warranty service, please contact your local service provider or DCS Customer Care Representative at (888) 936-7872. Before you call, please have the following information ready: n Model Number (can be found on the inside, right side panel behind th...
Page 35 - R E M A R Q U E; ou dans une pièce sans aération. Pour usage en plein air uniquement.; proximité de cet appareil électroménager ou de tout autre.; POUR VOTRE SÉCURITÉ; Si vous sentez une odeur de gaz :; À L’INTENTION DE NOS CLIENTS
1 Nous vous remercions d’avoir choisi ce gril de la série professionnelle « BGC » de DCS. Nous avons conçu ce Manuel pour expliquer les fonctions uniques de ces appareils. Ce manuel contient des informations extrêmement utiles sur la façon correcte de faire fonctionner votre nouvel appareil et d’en ...
Page 36 - TABLE DES MATIÈRES
2 M E S U R E S D E S É C U R I T É E T D E P R É C A U T I O N 3-6 M O DÈL E S D E G R I L 7 I N S T A L L A T I O N Emplacement du gril et des dégagements 8-10 Détails d’une construction intégrée 11-12 Branchement du gaz 13-16 Test de détection des fuites 17 Réglage du brûleur du gril 18 L’ensembl...
Page 37 - MESURES DE SÉCURITÉ ET DE PRÉCAUTION; IMPORTANTE CONSIGNE DE SÉCURITÉ!; de ce manuel. Ce gril est conçu pour un usage en plein air uniquement.; AUTOCOLLANT
MESURES DE SÉCURITÉ ET DE PRÉCAUTION IMPORTANTE CONSIGNE DE SÉCURITÉ! Certains fournisseurs de propane liquide peuvent remplir les bonbonnes de propane liquide du gril au-delà de leur capacité. Ce trop-plein peut créer une situation dangereuse. Une accumulation de pression peut effet se produire dan...
Page 38 - utilisation dangereuse.
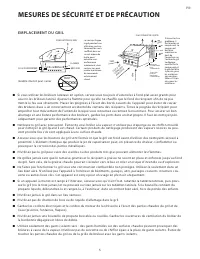
MESURES DE SÉCURITÉ ET DE PRÉCAUTION Pour assurer votre propre sécurité, habillez-vous de façon appropriée. Ne portez jamais de vêtements ou de man- ches lâches lorsque vous utilisez cet appareil. Certains tissus synthétiques sont extrêmement inflammables et ne doivent pas être portés pendant la cui...
Page 39 - E M P L A C E M E N T D U G R I L
5 MESURES DE SÉCURITÉ ET DE PRÉCAUTION n Si vous utilisez les brûleurs latéraux en option, servez-vous toujours d’ustensiles à fond plat assez grands pour couvrir les brûleurs latéral. Ajustez la flamme pour qu’elle ne chauffe que le fond du récipient afin de ne pas mettre le feu aux vêtements. Plac...
Page 40 - Cet appareil est conçu pour un usage en plein air uniquement !; AVERTISSEMENT CONCERNANT LA PROPOSITION 65 DE LA CALIFORNIE :
6 MESURES DE SÉCURITÉ ET DE PRÉCAUTION n Ayez un extincteur de classe ABC à portée de la main – ne tentez jamais d’éteindre un incendie de graisse avec de l’eau ou d’autres liquides. n Pour éviter toute brûlure lors de la cuisson, utilisez des outils de barbecue à manches longs. n Ne déplacez pas l’...
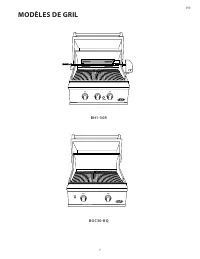
Page 41 - MODÈLES DE GRIL
Page 42 - E M P L A C E M E N T :; EMPLACEMENT DU GRIL ET DES DÉGAGEMENTS
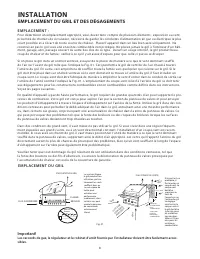
8 E M P L A C E M E N T : Pour déterminer un emplacement approprié, vous devez tenir compte de plusieurs éléments : exposition au vent, proximité de chemins de circulation, nécessité de garder les conduites d’alimentation en gaz ou électrique le plus court possible et à l’écart de toute source de ch...
Page 43 - Espaces de dégagement pour une construction non combustible *:
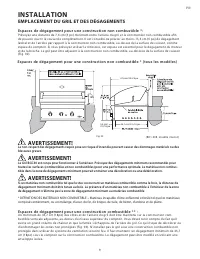
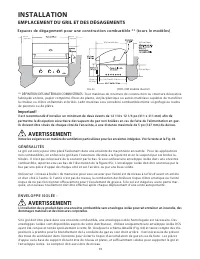
9 Espaces de dégagement pour une construction non combustible *: Prévoyez une distance de 7,6 cm (3 po) minimum entre l’arrière du gril et la construction non combustible afin de pouvoir ouvrir le couvercle complètement. Il est conseillé de prévoir au moins 15,3 cm (6 po) de dégagement latéral et de...
Page 44 - G É N É R A L I T É S; dommages matériels et des blessures corporelles.
10 INSTALLATION EMPLACEMENT DU GRIL ET DES DÉGAGEMENTS ** DÉFINITION DES MATÉRIAUX COMBUSTIBLES - Tout matériau de structure de construction ou structure décorative fabriquée en bois, papier comprimé, fibres de plante, vinyle/plastique ou autres matériaux capables de transférer la chaleur ou d’être ...
Page 45 - DÉTAILS D’UNE CONSTRUCTION INTÉGRÉE
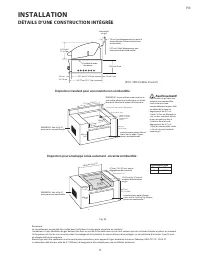
11 INSTALLATION DÉTAILS D’UNE CONSTRUCTION INTÉGRÉE évacuation du gril 7,6 cm/3 po (dégagement min. pour le couvercle avec une construction non combustible) 45,7 cm (18po) (dégagement avec une construction combustible) 25,4 cm/10 po 56,7 cm/22 5/16 po 64,77 cm/25 1/2 po 2,5 cm/1 po 5,5 cm/ 2-3/16 po...
Page 46 - MODÈLE
12 FIG. 05 PORTES D’ACCÈS - DIMENSIONS DES DECOUPES A 90º B Vent* Cutout for Access Doors MODÈLE A B (+0,-1/8) (+1/8,-0) ADN1-20x48 46” 20” ADN1-20x36 34” 20” ADN1-20x30 28” 20” ADN1-20x24 22” 20” Découpe pour portes d’accès A 90º B Vent* Optimal support location** LES TIROIRS - DIMENSIONS DES DECOU...
Page 47 - D E C O N N E X I O N D O I T Ê T R E E F F E C T U É P A R U N T E C H -; P O U R C O N N E C T E R L E S R A C C O R D S F O U R N I S A V E C L E G R I L :; BRANCHEMENT DU GAZ
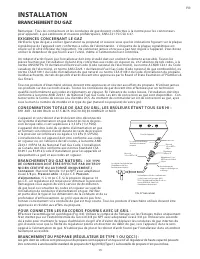
13 Remarque : Tous les connecteurs et les conduites de gaz doivent conformes à la norme pour les connecteurs pour appareils à gaz extérieure et maisons préfabriquées, ANSI Z21.75/CSA 6.27. E X I G E N C E S C O N C E R N A N T L E G A Z Vérifiez le type de gaz à utiliser (gaz naturel ou propane) et ...
Page 48 - E X I G E N C E S C O N C E R N A N T L A B O U T E I L L E D E P R O P A N E :; Le Gril est fourni avec un ensemble détendeur/tuyau de
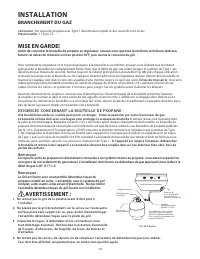
INSTALLATION BRANCHEMENT DU GAZ Connexion : Un tuyau de propane avec Type 1 déconnexion rapide et des raccords sont inclus. Pression utile : 11,0 po C.E. MISE EN GARDE! Avant de connecter la bouteille de propane au régulateur, assurez-vous que tous les brûleurs et brûleurs latéraux, fumoirs et valve...
Page 49 - E N C A S T R É E S
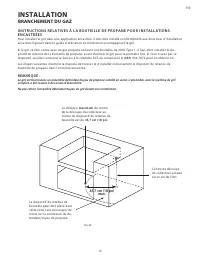
15 INSTALLATION BRANCHEMENT DU GAZ I N S T R U C T I O N S R E L A T I V E S À L A B O U T E I L L E D E P R O P A N E P O U R I N S T A L L A T I O N S E N C A S T R É E S Pour installer le gril dans une application encastrée, il doit être installé conformément aux directives d’installation encastr...
Page 51 - TEST DE DÉTECTION DES FUITES; G É N É R A L I T É S :; Avant la vérification :; d’épreuve d’étanchéité près d’une flamme vive.
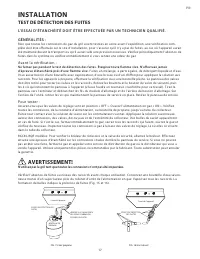
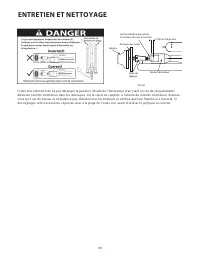
17 INSTALLATION TEST DE DÉTECTION DES FUITES Fond de l'appareil POINTS DE DÉTECTION DES FUITES VÉRIFIEZ SI LE TUYAU PORTE DES SIGNES D'ABRASION, FISSURES OU FUITES BOUTEILLE DE PROPANE Fond de l'appareil POINTS DE DÉTECTION DES FUITES FIG. 15 Gaz propane FIG. 16 Gaz naturel L’E S S A I D’É T A N C H...
Page 52 - RÉGLAGE DU BRÛLEUR DU GRIL; R É G L A G E D’A I R D U B R Û L E U R D U G R I L :; R É G L A G E S P O U R N I V E A U B A S :
18 INSTALLATION RÉGLAGE DU BRÛLEUR DU GRIL R É G L A G E D’A I R D U B R Û L E U R D U G R I L : Chaque brûleur du gril est testé et réglé en usine avant d’être expédié; toutefois, des variations au niveau de l’alimentation en gaz locale ou de la conversion d’un gaz à un autre peut nécessiter un nou...
Page 53 - INSTALLATION DE L’ENSEMBLE DU RADIANT; I N S T A L L A T I O N D E L’E N S E M B L E D U R A D I A N T :
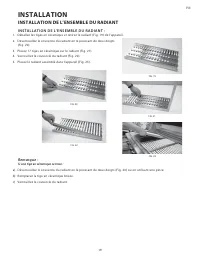
19 INSTALLATION INSTALLATION DE L’ENSEMBLE DU RADIANT I N S T A L L A T I O N D E L’E N S E M B L E D U R A D I A N T : 1. Déballez les tiges en céramique et retirez le radiant (Fig. 19) de l’appareil.2. Déverrouillez le couvercle du radiant en le poussant de deux doigts (Fig. 20). 3. Placez 17 tige...
Page 54 - LISTE DE CONTRÔLE DE L’INSTALLATEUR
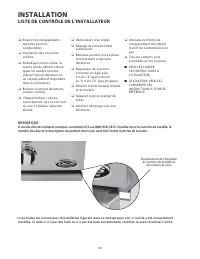
20 INSTALLATION LISTE DE CONTRÔLE DE L’INSTALLATEUR REMARQUE : Si un des articles indiqués manque, contactez DCS au (888) 936-7872. Veuillez avoir le numéro de modèle, le numéro de série et la description du produit dont vous avez fait l’achat à portée de la main. Lisez toutes les instructions d’ins...
Page 55 - P O U R A L L U M E R L E B R Û L E U R D U G R I L : ( B G C30- B Q M O D È L E ); Allumage du gril à l’allumette :; UTILISATION DU GRIL; INSTRUCTIONS D’ALLUMAGE; I N S T R U C T I O N S D’A L L U M A G E ( B G C30- B Q R M O D È L E ); Instructions d’allumage du gril :
P O U R A L L U M E R L E B R Û L E U R D U G R I L : ( B G C30- B Q M O D È L E ) Ouvrez le couvercle du gril avant d’allumer. Mettez tous les boutons sur « OFF ». Ouvrez lentement l’alimentation en gaz. Si vous sentez une odeur de gaz, fermez le gaz et appelez le service technique. Enfoncez le bou...
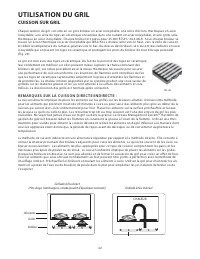
Page 56 - R E M A R Q U E S S U R L A C U I S S O N D I R E C T E/I N D I R E C T E :; CUISSON SUR GRIL
22 HEAT HEAT HEAT Grillade à feu indirect Aliments Grille Brûleur Grillade à feu direct (Hot-dogs, hamburgers, steaks/poulet d’épaisseur normale) HEAT HEAT HEAT CHALEUR CHALEUR CHALEUR Chaque section du gril consiste en un gros brûleur en acier inoxydable, une série d’écrans thermiques en acier inox...
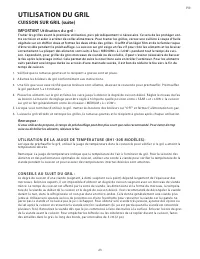
Page 57 - IMPORTANT; Utilisation du gril :; U T I L I S A T I O N D E L A J A U G E D E T E M P É R A T U R E ( B H1-30R M O D È L E S ):; C O N S E I L S A U S U J E T D U G R I L :
23 IMPORTANT Utilisation du gril : Traiter les grilles avant la première utilisation, puis périodiquement si nécessaire. Ce sera de les protéger con- tre corrision et aider à arrêter de coller alimentaire. Pour traiter les grilles, versez une cuillère à soupe d’huile végétale sur un chiffon doux et ...
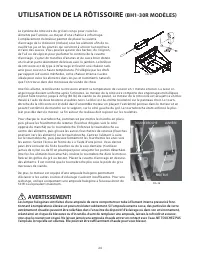
Page 58 - UTILISATION DE LA RÔTISSOIRE
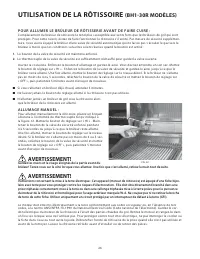
24 Le système de rôtissoire de gril est conçu pour cuire les aliments par l’arrière, au moyen d’une chaleur à infrarouge. L’emplacement du brûleur permet de placer la cuvette d’arrosage de la rôtissoire (incluse) sous les aliments afin de re- cueillir les jus et les gouttes qui serviront à arroser l...
Page 60 - Gardez les mains et le visage éloignés de la partie avant du
26 P O U R A L L U M E R L E B R Û L E U R D E R Ô T I S S E R I E A V A N T D E F A I R E C U I R E : L’emplacement du brûleur de rôtissoire le rend plus susceptible aux vents forts que les brûleurs de gril qui sont protégés. Pour cette raison, évitez de faire fonctionner la rôtissoire s’il vente. ...
Page 61 - C U I S S O N S U R L A R Ô T I S S O I R E
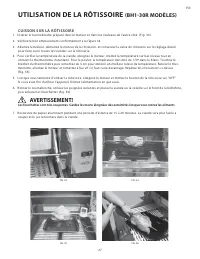
27 C U I S S O N S U R L A R Ô T I S S O I R E 1. Insérez le tournebroche préparé dans le moteur et dans les rouleaux de l’autre côté. (Fig. 33).2. Vérifiez le bon emplacement conformément à la figure 34.3. Allumez le brûleur, démarrez le moteur de la rôtissoire, et conservez la valve de rôtisserie ...
Page 62 - ENTRETIEN ET NETTOYAGE; R E M P L A C E M E N T D E L A P I L E :; R E M P L A C E M E N T D U R É G U L A T E U R E T D U
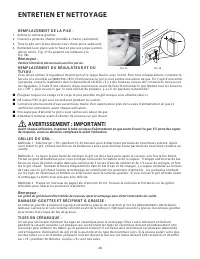
28 ENTRETIEN ET NETTOYAGE R E M P L A C E M E N T D E L A P I L E : 1. Retirez le ramasse-gouttes.2. Ouvrez la porte du chariot (modèle à chariot seulement).3. Tirez la pile vers le bas (servez-vous d’une pince aubesoin).4. Remettez-la en place vers le haut et poussez jusqu’à enten- dre un déclic, F...
Page 65 - L A F L A M M E D U B R Û L E U R E S T J A U N E O U O R A N G E, E T I L Y A U N E O D E U R D E G A Z :; DÉPANNAGE
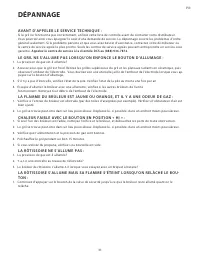
31 A V A N T D’A P P E L E R L E S E R V I C E T E C H N I Q U E : Si le gril ne fonctionne pas correctement, utilisez cette liste de contrôle avant de contacter votre distributeur. Vous pourriez ainsi vous épargner le coût d’une demande de service. Le dépannage couvre les problèmes d’ordre général ...
Page 66 - P O U R L’O B T E N T I O N D U S E R V I C E D E G A R A N T I E :
32 P O U R L’O B T E N T I O N D U S E R V I C E D E G A R A N T I E : Pour le service sous garantie, contactez votre distributeur ou le Centre de service à la clientèle DCS au (888) 936-7872. Avant d’appeler, veuillez avoir les informations suivantes à portée de main : n Numéro de modèle (peut se t...
Page 68 - U S C A
U S C A 5 9 0 8 3 5 D 03 .1 9 W W W. D C SA P P L I A N C E S .CO M © Fisher & Paykel Appliances 2019. All rights reserved. The product specifications in this booklet apply to the specific products and models described at the date of issue. Under our policy of continuous product improvement, t...