Page 3 - PRODUCT REGISTRATION; SAFETY INFORMATION
Thank you for purchasing our Commercial Cool product. This easy-to-use manual will guide you in getting the best use of your split AC.Remember to record the model and serial numbers. They are on a label in the rear. Staple your receipt to your manual. You will need it to obtain warranty service. Mod...
Page 4 - IMPORTANT SAFETY INSTRUCTIONS; WARNING; DANGER; WARNING
Page 4 SAFETY INFORMATION IMPORTANT SAFETY INSTRUCTIONS • Read this guide before installing and using the appliance.• All electrical connections, wiring and installation should be performed by a licensed electrician. Otherwise, it may cause personal injury or damage. • This appliance is not intended...
Page 5 - SAVE THESE INSTRUCTIONS; HOUSEHOLD USE ONLY
Page 5 SAFETY INFORMATION Improper installation may cause water leakage, electrical shock, fire, or may void the warranty. • In North America, service or repair must be performed in accordance with the requirement of NEC and CEC (by authorized personnel or authority having jurisdiction only.) Contac...
Page 9 - NOTES FOR HEATING
Page 9 SAFETY INFORMATION OPERATING CONDITIONS • Within the temperature range provided in following table, the air conditioner may stop running and other anomalies may arise. • When the temperature is too high, the air conditioner may activate the automatic protection device, so that the air conditi...
Page 10 - Emergency Operation
Page 10 SET UP & USE NOTE FOR TURNING OFF • When the air conditioner is turned off, the main controller will automatically decide whether to stop immediately or after running for dozens of seconds with lower frequency and lower air speed. NOTICES FOR USE Emergency Operation • If the remote contr...
Page 11 - INSTALLATION INSTRUCTIONS
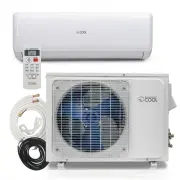
PARTS & FEATURES INDOOR UNIT OUTDOOR UNIT INSTALLATION INSTRUCTIONS Air Inlet Air Inlet Grill Panel Air Filter Air Louver Air Vent Air OutletGrill Air Outlet Air Outlet Force Switch Pipe Protection Ring Remote Control Refrigerant Pipe 157.5 inches Drain Hose 78.7 inches Page 11 Condensate drain ...
Page 12 - SUGGESTED TOOLS FOR INSTALLATION
Page 12 NOTICES: • A split system air conditioner is a great option for keeping your home cool and comfortable in the summer months. These units are also quieter, easier to install, and may be more energy efficient than some central air conditioning. • This type of A/C is ductless, so all you have t...
Page 13 - You’ll need to cut a hole through the wall to feed the pipes from the; INDOOR UNIT INSTALLATION; Space to the ceiling
Page 13 1. Select an unobstructed location on your interior wall to mount the indoor unit. • You’ll need to cut a hole through the wall to feed the pipes from the indoor unit to the outdoor unit, so make sure the location you choose will allow you to do so. Choose a spot away from direct sunlight. I...
Page 14 - Tip: Choose a central location for the indoor unit where the
Page 14 CAUTION • Choose a location with studs to ensure the wall is strong enough to hold the weight of the unit. • Install the unit at least 3.3 feet (1.0 m) away from antennas and power or connecting lines that are used for television, radio, home security systems, intercoms, or telephones. The e...
Page 15 - Secure the mounting plate to the interior wall.; • Hold the mounting plate against the wall where you want to install
Page 15 2. Secure the mounting plate to the interior wall. • Hold the mounting plate against the wall where you want to install the indoor unit. Use a level to make sure it is both horizontally and vertically level. Use a pencil to mark the locations of the screw holes, remove the plate, then drill ...
Page 16 - Secure the indoor unit to the mounting plate.; • To attach the air conditioner to the wall, simply align the female; Fixing the Indoor Unit; • Hang the indoor unit on the mounting
Page 16 INSTALLATION INSTRUCTIONS 3. Secure the indoor unit to the mounting plate. • To attach the air conditioner to the wall, simply align the female connections on the back of the unit with the male connections on the mounting plate and press firmly to secure the unit in place. Make sure the unit...
Page 17 - • Don’t place the outdoor unit directly on the ground, as it’s heavy; Tip: Situate the concrete pad so that it’s high enough to keep
Page 17 INSTALLATION INSTRUCTIONS 4. Lay a concrete pad on the ground. • Don’t place the outdoor unit directly on the ground, as it’s heavy and can shift around on dirt or rocks. Tip: Situate the concrete pad so that it’s high enough to keep the unit out of any water that may puddle on the ground du...
Page 18 - the refrigerant lines and condensate drain hose outside.; Make sure there are no pipes or wires behind the wall
Page 18 INSTALLATION INSTRUCTIONS 5. Drill a 3 in. (7.6 cm) hole through the wall so you can feed the refrigerant lines and condensate drain hose outside. • Make a mark in the center of the hole in the mounting plate. Use a keyhole saw or a drill with a hole-cutting attachment to create a circular 3...
Page 19 - • Depending on the position of the unit, the piping may be routed; All interior wiring must be compliant articles
Page 19 6. Check the electrical connections on the indoor unit. Route of Pipeline • Depending on the position of the unit, the piping may be routed sideway from the left or the right (Fig. 1), or vertically from the back (Fig. 2) (depending on the pipe length of the indoor unit). The indoor unit wil...
Page 21 - Wiring Diagram; • Connection is needed in accordance with the wiring diagram.
Page 21 INSTALLATION INSTRUCTIONS Wiring Diagram • Connection is needed in accordance with the wiring diagram. NOTE: • This manual usually includes the wiring mode for the different kinds of A/C. We cannot exclude the possibility that some special type of wiring diagrams are not included. • The diag...
Page 22 - Run the refrigerant lines and drain hose through the hole in
Page 22 INSTALLATION INSTRUCTIONS 7. Run the refrigerant lines and drain hose through the hole in the wall. • Then secure them to the designated spots on the indoor unit. • Place the drain hose on the bottom to ensure a free flow of water. • Each line comes pre-insulated, so you don’t have to worry ...
Page 23 - Position the outdoor unit away from any heavily trafficked,; • Find the hole you drilled through the mounting plate for the; OUTDOOR UNIT INSTALLATION
Page 23 INSTALLATION INSTRUCTIONS 1. Position the outdoor unit away from any heavily trafficked, dusty, or hot areas. • Find the hole you drilled through the mounting plate for the interior unit and position the exterior unit within 50 feet (15 m) so the piping and cable can easily be attached. Choo...
Page 24 - Secure the outdoor unit on top of the concrete pad.; • Lay a rubber cushion (Not included) on top of the pad to minimize
Page 24 INSTALLATION INSTRUCTIONS 2. Secure the outdoor unit on top of the concrete pad. • Lay a rubber cushion (Not included) on top of the pad to minimize vibration, then set the outdoor condenser unit on top of the pad. Secure the unit to the concrete with anchor bolts.
Page 25 - WARNING - All electrical connections, wiring and
Page 25 INSTALLATION INSTRUCTIONS 3. Wiring electrical unit. WARNING - All electrical connections, wiring and installation should be performed by a licensed electrician. Otherwise, it may cause personal injury or damage. • Electrician shall read rating plate for proper circuit breaker and conductor ...
Page 27 - Connect the refrigerant lines and electrical power to the
Page 27 INSTALLATION INSTRUCTIONS 4. Connect the refrigerant lines and electrical power to the outdoor unit. • Use flare nuts to secure the refrigerant lines from the indoor unit to the outdoor unit as per manual. Make all electrical connections as well.
Page 28 - INSTALL THE REFRIGERANT PIPE; Connecting the Refrigerant Pipe to Indoor Unit; CAUTION –
Page 28 INSTALL THE REFRIGERANT PIPE (the unit with the quick connectors) NOTE: All the illustrations in this manual are for explanation purpose only. Your air conditioner may be slightly different. The actual shape shall prevail. They are subject to change without notice for future improvement. Con...
Page 29 - After finishing connecting the couple of the; Connecting the Refrigerant Pipe to Outdoor Unit; For your safety, always wear goggles and work
Page 29 INSTALLATION INSTRUCTIONS • After finishing connecting the couple of the quick connectors, pass drain hose and the refrigerant pipes through the wall hole. NOTE: The quick connector parts must be placed outside of room. Using wall hole sleeve, cap and neoprene to seal the wall hole. • In ord...
Page 31 - Since the coupling works with tapping rings, it may leak
Page 31 INSTALLATION INSTRUCTIONS IMPORTANT: Since the coupling works with tapping rings, it may leak if you undo and reconnect the pipes. This will also void the warranty. After completing steps 1-4, check that all the connections are sealed correctly using leak detection spray or soap suds. If any...
Page 32 - IMPORTANT: The unit with the quick connectors does not; Wrap the Piping; Connect the water outlet with drain hose,
Page 32 INSTALLATION INSTRUCTIONS CAUTION – The conical ring on the valve has an important sealing function together with the sealing seat in the caps. Ensure that you do not damage the cone and that you keep the cap free of dirt and dust. • After completing steps 1-6, check that all the connections...
Page 33 - Affix the piping to the wall with clamps; • To ensure the pipes and cables don’t move around or become
Page 33 INSTALLATION INSTRUCTIONS 5. Affix the piping to the wall with clamps (Not included) • To ensure the pipes and cables don’t move around or become disconnected, attach them to the exterior wall of your home using clamps (not included).
Page 34 - Seal up the hole in the wall using expanding polyurethane; your air conditioning.
Page 34 INSTALLATION INSTRUCTIONS 6. Seal up the hole in the wall using expanding polyurethane foam. • Spray expanding polyurethane foam into the hole you drilled to feed the cable and piping through the wall. Make sure the hole is completely sealed to prevent hot air or insects from getting through...
Page 35 - Turn on the unit and enjoy the cool air!; • All that’s left to do is to start the A/C, which you can do from the
Page 35 INSTALLATION INSTRUCTIONS 7. Turn on the unit and enjoy the cool air! • All that’s left to do is to start the A/C, which you can do from the indoor unit. It should only take a minute or 2 for cool air to start blowing into your home.
Page 36 - • When replacing the batteries, do not mix the new batteries with old
Page 36 REMOTE CONTROL INSTRUCTIONS CAUTION • Before first time use of the remote control, install the batteries and ensure that the “+” and “-” poles are correctly positioned. • Ensure the remote control is pointed to the signal receiving window, and that there is no obstruction in between and the ...
Page 37 - REMOTE CONTROL INSTRUCTIONS; HANDLING ALKALINE BATTERIES
Page 37 REMOTE CONTROL INSTRUCTIONS HANDLING ALKALINE BATTERIES 1. NEVER mix alkaline, standard (carbon-zinc), rechargeable (nickel-cadmium) batteries with this product. 2. Should fluid from the battery accidentally get into your eyes, there is a threat of loss of eyesight, do not rub them. Immediat...
Page 41 - • The Fan On functions when the unit is turned off with the remote
Page 41 REMOTE CONTROL INSTRUCTIONS 13. FAN ON • The Fan On functions when the unit is turned off with the remote control in COOL, DRY, or AUTO mode. It will operate in HEAT mode (FAN mode for cool units only) with the internal fan running for ad-ditional time before stopping. On excessive hot and h...
Page 42 - Battery Instructions
Page 42 REMOTE CONTROL INSTRUCTIONS Battery Instructions 1. Slide to open the cover according to the direction indicated by the arrowhead. 2. Insert two brand new batteries (AAA, not included), and position the batteries to the right electric poles (+ & -). 3. Put the cover back on. Automatic op...
Page 43 - Fan operation mode; In the fan operation mode, the temperature setting are; Drying operation mode; display changes as you touch the button.; Backlight function; • The remote control has a backlight which can be turned on by press-
Page 43 Fan operation mode 1. Press the “MODE” button select the fan operation mode.2. By pressing the “SPEED” button, you can select the fan speed from LOW, MID, HIGH. 3. Press the “ON/OFF” button, the air-conditioner starts to operate.4. Press the “ON/OFF” button again, the air-conditioner stops. ...
Page 44 - Check after Installation; Electrical Safety Check; Test Operation; Test Operation preparation; TEST OPERATION
Page 44 Check after Installation Electrical Safety Check 1. If the supply voltage is as required.2. If there is any faulty or misconnection in each of the power, signal and grounding wires. 3. If the grounding wire of the air conditioner is securely grounded. Installation Safety Check 1. If the inst...
Page 47 - TROUBLESHOOTING & WARRANTY; TROUBLE; WARNING - Immediately stop all operations and turn off the power
TROUBLESHOOTING & WARRANTY TROUBLE POSSIBLE CAUSE Air conditioner can not operate at all. • Has the power been shut down?• Is the wiring loose?• Is voltage too high or too low ? (measured by professionals) • Does it reach the set time for start up?• Does the circuit protection device trip? Remot...
Page 48 - CUSTOMER SERVICE; IMPORTANT; DO NOT RETURN THIS PRODUCT TO THE STORE
Page 48 TROUBLESHOOTING & WARRANTY BEFORE YOU CALL FOR SERVICE IF THE AIR CONDITIONER FAILS TO OPERATE: A) Check to make sure that the air conditioner is plugged in securely. If it is not, remove the plug from the outlet, wait 10 seconds and plug it in again securely. B) Check for a blown circui...