Page 2 - Model number; PRODUCT REGISTRATION; SAFETY INFORMATION; TROUBLE SHOOTING & WARRANTY
ENGLISH Page 2 Thank you for purchasing our COMMERCIAL COOL product. This easy-to-use manual will guide you in getting the best use of your air conditioner.Remember to record the model and serial numbers. They are on a label on the rear. Staple your receipt to your manual. You will need it to obtain...
Page 3 - IMPORTANT SAFETY INSTRUCTIONS; CAUTION; When using electrical appliances, basic safety precautions
ENGLISH Page 3 SAFETY INFORMATION IMPORTANT SAFETY INSTRUCTIONS 1. To reduce risk of injury, read this guide before using the appliance.2. Air conditioner must be connected to proper electrical outlet with the correct electrical outlet with the correct electrical supply. 3. Proper grounding must be ...
Page 4 - HANDLING ALKALINE BATTERIES; the battery to leak fluid, overheat or explode.; SAVE THESE INSTRUCTIONS; HOUSEHOLD USE ONLY
Page 4 ENGLISH HANDLING ALKALINE BATTERIES 1. Should fluid from the battery accidentally get into your eyes, there is a threat of loss of eyesight, do not rub them. Immediately rinse your eyes with clean tap water and then consult a physician immediately. 2. Do not put the battery in a fire, expose ...
Page 5 - GROUNDING INSTRUCTIONS; ELECTRICAL REQUIREMENTS; Improper connection of the equipment grounding conductor
Page 5 ENGLISH GROUNDING INSTRUCTIONS ELECTRICAL REQUIREMENTS In the event of malfunction or breakdown, grounding provides a path of least resistance for electric current to reduce the risk of electric shock. The appliance must be connected to a cord having an equipment-grounding conductor and a gro...
Page 6 - Detection and Interruption) power cord that is required by UL. This; WARNING – RISK OF FIRE; Have a licensed electrician replace the receptacle.
Page 6 ENGLISH SAFETY INFORMATION LCDI POWER CORD AND PLUG This air conditioner is equipped with an LCDI (Leakage Current Detection and Interruption) power cord that is required by UL. This power supply cord contains state-of-the-art electronics that sense leakage current. If the cord is damaged and...
Page 7 - ALWAYS DO THIS
Page 7 ENGLISH SAFETY INFORMATION SAFETY GUIDELINES To prevent injury to the user or other people and property damage, the following instructions must be followed. Incorrect operation due to ignoring of instructions may cause harm or damage. ALWAYS DO THIS NEVER DO THIS ENERGY SAVE • Your air condit...
Page 8 - OPERATING CONDITION; MODE
ENGLISH SAFETY INFORMATION Page 8 OPERATING CONDITION The air conditioner must be operated within the temperature range indicated below: NOTE: · Unit performance may be affected when in use outside of these operating temperatures. MODE ROOM TEMPERATURE COOL 64˚F (18˚C) ~ 95˚F (35˚C) DEHUMIDIFY 64˚F ...
Page 10 - SPECIFICATIONS; CCP8JW; INSTALLATION GUIDE; floor strong enough to support the unit.
Page 10 ENGLISH SPECIFICATIONS CCP6JB / CCP6JP / CCP6JW Unit dimensions (W x D x H): 16.7” x 14.7” x 28.9” Unit Weight approx. 61.8 lbs. CCP8JW Unit dimensions (W x D x H): 16.7” x 14.7” x 28.9” Unit Weight approx. 62.5 lbs. CCP8HJW Unit dimensions (W x D x H): 16.7” x 14.7” x 28.9” Unit Weight appr...
Page 11 - WINDOW SLIDER KIT INSTALLATION; Attach the window slider kit to the
Page 11 ENGLISH WINDOW SLIDER KIT INSTALLATION Your window slider kit has been designed to fit most standard “Vertical” and “Horizontal” window applications; however, it may be necessary for you to improvise/modify some aspect of the installation procedures for certain types of window. Minimum and m...
Page 12 - EXHAUST HOSE INSTALLATION; Connect hose inlet to one end of air
Page 12 ENGLISH EXHAUST HOSE INSTALLATION The air exhaust hose and hose inlet must be installed or removed from the portable air conditioner in accordance with the way it is being used: COOL, DEHUMIDIFY, HEAT (Heat models CCP8HJW and CCP10HJW only) : Air exhaust hose and hose inlet should be connect...
Page 13 - CONTROL PANEL; OPERATING FROM THE CONTROL PANEL; TURNING THE APPLIANCE ON; Plug into the dedicated electrical outlet.
Page 13 ENGLISH Pictures are for illustration purpose only. Your model may or may not have all the features. CONTROL PANEL OPERATING FROM THE CONTROL PANEL The Control Panel enables you to manage all the main functions of the appliance, but to fully exploit its potential, you must use the remote con...
Page 14 - COOL MODE; CCP8HJW and CCP10HJW only)
Page 14 ENGLISH COOL MODE Ideal for hot weather when you need to cool the room. To set operation of the appliance correctly, press the or buttons until the desired temperature is displayed. (See Fig. 7) Then select the fan speed by pressing the Fan Speed Button until the light corresponding to the r...
Page 15 - TIMER; • Press the or button to select the; SWING INDICATOR LIGHT
Page 15 ENGLISH Page 15 SET UP & USE TIMER • To set the AUTO STOP timer. When the unit is ON, press the TIMER button. • Press the or button to select the AUTO TIME by 1 hour increments, up to 24 hours. The LED Display will indicate the remaining time. Press the TIMER button again. The TIMER indi...
Page 16 - OPERATING FROM THE REMOTE CONTROL; BATTERY INSTALLATION (BATTERIES NOT INCLUDED); “AAA”batteries as shown.
Page 16 ENGLISH Page 16 SET UP & USE OPERATING FROM THE REMOTE CONTROL BATTERY INSTALLATION (BATTERIES NOT INCLUDED) (1) Slide open the battery compartment cover. (2) Insert 2 × “AAA”batteries as shown. (3) Slide back the battery cover. CAUTION: Use only AAA or IEC R03 1.5V alkaline batteries. R...
Page 17 - REMOTE CONTROL
Page 17 ENGLISH SET UP & USE REMOTE CONTROL POWER BUTTON: Press to Turn ON or OFF TIMER BUTTON: Used to set a delay start or shut down time. MODE BUTTON: Each time you press the button COOL, DEHUMIDIFY, FAN, HEAT (models CCP8HJW and CCP10HJW is selected) ˚C / ˚F SELECTOR BUTTON: Select Fahrenhei...
Page 18 - POWER BUTTON; • Press the mode button to scroll through COOL , DRY , FAN , HEAT; • Select the target temperature 61 ̊F – 88 ̊F (16 ̊C – 31 ̊C) by pressing the
Page 18 ENGLISH SET UP & USE POWER BUTTON • Press to Turn Air Conditioner ON or OFF. Press LED button to illuminate the LED screen on the unit. • Will show on the remote LED screen when buttons are pressed to show that the remote control is sending a signal to the air conditioner. MODE BUTTON • ...
Page 19 - DEHUMIDIFY; Draining in Dehumidify mode; FAN; SWING
Page 19 ENGLISH DEHUMIDIFY Ideal for reducing humidity. • Keep window and door closed for the best dehumidifying effect . • Exhaust hose attachment is not required to reduce humidity, however it is recommended in very humid rooms so the warm air can be exhausted outside. Draining in Dehumidify mode ...
Page 20 - °C / °F SELECTOR BUTTON
Page 20 ENGLISH TIMER • To set the AUTO STOP timer. When the unit is ON, press the TIMER button. The TIME ON/OFF symbol on the remote LCD display will blink. • Press the or button to select the AUTO TIME by 1 hour increments, up to 24 hours. The Remote LCD Display will indicate the selected time. Pr...
Page 21 - • Download the JHS Smart app.
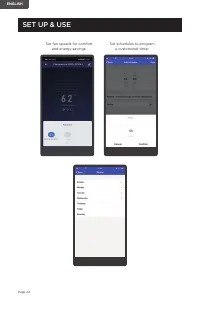
Page 21 ENGLISH JHS SMART(WIFI) GUIDE MODEL: CCP6JB, CCP6JP, CCP6JW OPERATION GUIDE: • Download the JHS Smart app. (1) Insert the power plug to keep the unit on standby. Touch the WiFi button on the unit panel for 5 seconds until LED indicator keep continuous flashing. (2) Back on the home page, cli...
Page 23 - driving on road or at the office.
Page 23 ENGLISH SET UP & USE (5) Now you can control the unit to set your room temperature whether you are driving on road or at the office. Turn your JHS air conditioner on and off. Change working modes Set the temperature Commercial COOL CCP6J Commercial COOL ...
Page 25 - PROTECTION FUNCTION OF JHS PORTABLE AIR CONDITIONER; • Frost Protection Function:
Page 25 ENGLISH SET UP & USE (6) Special Functions Share the functions of the unit with your family or friends. Have them install the JHS smart app, login, and click on device sharing. You can both now access the functions from your smart app. PROTECTION FUNCTION OF JHS PORTABLE AIR CONDITIONER ...
Page 26 - WATER DRAINAGE FOR COOLING AND HEAT MODES; FULL TANK - When the water level reaches a predetermined level, the; Intermittent Draining; • Let the water drain away and replace the drain; Continuous Draining; automatically restart after 3 minutes.
Page 26 ENGLISH WATER DRAINAGE FOR COOLING AND HEAT MODES This air conditioner is equipped with auto water evaporation so the water compartment would not typically fill in cooling or heating mode unless there is high humidity. Water drainage will generally only be required at the end of the season f...
Page 27 - CLEANING; CLEANING THE CABINET; START - END OF SEASON OPERATIONS; START OF SEASON CHECKS
Page 27 ENGLISH CLEANING WARNING: Before cleaning or maintenance, turn the appliance off by pressing the button on the control panel or button on the remote control. Unplug from the electrical outlet. CLEANING THE CABINET You should clean the appliance with a slightly damp cloth then dry with a dry ...
Page 28 - TROUBLESHOOTING & WARRANTY; IF THE AIR CONDITIONER FAILS TO OPERATE:; the use of the flammable refrigerants.; CUSTOMER SERVICE; IMPORTANT; DO NOT RETURN THIS PRODUCT TO THE STORE; If you have a problem with this product, please contact the
Page 28 ENGLISH TROUBLESHOOTING & WARRANTY BEFORE YOU CALL FOR SERVICE IF THE AIR CONDITIONER FAILS TO OPERATE: A) Check to make sure that the air conditioner is plugged in securely. If it is not, remove the plug from the outlet, wait 10 seconds and plug it in again securely. B) Check for a blow...
Page 31 - TV technician for help.
ENGLISH This device complies with part 15 of the FCC rules. Operation is subject to the following two conditions: 1) This device may not cause harmful interference, and 2) This device must accept any interference received, including interference that may cause undesired operation. This equipment has...
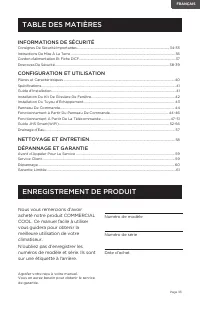
Page 33 - Nous vous remercions d’avoir; Numéro de modèle; ENREGISTREMENT DE PRODUIT; INFORMATIONS DE SÉCURITÉ
Page 33 FRANÇAIS Nous vous remercions d’avoir acheté notre produit COMMERCIAL COOL. Ce manuel facile à utiliser vous guidera pour obtenir la meilleure utilisation de votre climatiseur. N’oubliez pas d’enregistrer les numéros de modèle et série. Ils sont sur une étiquette à l’arrière. Agrafer votre r...
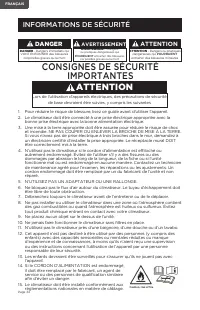
Page 34 - CONSIGNES DE SÉCURITÉ; ATTENTION; ATTENTION
Page 34 FRANÇAIS INFORMATIONS DE SÉCURITÉ CONSIGNES DE SÉCURITÉ IMPORTANTES 1. Pour réduire le risque de blessure, lisez ce guide avant d’utiliser l’appareil. 2. Le climatiseur doit être connecté à une prise électrique appropriée avec la bonne prise électrique avec la bonne alimentation électrique. ...
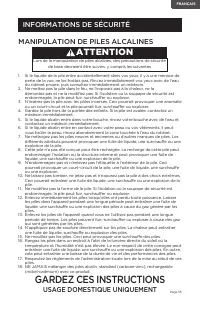
Page 35 - MANIPULATION DE PILES ALCALINES; Ne mettez pas la pile dans le feu, ne l’exposez pas à la chaleur, ne la; GARDEZ CES INSTRUCTIONS; USAGE DOMESTIQUE UNIQUEMENT
Page 35 FRANÇAIS MANIPULATION DE PILES ALCALINES 1. Si le liquide de la pile entre accidentellement dans vos yeux, il y a une menace de perte de la vue, ne les frottez pas. Rincez immédiatement vos yeux avec de l’eau du robinet propre, puis consultez immédiatement un médecin. 2. Ne mettez pas la pil...
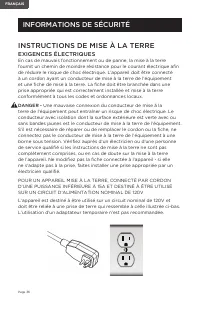
Page 36 - INSTRUCTIONS DE MISE À LA TERRE; EXIGENCES ÉLECTRIQUES; En cas de mauvais fonctionnement ou de panne, la mise à la terre
Page 36 FRANÇAIS INSTRUCTIONS DE MISE À LA TERRE EXIGENCES ÉLECTRIQUES En cas de mauvais fonctionnement ou de panne, la mise à la terre fournit un chemin de moindre résistance pour le courant électrique afin de réduire le risque de choc électrique. L’appareil doit être connecté à un cordon ayant un ...
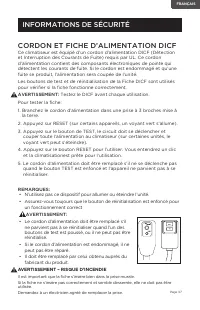
Page 37 - AVERTISSEMENT – RISQUE D’INCENDIE
Page 37 FRANÇAIS INFORMATIONS DE SÉCURITÉ CORDON ET FICHE D’ALIMENTATION DICF Ce climatiseur est équipé d’un cordon d’alimentation DICF (Détection et Interruption des Courants de Fuite) requis par UL. Ce cordon d’alimentation contient des composants électroniques de pointe qui détectent les courants...
Page 38 - TOUJOURS FAIRE
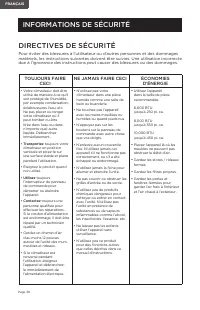
Page 38 FRANÇAIS INFORMATIONS DE SÉCURITÉ DIRECTIVES DE SÉCURITÉ Pour éviter des blessures à l’utilisateur ou d’autres personnes et des dommages matériels, les instructions suivantes doivent être suivies. Une utilisation incorrecte due à l’ignorance des instructions peut causer des blessures ou des ...
Page 39 - CONDITION DE FONCTIONNEMENT
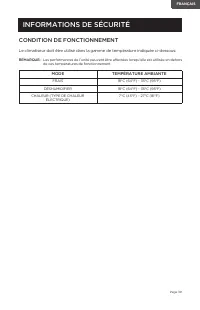
Page 39 FRANÇAIS INFORMATIONS DE SÉCURITÉ CONDITION DE FONCTIONNEMENT Le climatiseur doit être utilisé dans la gamme de température indiquée ci-dessous: REMARQUE: · Les performances de l’unité peuvent être affectées lorsqu’elle est utilisée en dehors de ces températures de fonctionnement. MODE TEMPÉ...
Page 40 - PIÈCES ET CARACTÉRISTIQUES
Page 40 FRANÇAIS PIÈCES ET CARACTÉRISTIQUES Tuyau d’Échappement d’Air Sortie De Tuyau Entrée De Tuyau Télécommande 2 X Écrou À Oreilles Et Boulon Bande De Mousse Tuyau De Vidange Joint De Drainage CONFIGURATION ET UTILISATION Panneau De Fenêtre 3MCX Page 40 Poignée Panneau De Commande Cadre De Filtr...
Page 41 - SPÉCIFICATIONS; GUIDE D’INSTALLATION; surfaces de tapis. N’essayez pas de rouler l’unité sur les objets.; CONFIGURATION ET UTILISATION
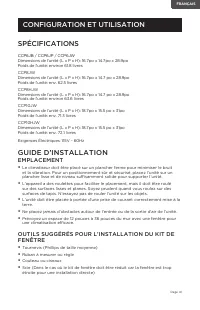
Page 41 FRANÇAIS SPÉCIFICATIONS CCP6JB / CCP6JP / CCP6JW Dimensions de l’unité (L x P x H): 16.7po x 14.7po x 28.9po Poids de l’unité: environ 61.8 livres CCP8JW Dimensions de l’unité (L x P x H): 16.7po x 14.7 po x 28.9po Poids de l’unité: env. 62.5 livres CCP8HJW Dimensions de l’unité (L x P x H):...
Page 42 - INSTALLATION DU KIT DE GLISSIÈRE DE FENÊTRE; l’ouvrant de la fenêtre.
Page 42 FRANÇAIS INSTALLATION DU KIT DE GLISSIÈRE DE FENÊTRE Votre kit de glissière de fenêtre a été conçu pour s’adapter à la plupart des applications de fenêtres “Verticales” et “Horizontales” standard; cependant, il peut être nécessaire pour vous d’improviser/de modifier certains aspects des proc...
Page 43 - INSTALLATION DU TUYAU D’ÉCHAPPEMENT
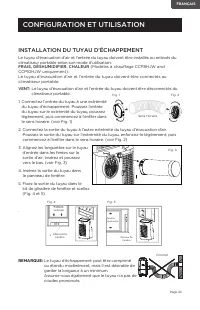
Page 43 FRANÇAIS INSTALLATION DU TUYAU D’ÉCHAPPEMENT Le tuyau d’évacuation d’air et l’entrée du tuyau doivent être installés ou enlevés du climatiseur portable selon son mode d’utilisation: FRAIS, DÉSHUMIDIFIER, CHALEUR (Modèles à chauffage CCP8HJW and CCP10HJW uniquement): Le tuyau d’évacuation d’a...
Page 44 - PANNEAU DE COMMANDE; ALLUMER L’APPAREIL; Branchez dans la prise électrique dédiée.
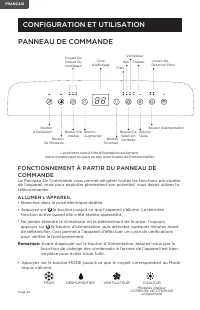
Page 44 FRANÇAIS Les photos sont à titre d’illustration seulement. Votre modèle peut ou peut ne pas avoir toutes les fonctionnalités. PANNEAU DE COMMANDE FONCTIONNEMENT À PARTIR DU PANNEAU DE COMMANDE Le Panneau De Commande vous permet de gérer toutes les fonctions principales de l’appareil, mais po...
Page 45 - MODE FRAIS
Page 45 FRANÇAIS MODE FRAIS Idéal par temps chaud quand vous devez refroidir la pièce. Pour régler le fonctionnement de l’appareil correctement, appuyez sur les boutons ou jusqu’à ce que la température voulue est affichée.(Voir Fig. 7) Sélectionnez ensuite la vitesse du ventilateur en appuyant sur l...
Page 46 - MINUTERIE; • Pour régler la minuterie AUTO; VOYANT D’OSCILLATION
Page 46 FRANÇAIS CONFIGURATION ET UTILISATION MINUTERIE • Pour régler la minuterie AUTO ARRÊT. Quand l’unité est allumée, appuyez sur le bouton MINUTERIE. • Appuyez sur la touche ou pour sélectionner le TEMPS AUTOMATIQUE par incréments d’une heure, jusqu’à 24 heures. L’affichage DEL indiquera le tem...
Page 47 - FONCTIONNEMENT À PARTIR DE LA TÉLÉCOMMANDE; INSTALLATION DE LA PILE (PILES NON INCLUSES); Utilisez uniquement des piles alcalines AAA ou IEC R03 1.5V.
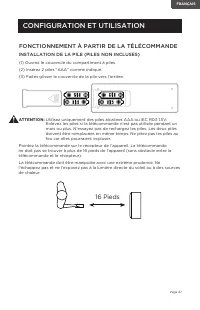
Page 47 FRANÇAIS CONFIGURATION ET UTILISATION FONCTIONNEMENT À PARTIR DE LA TÉLÉCOMMANDE INSTALLATION DE LA PILE (PILES NON INCLUSES) (1) Ouvrez le couvercle du compartiment à piles. (2) Insérez 2 piles “AAA” comme indiqué. (3) Faites glisser le couvercle de la pile vers l’arrière. ATTENTION: Utilis...
Page 48 - BOUTON VITESSE DE VENTILATEUR:
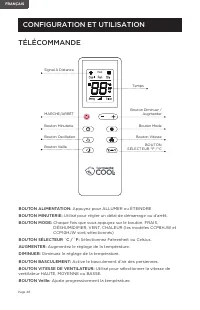
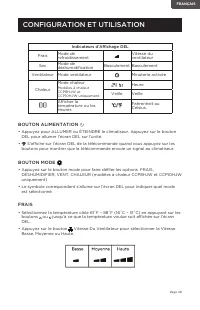
Page 48 FRANÇAIS CONFIGURATION ET UTILISATION TÉLÉCOMMANDE BOUTON ALIMENTATION: Appuyez pour ALLUMER ou ÉTEINDRE BOUTON MINUTERIE: Utilisé pour régler un délai de démarrage ou d’arrêt. BOUTON MODE: Chaque fois que vous appuyez sur le bouton, FRAIS, DÉSHUMIDIFIER, VENT, CHALEUR (les modèles CCP8HJW e...
Page 49 - BOUTON ALIMENTATION; Indicateurs d’Affichage DEL
Page 49 FRANÇAIS CONFIGURATION ET UTILISATION BOUTON ALIMENTATION • Appuyez pour ALLUMER ou ÉTEINDRE le climatiseur. Appuyez sur le bouton DEL pour allumer l’écran DEL sur l’unité. • S’affiche sur l’écran DEL de la télécommande quand vous appuyez sur les boutons pour montrer que la télécommande envo...
Page 50 - DÉSHUMIDIFIER; Drainage en mode Déshumidification; VENTILATEUR
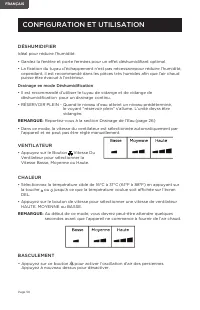
Page 50 FRANÇAIS DÉSHUMIDIFIER Idéal pour réduire l’humidité. • Gardez la fenêtre et porte fermées pour un effet déshumidifiant optimal . • La fixation du tuyau d’échappement n’est pas nécessairepour réduire l’humidité, cependant, il est recommandé dans les pièces très humides afin que l’air chaud p...
Page 51 - le bouton MINUTERIE. Le symbole TEMPS MARCHE/ARRÊT de l’écran DCL à; VEILLE; fournir un environnement confortable. Appuyez sur le bouton
Page 51 FRANÇAIS MINUTERIE • Pour régler la minuterie AUTO ARRÊT. Quand l’appareil est allumé, appuyez sur le bouton MINUTERIE. Le symbole TEMPS MARCHE/ARRÊT de l’écran DCL à distance clignote. • Appuyez sur la touche ou pour sélectionner TEMPS AUTO par incréments de 1 heure, jusqu’à 24 heures. L’Af...
Page 52 - • Téléchargez l’application JHS Smart.
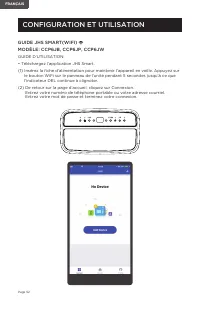
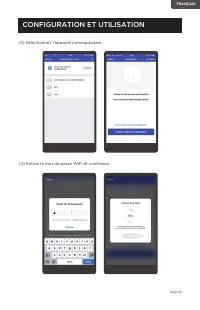
Page 52 FRANÇAIS GUIDE JHS SMART(WIFI) MODÈLE: CCP6JB, CCP6JP, CCP6JW GUIDE D’UTILISATION: • Téléchargez l’application JHS Smart. (1) Insérez la fiche d’alimentation pour maintenir l’appareil en veille. Appuyez sur le bouton WiFi sur le panneau de l’unité pendant 5 secondes jusqu’à ce que l’indicate...
Page 54 - ambiante si vous êtes sur la route ou au bureau.
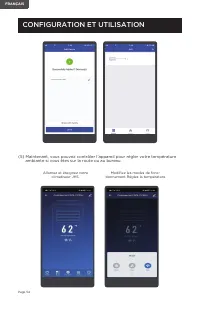
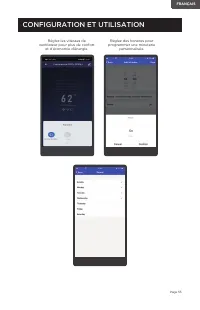
Page 54 FRANÇAIS CONFIGURATION ET UTILISATION (5) Maintenant, vous pouvez contrôler l’appareil pour régler votre température ambiante si vous êtes sur la route ou au bureau. Allumez et éteignez votre climatiseur JHS. Modifiez les modes de fonc- tionnement Réglez la température Commercial COOL CCP6J ...
Page 56 - Partagez les fonctions de l’unité avec votre famille ou vos amis.; FONCTION DE PROTECTION DU CLIMATISEUR PORTABLE JHS; • Fonction De Protection Contre Le Gel:
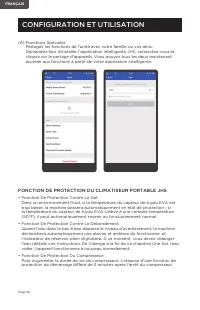
Page 56 FRANÇAIS CONFIGURATION ET UTILISATION (6) Fonctions Spéciales Partagez les fonctions de l’unité avec votre famille ou vos amis. Demandez-leur d’installer l’application intelligente JHS, connectez-vous et cliquez sur le partage d’appareils. Vous pouvez tous les deux maintenant accéder aux fon...
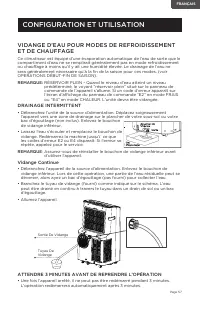
Page 57 - DRAINAGE INTERMITTENT; de vidange inférieur.; Vidange Continue
Page 57 FRANÇAIS VIDANGE D’EAU POUR MODES DE REFROIDISSEMENT ET DE CHAUFFAGE Ce climatiseur est équipé d’une évaporation automatique de l’eau de sorte que le compartiment d’eau ne se remplirait généralement pas en mode refroidissement ou chauffage à moins qu’il y ait une humidité élevée. Le drainage...
Page 58 - NETTOYAGE; NETTOYAGE DU BOÎTIER; OPÉRATIONS DÉBUT - FIN DE SAISON; CONTRÔLES DE DÉBUT DE SAISON; NETTOYAGE ET ENTRETIEN
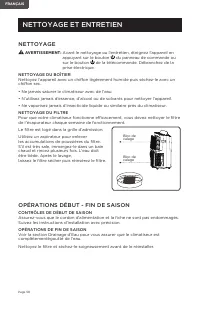
Page 58 FRANÇAIS NETTOYAGE AVERTISSEMENT: Avant le nettoyage ou l’entretien, éteignez l’appareil en appuyant sur le bouton du panneau de commande ou sur le bouton de la télécommande. Débranchez de la prise électrique. NETTOYAGE DU BOÎTIER Nettoyez l’appareil avec un chiffon légèrement humide puis sé...
Page 59 - DÉPANNAGE ET GARANTIE; SI LE CLIMATISEUR NE FONCTIONNE PAS:; autres que ceux recommandé par le fabricant.; SERVICE CLIENT; NE PAS RETOURNER CE PRODUIT AU MAGASIN; Si vous avez un problème avec ce produit, veuillez contacter le
Page 59 FRANÇAIS DÉPANNAGE ET GARANTIE AVANT D’APPELER POUR LESERVICE SI LE CLIMATISEUR NE FONCTIONNE PAS: A) Vérifiez que le climatiseur est bien branché. Si ce n’est pas le cas, enlevez la fiche de la prise, attendez 10 secondes et rebranchez-la correctement. B) Vérifiez la présence d’un fusible d...
Page 60 - jamais dépanner les composants internes.
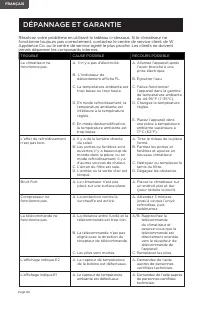
Page 60 FRANÇAIS DÉPANNAGE ET GARANTIE Résolvez votre problème en utilisant le tableau ci-dessous. Si le climatiseur ne fonctionne toujours pas correctement, contactez le centre de service client de W Appliance Co. ou le centre de service agréé le plus proche. Les clients ne doivent jamais dépanner ...
Page 62 - un technicien radio/TV expérimenté pour obtenir de l’aide
Page 62 FRANÇAIS Cet appareil est conforme à la partie 15 des Règles FCC. Le fonctionnement est soumis aux deux conditions suivantes: 1) cet appareil ne doit pas causer d’interférences nuisibles, et 2) Cet appareil doit accepter toute interférence reçue, y compris les interférences qui peuvent provo...
Page 64 - Número de modelo; REGISTRO DEL PRODUCTO; INFORMACIÓN DE SEGURIDAD; LIMPIEZA Y CUIDADO
Página 64 ESPAÑOL Gracias por comprar nuestro producto COMMERCIAL COOL. Este manual fácil de usar le guiará para obtener el mejor resultado al usar su aire acondicionado.Recuerde anotar los números de modelo y de serie. Están en una etiqueta en la parte trasera. rape o adjunte su recibo de compra a ...
Page 65 - INSTRUCCIONES IMPORTANTES DE; PELIGRO; PRECAUCIÓN; ADVERTENCIA
Página 65 ESPAÑOL INFORMACIÓN DE SEGURIDAD INSTRUCCIONES IMPORTANTES DE SEGURIDAD 1. Para reducir el riesgo de lesiones, lea esta guía antes de usar el aparato.2. El aire acondicionado debe estar conectado a una toma de corriente adecuada con el tipo de enchufe adecuado y con el suministro eléctrico...
Page 66 - MANIPULACIÓN DE PILAS ALCALINAS; puede perder fluido, sobrecalentarse o explotar.; CONSERVE ESTAS INSTRUCCIONES; SOLO PARA USO DOMÉSTICO
Página 66 ESPAÑOL MANIPULACIÓN DE PILAS ALCALINAS 1. Si el fluido de las pilas entrara en contacto con sus ojos accidentalmente, existe el riesgo de pérdida de la visión, no los frote. Enjuague sus ojos inmediatamente con agua del grifo y luego consulte a un médico inmediatamente. 2. No coloque la p...
Page 67 - INSTRUCCIONES DE CONEXIÓN A TIERRA; REQUISITOS ELÉCTRICOS; Una conexión incorrecta del conductor para la conexión a
Página 67 ESPAÑOL INSTRUCCIONES DE CONEXIÓN A TIERRA REQUISITOS ELÉCTRICOS En caso de falla o avería, la conexión a tierra proporciona una vía de menor resistencia para la corriente eléctrica y así reducir el riesgo de una descarga eléctrica. Este aparato debe estar conectado con un cable que posea ...
Page 68 - CABLE DE ALIMENTACIÓN Y ENCHUFE LCDI; Fuga de Corriente e Interrupción) como lo requiere UL. Esto cable de; ADVERTENCIA - RIESGO DE INCENDIO; Es importante que el enchufe se ajuste firmemente a la toma
Página 68 ESPAÑOL INFORMACIÓN DE SEGURIDAD CABLE DE ALIMENTACIÓN Y ENCHUFE LCDI Este aire acondicionado está equipado con un cable LCDI (Detección de Fuga de Corriente e Interrupción) como lo requiere UL. Esto cable de alimentación contiene componentes electrónicos de última generación que detectan ...
Page 69 - SIEMPRE HAGA
Página 69 ESPAÑOL INFORMACIÓN DE SEGURIDAD PAUTAS DE SEGURIDAD Para prevenir lesiones al usuario u otras personas y daños a la propiedad, se deben seguir las instrucciones a continuación. El uso inadecuado debido a ignorar las instrucciones puede causar lesiones o daños. SIEMPRE HAGA ESTO NUNCA HAGA...
Page 70 - CONDICIONES DE FUNCIONAMIENTO; MODO
Página 70 ESPAÑOL INFORMACIÓN DE SEGURIDAD CONDICIONES DE FUNCIONAMIENTO El aire acondicionado debe ser usado dentro del rango de temperatura indicado a continuación: NOTA: · El desempeño del aparato puede verse afectado cuando se utilice fuera del rango de temperaturas de funcionamiento. MODO TEMPE...
Page 71 - PIEZAS Y CARACTERÍSTICAS
Página 71 ESPAÑOL PIEZAS Y CARACTERÍSTICAS Manguera de evacuación de aire Salida de la manguera Entrada de la manguera Control remoto Tuercas de mariposa y tornillos (2) Junta de espuma Manguera de drenaje Junta de drenaje CONFIGURACIÓN Y USO Panel de ventana (3 partes) Manija Panel de control Marco...
Page 72 - ESPECIFICACIONES; GUÍA DE INSTALACIÓN; Cinta métrica o regla; CONFIGURACIÓN Y USO
Página 72 ESPAÑOL ESPECIFICACIONES CCP6JB / CCP6JP / CCP6JW Dimensiones del aparato (ancho x fondo x alto): 16,7” x 14,7” x 28,9” Peso aproximado: 61,8 lbs. CCP8JW Dimensiones del aparato (ancho x fondo x alto): 16,7” x 14,7” x 28,9” Peso aproximado: 62,5 lbs. CCP8HJW Dimensiones del aparato (ancho ...
Page 73 - INSTALACIÓN DEL KIT PARA VENTANA; Fije el kit de ventana a la hoja de la
Página 73 ESPAÑOL INSTALACIÓN DEL KIT PARA VENTANA Su kit para ventana ha sido diseñado para acomodarse a la mayoría de las ventanas “verticales” y “horizontales”. Sin embargo, puede ser necesario que improvise o adapte algunos aspectos del procedimiento de la instalación para ciertos tipos de venta...
Page 74 - INSTALACIÓN DE LA MANGUERA DE EVACUACIÓN
Página 74 ESPAÑOL INSTALACIÓN DE LA MANGUERA DE EVACUACIÓN La manguera de evacuación y los conectores de la manguera deben ser instalados o removidos del aire acondicionado portátil de acuerdo con el modo de uso: ENFRIAR, DESHUMIDIFICAR, CALENTAR (solo modelos con calor CCP8HJW y CCP10HJW): La mangu...
Page 75 - PANEL DE CONTROL; OPERACIÓN DESDE EL PANEL DE CONTROL; ENCENDER EL APARATO; Enchúfelo en una toma de corriente dedicada.
Página 75 ESPAÑOL Las imágenes son solo para fines ilustrativos. Su modelo puede tener o no todas las características. PANEL DE CONTROL OPERACIÓN DESDE EL PANEL DE CONTROL El panel de control le permite administrar todas las funciones principales del aparato, pero para aprovechar al máximo su potenc...
Page 76 - MODO ENFRIAR
Página 76 ESPAÑOL MODO ENFRIAR Ideal para climas cálidos cuando necesite enfriar la habitación. Configurar correctamente el funcionamiento del aparato, pulse los botones o hasta que se muestre la temperatura deseada. (ver Fig. 7) Luego seleccione la velocidad del ventilador presionando el botón Fan ...
Page 77 - TEMPORIZADOR
Página 77 ESPAÑOL CONFIGURACIÓN Y USO TEMPORIZADOR • Para configurar el temporizador de PARADA AUTOMÁTICA. Cuando el aparato esté ENCENDIDO, presione el botón del TEMPORIZADOR. • Pulse los botones o para seleccionar el tiempo de apagado automático en incrementos de 1 hora, hasta 24 horas. La pantall...
Page 78 - OPERACIÓN DESDE EL CONTROL REMOTO; Use solamente pilas alcalinas AAA o IEC R03 de 1,5V. Quite
Página 78 ESPAÑOL CONFIGURACIÓN Y USO OPERACIÓN DESDE EL CONTROL REMOTO INSTALACIÓN DE LAS PILAS (NO INCLUIDAS) (1) Deslice la tapa del compartimiento de las pilas. (2) Inserte 2 pilas “AAA” como se muestra. (3) Deslice la tapa del compartimiento de las pilas hacia su posición cerrada. PRECAUCIÓN: U...
Page 79 - BOTÓN DE OSCILACIÓN:
Página 79 ESPAÑOL CONFIGURACIÓN Y USO TÉLÉCOMMANDE BOTÓN DE ENCENDIDO: presione para encender o apagar BOTÓN TIMER: Se utiliza para establecer una hora de inicio o apagado diferido. BOTÓN DE MODO: Cada vez que presione el botón se selecciona ENFRIAR, DESHUMIDIFICAR, VENTILADOR, CALOR (en los modelos...
Page 80 - BOTÓN DE ENCENDIDO; CALENTAR (solo modelos con calor CCP8HJW y CCP10HJW); • Presione el botón “Fan Speed”
Página 80 ESPAÑOL CONFIGURACIÓN Y USO BOTÓN DE ENCENDIDO • Presiónelo para ENCENDER o APAGAR el aire acondicionado. Pulse el botón LED para iluminar la pantalla LED del aparato. • Se mostrará en la pantalla LED del control remoto cuando se presione un botón para indicar que el control remoto está en...
Page 81 - DESHUMIDIFICAR; Drenaje en el modo Deshumidificar; VENTILADOR; • Pulse el botón “Fan Speed”; CALENTAR
Página 81 ESPAÑOL DESHUMIDIFICAR Ideal para reducir la humedad. • Mantenga las ventanas y puertas cerradas para un mejor efecto deshumidificador . • La manguera de drenaje no es necesaria para reducir la humedad pero se recomienda en habitaciones muy húmedas para que el aire caliente se pueda expuls...
Page 82 - para seleccionar el TEMPORIZADOR en incrementos de; DORMIR; BOTÓN SELECTOR °C / °F
Página 82 ESPAÑOL TEMPORIZADOR • Para configurar el temporizador de PARADA AUTOMÁTICA. Cuando el aparato esté ENCENDIDO, presione el botón del TEMPORIZADOR. El símbolo de ENCENDIDO/APAGADO en la pantalla LCD del control remoto parpadeará. • Pulse el botón o para seleccionar el TEMPORIZADOR en increm...
Page 83 - • Descargue la aplicación JHS Smart.
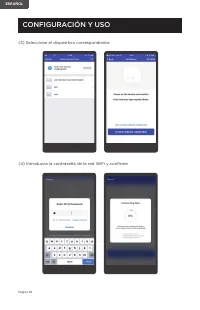
Página 83 ESPAÑOL MANUAL DE JHS SMART (WIFI) MODELO: CCP6JB, CCP6JP, CCP6JW GUÍA DE USO: • Descargue la aplicación JHS Smart. (1) Inserte el enchufe para mantener la unidad en espera. Toque el botón WiFi del el panel de control del aparato durante 5 segundos hasta que el indicador LED parpadee conti...
Page 87 - • Función de protección contra congelación:
Página 87 ESPAÑOL CONFIGURACIÓN Y USO (6) Funciones especiales Comparta las funciones del aparato con su familia o amigos. Haga que instalen la aplicación JHS smart, inicien sesión y hagan clic en uso compartido de dispositivos. Así podrán ambos acceder a las funciones desde la app inteligent. FUNCI...
Page 88 - OPERACIONES DE INICIO Y FIN DE TEMPORADA).; DRENAJE INTERMITENTE; NOTA; Drenaje continuo
Página 88 ESPAÑOL DRENAJE DE AGUA PARA LOS MODOS ENFRIAR Y CALENTAR Este aire acondicionado está equipado con evaporación automática de agua para que el depósito no se llene bajo condiciones normales durante los modos de calentar o enfriar excepto cuando hay alta humedad. Generalmente, el drenaje de...
Page 89 - LIMPIEZA; LIMPIEZA DEL GABINETE; OPERACIONES DE INICIO/FIN DE TEMPORADA; COMPROBACIONES DE INICIO DE TEMPORADA
Página 89 ESPAÑOL LIMPIEZA ADVERTENCIA: Antes limpiar o hacer mantenimiento, apague el aparato pulsando el botón en el panel de control o el botón en el control remoto. Desconéctelo de la toma de corriente. LIMPIEZA DEL GABINETE Debe limpiar el aparato con un paño ligeramente humedecido y luego seca...
Page 90 - RESOLUCIÓN DE PROBLEMAS Y GARANTÍA; SI EL AIRE ACONDICIONADO NO FUNCIONA:; con una evaluación reconocida por la especificación.; sean los recomendados por el fabricante.; SERVICIO AL CLIENTE; IMPORTANTE; NO DEVUELVA ESTE PRODUCTO A LA TIENDA; Si tiene problemas con este producto, por favor, contacte al
Página 90 ESPAÑOL RESOLUCIÓN DE PROBLEMAS Y GARANTÍA ANTES DE LLAMAR AL SERVICIO TÉCNICO SI EL AIRE ACONDICIONADO NO FUNCIONA: A) Asegúrese de que el aparato está enchufado firmemente. Si no lo está, quite el enchufe de la toma de corriente, espere 10 segundos y conéctelo nuevamente de forma segura....
Page 91 - nunca deben solucionar problemas de componentes internos.
Página 91 ESPAÑOL RESOLUCIÓN DE PROBLEMAS Y GARANTÍA Solucione su problema utilizando el cuadro a continuación. Si el aire acondicionado aún no funciona correctamente, comuníquese con el centro de servicio al cliente de W Appliance Co. o con el centro de servicio autorizado más cercano. Los clientes...