Page 2 - はじめに; 主な特長
2 はじめに このたびは、キヤノンコミュニケーションカメラ VC-C50i/VC-C50iR(以下、本機)をお買い上げいただき、誠にありがとうございます。本機を正しく安全にお使いいただくために、必ずこの使用説明書をお読みください。また、「 a 安全にお使いいただくために 」を最初によくお読みになった上、記載事項を必ずお守りくださ い。 主な特長 ■ 26 倍光学ズーム、12 倍電子ズームによる高倍率撮影 ■ 1 ルクスの低照度下で可視光撮影が可能 ■ 内蔵赤外光照明により 0 ルクス撮影可能(ナイトモード) ■ 高速/高精度カメラヘッド駆動 ■ ノイズリダクションによるクリアーな映像 著作権に...
Page 3 - 日本語; もくじ
日本語 3 a 安全にお使いいただくために ........................................................... 4 本書で使用しているマークについて .......................................................... 4日常のお手入れ ............................................................................................. 7 ご使用の前に ...............................
Page 4 - けが; 本書で使用しているマークについて; 安全にお使いいただくために; 警告; i k; マーク
4 本機をお使いいただくにあたり、必ず守っていただかなければならない注意事項について説明し ます。守られない場合、 けが や 死亡事故 、 物的損害 が発生することがありますので、よく お読みになった上、必ずお守りください。 本書で使用しているマークについて 本書では特にお読みいただきたい説明に、次のマークを使用しています。 本機を記憶装置(ビデオデッキなど)に接続して映像を記録する場合、内部的、外部的要因の如何にかかわらず、記録内容や映像の欠損およびそれにともなう経済損失が生じても、当社は一切の責任を負いかねますのであらかじめご了承ください。 a 安全にお使いいただくために この表示を無視し...
Page 5 - 使用上の注意; 設置上の注意; 注意
a 安全にお使いいただくために 日本語 5 a 使用上の注意 次のような場合はただちに使用を中止し、電源プラグをコンセントから 抜いて、最寄りの販売店にご連絡ください。 そのまま使用すると火災や感電の原因になります。 ● 発煙、異音、発熱、異臭などの異常を発見したと き ● 金属や液体が内部に入ってしまったとき ● 何らかの理由で機器が破損したとき ご使用の際は次のことをお守りください。 守られない場合、火災や感電の原因になります。 ● 機器の近くで可燃性のスプレーを使用しないでく ださい。 ● 分解、改造はしないでください。 ● 衝撃を与えないでください。 ● 長期間使用しないときは AC ...
Page 6 - 電源に関する注意; 電池の取扱いに関する注意[リモコン(オプション)使用時]; i j
a 安全にお使いいただくために 6 a 電源に関する注意 ご使用の際は次のことをお守りください。 守られない場合、火災や感電の原因になります。 ● 必ず付属の専用 AC アダプタを使用してください。 また、付属の AC アダプタは、本製品以外には使用 しないでください。 ● 電源コードに重いものを載せる、引っ張る、無理に 曲げる、傷つける、加工するなどしないでください。 ● AC アダプタを布や布団でおおったり、つつんだり しないでください。 ● 濡れた手で操作しないでください。 ● プラグは奥まで確実に差し込んでください。 プラグをコンセントから抜くときは、プラグを持って 抜いてください。 ...
Page 7 - お手入れに関する注意; 外装のお手入れ; 柔らかい布を水またはうすい中性洗剤で湿らせ、軽く汚れ; レンズのお手入れ; 市販のレンズクリーナーを使用し、レンズ表面の汚れを落とす; 持ち運ぶときの注意
a 安全にお使いいただくために 日本語 7 お手入れの際は次のことをお守りください。 守られない場合、火災や感電の原因になります。 ● 電源プラグをコンセントから抜いてください。 ● アルコールやシンナー、ベンジンなどの引火性溶剤 は使用しないでください。 i k 火災注意 感電注意 a 警告 g プラグをコンセ ントから抜く a お手入れに関する注意 b 禁止 日常のお手入れ 外装のお手入れ 1. 電源プラグをコンセントから抜く 2. 柔らかい布を水またはうすい中性洗剤で湿らせ、軽く汚れ を拭き取る 3. 乾いた布で拭く 4. 終了したら電源プラグをコンセントに差し込む レンズのお手...
Page 8 - ご使用の前に; 本機および付属品を確認してください
8 ご使用の前に ● 使用説明書● 保証書 本機および付属品を確認してください 本機を設置する前に、パッケージに以下に示すものがすべて揃っているかどうかをお確かめください。万が一不足しているものがある場合は、お買い上げの販売店までご連絡ください。 各部の名称 ■ オプション商品 ● リモコン WL-V5(→ P.15)● ワイドコンバータ WL-37(→ P.10) VC-C50iR では使用できません。 ※三脚取付け用のネジ穴は本機底面の中央にあります。 または VC-C50i 本体 VC-C50iR 本体 AC ケーブル (ケーブル長:1m) AC アダプタ PA-V16 (ケーブル長:1...
Page 9 - 設置する; 三脚を使う; 設置は確実に行ってください
ご使用の前に 日本語 9 設置する 三脚を使う 三脚取付け用のネジ穴は、本機底面の中央にあります。 (取付け寸法) • ネジ穴間 :114mm • ネジ穴径 :直径 6mm • 取付け板厚 :1mm 30mm以上 6.0mm未満 取付けネジ a 警告 設置は確実に行ってください ● 天井に設置する場合は、お買い上げの販売店にご相談ください。 ● 天井への設置は、本体と取付け金具を含む重量に充分耐えられる強度 があることをお確かめください。充分な強度がないと、落下して大けがの原因となります。 ● 1 年に 1 度は、必ず取付け部(およびオプションのワイドコンバータ 使用時はワイドコンバータ...
Page 10 - ワイドコンバータを使う; 使用すると、次第に取付け部がゆるみ、落下し; 接続する
ご使用の前に 10 VIDEO OUT A1 B1 A10 B10 DC IN 13V ワイドコンバータを使う オプションのワイドコンバータ WL-37 を使用すると、広角撮影(焦点距離約 0.74 倍)ができます。ワイドコンバータは水平に、正しく装着し、しっかり締めてください。正しく装着すると、ワイドコンバータは約 3 回転して止まります。 ワイドコンバータ a 警告 ワイドコンバータ WL-37 は VC-C50iR に取付けて使用することはできません。 使用すると、次第に取付け部がゆるみ、落下し てけがの原因になります。 ● ワイドコンバータ WL-37 以外のものを使用すると、正しく動...
Page 11 - マルチコネクタで接続する
ご使用の前に 日本語 11 マルチコネクタで接続する マルチコネクタ用プラグにリード線(AWG No.28 〜 18)を取り付ける 1. リード線取り付け穴に隣接しているスロットへ、マ イナスドライバーを奥まで差し込む ■ リード線取り付け穴の内部が開きます。 2. マイナスドライバーを差し込んだまま、リード線取 り付け穴にリード線を差し込む 3. リード線が穴から抜けないように押さえながら、マ イナスドライバーを引き抜く ■ リード線が取り付け穴に固定されます。 同様の手順で、必要なリード線をすべて接続します。 マルチコネクタで接続する場合は、お買い上げの販売店にご相談ください。 マルチコネ...
Page 12 - マルチコネクタのピン配列
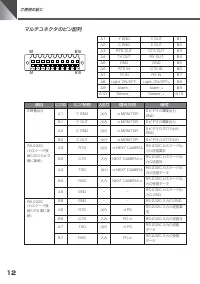
ご使用の前に 12 マルチコネクタのピン配列 A1 Y GND Y OUT B1 A2 C GND C OUT B2 A3 RTS OUT CTS OUT B3 A4 TX OUT RX OUT B4 A5 GND GND B5 A6 RTS IN CTS IN B6 A7 TX IN RX IN B7 A8 Light̲ON/OFF- Light̲ON/OFF+ B8 A9 Alarm̲- Alarm̲+ B9 A10 Sensor̲- Sensor̲+ B10 項目 ピン NO ピン名称 入出力 信号方向 備考 S 映像出力 A1 Y GND 出力 ⇒ MONITOR S ビデオの輝度出力...
Page 13 - 外部デバイス入出力端子
ご使用の前に 日本語 13 項目 ピン NO ピン名称 入出力 信号方向 備考 A8 Light̲ON/OFF- 出力 電流吸い込み 外部照明スイッチ FETSW 50V/200mA(MAX) B8 Light̲ON/OFF+ 出力 電流はきだし 外部照明スイッチ FETSW 50V/200mA(MAX) A9 Alarm̲- 出力 電流吸い込み アラーム制御 FET SW50V/200mA(MAX) B9 Alarm̲+ 出力 電流はきだし アラーム制御 FET SW50V/200mA(MAX) A10 Sensor̲- 入力 電流吸い込み GND B10 Sensor̲+ 入力 電流はきだ...
Page 14 - LED の表示と本機の状態について; LED の状態
ご使用の前に 14 電源の ON/OFF 本機には電源スイッチがありません。AC アダプタの電源プラグを差し込むことで電源 ON となります。電源を ON にすると、本機の LED が緑色に点灯します。また、モニタの電源がON になっていれば映像が映ります。 LED の表示と本機の状態について LED の状態 本機の状態 緑色で点灯 カメラ ON の状態(→ P.22) 0.1 秒間隔の点滅 リモコンのボタン操作中 緑色で点滅 0.5 秒間隔の点滅 プリセットを登録中または実行中(→ P.21)、または設定画面を表示中(→ P.23) 1 秒間隔の点滅 カメラヘッド位置を初期化中 オレンジ色で...
Page 15 - リモコンで操作する; 各部の名称
日本語 15 リモコンで操作する リモコン WL-V5 はオプションです。リモコンのボタン操作中は、本機の LED は緑色で点滅(0.1 秒間隔)します。 各部の名称 本機を使用しないときは、できるだけカメラを OFF(→ P.22)にしてください。節電にな ります。また、長期間使用しないときは、AC アダプタの電源プラグを抜いて電源 OFF (→ P.14)の状態にしておくことをお勧めします。ただし、電源を OFF にすると日付、時 刻はクリアされます。 3 2 1 AF 6 5 4 MF 9 8 7 0 MENU ID HOME Fn BRIGHT ON SCREEN ∞ SET/OK C...
Page 16 - リモコンの届く範囲; 電池を取扱う際は次のことをお守りください。; j b; リモコンに電池を入れる
リモコンで操作する 16 2. 電池を入れる ■ +と−の向きに注意して入れてください。 3. 電池カバーを取付ける リモコンの届く範囲 図に示す範囲内で、リモコンをカメラのリモコン受光部に向けて操作してください。ただし、電池の残量や障害物などによって、リモコンの届く範囲は変わります。(VC-C50iR も同様です。) 90 ° 30 ° 30 ° 90 ° 5m a 警告 電池を取扱う際は次のことをお守りください。 守られない場合、破裂、発熱、発火、漏液の原因になります。 ● 火の中に入れたり、加熱、ショート、分解したりしないでください。 ● 乾電池は充電しないでください。 i k 火災注意...
Page 17 - カメラヘッドの向きを手で変えないでください。; カメラヘッドの動作範囲; カメラヘッドの向きを変える; 左右に動かすとき(パン); 上下に動かすとき(チルト); ボ タ ン を 押 す; 正面に戻すとき(ホーム); ボ タ ン を 押 す
日本語 リモコンで操作する 17 カメラヘッドの向きを手で変えないでください。 カメラヘッドの向きを誤って手で変えたり、ものなどが当たった り し て カ メ ラ ヘ ッ ド が 直 接 動 い て し ま っ た 場 合 は 、 必 ず h ボタンを押してください。カメラが記憶しているパン / チルト位置と、実際のパン / チルト位置のずれがなくなり、正常に動作するようになります。 カメラヘッドの動作範囲 カメラヘッドの水平位置からの動作範囲を示します。VC-C50i の上方向の初期設定は30°ですが、90°まで設定することができます(→ P.27)。 170° 10° 90° 30° 30...
Page 18 - ズームインするとき(テレ); 側 を 押 す; ズームアウトするとき(ワイド); 側を押す; ピントの合う範囲
リモコンで操作する 18 ズームイン / ズームアウト (テレ / ワイド) モニタの画面上の被写体を大きく(ズームイン)したり、小さく(ズームアウト)したりします。 3 2 1 AF 6 5 4 MF 9 8 7 0 MENU ID HOME Fn BRIGHT ON SCREEN ∞ SET/OK CANCEL ZOOM T W ズームインするとき(テレ) t 側 を 押 す ■ ボタンを押し続けるとズーム速度が次のように変化します。 低速 高速 ズームアウトするとき(ワイド) w 側を押す ■ ボタンを押し続けるとズーム速度が次のように変化します。 ...
Page 19 - ピントを調節する; (フォーカス); オートフォーカスにするとき; オートフォーカスではピントの合いにくい被写体
日本語 リモコンで操作する 19 ピントを調節する (フォーカス) 被写体にピントを合わせます。ピントを自動で合わせるオートフォーカスと、手動で合わせるマニュアルフォーカスがあります。(初期設定はオートフォーカスです。) 3 2 1 AF 6 5 4 MF 9 8 7 0 MENU ID HOME Fn BRIGHT ON SCREEN ∞ SET/OK CANCEL ZOOM T W オートフォーカスにするとき a ボ タ ン を 押 す ■ ピントは自動的に合います。 オートフォーカスではピントの合いにくい被写体 次のような被写体は、オートフォーカスではピントが合いにくいことがあります。そ...
Page 20 - ピントを固定にするとき; 明るくする、暗くする; 明るさを調節する; (ブライト)
リモコンで操作する 20 3 2 1 AF 6 5 4 MF 9 8 7 0 MENU ID HOME Fn BRIGHT ON SCREEN ∞ SET/OK CANCEL ZOOM T W ピントを固定にするとき n ボ タ ン を 押 す ■ オートフォーカスを解除し、ピントが固定になります。 近くにピントを合わせるとき r ボ タ ン を 押 す ■ マニュアルフォーカスになり、近くにピントを合わせること ができます。 ■ ボタンを押し続けると、ピントの合う位置が近くに移動し続 けます。 遠くにピントを合わせるとき e ボ タ ン を 押 す ■ マニュアルフォーカスになり、遠くにピン...
Page 21 - カメラの状態を記憶させる; (プリセット); カメラヘッドの向き、ズームの位置および明るさを決め; 登録内容を実行するとき
日本語 リモコンで操作する 21 3 2 1 AF 6 5 4 MF 9 8 7 0 MENU ID HOME Fn BRIGHT ON SCREEN ∞ SET/OK CANCEL ZOOM T W ● プリセット動作時のパン / チルトの動作速度は、設定画面で設定したパン / チルトの動 作速度になります。また、[AUTO]の場合は最高速になります(→ P.26)。 ● プリセットの登録内容は常に上書きされます。すでに登録してあるプリセットをクリア することはできません。ただし、COMMAND のモードを変更した場合はクリアされま す(→ P.29)。 ● マニュアルフォーカスになっている...
Page 22 - カメラを OFF にするとき; カメラ O N の状態で; カメラを ON にするとき; カメラ O F F の状態で
リモコンで操作する 22 カメラを ON/OFF する カメラの ON/OFF は p (カメラ ON/OFF)ボタンで行います。カメラを OFF にしてもプリ セット、日付、時刻、ID 番号はクリアされません。 3 2 1 AF 6 5 4 MF 9 8 7 0 MENU ID HOME Fn BRIGHT ON SCREEN ∞ SET/OK CANCEL ZOOM T W カメラを OFF にするとき カメラ O N の状態で p ボタンを押す ■ 映像が消え、本機の LED が赤色で点灯します(カメラ O F F )。 p ボ タ ン お よ び i ボ タ ン 以 外 の リ モ コ...
Page 23 - いろいろな設定; 設定操作に使用するボタン
日本語 23 いろいろな設定 設定画面を表示して、時計や文字の設定および表示、カメラの動作などを設定することができます。 設定操作に使用するボタン 設定は、以下に示すリモコンのボタンを使って行います。 設定画面の説明 m ボタンを押すと設定画面が表示できます。 MA I N MENU SE T MENU D I SP MENU CA E MENU NEXT SE T LAY RA M BACK CANCE L SET MENU :本機をマルチコネクタを介してパソコンやその他 の装置で制御するための設定ができます (→ P.30、31)。 DISPLAY MENU:時計合わせや撮影画面にカメラ番...
Page 24 - 時計を合わせる
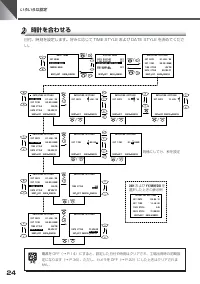
いろいろな設定 24 時計を合わせる 日付、時刻を設定します。好みに応じて TIME STYLE および DATE STYLE を決めてください。 電源を OFF(→ P.14)にすると、設定した日付や時刻はクリアされ、工場出荷時の初期設 定になります(→ P.36)。ただし、カメラを OFF(→ P.22)にしたときはクリアされま せん。 MA I N MENU SE T MENU D I SP MENU CA E MENU NEXT SE T LAY RA M BACK CANCE L NEXT SE T BACK CANCE L NEXT SE T BACK CANCE L SE T C...
Page 25 - 文字の設定
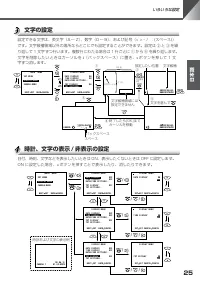
日本語 いろいろな設定 25 文字の設定 設定できる文字は、英文字(A 〜 Z)、数字(0 〜 9)、および記号(< > - / . : (スペース))です。文字候補領域以外の場所ならどこにでも設定することができます。設定は w と e を繰 り返して 1 文字ずつ行います。複数行にわたる場合は 1 行ごとに q から t を繰り返します。 文 字 を 削 除 し た い と き は カ ー ソ ル を l ( バ ッ ク ス ペ ー ス) に 置 き 、 s ボ タ ン を 押 し て 1 文 字ずつ消します。 MA I N MENU SE T MENU D I SP MENU ...
Page 26 - カメラヘッドの動作スピードおよびパン動作の設定
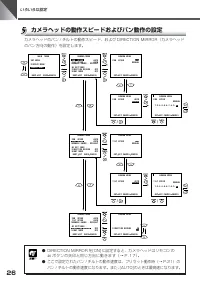
いろいろな設定 26 カメラヘッドの動作スピードおよびパン動作の設定 カメラヘッドのパン / チルトの動作スピード、および DIRECTION MIRROR(カメラヘッドのパン方向の動作)を設定します。 1 MA I N MENU SE T MENU D I SP MENU CA E MENU NEXT SE T LAY RA M BACK CANCE L SE T T I N N GS M I RROR . . ME A C RA MENU SPE ED SPE E AUTOAUTO D I T PAN ME A C RA MENU SPE ED A N A M AL U U TO PAN ...
Page 27 - カメラヘッドの動作範囲の設定
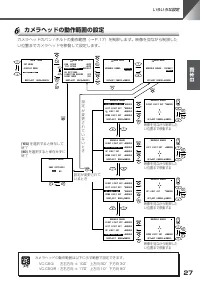
日本語 いろいろな設定 27 カメラヘッドの動作範囲の設定 カメラヘッドのパン / チルトの動作範囲(→ P.17)を制限します。映像を見ながら制限したい位置までカメラヘッドを移動して設定します。 MA I N MENU SE T MENU D I SP MENU CA E MENU NEXT SE T LAY RA M BACK CANCE L SE T T T I N N GS M I RROR . . ME A C RA MENU SPE EDSPE E AUTOAUTO D I T PAN ME A C RA MENU L T MO A RANGE DE FAUL T . . NEXT...
Page 28 - AE、フリッカ防止の設定
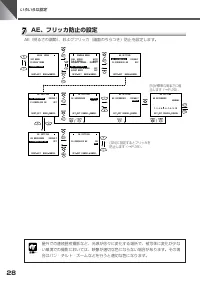
いろいろな設定 28 MA I N MENU SE T MENU D I SP MENU CA E MENU NEXT SE T LAY RA M BACK CANCE L SE T T I N N GS M I RROR . . ME A C RA MENU SPE EDSPE E AUTOAUTO D I T PAN AE E S I T T NG A F L I CKERL E E D SS AE E RE F ERENCE L T MO A RANGE DE FAUL T . . NEXT SE T BL E V A D I RECT I O E BACK CANCE F F L AE...
Page 29 - ナイトモードの設定
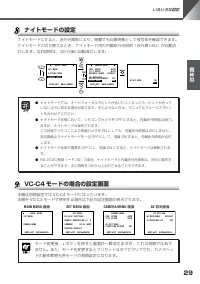
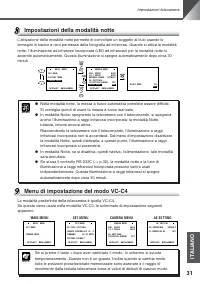
日本語 いろいろな設定 29 ナイトモードの設定 ナイトモードにすると、赤外光撮影により、暗闇でも白黒映像として被写体を確認できます。ナイトモードに切り替えるとき、ナイトモード用の内蔵赤外光照明(赤外線 LED)が自動点灯します。なお照明は、30 分後に自動消灯します。 ● ナイトモードでは、オートフォーカスでピントが合いにくくなったり、ピントが合って いないように見える場合があります。そのようなときは、マニュアルフォーカスでピン トを合わせてください。 ● ナイトモード状態において、リモコンでカメラを OFF にすると、内蔵赤外照明は消灯し ますが、ナイトモードは保持されます。 この状態でリ...
Page 31 - 複数のカメラを個別に操作する; ID 番号を設定する
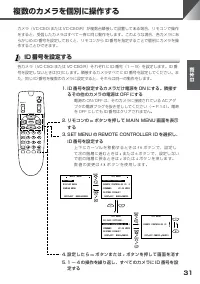
日本語 31 複数のカメラを個別に操作する カメラ(VC-C50i または VC-C50iR)が複数台隣接して設置してある場合、リモコンで操作をすると、受信したカメラはすべて一斉に同じ動作をします。このような場合、各カメラにあらかじめ ID 番号を設定しておくと、リモコンから ID 番号を指定することで個別にカメラを操作することができます。 ID 番号を設定する 各カメラ(VC-C50i または VC-C50iR)それぞれに ID 番号(1 〜 9)を設定します。ID 番号を設定しないときは[0]にします。隣接するカメラすべてに ID 番号を設定してください。また、同じ ID 番号を複数のカメ...
Page 32 - 個別に操作したいカメラを選択する
32 複数のカメラを個別に操作する 個別に操作したいカメラを選択する <例> 下図のような 4 台のカメラ(ID1 〜 ID3)のうち、ID2(2 台)のカメラだけ個別に 操作できるようにします。通常の使用時は、カメラの LED は緑色で点灯しています。 ● 操作は、隣接するすべてのカメラの LED を確認しながら行ってください。リ モコンの信号がすべてのカメラに届いているかどうか確認できます。 ● ID 番号が設定されていないカメラ(ID:0)は、ステップ 2 で ON になります。● カメラが O F F のときでも、 i ボタンを押すとすべてのカメラの L E D はオレ ンジ色に点滅し...
Page 33 - 個別操作を解除する
33 日本語 複数のカメラを個別に操作する 3 2 1 AF 6 5 4 MF 9 8 7 0 MENU ID HOME Fn BRIGHT ON SCREEN ∞ SET/OK CANCEL ZOOM T W 1 . i ボ タ ン を 押 す 隣接するすべてのカメラの LED がオレンジ色の点滅(0.5秒間隔)に変わります。 操 作 を 中 止 し た い と き は c ボ タ ン ま た は i ボ タ ン を 押 し てください。ID2 のカメラの LED は緑色の点灯に、その他のカメラの LED はオレンジ色の点灯になります。 以上で解除操作は終了です。すべてのカメラのリモコン操作...
Page 34 - 故障かなと思ったら; リモコン操作ができない
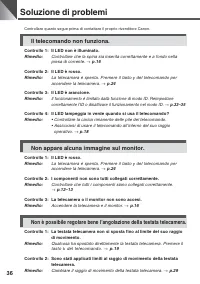
34 故障かなと思ったら もう一度以下のことを確認してから販売店にご連絡ください。 リモコン操作ができない 確認 1. LED が消灯していませんか?対処 電源プラグをコンセントに正しく奥まで差し込んでください。 → P.14 確認 2. LED が赤色で点灯していませんか?対処 カメラが O F F になっています。リモコンの p ボタンを押してカメラを ON にしてください。 → P.22 確認 3. LED がオレンジ色で点灯をしていませんか?対処 ID 設定機能による動作制限を受けています。ID を正しく設定し直すか、個別操作を解除してください。 → P.31 〜 33 確認 4. リ...
Page 35 - プリセットで登録した位置にカメラヘッドが向かない
日本語 故障かなと思ったら 35 プリセットで登録した位置にカメラヘッドが向かない 確認 1. カメラヘッドが動作範囲まで動きますか?対処 何らかの原因でカメラヘッドが直接動いてしまいました。リモコンの h ボタンを押してください。→ P.17 確認 2. プリセット登録後にパン / チルトの動作範囲を変更していませんか?対処 プリセットを登録し直してください。 → P.21 ピントが合わない 確認 1. マニュアルフォーカスになっていませんか?対処 マニュアルでピントを調節するか、リモコンの a ボタンを押してオート フォーカスにしてください。 → P.19 〜 20 確認 2. レンズが汚...
Page 36 - 工場出荷時の初期設定; (本機の初期設定)
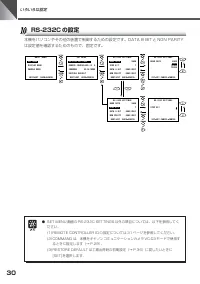
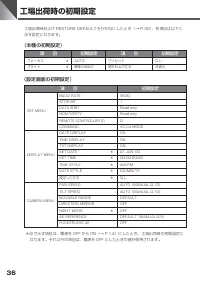
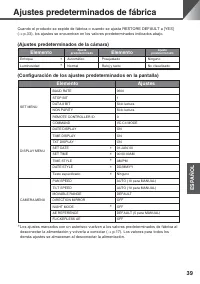
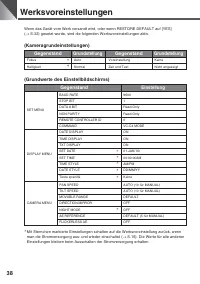
36 工場出荷時の初期設定 * 印で示す項目は、電源を OFF から ON(→ P.14)にしたとき、工場出荷時の初期設定に なります。それ以外の項目は、電源を OFF にしたときの値が保持されます。 工場出荷時および RESTORE DEFAULT を[YES]にしたとき(→ P.30)、各項目は以下に示す設定になります。 (本機の初期設定) 項 目 初期設定 項 目 初期設定 フォーカス * AUTO プリセット なし ブライト * 標準の明るさ 時計および文字 非表示 (設定画面の初期設定) 項 目 初期設定 BAUD RATE 9600 STOP BIT 1 SET MENU D...
Page 37 - 主な仕様; 項 目
日本語 37 主な仕様 ● 仕様は改善などの理由で予告なく変更することがあります。● AC アダプタは、必ず付属の専用 AC アダプタを使用してください。また、付属の AC アダプタは、本製品以 外には使用しないでください。 項 目 内 容 映 像 信 号 NTSC 方式準拠 撮 像 素 子 1/4 型 CCD 画 素 数 実効 34 万画素 同 期 方 式 内部同期方式 水 平 解 像 度 460TV 本 垂 直 解 像 度 350TV 本 S N 比 50dB 走 査 方 式 2:1 インターレス 最 低 被 写 体 照 度 ノーマルモード:1lux(1/30 秒時)/ナイトモード...
Page 38 - お問い合せ先; キヤノンお客様相談センター; 補修用性能部品について
お問い合せ先 製品に関するお問い合せは、お客様相談センターをご利用ください。 キヤノンお客様相談センター TV 会議システム・ビジュアルコミュニケーション 050-555-90074 [受付時間] < 平日 > 9:00 〜 12:00 / 13:00 〜 17:00(土・日・祝日及び年末年始弊社休業日は休ませていただきます) ※ 上記番号をご利用いただけない方は 043-211-9622 をご利用ください。※ IP 電話をご利用の場合、プロバイダーのサービスによってつながらない場 合があります。 ※ 受付時間は予告なく変更する場合があります。あらかじめご了承ください。 補修用性能...
Page 39 - INSTRUCTION MANUAL; ENGLISHENGLISH
Page 40 - Introduction; ” section first and
2 Introduction Thank you for purchasing the Canon Communication Camera VC-C50i/VC-C50iR.Please read this Instruction Manual carefully to ensure that you use the Productcorrectly and safely. Read the “ a Safe Use of Equipment ” section first and observe these instructions when you use the Product. Fe...
Page 41 - ENGLISH; Copyright Information; The contents of this Manual are subject to change without notice.; Exclusion of Liability
3 Introduction ENGLISH Copyright Information Video or still images recorded using your VC-C50i/VC-C50iR cannot be used inways that infringe copyright laws or without the consent of the owner, unlessintended for personal use only. Note The contents of this Manual are subject to change without notice....
Page 42 - Safe Use of Equipment; Important Warnings
4 a Safe Use of Equipment a CAUTION: TO REDUCE THE RISK OF ELECTRIC SHOCK, DO NOT REMOVE COVERS.NO USER-SERVICEABLE PARTS INSIDE. REFER SERVICING TOQUALIFIED SERVICE PERSONNEL. The serial number of this equipment may be found on the back of the camerahead. No others have the same serial number as yo...
Page 43 - FDA regulation; Important Operational Instructions
5 a Safe Use of Equipment ENGLISH a CAUTION: TO REDUCE THE RISK OF ELECTRIC SHOCK AND TO REDUCE ANNOYINGINTERFERENCE, USE THE RECOMMENDED ACCESSORIES ONLY. FDA regulation This equipment has not been evaluated by the Food and Drug Administration(FDA) for use as a medical device. When incorporated int...
Page 44 - IC NOTICE; the receiver is connected.
6 a Safe Use of Equipment IC NOTICE This product does not exceed the Class B limits for radio noise emissions fromdigital apparatus as set out in the Interference-causing equipment standardentitled ‘Digital Apparatus’, ICES-003 of the Industry Canada. FCC NOTICE COMMUNICATION CAMERA, Model: PT-50iN/...
Page 45 - IMPORTANT SAFETY INSTRUCTIONS
7 a Safe Use of Equipment ENGLISH In these safety instructions, the word“equipment” refers to the Canoncommunication camera VC-C50i/VC-C50iRand all its accessories. 1. Read Instructions - All the safety andoperating instructions should be readbefore the equipment is operated. 2. Retain Instructions ...
Page 48 - Cleaning the Lens; Maintenance; Cleaning the Equipment; Unplug the AC adapter from the wall outlet.; WARNING; Icons Used in This Instruction Manual; Wipe with a dry cloth.
10 a Safe Use of Equipment Cleaning the Lens Use a commercially available lens cleaner to remove any soiling from thelens. ■ The auto-focus may not function correctly if the surface of the lens is dirty. ■ Scratches on the surface of the lens will cause image defects. Maintenance Cleaning the Equipm...
Page 49 - CONTENTS
11 ENGLISH CONTENTS a Safe Use of Equipment .......................................................................................... 4 a Important Warnings ................................................................................... 4 a Important Operational Instructions ......................
Page 50 - Before You Use the Product; Checking the Camera and Its Accessories; AC cable
12 Before You Use the Product ● Instruction Manual ● Warranty Card (NTSC model only) Checking the Camera and Its Accessories Before you install the Product, check that all the items shown below are included in yourproduct package. If any of these items is missing, contact your Canon dealer. Nomencla...
Page 51 - Installing the Product; Using a Tripod
Before You Use the Product 13 ENGLISH Installing the Product (Installation)• Distance between tapped holes: 114 mm (4.49 in.)• Tapped hole diameter: 6 mm (0.24 in.)• Mounting plate thickness: 1 mm (0.04 in.) Install the camera securely. ● When installing the camera on the ceiling, contact your Canon...
Page 52 - Using the Wide-angle Converter; Connecting the Components
Before You Use the Product 14 Using the Wide-angle Converter The optional Wide-angle Converter WL-37 can be used to provide wide-angle shots (approx.0.74 × the normal focal distance). Mount the wide-angle converter correctly so that it is level and fitted securely onto thecamera. When mounted correc...
Page 53 - Attaching the Multiconnector to the Camera; Push the multiconnector plug in fully.; Connecting to the Multiconnector
Before You Use the Product 15 ENGLISH Attaching the Multiconnector to the Camera 1. Raise the levers on each side of themulticonnector plug. 2. Push the multiconnector plug into themulticonnector socket. 3. Push the multiconnector plug in fully. ■ The multiconnector plug is locked into thesocket on ...
Page 54 - Multiconnector Pin Layout
Before You Use the Product 16 Multiconnector Pin Layout A1 Y GND Y OUT B1 A2 C GND C OUT B2 A3 RTS OUT CTS OUT B3 A4 TX OUT RX OUT B4 A5 GND GND B5 A6 RTS IN CTS IN B6 A7 TX IN RX IN B7 A8 Light_ON/OFF- Light_ON/OFF+ B8 A9 Alarm_- Alarm_+ B9 A10 Sensor_- Sensor_+ B10 Item Pin No. Pin name Signal dir...
Page 55 - External Device I/O Terminals
Before You Use the Product 17 ENGLISH External lighting control signal Item Pin No. Pin name Signal direction Notes A8 Light_ON/OFF- Output Current input External lighting switch 50V/200mA (max.) B8 Light_ON/OFF+ Output Current output External lighting switch 50V/200mA (max.) A9 Alarm_- Output Curre...
Page 56 - Turning the Power ON and OFF; LED Displays and the Camera Status
Before You Use the Product 18 Turning the Power ON and OFF The VC-C50i/VC-C50iR camera does not have a power switch. You can switch the camera onby plugging the AC adapter into a wall outlet. When power to the camera is switched on, theLED on the camera turns green. If the monitor is switched on, an...
Page 57 - Controlling the Camera from the Wireless Controller; Nomenclature
19 ENGLISH Controlling the Camera from the Wireless Controller The Wireless Controller WL-V5 is optional.While the wireless controller buttons are being used, the LED on the camera blinks green (at0.1-second intervals). Nomenclature Whenever possible, switch the camera off when it is not in use ( → ...
Page 58 - Remove the battery cover.; Operable Range of the Wireless Controller; Loading the Batteries into the Wireless Controller
20 Controlling the Camera from the Wireless Controller The wireless controller requires two AA-type batteries. 1. Remove the battery cover. 2. Insert the batteries. ■ Taking care that the poles (+ and –) arecorrectly positioned. 3. Replace the battery cover. Operable Range of the Wireless Controller...
Page 59 - Range of Camera Head Movement; To move the camera head left and right (pan); Press the; To move the camera head up and down (tilt); To move the camera head to the Home position; P r e s s t h e; Changing the Camera Head Angle
21 ENGLISH Controlling the Camera from the Wireless Controller Range of Camera Head Movement The figures below show the range of camera head movement from a horizontal position. Thedefault range of upward movement for the VC-C50i is 30 ° , but the range can be set to 90 ° ( → P.31). 170 ° 10 ° 90 ° ...
Page 61 - To use autofocus mode; Focusing
23 ENGLISH Controlling the Camera from the Wireless Controller 3 2 1 AF 6 5 4 MF 9 8 7 0 MENU ID HOME Fn BRIGHT ON SCREEN ∞ SET/OK CANCEL ZOOM T W To use autofocus mode P r e s s t h e a b u t t o n . ■ The camera focuses automatically. Focusing (FOCUS) This section describes how to focus on the sub...
Page 62 - To fix the focus; To focus on nearby subjects; Adjusting the Brightness; To brighten or darken the image
24 Controlling the Camera from the Wireless Controller 3 2 1 AF 6 5 4 MF 9 8 7 0 MENU ID HOME Fn BRIGHT ON SCREEN ∞ SET/OK CANCEL ZOOM T W To fix the focus P r e s s t h e n b u t t o n . ■ This switches auto-focus off and fixes the focus. To focus on nearby subjects P r e s s t h e r b u t t o n . ...
Page 63 - To store a position; To restore a preset position; Storing a Preset Camera Position
25 ENGLISH Controlling the Camera from the Wireless Controller To store a position 1. Set the camera head angle, zoom position and brightness. ■ The focus setting is not stored. 2. P r e s s t h e s b u t t o n . ■ The LED on the camera blinks green (at 0.5-secondintervals). ■ Press the c button aga...
Page 64 - To switch the camera off; In the status of camera ON, press the; To switch the camera on; In the status of camera OFF, press the; Switching the Camera ON and OFF
26 Controlling the Camera from the Wireless Controller 3 2 1 AF 6 5 4 MF 9 8 7 0 MENU ID HOME Fn BRIGHT ON SCREEN ∞ SET/OK CANCEL ZOOM T W To switch the camera off In the status of camera ON, press the p button. ■ The image disappears and the LED on the camera turns red(camera OFF). The camera will ...
Page 65 - Camera Settings; Buttons Used to Specify the Settings; Setting Menu Description
27 ENGLISH Camera Settings Set and display the clock and text, and specify camera operation settings. Buttons Used to Specify the Settings The wireless controller buttons shown below are used for the setting. Setting Menu Description Press the m button to display the setting menu. MA I N MENU SE T M...
Page 66 - Setting the Clock
Camera Settings 28 Setting the Clock Use the procedure below to set the date and time. You can also select your preferred TIMESTYLE and DATE STYLE settings. When you turn the power off ( → P.18), the specified date and time are cleared and the settings revert to the factory default settings ( → P.40...
Page 67 - Selecting Display/Hide Clock and Text
Camera Settings 29 ENGLISH Selecting Display/Hide Clock and Text Select ON to display the date, time and text, and select OFF to hide them. If you select ON,you can display and hide the date, time and text by pressing the o button. Entering Characters The characters that can be specified are upperca...
Page 68 - Setting the Camera Head Movement Speed and Pan Operation
Camera Settings 30 1 MA I N MENU SE T MENU D I SP MENU CA E MENU NEXT SE T LAY RA M BACK CANCE L SE T T I N N GS M I RROR . . ME A C RA MENU SPE ED SPE E AUTOAUTO D I T PAN ME A C RA MENU SPE ED A N A M AL U U TO PAN L T MO A RANGE DE FAUL T . . NEXT SE T BL E V AD I RECT I O E BACK CANCE F F L ME A...
Page 69 - Setting the Range of Camera Head Movement
Camera Settings 31 ENGLISH MA I N MENU SE T MENU D I SP MENU CA E MENU NEXT SE T LAY RA M BACK CANCE L SE T T T I N N GS M I RROR . . ME A C RA MENU SPE EDSPE E AUTOAUTO D I T PAN ME A C RA MENU L T MO A RANGE DE FAUL T . . NEXT SE T BL E V MO A RANGE DE MANUAL FAUL T . . BL E V A D I REC T I O E BA...
Page 70 - Setting the AE
Camera Settings 32 Setting the AE Use the procedure below to specify the AE (brightness adjustment) setting. FLICKERLESSAE is unnecessary to set. MA I N MENU SE T MENU D I SP MENU CA E MENU NEXT SE T LAY RA M BACK CANCE L SE T T I N N GS M I RROR . . ME A C RA MENU SPE EDSPE E AUTOAUTO D I T PAN AE ...
Page 71 - Night Mode Settings
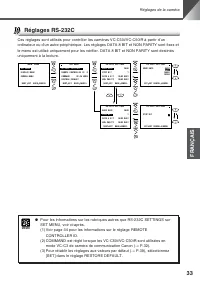
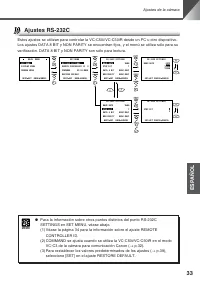
Camera Settings 33 ENGLISH MA I N MENU SE T MENU CA E MENU NEXT SE T RA M BACK CANCE L SE T MENU NEXT SE T BACK CANCE L RS - 2 3 2C E T T I NGS . . S REMO O O NTR R T E C L L E I D 0 C R ESTOR E DE FAUL T O D E 3 C - C V MOD AN MM SE T T I N N GS M I RROR . . ME A C RA MENU SPE EDSPE E AUTOAUTO D I ...
Page 73 - ID Mode; Setting the ID Number
35 ENGLISH ID Mode When multiple VC-C50i/VC-C50iR cameras are connected and installed, all the cameras inrange of the wireless controller simultaneously perform the operations specified. In thissituation, the cameras can be operated individually by assigning separate ID numbers to eachcamera beforeh...
Page 74 - P r e s s t h e; Selecting the Camera to be Controlled
ID Mode 36 3 2 1 AF 6 5 4 MF 9 8 7 0 MENU ID HOME Fn BRIGHT ON SCREEN ∞ SET/OK CANCEL ZOOM T W 1. P r e s s t h e i b u t t o n . The LEDs on all the adjacent connected cameras blink orange(at 0.5-second intervals). To cancel ID mode operation, press the c or i button. The LEDs on all the cameras th...
Page 75 - Cancelling ID Mode
ID Mode 37 ENGLISH 3 2 1 AF 6 5 4 MF 9 8 7 0 MENU ID HOME Fn BRIGHT ON SCREEN ∞ SET/OK CANCEL ZOOM T W 1. P r e s s t h e i b u t t o n . The LEDs on all the adjacent connected cameras blink orange(at 0.5-second intervals). To cancel ID mode operation, press the c or i button. The LEDs on all the ID...
Page 76 - The wireless controller does not work.; Does the LED blink green when you use the wireless controller?; There is no picture on the monitor.; The components are not all connected correctly.; Cannot adjust the camera head angle properly.; Troubleshooting
38 Check the following before contacting your Canon supplier. The wireless controller does not work. Check 1: The LED is not lit. Response: Check that the plug is inserted into the main power outlet correctly andpushed in all the way. → P.18 Check 2: The LED is red. Response: The camera is switched ...
Page 77 - The camera will not move to a preset position.; The camera is set to manual focus mode.
Troubleshooting 39 ENGLISH The camera will not move to a preset position. Check 1: The camera head will not move to the limit of its range ofmovement. Response: Something has directly moved the camera head. Press the h button on the wireless controller. → P.21 Check 2: The range of pan/tilt movement...
Page 78 - Factory Default Settings
40 Factory Default Settings When the Product is shipped from the factory or when RESTORE DEFAULT has been set to[YES] ( → P.34), the settings are set to the default values shown below. (Camera Default Settings) Item Default Item Default Focus * Auto Preset None Brightness * Normal Clock and Text Not...
Page 79 - Specifications
41 ENGLISH Specifications * If you are using a computer to control the camera, the image on the screen may appearshaky when the camera head is being moved slowly. Item Details Video Signal NTSC model for USA, CanadaPAL model for Europe, Asia, Oceania Image Sensor 1/4-inch CCD Total number of pixels ...
Page 81 - FRANÇAIS; MODE D’EMPLOI
Page 82 - Caractéristiques
2 Introduction Nous vous remercions d’avoir choisi la Caméra de Communication Canon VC-C50i/VC-C50iR.Veuillez lire attentivement ce mode d’emploi pour assurer le bon fonctionnement decet appareil. Consultez tout d’abord la section “ a Utilisation en toute sécurité de l’appareil ” et veillez à observ...
Page 83 - Propriété littéraire; Note; Mise en garde
3 Introduction FRANÇAIS Propriété littéraire Les images vidéo ou fixes enregistrées avec la caméra VC-C50i/VC-C50iR ne peuvent pas être utilisées sielles constituent une violation de la propriété littéraire, sans approbation de l’auteur, sauf si cet usage est exclusivement à titre privé. Note Les in...
Page 84 - Utilisation en toute sécurité de l’appareil; Avertissements importants; Numéro de série
4 a Utilisation en toute sécurité de l’appareil Le point d’exclamation inscrit dans un triangle a pour objet d’informer l’utilisateur de laprésence, dans la documentation qui l’accompagne, d’instructions importantesrelatives à l’utilisation et à l’entretien de l’appareil. a a Avertissements importan...
Page 85 - NOTIFICATION IC; Instructions d’utilisation importantes
5 a Utilisation en toute sécurité de l’appareil FRANÇAIS a AVERTISSEMENT: POUR RÉDUIRE LES RISQUES DE SECOUSSE ÉLECTRIQUE, N’EXPOSEZPAS CET APPAREIL À LA PLUIE NI À L’HUMIDITÉ. a ATTENTION: POUR RÉDUIRE LES RISQUES DE SECOUSSE ÉLECTRIQUE ET ÉVITERLES BROUILLAGES INTEMPESTIFS, N’UTILISEZ QUE LES ACCE...
Page 86 - INSTRUCTIONS DE SÉCURITÉ IMPORTANTES
6 a Utilisation en toute sécurité de l’appareil a INSTRUCTIONS DE SÉCURITÉ IMPORTANTES Dans ces instructions, le mot “équipement” faitréférence à la caméra de communicationCANON VC-C50i/VC-C50iR et tous sesaccessoires. 1. Lisez ces instructions - Avant d’utiliser cetéquipement, lisez toutes les inst...
Page 89 - Entretien; Nettoyage de l’appareil; Débranchez l’adaptateur secteur de la prise murale.; Nettoyage de l’objectif
9 a Utilisation en toute sécurité de l’appareil FRANÇAIS Entretien Nettoyage de l’appareil 1. Débranchez l’adaptateur secteur de la prise murale. 2. Essuyez soigneusement l’appareil avec un chiffon doux imbibé d’eau oud’un produit de nettoyage à faible concentration. Ne pas utiliser de dissolvants, ...
Page 90 - Table des matières
10 Table des matières a Utilisation en toute sécurité de l’appareil ............................................................ 4 a Avertissements importants ....................................................................... 4 a Instructions d’utilisation importantes .............................
Page 91 - Avant d’utiliser la caméra; Vérification de la caméra et de ses accessoires; Adaptateur secteur PA-V16
11 FRANÇAIS Avant d’utiliser la caméra ● Mode d’emploi ● Carte de garantie (Modèle NTSCuniquement) Vérification de la caméra et de ses accessoires Avant d’installer la caméra, vérifiez si tous les éléments indiqués ci-dessous sont contenusdans l’emballage de l’appareil. Si l’un d’entre eux est manqu...
Page 92 - Utilisation d’un trépied; Installation de la caméra
Avant d’utiliser la caméra 12 Utilisation d’un trépied Une monture de vis pour trépied est située au centre du dessous de la caméra. Installation de la caméra (Installation)• Distance entre les orifices taraudés: 114 mm (4,49 pouces)• Diamètre des orifices taraudés: 6 mm (0,24 pouce)• Épaisseur de l...
Page 93 - Utilisation du convertisseur grand angle; Connexion des composants
Avant d’utiliser la caméra 13 FRANÇAIS Utilisation du convertisseur grand angle Le convertisseur grand angle WL-37 en option peut être utilisé pour des prises de vues engrand angle (environ 0,74 × la distance focale normale). Montez correctement le convertisseur grand angle de façon à ce qu’il soit ...
Page 94 - Fixation du multiconnecteur à la caméra; Poussez à fond la fiche multiconnecteur.; Branchement au multiconnecteur
Avant d’utiliser la caméra 14 Fixation du multiconnecteur à la caméra 1. Soulevez les leviers de chaque côté de la fichemulticonnecteur. 2. Poussez la fiche multiconnecteur dans la prisemulticonnecteur. 3. Poussez à fond la fiche multiconnecteur. ■ La fiche multiconnecteur est verrouilléedans la pri...
Page 95 - Configuration des broches du multiconnecteur
Avant d’utiliser la caméra 15 FRANÇAIS Rubrique Désignation broche Direction du signal Remarques Sortie S-vidéo A1 Y GND Sortie ⇒ MONITOR Terre sortie luminosité S-vidéo B1 Y OUT Sortie ⇒ MONITOR Sortie luminosité S-vidéo A2 C GND Sortie ⇒ MONITOR Terre sortie chrominance S-vidéo B2 C OUT Sortie ⇒ M...
Page 96 - Bornes E/S pour appareil externe
Avant d’utiliser la caméra 16 Bornes E/S pour appareil externe Bornes d’entrée pour appareil externe Elles comprennent 2 bornes de capteur (positive (+) et négative (–)). La borne négative estbranchée à la terre interne de la caméra et la borne positive est branchée au plus jusqu’à 5volts à 10 kohm ...
Page 97 - Mise sous et hors tension; Diodes électroluminescentes (DEL) et état de la caméra
Avant d’utiliser la caméra 17 FRANÇAIS Mise sous et hors tension Les caméras VC-C50i/VC-C50iR n’ont pas d’interrupteur d’alimentation. Vous pouvez mettre la camérasous tension en branchant l’adaptateur secteur dans une prise murale. Lorsque la caméra est mise soustension, la DEL sur la caméra passe ...
Page 98 - Commande de la caméra avec la télécommande sans fil
18 Commande de la caméra avec la télécommande sans fil La télécommande sans fil WL-V5 est en option.Lorsque les touches de la télécommande sans fil sont utilisées, la DEL de la caméra clignoteen vert (à des intervalles de 0,1 seconde). Nomenclature Dans la mesure du possible, mettez la caméra à l’ar...
Page 99 - Rayon d’action de la télécommande sans fil; Mise en place des piles dans la télécommande sans fil; Enlevez le couvercle du logement des piles.
19 Commande de la caméra avec la télécommande sans fil FRANÇAIS Rayon d’action de la télécommande sans fil Utilisez la télécommande sans fil dans le rayon d’action indiqué ci-dessous, en la dirigeantface au capteur de télécommande. Le rayon d’action de la télécommande sans fil varie enfonction de la...
Page 100 - Plage du mouvement mde la tête de la caméra; Modification de l’angle de la tête de la caméra; Pour déplacer la tête de la caméra de gauche à droite (panorama); Appuyez sur les touches; Pour déplacer la tête de la caméra de haut en bas (inclinaison); A p p u y e z s u r l e s t o u c h e s; Pour déplacer la tête de la caméra en position de départ; Appuyez sur la touche
20 Commande de la caméra avec la télécommande sans fil Plage du mouvement mde la tête de la caméra Les illustrations ci-dessous présentent la plage du mouvement de la tête de la caméra à partirde la position horizontale. La plage par défaut du mouvement vertical pour la VC-C50i est de30 ° , mais cet...
Page 101 - Appuyez sur le côté
21 FRANÇAIS Commande de la caméra avec la télécommande sans fil Pour faire un zoom avant (TELE): Appuyez sur le côté t de la touche. ■ Maintenez la touche enfoncée pour modifier le rapport duzoom comme indiqué ci-dessous. Lent Rapide Pour faire un zoom arrière (WIDE): Appuyez sur le côté w de la tou...
Page 102 - Pour utiliser le mode de mise au point automatique; Mise au point
22 Commande de la caméra avec la télécommande sans fil Pour utiliser le mode de mise au point automatique Appuyez sur la touche a . ■ La caméra effectue automatiquement la mise au point. Mise au point (FOCUS) Cette section décrit comment faire la mise au point sur le sujet. Les caméras VC-C50i/VC-C5...
Page 103 - Pour fixer la mise au point; Réglage de la luminosité; Pour éclaircir ou assombrir l’image
23 FRANÇAIS Commande de la caméra avec la télécommande sans fil Pour fixer la mise au point Appuyez sur la touche n . ■ Ceci désactive la mise au point automatique et fixe la miseau point. Pour la mise au point de sujets à proximité Appuyez sur la touche r . ■ Ceci permet de mettre la caméra en mode...
Page 104 - Pour sauvegarder une position; Effectuez le réglage désiré pour l’angle de la tête, la; Appuyez sur la touche; Pour remettre à la position initiale; Appuyez sur une touche numérotée de; Sauvegarde d’une position préréglée de la caméra
24 Commande de la caméra avec la télécommande sans fil Pour sauvegarder une position 1. Effectuez le réglage désiré pour l’angle de la tête, la position du zoom et le niveau de luminosité. ■ Le réglage de la mise au point n’est pas sauvegardé. 2. Appuyez sur la touche s . ■ La DEL sur la caméra clig...
Page 105 - Marche et arrêt de la caméra; Pour mettre la caméra à l’arrêt; Pour mettre la caméra en marche
25 FRANÇAIS Commande de la caméra avec la télécommande sans fil Marche et arrêt de la caméra La caméra est mise en marche ou à l’arrêt à l’aide de la touche p (caméra ON/OFF) de la télécommande sans fil. Les positions de préréglage mémorisées, la date, l’heure et le numérod’identification ne sont pa...
Page 106 - Réglages de la caméra; Touches utilisées pour spécifier les réglages; Description du menu de réglage
26 Réglages de la caméra Pour régler et afficher l’horloge et le texte et spécifier les réglages de fonctionnement de lacaméra. Touches utilisées pour spécifier les réglages Les touches de la télécommande sans fil indiquées ci-dessous sont utilisées pour le réglage. Description du menu de réglage Ap...
Page 107 - Réglage de l’horloge
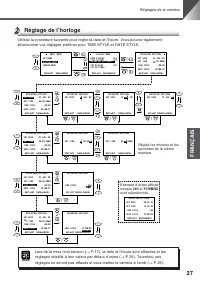
Réglages de la caméra 27 FRANÇAIS Réglage de l’horloge Utilisez la procédure suivante pour régler la date et l’heure. Vous pouvez égalementsélectionner vos réglages préférés pour TIME STYLE et DATE STYLE. Réglez les minutes et lessecondes de la mêmemanière. Exemple d’écran affichélorsque 24H et YY/M...
Page 110 - Réglage de la portée du mouvement de la tête de la caméra
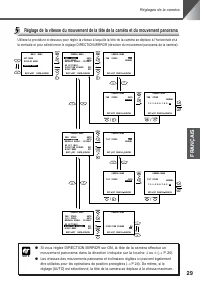
Réglages de la caméra 30 Réglage de la portée du mouvement de la tête de la caméra Utilisez la procédure ci-dessous pour limiter la portée des mouvements panorama et inclinaison de lacaméra ( → P.20). Cette fonction vous permet également de regarder l’image sur le moniteur lorsque vous déplacez la t...
Page 111 - Réglage de l’exposition automatique AE
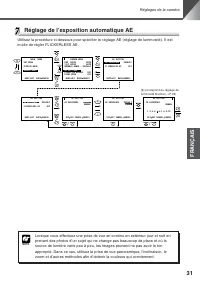
Réglages de la caméra 31 FRANÇAIS Réglage de l’exposition automatique AE Utilisez la procédure ci-dessous pour spécifier le réglage AE (réglage de luminosité). Il estinutile de régler FLICKERLESS AE. MA I N MENU SE T MENU D I SP MENU CA E MENU NEXT SE T LAY RA M BACK CANCE L SE T T I N N GS M I RROR...
Page 112 - Réglage du mode nocturne; Menu de réglage du mode VC-C4
Réglages de la caméra 32 MA I N MENU SE T MENU CA E MENU NEXT SE T RA M BACK CANCE L SE T MENU NEXT SE T BACK CANCE L RS - 2 3 2C E T T I NGS . . S REMO O O NTR R T E C L L E I D 0 C R ESTOR E DE FAUL T O D E 3 C - C V MOD AN MM SE T T I N N GS M I RROR . . ME A C RA MENU SPE EDSPE E AUTOAUTO D I T ...
Page 114 - Mode ID; Réglage du numéro ID
34 Mode ID 1. Mettez sous tension les caméras auxquelles vous désirez attribuer le même numéro ID. Mettez lesautres caméras branchées hors tension. Mettez la caméra hors tension en débranchant l’adaptateursecteur branché à la caméra ( → P.17). Le numéro ID n’est pas effacé même après la mise hors te...
Page 115 - Sélection de la caméra à contrôler; Appuyez sur la touche
Mode ID 35 FRANÇAIS Sélection de la caméra à contrôler <Exemple> Comme indiqué sur l’illustration ci-dessous, parmi les 4 caméras (ID1 à ID3) seules les caméras ayant le numéro 2 (2 caméras) sont sélectionnées pour lefonctionnement en mode ID. En temps normal, les DEL des caméras passent au ve...
Page 116 - Annulation du mode ID
Mode ID 36 1. Appuyez sur la touche i . Les DEL sur toutes les caméras branchées adjacentes clignotenten orange (à des intervalles de 0,5 secondes). Pour annuler le fonctionnement en mode ID, appuyez sur latouche c ou i . Les DEL sur toutes les caméras avec le numéro ID2 passent au vert et les DEL s...
Page 117 - Dépannage; La télécommande sans fil ne fonctionne pas.; Contrôle 4: La DEL clignote-t-elle en vert lorsque vous utilisez la; Pas d’image sur l’écran.; portée de son mouvement.
37 FRANÇAIS Dépannage Procédez aux contrôles suivants avant de contacter votre revendeur Canon. La télécommande sans fil ne fonctionne pas. Contrôle 1: The DEL is not lit.Réponse: Vérifiez si la fiche est bien branchée et bien enfoncée dans la prise secteur. → P.17 Contrôle 2: La DEL est rouge.Répon...
Page 118 - La caméra ne se déplace pas sur une position préréglée.; La caméra ne fait pas la mise au point.; distance focale de la caméra.
Dépannage 38 La caméra ne se déplace pas sur une position préréglée. Contrôle 1: La tête de la caméra ne se déplace pas jusqu’à la limite de la portée de son mouvement. Réponse: La tête de la caméra a été déplacée accidentellement. Appuyez sur la touche h de la télécommande sans fil. → P.20 Contrôle...
Page 119 - Réglages par défaut d’usine
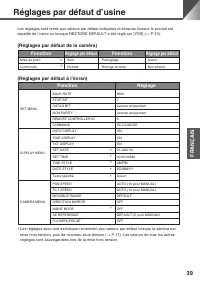
39 FRANÇAIS Réglages par défaut d’usine Les réglages sont remis aux valeurs par défaut indiquées ci-dessous lorsque le produit estexpédié de l’usine ou lorsque RESTORE DEFAULT a été réglé sur [YES] ( → P.33). * Les réglages avec une astérisque reviennent aux valeurs par défaut lorsque la caméra estm...
Page 120 - Spécifications
40 Spécifications * Lorsque vous utilisez l’ordinateur pour contrôler la caméra, l’image sur l’écran sera peut-êtrefloue lorsque la tête de la caméra est déplacée lentement. Caractéristiques Détails Signal vidéo Modèle NTSC pour les Etats-Unis et le CanadaModèle PAL pour l’Europe, l’Asie et l’Océani...
Page 123 - ESPAÑOL; MANUAL DE INSTRUCCIONES
Page 124 - Introducción; Uso seguro del equipo; observe estas instrucciones cuando se utiliza el producto.; Características de la cámara para comunicación VC-C50i/VC-C50iR; Zoom óptico 26
2 Introducción Gracias por la compra de la Cámara para comunicación Canon VC-C50i/VC-C50iR.Se ruega leer atentamente este manual de instrucciones para un uso seguro ycorrecto del producto. Lea primero la sección “ a Uso seguro del equipo ” y observe estas instrucciones cuando se utiliza el producto....
Page 125 - Información sobre derechos de autor; Exclusión de responsabilidad
3 Introducción ESPAÑOL Información sobre derechos de autor Las imágenes fijas o de vídeo grabadas con su VC-C50i/VC-C50iR no se pueden utilizar de forma quepuedan infringir las leyes de los derechos de autor, o sin el consentimiento de su propietario, a menos quesea exclusivamente para uso personal....
Page 126 - de teléfono del concesionario; Advertencias importantes
4 a Uso seguro del equipo a PRECAUCIÓN: PARA REDUCIR EL RIESGO DE DESCARGAS ELÉCTRICAS, NO RETIRENINGUNA CUBIERTA. EN EL INTERIOR NO HAY PIEZAS QUE PUEDAREPARAR EL USUARIO. DEJE EL SERVICIO EN MANOS DE PERSONAL DESERVICIO ESPECIALIZADO. El número de serie de este equipo se encuentra indicado en la p...
Page 127 - Instrucciones importantes de uso
5 a Uso seguro del equipo ESPAÑOL a PRECAUCIÓN: PARA EVITAR EL RIESGO DE DESCARGAS ELÉCTRICAS EINTERFERENCIAS PERJUDICIALES, UTILICE SOLAMENTE LOSACCESORIOS RECOMENDADOS. a Instrucciones importantes de uso a ADVERTENCIA: PARA REDUCIR EL RIESGO DE DESCARGAS ELÉCTRICAS, NO EXPONGAESTE EQUIPO A LA LLUV...
Page 128 - INSTRUCCIONES DE SEGURIDAD IMPORTANTES
6 a Uso seguro del equipo En estas instrucciones de seguridad, lapalabra “equipo” se refiere a la cámarapara comunicación VC-C50i/VC-C50iRCanon y todos sus accesorios. 1. Lea las instrucciones - Deben leersetodas las instrucciones de seguridad yde uso antes de utilizar el equipo. 2. Conserve las ins...
Page 131 - Limpieza del objetivo; Mantenimiento; Limpieza del equipo; Desenchufe el adaptador AC del tomacorriente de la pared.; Limpie con un paño seco.; Iconos utilizados en este manual de instrucciones; ADVERTENCIA
9 a Uso seguro del equipo ESPAÑOL Limpieza del objetivo Limpie el objetivo con un producto limpiador de objetivos en venta en lastiendas del ramo. ■ El enfoque automático podría no funcionar correctamente si hay suciedad en lasuperficie del objetivo. ■ Los arañazos de la superficie del objetivo podr...
Page 132 - ÍNDICE
10 ÍNDICE a Uso seguro del equipo .......................................................................................... 4 a Advertencias importantes .......................................................................... 4 a Instrucciones importantes de uso .....................................
Page 133 - Antes de usar el producto; Comprobación de la cámara y sus accesorios; Cable AC
11 ESPAÑOL Antes de usar el producto ● Manual de instrucciones ● Tarjeta de garantía(sólo modelo NTSC) Comprobación de la cámara y sus accesorios Antes de instalar el producto, compruebe que todos los elementos indicados abajo seencuentran incluidos en el paquete del producto. Si hay algún elemento ...
Page 134 - Instalación del producto; Uso del trípode
Antes de usar el producto 12 Instalación del producto (Instalación)• Distancia entre orificios roscados: 114 mm (4,49 pulg.)• Diámetro del orificio roscado: 6 mm (0,24 pulg.)• Espesor de la placa de montaje: 1 mm (0,04 pulg.) Instale firmemente la cámara. ● Para instalar la cámara en el techo, pónga...
Page 135 - Utilización del convertidor gran angular; Conexión de los componentes
Antes de usar el producto 13 ESPAÑOL Utilización del convertidor gran angular El convertidor gran angular WL-37 opcional se puede utilizar para obtener tomas de primerosplanos (aprox. 0,74 × de la distancia focal normal). Instale correctamente el convertidor gran angular de manera que quede nivelado...
Page 136 - Fijación del multiconector a la cámara; Introduzca a fondo el enchufe multiconector.; Conexión al multiconector
Antes de usar el producto 14 Fijación del multiconector a la cámara 1. Levante las palancas de ambos lados delenchufe multiconector. 2. Introduzca el enchufe multiconector en elzócalo del multiconector. 3. Introduzca a fondo el enchufe multiconector. ■ El enchufe multiconector queda bloqueadoen el z...
Page 137 - Disposición de las patillas del multiconector
Antes de usar el producto 15 ESPAÑOL Disposición de las patillas del multiconector A1 Y GND Y OUT B1 A2 C GND C OUT B2 A3 RTS OUT CTS OUT B3 A4 TX OUT RX OUT B4 A5 GND GND B5 A6 RTS IN CTS IN B6 A7 TX IN RX IN B7 A8 Light_ON/OFF- Light_ON/OFF+ B8 A9 Alarm_- Alarm_+ B9 A10 Sensor_- Sensor_+ B10 Eleme...
Page 138 - Terminales E/S del dispositivo externo
Antes de usar el producto 16 Terminales E/S del dispositivo externo Terminales de entrada del dispositivo externo Se componen de 2 terminales de sensor (positivo (+) y negativo (–)). El terminal negativo seencuentra conectado a la masa interna propia de la cámara y el terminal positivo seencuentra p...
Page 139 - Conexión y desconexión de la alimentación; Indicaciones LED y estado de la cámara
Antes de usar el producto 17 ESPAÑOL Conexión y desconexión de la alimentación La cámara VC-C50i/VC-C50iR no dispone de interruptor de alimentación. La cámara seenciende al conectar el adaptador AC en un tomacorriente de pared. Al encenderse lacámara, el LED de la cámara se ilumina en verde. Si el m...
Page 140 - Controlando la cámara con el controlador sin hilos; Nomenclatura
18 Controlando la cámara con el controlador sin hilos Siempre que sea posible, apague la cámara cuando no está en uso ( → p.25) para reducir el consumo de energía. Si no se va a utilizar la cámara por untiempo prolongado, desenchufe el adaptador AC del tomacorriente de la pared( → p.17). Si desconec...
Page 141 - Retire la tapa del compartimiento de las pilas.; Radio de acción del controlador sin hilos; Instalación de las pilas en el controlador sin hilos
19 Controlando la cámara con el controlador sin hilos ESPAÑOL El controlador sin hilos requiere dos pilas tipo AA. 1. Retire la tapa del compartimiento de las pilas. 2. Inserte las pilas. ■ Asegúrese de que las polaridades (+ y –)queden correctamente posicionadas. 3. Reinstale la tapa del compartimi...
Page 142 - Rango de movimiento del cabezal de la cámara; Oprima los botones; Para mover el cabezal de la cámara a la posición inicial; O p r i m a e l b o t ó n; Cambio del ángulo del cabezal de la cámara
20 Controlando la cámara con el controlador sin hilos Rango de movimiento del cabezal de la cámara En las siguientes figuras se muestra el rango de movimiento del cabezal de la cámara conrespecto a la posición horizontal. El rango predeterminado para el movimiento hacia arriba dela VC-C50i es de 30 ...
Page 143 - Oprima el lado; Zoom de acercamiento/alejamiento
21 Controlando la cámara con el controlador sin hilos ESPAÑOL 3 2 1 AF 6 5 4 MF 9 8 7 0 MENU ID HOME Fn BRIGHT ON SCREEN ∞ SET/OK CANCEL ZOOM T W Para el zoom de acercamiento (TELE): Oprima el lado t del botón. ■ Manteniendo oprimido el botón, el régimen del zoom cambiade la siguiente manera. Lento ...
Page 144 - Para utilizar el modo de enfoque automático; Enfoque
22 Controlando la cámara con el controlador sin hilos 3 2 1 AF 6 5 4 MF 9 8 7 0 MENU ID HOME Fn BRIGHT ON SCREEN ∞ SET/OK CANCEL ZOOM T W Para utilizar el modo de enfoque automático O p r i m a e l b o t ó n a . ■ La cámara enfoca automáticamente. Enfoque (FOCUS) Esta sección describe cómo enfocar e...
Page 145 - Para fijar el enfoque; Para enfocar sujetos cercanos; Ajuste de la luminosidad; Para aclarar u oscurecer la imagen
23 Controlando la cámara con el controlador sin hilos ESPAÑOL 3 2 1 AF 6 5 4 MF 9 8 7 0 MENU ID HOME Fn BRIGHT ON SCREEN ∞ SET/OK CANCEL ZOOM T W Para fijar el enfoque O p r i m a e l b o t ó n n . ■ Se desactiva el enfoque automático y se fija el enfoque. Para enfocar sujetos cercanos O p r i m a e...
Page 146 - Almacenamiento de una posición de preajuste de la cámara; Para almacenar una posición; Para restablecer una posición de preajuste
24 Controlando la cámara con el controlador sin hilos ● Durante las operaciones de preajuste, los movimientos para giro einclinación de la cámara se realizan a las velocidades definidas para laoperación de giro/inclinación en el menú de ajuste. Si se selecciona el ajuste[AUTO], el cabezal se mueve a...
Page 147 - Para apagar la cámara; Con la cámara encendida, oprima el botón; Para encender la cámara; Con la cámara apagada, oprima el botón; Encendido y apagado de la cámara
25 Controlando la cámara con el controlador sin hilos ESPAÑOL 3 2 1 AF 6 5 4 MF 9 8 7 0 MENU ID HOME Fn BRIGHT ON SCREEN ∞ SET/OK CANCEL ZOOM T W Para apagar la cámara Con la cámara encendida, oprima el botón p . ■ La imagen desaparece y el LED de la cámara cambia a rojo(cámara apagada). Ahora, la c...
Page 148 - Ajustes de la cámara; Botones utilizados para especificar los ajustes; Descripción del menú de ajuste
26 Ajustes de la cámara Permiten configurar y visualizar el reloj y el texto, y especificar los ajustes de funcionamientode la cámara. Botones utilizados para especificar los ajustes Los botones del controlador sin hilos mostrados abajo se utilizan para los ajustes. Descripción del menú de ajuste Op...
Page 149 - Ajuste del reloj
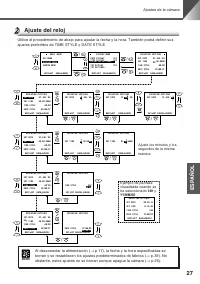
Ajustes de la cámara 27 ESPAÑOL Ajuste del reloj Utilice el procedimiento de abajo para ajustar la fecha y la hora. También podrá definir susajustes preferidos de TIME STYLE y DATE STYLE. Al desconectar la alimentación ( → p.17), la fecha y la hora especificadas se borran y se restablecen los ajuste...
Page 150 - Introducción de caracteres
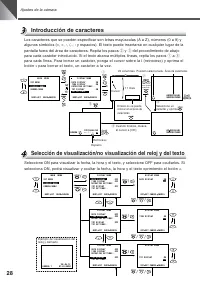
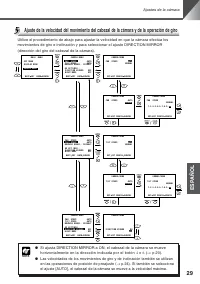
Ajustes de la cámara 28 Selección de visualización/no visualización del reloj y del texto Seleccione ON para visualizar la fecha, la hora y el texto, y seleccione OFF para ocultarlos. Siselecciona ON, podrá visualizar y ocultar la fecha, la hora y el texto oprimiendo el botón o . Introducción de car...
Page 152 - Ajuste del rango de movimiento del cabezal de la cámara
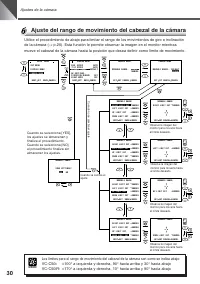
Ajustes de la cámara 30 Ajuste del rango de movimiento del cabezal de la cámara Utilice el procedimiento de abajo para limitar el rango de los movimientos de giro e inclinaciónde la cámara ( → p.20). Esta función le permite observar la imagen en el monitor mientras mueve el cabezal de la cámara hast...
Page 153 - Ajuste de la exposición automática AE
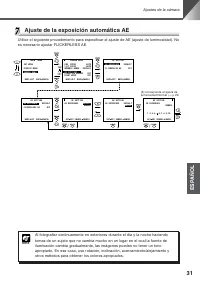
Ajustes de la cámara 31 ESPAÑOL Ajuste de la exposición automática AE Utilice el siguiente procedimiento para especificar el ajuste de AE (ajuste de luminosidad). Noes necesario ajustar FLICKERLESS AE. MA I N MENU SE T MENU D I SP MENU CA E MENU NEXT SE T LAY RA M BACK CANCE L SE T T I N N GS M I RR...
Page 154 - Ajustes del modo nocturno
Ajustes de la cámara 32 MA I N MENU SE T MENU CA E MENU NEXT SE T RA M BACK CANCE L SE T MENU NEXT SE T BACK CANCE L RS - 2 3 2C E T T I NGS . . S REMO O O NTR R T E C L L E I D 0 C R ESTOR E DE FAUL T O D E 3 C - C V MOD AN MM SE T T I N N GS M I RROR . . ME A C RA MENU SPE EDSPE E AUTOAUTO D I T P...
Page 156 - Modo ID; Ajuste del número ID
34 Modo ID Cuando hay múltiples cámaras VC-C50i/VC-C50iR conectadas e instaladas, todas lascámaras del radio de acción del controlador sin hilos realizarán simultáneamente lasoperaciones especificadas. No obstante, es posible accionar las cámaras individualmenteasignándoles previamente números de id...
Page 157 - O p r i m a e l b o t ó n; Selección de la cámara a controlar
Modo ID 35 ESPAÑOL 3 2 1 AF 6 5 4 MF 9 8 7 0 MENU ID HOME Fn BRIGHT ON SCREEN ∞ SET/OK CANCEL ZOOM T W 1. O p r i m a e l b o t ó n i . Los LEDs de todas las cámaras conectadas adyacentesparpadean en naranja (a intervalos de 0,5 segundo). Para cancelar la operación del modo ID, oprima el botón c o i...
Page 158 - Cancelación del modo ID
Modo ID 36 3 2 1 AF 6 5 4 MF 9 8 7 0 MENU ID HOME Fn BRIGHT ON SCREEN ∞ SET/OK CANCEL ZOOM T W 1. O p r i m a e l b o t ó n i . Los LEDs de todas las cámaras conectadas adyacentesparpadean en naranja (a intervalos de 0,5 segundo). Para cancelar la operación del modo ID, oprima el botón c o i . Los L...
Page 159 - El controlador sin hilos no funciona.; cabezal de la cámara.; Problemas y solución de problemas
37 ESPAÑOL Compruebe lo siguiente antes de ponerse en contacto con su concesionario Canon. El controlador sin hilos no funciona. Comprobación 1: El LED no está iluminado.Solución: Compruebe que la clavija esté insertada en el tomacorriente,correctamente y hasta el fondo. → p.17 Comprobación 2: El LE...
Page 160 - La cámara no se mueve a una posición de preajuste.; cambiado después de almacenar la posición de preajuste.
Problemas y solución de problemas 38 La cámara no se mueve a una posición de preajuste. Comprobación 1: El cabezal de la cámara no se mueve hasta el límite de su rango de movimiento. Solución: Algo ha movido directamente el cabezal de la cámara. Oprima elbotón h del controlador sin hilos. → p.20 Com...
Page 161 - Ajustes predeterminados de fábrica
39 ESPAÑOL Ajustes predeterminados de fábrica Cuando el producto se expide de fábrica o cuando se ajusta RESTORE DEFAULT a [YES]( → p.33), los ajustes se encuentran en los valores predeterminados indicados abajo. (Ajustes predeterminados de la cámara) Elemento Elemento Enfoque * Automático Preajusta...
Page 162 - Especificaciones
40 Especificaciones * Si se utiliza un ordenador para controlar la cámara, la imagen de la pantalla podría aparecervacilante cuando el cabezal de la cámara se mueve lentamente. Elemento Detalles Señal de vídeo Modelo NTSC para EE.UU., CanadáModelo PAL para Europa, Asia, Oceanía Sensor de imagen CCD ...
Page 165 - DEUTSCH; GEBRAUCHSANLEITUNG
Page 166 - Einführung; Wichtige Sicherheitshinweise; ”, und befolgen Sie alle; Erlaubt Aufnahmen bei schwachem Licht bis hinunter zu 1 Lux.
2 Einführung Wir danken Ihnen für Ihr Vertrauen in die Canon Überwachungskamera VC-C50i/VC-C50iR.Bitte lesen Sie die Gebrauchsanleitung gut durch, um einen korrekten, sicherenBetrieb des Geräts zu gewährleisten. Lesen Sie vor dem ersten Einsatz vor allemdie Hinweise unter “ a Wichtige Sicherheitshin...
Page 167 - Informationen zum Urheberrecht
Einführung 3 DEUTSCH Informationen zum Urheberrecht Lauf- und Standbilder, die mit der VC-C50i/VC-C50iR aufgezeichnet wurden, dürfen nicht in einer dasUrheberrecht verletzenden Weise verwendet werden bzw. nicht ohne die Genehmigung desUrheberrechtsinhabers, ausgenommen für rein persönliche Zwecke. H...
Page 168 - In dieser Anleitung verwendete Symbole; Wichtige Warnhinweise
4 a Wichtige Sicherheitshinweise Dieses Produkt ist zum Gebrauch im Wohnbereich, Geschäfts-und Gewerbebereich sowiein Kleinbetrieben vorgesehen. Das Netzteil des VC-C50i/VC-C50iR kann an eine gewöhnliche Netzsteckdoseangeschlossen werden. Schlagen Sie in der Bedienungsanleitung nach, umsicherzustell...
Page 169 - WICHTIGE HINWEISE ZUR SICHERHEIT
a Wichtige Sicherheitshinweise 5 DEUTSCH Bei den folgenden Sicherheitshinweisenbezeichnet der Ausdruck “Gerät” die CanonÜberwachungskamera VC-C50i/VC-C50iR undderen Zubehör. 1. Anweisungen durchlesen - Lesen Sie dieAnweisungen zu Sicherheit und Betriebdurch, bevor Sie das Gerät in Betriebnehmen. 2. ...
Page 172 - Reinigung des Objektivs; Wartung; Reinigung des Geräts; Ziehen Sie das Netzadapterkabel von der Wandsteckdose ab.; Wischen Sie das Gerät mit einem trockenen Tuch ab.
a Wichtige Sicherheitshinweise 8 Reinigung des Objektivs Verwenden Sie einen handelsüblichen Objektivreiniger, um Verschmutzungenvon der Linsenoberfläche zu entfernen. ■ Wenn die Linsenoberfläche verschmutzt ist, funktioniert eventuell der Autofokus nichtkorrekt. ■ Kratzer auf der Linsenoberfläche k...
Page 173 - INHALT
9 DEUTSCH INHALT a Wichtige Sicherheitshinweise ............................................................................... 4 In dieser Anleitung verwendete Symbole .......................................................... 4 a Wichtige Warnhinweise .................................................
Page 174 - Vor der Inbetriebnahme des Geräts; Überprüfen der Kamera und ihres Zubehörs; Bezeichnungen; oder
10 Vor der Inbetriebnahme des Geräts Überprüfen der Kamera und ihres Zubehörs Vergewissern Sie sich vor dem Installieren, daß in der Verpackung alle folgendeGegenstände enthalten sind. Falls etwas fehlen sollte, wenden Sie sich bitte an Ihren Canon-Händler. ■ Optionales Gerät ● Fernbedienung WL-V5 (...
Page 175 - Verwendung eines Stativs; Installieren des Geräts
Vor der Inbetriebnahme des Geräts 11 DEUTSCH Verwendung eines Stativs An der Unterseite der Kamera befindet sich ein Innengewinde zur Montage eines Stativs. Installieren des Geräts Montageplatte Schraube VC-C50iR Schraube Installierung der VC-C50i Auf ebener, stabiler Fläche anbringen. Installierung...
Page 176 - Einsatz des Weitwinkelkonverters; Anschließen der Komponenten
Vor der Inbetriebnahme des Geräts 12 Einsatz des Weitwinkelkonverters Der optionale Weitwinkelkonverter WL-37 bietet Aufnahmen im Weitwinkel (etwa 0,74 malNormalbrennweite).Montieren Sie den Weitwinkelkonverter so, daß er eben liegt und fest mit der Kameraverbunden ist. Nach der korrekten Montage so...
Page 177 - Befestigen des Mehrfachsteckverbinder-Steckers
Vor der Inbetriebnahme des Geräts 13 DEUTSCH Befestigen des Mehrfachsteckverbinder-Steckers 1. Stellen Sie die Hebel an beiden Seiten desMehrfachsteckverbinder-Steckers hoch. 2. Drücken Sie den Mehrfachsteckverbinder-Stecker in die Mehrfachsteckverbinder-Buchse. 3. Drücken Sie den Mehrfachsteckverbi...
Page 178 - Mehrfachsteckverbinder Pinbelegung
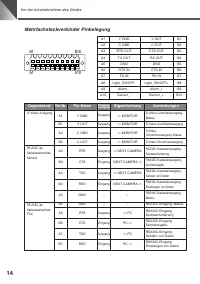
Vor der Inbetriebnahme des Geräts 14 Mehrfachsteckverbinder Pinbelegung A1 Y GND Y OUT B1 A2 C GND C OUT B2 A3 RTS OUT CTS OUT B3 A4 TX OUT RX OUT B4 A5 GND GND B5 A6 RTS IN CTS IN B6 A7 TX IN RX IN B7 A8 Light_ON/OFF- Light_ON/OFF+ B8 A9 Alarm_- Alarm_+ B9 A10 Sensor_- Sensor_+ B10 A1 B1 A10 B10 Ge...
Page 180 - Ein- und Ausschalten des Geräts; LED-Anzeigen und Kamerabetriebszustand
Vor der Inbetriebnahme des Geräts 16 Ein- und Ausschalten des Geräts Die VC-C50i/VC-C50iR Kamera weist keinen Hauptschalter auf. Schalten Sie die Kamera ein,indem Sie sie über den Netzadapter an der Wandsteckdose anschließen. Wenn dieStromversorgung zur Kamera eingeschaltet wird, leuchtet die LED-La...
Page 181 - Ansteuern der Kamera mit der Fernbedienung
17 DEUTSCH Ansteuern der Kamera mit der Fernbedienung Schalten Sie die Kamera möglichst aus, wenn sie nicht benutzt wird ( → S.24), Sie sparen dadurch Strom. Falls die Kamera längere Zeit nicht benutzt wird,sollten Sie den Netzadapter von der Wandsteckdose abziehen ( → S.16). Wenn Sie die Stromverso...
Page 182 - Steuerbereich der Fernbedienung; Nehmen Sie den Batteriefachdeckel ab.; Einlegen der Batterien in die Fernbedienung
Ansteuern der Kamera mit der Fernbedienung 18 Steuerbereich der Fernbedienung Richten Sie die Fernbedienung im folgenden Bereich auf den Fernbedienungssensor. DerSteuerbereich der Fernbedienung hängt vom Ladezustand der Batterien und vonInterferenzen anderer Objekte ab. (Gleiches gilt für die VC-C50...
Page 183 - Bewegen der Kamera; Bewegungsbereich des Kamerakopfs; Bewegen des Kamerakopfs nach links und rechts (Schwenken); Bewegen des Kamerakopfs nach oben und unten (Neigen); B e t ä t i g e n S i e d i e; Bewegen des Kamerakopfs in die Grundposition; Betätigen Sie die
Ansteuern der Kamera mit der Fernbedienung 19 DEUTSCH Bewegen der Kamera (Schwenken/Neigen/Ausgangsposition) Verändern Sie den Kamerakopfwinkel wie folgend. Bewegungsbereich des Kamerakopfs Folgende Werte zeigen die Kamerakopfbewegung aus der Horizontalen. Die Voreinstellungfür Bewegung nach oben is...
Page 184 - Heranzoomen/Wegzoomen; Drücken Sie auf die
Ansteuern der Kamera mit der Fernbedienung 20 Heranzoomen (TELE): Drücken Sie auf die t Seite der Taste. ■ Bei gedrückter Taste erhöht sich die Zoomgeschwindigkeitwie folgend. Langsam Schnell Heranzoomen/Wegzoomen (TELE/WEIT) Die Zoomfunktion vergrößert (Heranzoomen) und verkleinert (Wegzoomen) das ...
Page 185 - Scharfeinstellung; Zum Aktivieren des Autofokusmodus
Ansteuern der Kamera mit der Fernbedienung 21 DEUTSCH Scharfeinstellung (FOKUS) Dieser Abschnitt erläutert das Fokussieren. Die VC-C50i/VC-C50iR hat einenAutofokusmodus, womit die Kamera automatisch auf ein Objekt fokussiert, und einenmanuellen Fokusmodus, wo die Bedienungsperson manuell scharf eins...
Page 186 - Festhalten des Fokuspunkts; Einstellen der Helligkeit
Ansteuern der Kamera mit der Fernbedienung 22 Festhalten des Fokuspunkts Betätigen Sie die n Taste. ■ Damit wird der Autofokus abgeschaltet und der Fokuspunktfestgehalten. Fokussieren auf naheliegende Objekte Betätigen Sie die r Taste. ■ Die Kamera wird damit auf manuellen Fokusmodusumgeschaltet, wä...
Page 187 - Speichern einer voreingestellten Kameraposition; Speichern einer Position
Ansteuern der Kamera mit der Fernbedienung 23 DEUTSCH Speichern einer voreingestellten Kameraposition (PRESET) In diesem Abschnitt wird erläutert, wie man den Kamerakopfwinkel, die Zoomposition und denHelligkeitspegel abspeichert. Bis zu neun (1 bis 9) Voreinstellpositionen sind abspeicherbar.Beim A...
Page 188 - Ausschalten der Kamera; Betätigen Sie bei eingeschalteter Kamera die; Einschalten der Kamera; Betätigen Sie bei ausgeschalteter Kamera die; Ein- und Ausschalten der Kamera
Ansteuern der Kamera mit der Fernbedienung 24 Ausschalten der Kamera Betätigen Sie bei eingeschalteter Kamera die p Taste. ■ Das Bild erlischt, und die LED-Lampe der Kamera leuchtetrot (Kamera AUS). Die Kamera läßt sich nun nur mit Taste p oder Taste i der Fernbedienung ansteuern. Einschalten der Ka...
Page 189 - Erläuterung des Einstellungsmenüs; Kameraeinstellungen; Tasten für Vorgabe der Einstellungen
25 DEUTSCH 3 2 1 AF 6 5 4 MF 9 8 7 0 MENU ID HOME Fn BRIGHT ON SCREEN ∞ SET/OK CANCEL ZOOM T W 5 8 T a s t e n : Bewegt den Cursor nach oben und unten. 6 T a s t e : Bewegt den Cursor nach rechts. Außerdem zum Vorrücken auf die nächste Ebene. 4 T a s t e : Bewegt den Cursor nach links. c T a s t e :...
Page 190 - Einstellen der Zeit
26 Kameraeinstellungen Einstellen der Zeit Gehen Sie zum Einstellen von Datum und Uhrzeit wie folgend vor. Auch Einstellungen fürTIME STYLE und DATE STYLE sind verfügbar. Minuten und Sekundenauf gleiche Weise setzen Beispiel für Bildschirm,wenn 24H und YY/MM/DD (Jahr/Monat/Tag)gewählt sind MA I N ME...
Page 191 - Eingabe von Zeichen
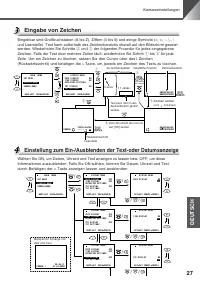
27 DEUTSCH Kameraeinstellungen Eingabe von Zeichen Eingebbar sind Großbuchstaben (A bis Z), Ziffern (0 bis 9) und einige Symbole (<, >, -, /,., :und Leerstelle). Text kann außerhalb des Zeichenbereichs überall auf den Bildschirm gesetztwerden. Wiederholen Sie Schritte w und e der folgenden Pro...
Page 193 - Einstellen des Bewegungsbereichs des Kamerakopfs
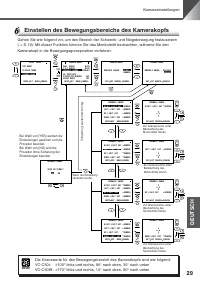
29 DEUTSCH Kameraeinstellungen Einstellen des Bewegungsbereichs des Kamerakopfs Gehen Sie wie folgend vor, um den Bereich der Schwenk- und Neigebewegung festzusetzen( → S.19). Mit dieser Funktion können Sie das Monitorbild beobachten, während Sie den Kamerakopf in die Bewegungsgrenzposition verfahre...
Page 195 - Nachtmodus-Einstellungen; Einstellungsmenü für Modus VC-C4
31 DEUTSCH Kameraeinstellungen Nachtmodus-Einstellungen Im Nachtmodus können Sie Motive in dunkler Umgebung anhand von Schwarzweißbildernerfassen, die durch Infrarotfotografie abgebildet werden. Beim Aktivieren des Nachtmoduswird das eingebaute Infrarotlicht (Infrarot-LED) automatisch eingeschaltet....
Page 197 - Vorgabe der Kennummer
33 DEUTSCH 4. Betätigen Sie nach dem Festlegen der Kennummer die m oder c Taste, um die Einstellungsmenüs zu verlassen. 5. Wiederholen Sie die Schritte 1 bis 4, bis die Kennummern für alle Kameras festgelegt sind. ID-Modus Wenn mehrere VC-C50i/VC-C50iR Kameras angeschlossen und installiert sind, füh...
Page 198 - Wahl der anzusteuernden Kamera
34 ID-Modus 1. Betätigen Sie die i Taste. Die LED-Lampen aller daneben angeschlossenen Kamerasblinken orange (in 0,5 s Intervallen). Betätigen Sie Taste c oder i , um den ID-Modus-Betrieb abzubrechen. Die LED-Lampen aller Kameras leuchten nungrün. 2. Betätigen Sie eine Zifferntaste (in diesem Fall 2...
Page 199 - Betätigen Sie die; Aufheben des ID-Modus
35 DEUTSCH ID-Modus 1. Betätigen Sie die i Taste. Die LED-Lampen aller daneben angeschlossenen Kamerasblinken orange (in 0,5 s Intervallen). Betätigen Sie Taste c oder i , um den ID-Modus-Betrieb abzubrechen. Die LED-Lampen aller ID2 Kameras leuchtengrün, und die LED-Lampen der anderen Kameras leuch...
Page 200 - Fehlersuche; Die Fernbedienung funktioniert nicht.; Prüfung 4: Blinkt die LED-Lampe grün, wenn Sie die Fernbedienung; Auf dem Monitor ist kein Bild zu sehen.; Prüfung 3: Stromversorgung der Kamera oder des Monitors ist nicht; Der Kamerakopfwinkel kann nicht korrekt eingestellt werden.; Prüfung 1: Der Kamerakopf bewegt sich nicht bis zur eingestellten
36 Fehlersuche Kontrollieren Sie folgendes, bevor Sie sich an Ihren Canon-Händler wenden. Die Fernbedienung funktioniert nicht. Prüfung 1: Die LED-Lampe leuchtet nicht.Abhilfe: Vergewissern Sie sich, daß der Stecker an die Wandsteckdose angeschlossen und ganz eingesteckt ist. → S.16 Prüfung 2: Die L...
Page 201 - Die Kamera geht nicht in die Voreinstellposition.; Die Kamera fokussiert nicht.; Scharfeinstellbereichs.
37 DEUTSCH Fehlersuche Die Kamera geht nicht in die Voreinstellposition. Prüfung 1: Der Kamerakopf bewegt sich nicht bis zur eingestellten Grenzposition. Abhilfe: Der Kamerakopf wurde etwas verdreht. Drücken Sie die h Taste der Fernbedienung. → S.19 Prüfung 2: Der Bewegungsbereich für Schwenken/Neig...
Page 202 - Werksvoreinstellungen
38 (Grundwerte des Einstellbildschirms) Gegenstand Einstellung BAUD RATE 9600 STOP BIT 1 SET MENU DATA 8 BIT Read-Only NON PARITY Read-Only REMOTE CONTROLLER ID 0 COMMAND VC-C4 MODE DATE DISPLAY ON TIME DISPLAY ON TXT DISPLAY ON DISPLAY MENU SET DATE * 01.JAN.’00 SET TIME * 00:00:00AM TIME STYLE * A...
Page 203 - Technische Daten
39 DEUTSCH Technische Daten * Falls die Kamera mit einem Computer gesteuert wird, erscheint das Bild eventuellverwackelt, wenn der Kamerakopf langsam bewegt wird. Gegenstand Daten Videosignal PAL-Modell Bildsensor 1/4-Zoll-CCD Gesamtzahl Bildpunkte 400.000 effektive Bildpunkte Synchronisierung Inter...
Page 205 - ITALIANO; MANUALE DI ISTRUZIONI
Page 206 - Introduzione; ” e osservare queste istruzioni quando si usa il prodotto.
2 Introduzione Grazie per avere acquistato la telecamera per comunicazioni Canon VC-C50i/VC-C50iR.Si prega di leggere attentamente questo manuale di istruzioni per assicurare un usocorretto e sicuro del prodotto. Leggere prima la sezione “ a Uso sicuro dell’apparecchio ” e osservare queste istruzion...
Page 207 - Informazioni di copyright
3 Introduzione ITALIANO Informazioni di copyright Le immagini video o ferme registrate con la VC-C50i/VC-C50iR non possono essere usate in modi checontravvengano alle leggi sui diritti d’autore o senza il consenso del proprietario, a meno che si trattiesclusivamente di uso personale. Nota Il contenu...
Page 208 - Uso sicuro dell’apparecchio; Avvertimenti importanti; Icon usate in questo manuale di istruzioni
4 a Uso sicuro dell’apparecchio a Avvertimenti importanti L’adattatore a corrente alternata può venire collegato alla VC-C50i/VC-C50iR e ad unapresa di corrente alternata di rete. Controllare sul manuale di istruzioni che la VC-C50i/VC-C50iR utilizzata sia compatibile con questo adattatore.– La pres...
Page 209 - ISTRUZIONI DI SICUREZZA IMPORTANTI
5 a Uso sicuro dell’apparecchio ITALIANO In queste istruzioni di sicurezza, la parola“apparecchio” si riferisce alla telecamera percomunicazioni VC-C50i/VC-C50iR Canon e atutti i suoi accessori. 1. Leggere le istruzioni - Tutte le istruzioni disicurezza e di impiego devono esserelette prima di usare...
Page 212 - Passare con un panno asciutto.; Pulizia dell’obiettivo; Manutenzione; Pulizia dell’apparecchio; Scollegare l’adattatore CA dalla presa di corrente.
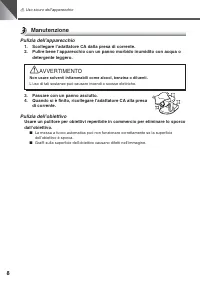
8 a Uso sicuro dell’apparecchio 3. Passare con un panno asciutto. 4. Quando si è finito, ricollegare l’adattatore CA alla presadi corrente. Pulizia dell’obiettivo Usare un pulitore per obiettivi reperibile in commercio per eliminare lo sporcodall’obiettivo. ■ La messa a fuoco automatica può non funz...
Page 213 - INDICE
9 ITALIANO INDICE a Uso sicuro dell’apparecchio ................................................................................. 4 Icon usate in questo manuale di istruzioni ........................................................ 4 a Avvertimenti importanti ...........................................
Page 214 - Prima di usare il prodotto; Controllo della telecamera e dei suoi accessori; Connettore multiplo
10 Testata telecamera( → p.19) Terminale VIDEO OUT( → p.12) Terminale DC IN 13V( → p.12) LED (→ p.16) Sensore pertelecomando( → p.18) Base ( → p.11) VC-C50i VC-C50iR Prima di usare il prodotto ● Manuale di istruzioni Controllo della telecamera e dei suoi accessori Prima di installare il prodotto, co...
Page 215 - Uso di un treppiede; Installazione del prodotto
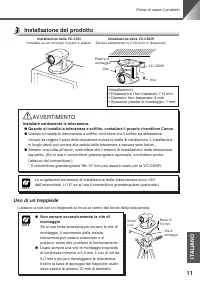
Prima di usare il prodotto 11 ITALIANO Uso di un treppiede L’attacco a vite per un treppiede si trova al centro del fondo della telecamera. Installazione del prodotto (Installazione)• Distanza tra i fori trapanati: 114 mm• Diametro foro trapanato: 6 mm• Spessore piastra di montaggio: 1 mm Vite Piast...
Page 216 - Uso del convertitore grandangolare; Collegamento dei componenti
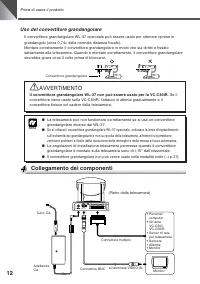
Prima di usare il prodotto 12 Uso del convertitore grandangolare Il convertitore grandangolare WL-37 opzionale può essere usato per ottenere riprese ingrandangolo (circa 0,74 × della normale distanza focale). Montare correttamente il convertitore grandangolare in modo che sia diritto e fissatosaldam...
Page 217 - Collegamento del connettore multiplo alla telecamera; Spingere il connettore multiplo nella sua spina.; Collegamento via connettore multiplo
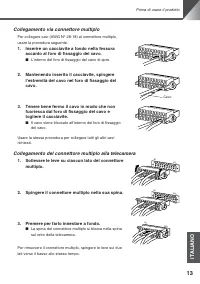
Prima di usare il prodotto 13 ITALIANO Collegamento del connettore multiplo alla telecamera 1. Sollevare le leve su ciascun lato del connettoremultiplo. 2. Spingere il connettore multiplo nella sua spina. 3. Premere per farlo innestare a fondo. ■ La spina del connettore multiplo si blocca nella spin...
Page 218 - Disposizione piedini del connettore multiplo
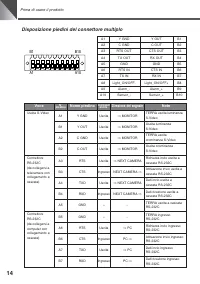
Prima di usare il prodotto 14 Disposizione piedini del connettore multiplo A1 Y GND Y OUT B1 A2 C GND C OUT B2 A3 RTS OUT CTS OUT B3 A4 TX OUT RX OUT B4 A5 GND GND B5 A6 RTS IN CTS IN B6 A7 TX IN RX IN B7 A8 Light_ON/OFF- Light_ON/OFF+ B8 A9 Alarm_- Alarm_+ B9 A10 Sensor_- Sensor_+ B10 Voce Nome pie...
Page 219 - Terminali di ingresso/uscita per dispositivi esterni
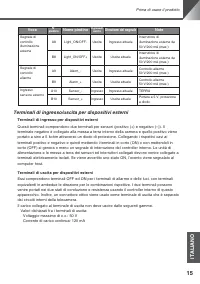
Prima di usare il prodotto 15 ITALIANO Terminali di ingresso/uscita per dispositivi esterni Terminali di ingresso per dispositivi esterni Questi terminali comprendono due terminali per sensori (positivo (+) e negativo (–)). Ilterminale negativo è collegato alla messa a terra interno della camera e q...
Page 220 - Accensione e spegnimento; Indicazioni LED e stato della telecamera; Indicazioni LED; Stato della telecamera
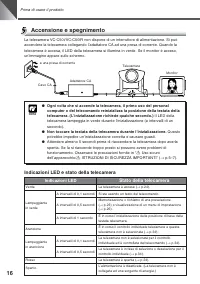
Prima di usare il prodotto 16 Monitor Telecamera Adattatore CA a una presa di corrente Cavo CA Accensione e spegnimento La telecamera VC-C50i/VC-C50iR non dispone di un interruttore di alimentazione. Si puòaccendere la telecamera collegando l’adattatore CA ad una presa di corrente. Quando latelecame...
Page 221 - Controllo della telecamera con il telecomando
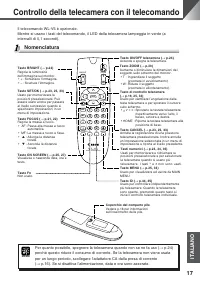
17 ITALIANO Controllo della telecamera con il telecomando Il telecomando WL-V5 è opzionale.Mentre si usano i tasti del telecomando, il LED della telecamera lampeggia in verde (aintervalli di 0,1 secondi). Nomenclatura Per quanto possibile, spegnere la telecamera quando non se ne fa uso ( → p.24) per...
Page 222 - Raggio operativo del telecomando; Inserimento delle pile nel telecomando; Rimuovere il coperchio del comparto pile.
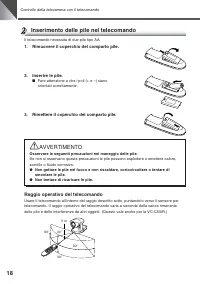
18 Controllo della telecamera con il telecomando Raggio operativo del telecomando Usare il telecomando all’interno del raggio descritto sotto, puntandolo verso il sensore pertelecomando. Il raggio operativo del telecomando varia a seconda della carica rimanentedelle pile e delle interferenze da altr...
Page 223 - Raggio di movimento della testata telecamera; P r e m e r e i t a s t i; Per riportare la testata telecamera alla posizione base; P r e m e r e i l t a s t o; Cambiamento dell’angolazione della testata telecamera
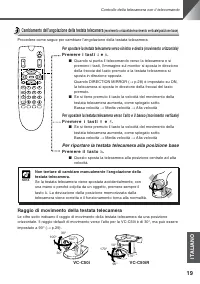
19 ITALIANO Controllo della telecamera con il telecomando Raggio di movimento della testata telecamera Le cifre sotto indicano il raggio di movimento della testata telecamera da una posizioneorizzontale. Il raggio default di movimento verso l’alto per la VC-C50i è di 30 ° , ma può essere impostato a...
Page 224 - Premere il lato; Zoomata in avvicinamento/allontanamento
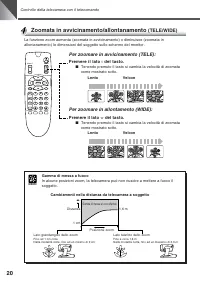
20 Controllo della telecamera con il telecomando Per zoomare in avvicinamento (TELE): Premere il lato t del tasto. ■ Tenendo premuto il tasto si cambia la velocità di zoomatacome mostrato sotto. Lento Veloce Per zoomare in allontamento (WIDE): Premere il lato w del tasto. ■ Tenendo premuto il tasto ...
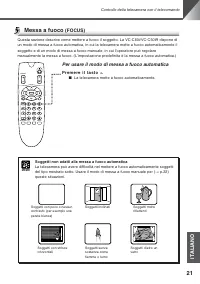
Page 225 - Per usare il modo di messa a fuoco automatica; Messa a fuoco
21 ITALIANO Controllo della telecamera con il telecomando Per usare il modo di messa a fuoco automatica P r e m e r e i l t a s t o a . ■ La telecamera mette a fuoco automaticamente. 3 2 1 AF 6 5 4 MF 9 8 7 0 MENU ID HOME Fn BRIGHT ON SCREEN ∞ SET/OK CANCEL ZOOM T W Messa a fuoco (FOCUS) Questa sezi...
Page 226 - Per fissare la messa a fuoco; Regolazione della luminosità
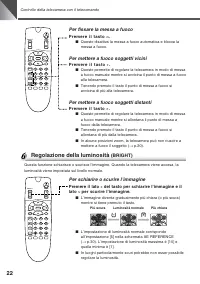
22 Controllo della telecamera con il telecomando Per fissare la messa a fuoco P r e m e r e i l t a s t o n . ■ Questo disattiva la messa a fuoco automatica e blocca lamessa a fuoco. Per mettere a fuoco soggetti vicini P r e m e r e i l t a s t o r . ■ Questo permette di regolare la telecamera in mo...
Page 227 - Per memorizzare una posizione; Impostare l’angolazione della testata telecamera, la; P r e m e r e i l t a s t o; Per richiamare una posizione preselezionata; P r e m e r e u n t a s t o d a; Memorizzazione di una posizione telecamera preselezionata
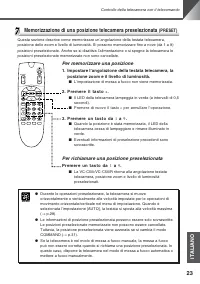
23 ITALIANO Controllo della telecamera con il telecomando Per memorizzare una posizione 1. Impostare l’angolazione della testata telecamera, la posizione zoom e il livello di luminosità. ■ L’impostazione di messa a fuoco non viene memorizzata. 2. P r e m e r e i l t a s t o s . ■ Il LED della teleca...
Page 228 - Per spegnere la telecamera; Se la telecamera è accesa, premere il tasto; Per accendere la telecamera; Nello stato di telecamera spenta, premere il tasto; Accensione e spegnimento della telecamera
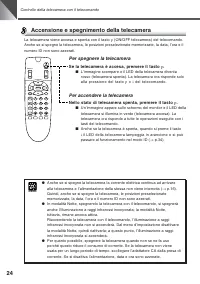
24 Controllo della telecamera con il telecomando Per spegnere la telecamera Se la telecamera è accesa, premere il tasto p . ■ L’immagine scompare e il LED della telecamera diventarosso (telecamera spenta). La telecamera ora risponde soloalla pressione del tasto p o i del telecomando. Per accendere l...
Page 229 - Impostazioni telecamera; Descrizione del menu di impostazione; Tasti usati per specificare le impostazioni
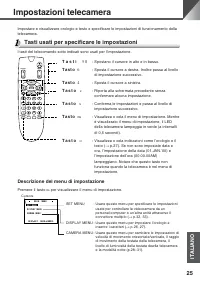
25 ITALIANO Impostazioni telecamera Descrizione del menu di impostazione Premere il tasto m per visualizzare il menu di impostazione. Impostare e visualizzare orologio e testo e specificare le impostazioni di funzionamento dellatelecamera. Tasti usati per specificare le impostazioni I tasti del tele...
Page 230 - Impostazione dell’orologio
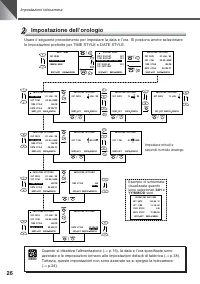
Impostazioni telecamera 26 Impostazione dell’orologio Usare il seguente procedimento per impostare la data e l’ora. Si possono anche selezionarele impostazioni preferite per TIME STYLE e DATE STYLE. Esempio di schermatavisualizzata quandosono selezionati 24H e YY/MM/DD sont Impostare minuti esecondi...
Page 231 - Inserimento di caratteri
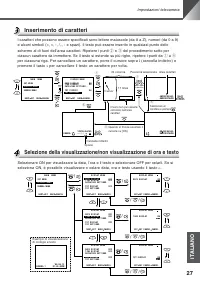
Impostazioni telecamera 27 ITALIANO Inserimento di caratteri I caratteri che possono essere specificati sono lettere maiuscole (da A a Z), numeri (da 0 a 9)e alcuni simboli (<, >, -, /,., : e spazi). Il testo può essere inserito in qualsiasi punto delloschermo al di fuori dell’area caratteri. ...
Page 233 - Impostazione del raggio di movimento della testata telecamera
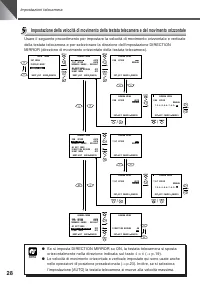
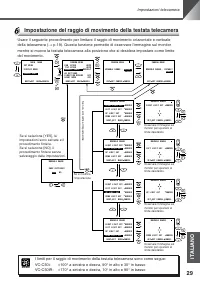
Impostazioni telecamera 29 ITALIANO Impostazione del raggio di movimento della testata telecamera Usare il seguente procedimento per limitare il raggio di movimento orizzontale e verticaledella telecamera ( → p.19). Questa funzione permette di osservare l’immagine sul monitor mentre si muove la test...
Page 234 - Impostazione dell’AE
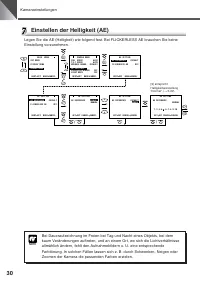
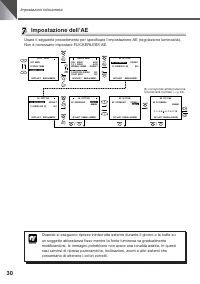
Impostazioni telecamera 30 Impostazione dell’AE Usare il seguente procedimento per specificare l’impostazione AE (regolazione luminosità).Non è necessario impostare FLICKERLESS AE. MA I N MENU SE T MENU D I SP MENU CA E MENU NEXT SE T LAY RA M BACK CANCE L SE T T I N N GS M I RROR . . ME A C RA MENU...
Page 235 - Impostazioni della modalità notte; Menu di impostazione del modo VC-C4
Impostazioni telecamera 31 ITALIANO MA I N MENU SE T MENU CA E MENU NEXT SE T RA M BACK CANCE L SE T MENU NEXT SE T BACK CANCE L RS - 2 3 2C E T T I NGS . . S REMO O O NTR R T E C L L E I D 0 C R ESTOR E DE FAUL T O D E 3 C - C V MOD AN MM SE T T I N N GS M I RROR . . ME A C RA MENU SPE EDSPE E AUTO...
Page 237 - Impostazione del numero ID
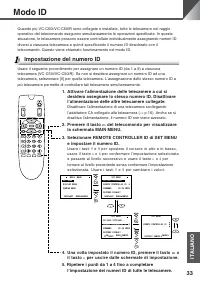
33 ITALIANO Modo ID 1. Attivare l’alimentazione delle telecamere a cui si desidera assegnare lo stesso numero ID. Disattivarel’alimentazione delle altre telecamere collegate. Disattivare l’alimentazione di una telecamera scollegandol’adattatore CA collegato alla telecamera ( → p.16). Anche se si dis...
Page 238 - Selezione della telecamera da controllare
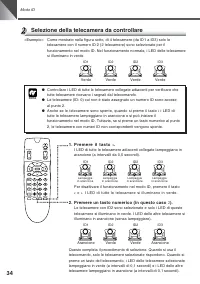
Modo ID 34 1. P r e m e r e i l t a s t o i . I LED di tutte le telecamere adiacenti collegate lampeggiano inarancione (a intervalli da 0,5 secondi). Per disattivare il funzionamento nel modo ID, premere il tasto c o i . I LED di tutte le telecamere si illuminano in verde. 2. Premere un tasto numeri...
Page 239 - P r e m e r e i l t a s t o; Disattivazione del modo ID
Modo ID 35 ITALIANO 1. P r e m e r e i l t a s t o i . I LED di tutte le telecamere adiacenti collegate lampeggiano inarancione (a intervalli da 0,5 secondi). Per annullare il funzionamento nel modo ID, premere il tasto c o i . I LED di tutte le telecamere con ID2 diventano verdi e i LED delle altre...
Page 240 - Soluzione di problemi
36 Controllare quanto segue prima di contattare il proprio rivenditore Canon. Il telecomando non funziona. Controllo 1: Il LED non è illuminato.Rimedio: Controllare che la spina sia inserita correttamente e a fondo nellapresa di corrente. → p.16 Controllo 2: Il LED è rosso.Rimedio: La telecamera è s...
Page 241 - La telecamera non si sposta ad una posizione preselezionata.; quando si è memorizzata la posizione preselezionata.; La telecamera non mette a fuoco.; focale della telecamera.
Soluzione di problemi 37 ITALIANO La telecamera non si sposta ad una posizione preselezionata. Controllo 1: La testata telecamera non si sposta fino al limite del suo raggio di movimento. Rimedio: Qualcosa ha spostato direttamente la testata telecamera. Premere iltasto h del telecomando. → p.19 Cont...
Page 242 - (Impostazioni default della schermata di impostazione); Impostazioni default di fabbrica
38 (Impostazioni default della schermata di impostazione) Voce Impostazione BAUD RATE 9600 STOP BIT 1 SET MENU DATA 8 BIT Solo lettura NON PARITY Solo lettura REMOTE CONTROLLER ID 0 COMMAND VC-C4 MODE DATE DISPLAY ON TIME DISPLAY ON TXT DISPLAY ON DISPLAY MENU SET DATE * 01.JAN.’00 SET TIME * 00:00:...
Page 243 - Dati tecnici
39 ITALIANO Dati tecnici * Se si usa un computer per controllare la telecamera, l’immagine sullo schermo può appariretremolante quando la testata telecamera viene spostata lentamente. Voce Dettagli Segnale video Modello PAL Sensore immagine CCD da 1/4 di pollice Numero totale di pixel 400.000 pixel ...