Page 2 - If you need to call Customer Service; * The serial number can be displayed on the LCD screen
If you need to call Customer Service Please complete the following information for future reference: Model Number: DCP-7010L and DCP-7025(Circle your model number) Serial Number:* Date of Purchase: Place of Purchase: * The serial number can be displayed on the LCD screen (Menu, 3, 1 (for DCP-7010L) ...
Page 3 - Compilation and Publication Notice
i Compilation and Publication Notice Under the supervision of Brother Industries Ltd., this manual has been compiled and published, covering the latest product descriptions and specifications. The contents of this manual and the specifications of this product are subject to change without notice. Br...
Page 5 - Safety precautions; We use the following icons throughout this User’s Guide.; To use the machine safely; Warnings tell you what to do to prevent possible personal injury.; WARNING
iii Safety precautions We use the following icons throughout this User’s Guide. To use the machine safely Please keep these instructions for later reference and read them before attempting any maintenance. Warnings tell you what to do to prevent possible personal injury. Electrical Hazard icons aler...
Page 7 - Table of Contents; Introduction
v Table of Contents 1 Introduction Using this Guide .................................................................................................. 1-1Choosing a location ............................................................................................. 1-2Control panel overview .........
Page 9 - Using this Guide; Note; Illustrations in this User’s Guide are based on DCP-7025.; Bold; Italics
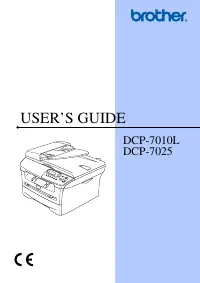
1 - 1 1 1 Using this Guide Throughout this Guide you will see special symbols alerting you to important warnings, notes and actions. Special fonts identify keys you should press, messages that appear on the LCD, and important points or related topics. Note Illustrations in this User’s Guide are base...
Page 10 - Choosing a location; CAUTION; Avoid placing your machine in a high-traffic area.
Chapter 1 1 - 2 Choosing a location Place your machine on a flat, stable surface that is free of vibration and shocks, such as a desk. Put the machine near a standard, grounded electrical socket. Choose a location where the temperature remains between 10°C and 32.5°C. CAUTION ■ Avoid placing your ma...
Page 11 - Control panel overview; Copy keys
Introduction 1 - 3 1 Control panel overview Stack Copies:01 100% Auto 1 Copy keys (Temporary settings): Options You can quickly and easily select temporary settings for copying. Enlarge/Reduce Lets you enlarge or reduce copies depending on the ratio you select. Contrast Lets you select the copy qual...
Page 12 - Load document
Chapter 1 1 - 4 Load document You can make copies and scan from the ADF (automatic document feeder) and from the scanner glass. Note ADF is not available for DCP-7010L. Using the automatic document feeder (ADF) (DCP-7025 only) The ADF can hold up to 35 pages and feeds each sheet individually. Use st...
Page 13 - Using the scanner glass; Lift the document cover.
Introduction 1 - 5 1 Using the scanner glass You can use the scanner glass to copy or scan pages of a book or one page at a time. Documents can be up to 215.9 mm wide and 297 mm long. Note DCP-7025 only:To use the scanner glass, the ADF must be empty. 1 Lift the document cover. 2 Using the document ...
Page 14 - About paper; Recommended Paper; Use paper that is 75 to 90 g/m; Choosing acceptable paper
Chapter 1 1 - 6 About paper Recommended Paper To get the best print quality, we suggest using the following paper. ■ Use paper that is made for plain-paper copying. ■ Use paper that is 75 to 90 g/m 2 . ■ Use neutral paper. Do not use acidic or alkaline paper. ■ Use long-grain paper. ■ Use paper with...
Page 15 - Paper capacity of the paper trays
Introduction 1 - 7 1 Paper capacity of the paper trays CAUTION Do not use the following types of paper or envelopes, they may cause a paper jam and damage your machine. Do not use: • Inkjet paper; • Coated paper, such as vinyl coated paper; • Pre-prined or highly textured paper, or paper with an emb...
Page 16 - How to load paper; Put paper in the paper tray.
Chapter 1 1 - 8 How to load paper To load paper or other media in the paper tray 1 Pull the paper tray completely out of the machine. 2 While pressing the paper guide release lever, slide the adjusters to fit the paper size.Check that the guides are firmly in the slots. 3 Fan the stack of paper well...
Page 17 - The side to be printed on must be face up.
Introduction 1 - 9 1 To load paper or other media in the manual feed slot You can load envelopes and special print media one at a time into this slot. Use the manual feed slot to print or copy on labels, envelopes or thicker paper. 1 Slide the paper guides to fit the paper size. 2 Using both hands p...
Page 18 - Initial Setup; Setting the Paper Type; Setting the Paper Size; Getting started
2 - 1 2 Initial Setup Setting the Paper Type To get the best print quality, set the machine for the type of paper you are using. 1 Press Menu and or to select 1.General Setup . Press Set . 2 Press or to select 1.Paper Type . Press Set . 3 Press or to select Plain , Thin , Thick , Thicker , Transpare...
Page 19 - Setting the Beeper Volume
Getting started 2 - 2 2 Setting the Beeper Volume You can change the beeper volume. The default setting is Med . When the beeper is on, the machine will beep when you press a key or make a mistake. 1 Press Menu and or to select 1.General Setup . Press Set . 2 Press or to select 3.Beeper . Press Set ...
Page 20 - Sleep Time; Setting the LCD Contrast; Printing the User Settings List
Chapter 2 2 - 3 Sleep Time Setting the Sleep Time reduces power consumption by turning off the fuser inside the machine while it is idle. You can choose how long the machine is idle (from 00 to 99 minutes) before it goes into sleep mode. The timer is automatically reset when the machine receives PC ...
Page 21 - Making a single copy; Sorting; Stop copying; Making copies
3 - 1 3 3 Using the machine as a copier You can use your machine as a copier, making up to 99 copies at a time. The printable area of your machine begins at approximately 2 mm from both sides and 3 mm from the top or bottom of the paper. Note The printable area shown above is for a single copy or a ...
Page 22 - Changing the default copy settings; Temporary Copy keys
Chapter 3 3 - 2 Using the Temporary Copy keys When you want to quickly change the copy settings temporarily for the next copy, use the Temporary Copy keys. You can use different combinations. Note ■ The machine returns to its default settings 60 seconds after it finishes copying. ■ You can save the ...
Page 23 - Adjusting contrast
Making copies 3 - 3 3 3 Press or to select the enlargement or reduction ratio you want. Press Set . — OR — You can select Custom(25-400%) and press Set . Press or to enter an enlargement or reduction ratio from 25% to 400% . Press Set . Note Enlargement or reduction ratio can also be increased or de...
Page 24 - Changing the temporary copy settings; Use the; Options; The factory settings are shown in Bold.; Set; Start; if you have finished choosing settings.
Chapter 3 3 - 4 Changing the temporary copy settings Use the Options key to quickly set the following copy settings temporarily for the next copy. Note The factory settings are shown in Bold. After you choose your settings by pressing Set , the LCD shows Set temporarily . Press Start if you have fin...
Page 26 - If you are using the scanner glass:
Chapter 3 3 - 6 If you are using the scanner glass: 6 After the machine scans the page, the LCD shows: Press to scan the next page. 7 Put the next document on the scanner glass. Press Set . Repeat Steps 6 and 7 for each page of the layout. 8 After all the pages of the document have been scanned, pre...
Page 29 - Software Features
4 - 1 4 4 The User’s Guide on the CD-ROM includes the Software User’s Guide for features available when connected to a computer (for example, Printing and Scanning). The availability of the features listed below varies by model: ■ Using the machine as a Printer (See Chapter 1 in the Software User’s ...
Page 30 - Laser Diode; Disconnect device; Important information
5 - 1 5 IEC 60825-1 Specification This machine is a Class 1 laser product as defined in IEC 60825-1 specifications. The label shown below is attached in countries where required. This machine has a Class 3B Laser Diode which emits invisible laser radiation in the Scanner Unit. The Scanner Unit shoul...
Page 31 - Important safety instructions
Important information 5 - 2 5 Radio interference (220-240V Model Only) This product complies with EN55022(CISPR Publication 22)/Class B.Before this product is used, ensure that you use the following interface cables. 1 A shielded parallel interface cable with twisted-pair conductors and that is mark...
Page 32 - Trademarks
Chapter 5 5 - 3 A Do not allow anything to rest on the power cord. Do not place this product where people can walk on the cord. B Do not place anything in front of the machine that will block printing. Do not place anything in the path of printing. C Wait until pages have exited the machine before p...
Page 33 - Troubleshooting; Error messages
6 - 1 6 6 Troubleshooting Error messages As with any sophisticated office product, errors may occur. If this happens, your machine identifies the problem and displays an error message. The most common error messages are shown below. You can correct most problems by yourself. If you need more help, t...
Page 35 - OR
Troubleshooting and routine maintenance 6 - 3 6 Document jams (DCP-7025 only) If the document is jammed, follow the steps below. Document is jammed in the top of the ADF unit 1 Take out any paper from the ADF that is not jammed. 2 Open the ADF cover. 3 Pull the jammed document out to the left. 4 Clo...
Page 36 - Paper jams; Paper is jammed inside the machine; Open the front cover.
Chapter 6 6 - 4 Paper jams To clear paper jams, please follow the steps in this section. Paper is jammed inside the machine 1 Pull the paper tray completely out of the machine. 2 Pull the jammed paper up and out of the paper tray opening. 3 Open the front cover. 4 Pull out the drum unit and toner ca...
Page 37 - Close the front cover.
Troubleshooting and routine maintenance 6 - 5 6 6 Put the drum unit and toner cartridge assembly back in the machine. 7 Close the front cover. 8 Put the paper tray in the machine. Paper is jammed at back of the machine 1 Open the front cover. 2 Pull out the drum unit and toner cartridge assembly. 3 ...
Page 38 - Close the back cover.
Chapter 6 6 - 6 4 Pull the tab toward you to open the rear chute cover. 5 Pull the jammed paper out of the fuser unit. If the jammed paper cannot be pulled out easily, push down the blue tab with one hand as you gently pull the paper out with other hand. 6 Close the back cover. 7 Put the drum unit a...
Page 40 - If you are having difficulty with your machine
Chapter 6 6 - 8 If you are having difficulty with your machine If you think there is a problem with your machine, check the chart below and follow the troubleshooting tips. The Brother Solutions Center offers the latest FAQs and troubleshooting tips. Visit us at http://solutions.brother.com. DIFFICU...
Page 43 - Improving the print quality; This section provides information on the following topics:
Troubleshooting and routine maintenance 6 - 11 6 Improving the print quality This section provides information on the following topics: Examples of poor print quality Recommendation Faint Check the machine’s environment. Conditions such as humidity, high temperatures, and so on may cause this print ...
Page 44 - Cleaning the drum unit
Chapter 6 6 - 12 All black Clean the primary corona wire on the drum unit. (See Cleaning the corona wire on page 6-19.) If the print quality has not improved, install a new drum unit. (See Replacing the drum unit (DR-2000) on page 6-23.) White Spots on black text and graphics at 78.5 mm intervals Bl...
Page 48 - Close the carton and tape it shut.; Routine maintenance
Chapter 6 6 - 16 9 Pack the drum unit and toner cartridge assembly, AC power cord and printed materials in the original carton as shown below: 0 Close the carton and tape it shut. Routine maintenance Cleaning the outside of the machine 1 Pull the paper tray completely out of the machine. CAUTION The...
Page 49 - Cleaning the scanner glass
Troubleshooting and routine maintenance 6 - 17 6 2 Wipe the outside of the machine with a soft cloth to remove dust. 3 Remove anything that is stuck inside the paper tray. 4 Wipe the inside and the outside of the paper tray with a soft cloth to remove dust. 5 Re-load the paper and put the paper tray...
Page 50 - not
Chapter 6 6 - 18 Cleaning the laser scanner window 1 Before you clean the inside of the machine, turn off the machine’s power switch. 2 Open the front cover and pull out the drum unit and toner cartridge assembly. 3 Gently clean the laser scanner window by wiping it with a clean soft, dry, lint-free...
Page 51 - may have vertical black stripes on them.
Troubleshooting and routine maintenance 6 - 19 6 4 Put the drum unit and toner cartridge assembly back into the machine. 5 Close the front cover. 6 Turn on the machine’s power switch. Cleaning the corona wire We recommend placing the drum unit and toner cartridge assembly on a cloth or large disposa...
Page 54 - Remove the protective cover.
Chapter 6 6 - 22 4 Gently rock the toner cartridge from side to side five or six times to distribute the toner evenly inside the cartridge. 5 Remove the protective cover. 6 Insert the new toner cartridge in the drum unit until it clicks into place. If you put it in properly, the lock lever will lift...
Page 55 - , the drum unit is near; Cleaning the laser scanner; up to; So please be careful.
Troubleshooting and routine maintenance 6 - 23 6 Replacing the drum unit (DR-2000) The machine uses a drum unit to create print images on paper. If the LCD shows Change Drum Soon , the drum unit is near the end of its life and it is time to buy a new one. Even if the LCD shows Change Drum Soon , you...
Page 56 - When the LCD shows
Chapter 6 6 - 24 2 Hold down the lock lever on the left and pull the toner cartridge out of the drum unit. Note ■ Discard the used drum unit according to local regulations, keeping it separate from domestic waste. You can also check our ecology website www.brothergreen.co.uk for recycling informatio...
Page 57 - Machine Information; Checking the Serial Number; Checking the Drum Life
Troubleshooting and routine maintenance 6 - 25 6 Machine Information Checking the Serial Number You can view the machine’s serial number on the LCD. 1 Press Menu and or to select 3.Machine Info. or 4.Machine Info. Press Set . 2 Press or to select 1.Serial No. Press Set . 3 Press Stop/Exit . Checking...
Page 58 - Menu table; Menu Mode; Appendix
A - 1 A On-screen programming Your machine is designed to be easy to use with LCD on-screen programming. User-friendly programming helps you take full advantage of all the menu selections your machine has to offer. Since your programming is done on the LCD, we have created step-by-step on-screen ins...
Page 62 - Specifications
S - 1 S Product description General Specifications Memory Capacity 16 MB (DCP-7010L) 32 MB (DCP-7025) Automatic Document Feeder (ADF) (DCP-7025 only) Up to 35 pages Paper Tray 250 Sheets (80 g/m 2 ) Printer Type Laser Print Method Electrophotography by semiconductor laser beam scanning LCD (Liquid C...
Page 63 - Print media; For more details, see
Specifications S - 2 S Print media Note ■ For transparency or label, we recommend removing printed pages from the output paper tray immediately after they exit the machine to avoid smudging. ■ For more details, see About paper on page 1-6. Temperature Operating: 10 - 32.5°C Storage: 0 - 40°C Humidit...
Page 64 - Mac OS
S - 3 Copy Scanner Note Mac OS ® X scanning is supported in Mac OS ® X 10.2.4 or greater. Color/Monochrome Monochrome Document Size ADF Width: 147.3 mm to 215.9 mm (For DCP-7025 only) ADF Height: 147.3 mm to 356 mm (For DCP-7025 only) Scanner Glass Width: Max. 215.9 mm Scanner Glass Height: Max. 297...
Page 65 - Printer
Specifications S - 4 S Printer Interfaces (Cables are not included.) Note Your machine has a full-speed USB 2.0 interface. This interface is compatible with Hi-Speed USB 2.0; however, the maximum data transfer rate will be 12 Mbits/s. The machine can also be connected to a computer that has a USB 1....
Page 67 - Index
I - 1 I A ADF (automatic document feeder) .......... 1-4ADF cover ............................................... 6-3 C Cleaning corona wire ........................................ 6-19drum unit ............................................ 6-12laser scanner window ........................ 6-18scann...


 Brother DCP-585CW User Manual
 Brother DCP-1510 User Manual
 Brother DCP-1600 User Manual
 Brother DCP-1601 User Manual
 Brother DCP-1610NW User Manual
 Brother DCP-6690CW User Manual
 Brother DCP-7020 User Manual
 Brother DCP-7030 User Manual
 Brother DCP-7040 User Manual
 Brother DCP-7045N User Manual
 Brother DCP-7055 User Manual
 Brother DCP-7055W User Manual