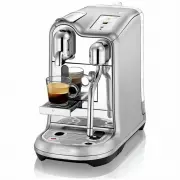
Page 3 - Packaging Content; Creatista Pro
CREATISTA PRO MY MACHINE Welcome EN 2 220–240 V, 50–60 Hz, 2300 W max 19 bar / 1.9 MPa ~6.65 kg / 14.7 lbs 2 L / 68 fl.oz 25.1 cm 41.8 cm 49.9 cm 9.8 in 16.5 in 19.6 in USER MANUAL Nespresso is an exclusive system creating the perfect Espresso, time after time. Each parameter has been calculated wit...
Page 4 - Contents
EN 3 Contents Safety Precautions 4 Machine Overview 7 First Use 8 Drinks Menu 9 Coffee Settings 9 Milk Coffee 11 Regular Coffee 12 Coffee Preparation Tips 13 Daily Cleaning 14 Maintenance 15 Descaling 16 Water Hardness 16 Trouble Shooting 17 Contact Nespresso 19 Disposal and Environmental Protection...
Page 5 - Safety Precautions; Avoid risk of fatal
4 EN Safety Precautions CAUTION: the safety precautions are part of the appliance. Read them carefully before using your new appliance for the first time. Keep them in a place where you can find and refer to them later on. CAUTION: when you see this sign, please refer to the safety precautions to av...
Page 6 - The appliance must; Avoid possible harm
5 EN Safety Precautions The appliance must only be connected after installation. • Do not pull the cord over sharp edges, clamp it or allow it to hang down. • Keep the cord away from heat and damp. • If the supply cord is damaged, it must be replaced by the manufacturer, its service agent or similar...
Page 7 - Descaling; SAVE THESE
6 EN brewing due to risk of scalding. Water could flow around a capsule when not perforated by the blades and damage the appliance. • Never use a damaged or deformed capsule. If a capsule is blocked in the capsule compartment, turn the machine off and unplug it before any operation. Call Nespresso o...
Page 8 - Machine Overview
Power button Press to turn machine ON / OFF LCD touch screen - Swipe to navigate - Tap to select EN 7 7 Machine Overview Water tank & lid EN EN Power button LCD touch screen Lever for capsule insertion Capsule container Removable drip grid Removable drip tray with full indicator Pop out cup supp...
Page 9 - First Use
EN 8 First Use Read and safely disgard any packaging materials or promotional labels attached to your machine before use. CAUTION: Please ensure ground continuity when plugging the machine in the power outlet. Read the important safeguards first to avoid risks of fatal electrical shock and fire. ❸ T...
Page 10 - Drinks Menu & Selection
Tap the screen to select. EN 9 Hot Water Tap to Start Drink Adjustments Milk Settings Coffee Settings Exit Drinks Menu & Selection Swipe up and down on the touch screen to navigate the menu. Hot Water Tap to manuallystart and stop. Max. 200 mls (6.5 fl. oz) Menu Drink Menu Drink Confirmation
Page 11 - Drink Adjustments
EN 10 ❷ Tap to save your custom drink settings. Custom drink will appear in Drinks Menu. Drink Adjustments ❶ Slide circle up and down the bar to adjust. Notch on the bar is the drink default setting. Adjustment Slider Adjustment Slider Adjustment Slider Close Save Close Close Save Adjust Coffee Volu...
Page 12 - Making a Milk Coffee
EN 11 Exit Exit Milk Running Milk Complete Coffee and milk will stop running automatically. Alternatively, tap the icon to stop. Coffee extraction and milk texturing will start simultaneously. Making a Milk Coffee Icons Next Large Next button Skip button Tick button Waiting Icon Save button Delete b...
Page 13 - Making a Regular Coffee
EN 12 Coffee Settings Coffee will stop running automatically. Alternatively, tap the icon to stop. Making a Regular Coffee Hot Water Hot Water Exit Coffee Running Exit Exit Add Coffee (insert new capsule and extract again) Drink Confirmation Drink Running Drink Complete
Page 14 - Coffee Preparation Tips; Adjusting Regular / Milk Coffee Drinks
EN 13 Coffee Preparation Tips For smaller cups , use the cup support. Always ensure the milk jug is positioned on the drip tray temperature sensor when texturing milk. Flat White Min Cafe Latte Min Cappuccino Min Latte Macchiato Max To ensure hygienic conditions , it is highly recommended not to reu...
Page 15 - Daily Cleaning
Never immerse the appliance or any part of it in water or any other liquid EN 14 ❶ Empty the drip tray and capsule container every day. Remove and clean the cup support and wipe inside the machine. Remove and clean the water tank with an odorless detergent and rinse with warm water. Daily Cleaning D...
Page 16 - Menu
EN 15 Menu Tap to select and follow the on-screen instructions. Clean Steam Wand Recommended monthly to clean steam paths, steam wand and prevent blockages. Rinse Steam Wand Use daily to clean any blockages. Descale Remove any scale build-up. Refer to Descale instructions on following page. Water Ha...
Page 17 - Water Hardness Levels
EN 16 Descaling Read the important safeguard on the descaling package and refer to the table for the frequency of use.The descaling solution can be harmful. Avoid contact with eyes, skin and surfaces. Never use any product other than the Nespresso descaling kit available at Nespresso to avoid damage...
Page 18 - Troubleshooting
EN 17 EN Screen / buttons not illuminated. - Machine turns OFF automatically. - Press POWER button to turn machine ON. - Check the outlet: plug, voltage, fuse. No steam or hot water. - Machine is OFF. Press POWER button to turn machine ON. - Check the outlet: plug, voltage, fuse. No coffee, no water...
Page 19 - Troubleshooting Milk Froth Preparation
EN 18 Troubleshooting Milk Froth Preparation Milk steam cycle does not start. - Check if the water tank is correctly positioned, if empty, fill with fresh potable water. - Check steam tip for any blockages and ensure wand is lowered. Quality of froth not up to standard. - Be sure to use pasteurised ...
Page 20 - Contact Nespresso; Disposal and; Limited Guarantee
EN 19 Contact Nespresso As we may not have foreseen all uses of your appliance , should you need any additional information, in case of problems or simply to seek advice, call Nespresso or your Nespresso authorized representative. Contact details for Nespresso or your Nespresso authorized representa...
Page 21 - Notes
Page 24 - CREATISTA PRO