Page 2 - CONGRATULATIONS; on the purchase of your Breville product; Register online for product support
3 CONTENTS CONTENTS 4 Breville recommends safety first 8 Know your Breville product 10 Operating your Breville product 12 Using the Grind Control™ - Carafe Mode 15 Using the Grind Control™ - Single Cup Mode 17 Programming the Clock & Auto Start 20 Advanced Features 21 Helpful Tips 23 Care & ...
Page 3 - READ ALL INSTRUCTIONS; IMPORTANT SAFEGUARDS
4 5 BREVILLE RECOMMENDS SAFETY FIRST BREVILLE RECOMMENDS SAFETY FIRST BREVILLE RECOMMENDS SAFETY FIRST BREVILLE RECOMMENDS SAFETY FIRST BREVILLE RECOMMENDS SAFETY FIRST At Breville we are very safety conscious. We design and manufacture consumer products with the safety of you, our valued customer, ...
Page 4 - FOR HOUSEHOLD USE ONLY; CAUTION; NOTE; (Applicable to California
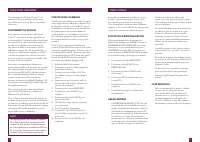
6 7 BREVILLE RECOMMENDS SAFETY FIRST BREVILLE RECOMMENDS SAFETY FIRST BREVILLE RECOMMENDS SAFETY FIRST FOR HOUSEHOLD USE ONLY SAVE THESE INSTRUCTIONS IMPORTANT SAFEGUARDS FOR ALL ELECTRICAL APPLIANCES • Fully unwind cord before use. • To protect against electric shock, do not immerse cord, plug or a...
Page 6 - FRESH IS BEST; CLICK
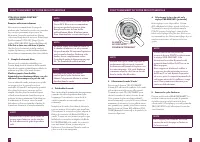
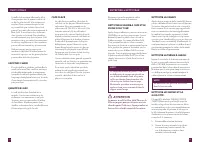
10 11 OPERATING YOUR BREVILLE PRODUCT OPERATING YOUR BREVILLE PRODUCT OPERATING YOUR BREVILLE PRODUCT OPERATING YOUR BREVILLE PRODUCT BEFORE FIRST USE Unpack all parts and accessories before removing and safely discarding all packaging material and promotional labels. Ensure the power cord is unplug...
Page 7 - de-mineralized water or any other liquid.; carafe to over flow.; Steam may emit from the rear steam
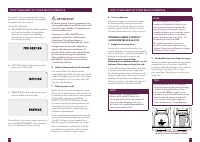
12 13 OPERATING YOUR BREVILLE PRODUCT OPERATING YOUR BREVILLE PRODUCT OPERATING YOUR BREVILLE PRODUCT OPERATING YOUR BREVILLE PRODUCT USING THE GRIND CONTROL™ - CARAFE MODE First Time Use Only We recommend flushing the machine to remove any dust particles or residue from the manufacturing process. F...
Page 8 - Using the Brew Pause Feature; USING THE GRIND CONTROLTM; Fill the Water Tank; TIP
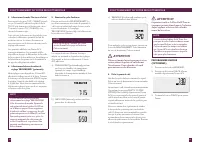
14 15 OPERATING YOUR BREVILLE PRODUCT OPERATING YOUR BREVILLE PRODUCT OPERATING YOUR BREVILLE PRODUCT OPERATING YOUR BREVILLE PRODUCT The count-down timer will then begin. The time displayed is an estimate only and will depend on the brew size and strength settings you have selected. The LCD screen ...
Page 9 - Select ‘Single Cup’ Mode; Empty the Coffee Basket; PROGRAMMING THE CLOCK
16 17 OPERATING YOUR BREVILLE PRODUCT OPERATING YOUR BREVILLE PRODUCT OPERATING YOUR BREVILLE PRODUCT OPERATING YOUR BREVILLE PRODUCT 3. Select ‘Single Cup’ Mode Press the CUP|CARAFE dial until the LCD screen displays the CUP symbol and the current cup size selected in ounces. Rotate the CUP|CARAFE ...
Page 10 - CHANGING THE ‘READY’
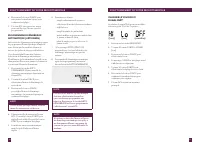
18 19 OPERATING YOUR BREVILLE PRODUCT OPERATING YOUR BREVILLE PRODUCT OPERATING YOUR BREVILLE PRODUCT OPERATING YOUR BREVILLE PRODUCT 2. Rotate the STRENGTH dial to adjust the time you want the brewer to start. 3. Press the STRENGTH button to set the Auto Start time. The machine will beep to confirm...
Page 11 - CALIBRATE FUNCTION
20 21 ADVANCED FEATURES HELPFUL TIPS HELPFUL TIPS ADVANCED FEATURES Your Grind Control™ coffee brewer is equipped with some advanced features that usually only need to be used occasionally. These are outlined below: ADJUSTING THE GRINDER Your Grind Control™ coffee brewer is fitted with Adjustable St...
Page 12 - COFFEE
22 23 HELPFUL TIPS CARE & CLEANING CARE & CLEANING HELPFUL TIPS WATER QUALITY • Fresh, good-tasting water is essential for a perfect cup. If your water contains excessive sediment, or has an ‘off’ taste or odor, we recommend using filtered water. Never use distilled or de-mineralized water a...
Page 13 - CLEANING THE GRINDS CATCHER; Empty the Water Tank
24 25 CARE & CLEANING CARE & CLEANING CARE & CLEANING CARE & CLEANING 5. Remove the upper burr by turning the handle clockwise. R E LE A S E LO CK 6. Using the provided cleaning brush, thoroughly remove any build-up of coffee grinds that have formed around the grinding burrs and coff...
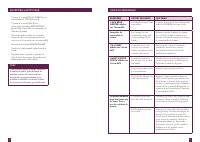
Page 14 - TROUBLESHOOTING; PROBLEM
26 27 CARE & CLEANING TROUBLESHOOTING • Rotate the STRENGTH Dial to select PRE-GROUND setting. However do not add any coffee to the coffee basket. • Place the carafe into position under the drip stop outlet (Ensure the carafe is empty and the lid is securely locked). • Press the START | CANCEL b...
Page 18 - Consommateurs au Canada:; Inscrivez-vous en ligne pour le soutien; FÉLICITATIONS; pour l’achat de votre produit Breville
35 TABLE DES MATIÈRES TABLE DES MATIÈRES 36 Breville vous recommande la sécurité avant tout 40 Faites la connaissance de votre produit Breville 42 Fonctionnement de votre produit Breville 44 Utiliser le Grind Control MC - Mode 'Carafe' 47 Utiliser le Grind Control MC - Mode 'Une tasse à la fois' 49 ...
Page 19 - LIRE TOUTES LES; IMPORTANTES MESURES
36 37 BREVILLE VOUS RECOMMANDE LA SÉCURITÉ AVANT TOUT BREVILLE VOUS RECOMMANDE LA SÉCURITÉ AVANT TOUT LIRE TOUTES LES INSTRUCTIONS • Lisez attentivement toutes les instructions avant de faire fonctionner l'appareil et conservez-les à titre de référence. • Retirez et jetez en lieu sûr le matériel d'e...
Page 20 - USAGE DOMESTIQUE SEULEMENT
38 39 BREVILLE VOUS RECOMMANDE LA SÉCURITÉ AVANT TOUT BREVILLE VOUS RECOMMANDE LA SÉCURITÉ AVANT TOUT • N'utilisez pas de produits rugueux ou abrasifs comme les tampons à récurer en laine d'acier pour nettoyer l'appareil ou ses pièces. • L'utilisation d'accessoires non vendus ou recommandés par Brev...
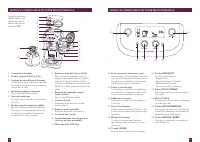
Page 22 - Installer la trémie à grains; LA FRAÎCHEUR AVANT TOUT; VUE D'ENSEMBLE DU PRODUIT
42 43 FONCTONNEMENT DE VOTRE PRODUIT BREVILLE FONCTONNEMENT DE VOTRE PRODUIT BREVILLE AVANT LA PREMIÈRE UTILISATION Retirez toutes les pièces et accessoires avant de retirer et de jeter en lieu sûr tout le matériel d'emballage et les étiquettes promotionnelles. Assurez-vous que l'appareil n'est pas ...
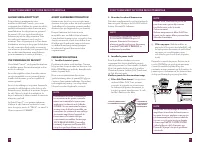
Page 23 - Assurez-vous toujours que la carafe est; Si vous utilisez du café prémoulu,
44 45 FONCTONNEMENT DE VOTRE PRODUIT BREVILLE FONCTONNEMENT DE VOTRE PRODUIT BREVILLE UTILISER LE GRIND CONTROL MC - MODE CARAFE Première utilisation seulement Nous vous recommandons de purger la machine afin d'enlever les résidus ou particules de poussière provenant du processus de fabrication. Sui...
Page 24 - ATTENTION; Utiliser la fonction Pause d'écoulement; Vider le panier à café; Verser et déguster; UTILISER LE GRIND CONTROL; - MODE UNE TASSE À LA FOIS; affectera l'électronique et le goût du café.; TRUC
46 47 FONCTONNEMENT DE VOTRE PRODUIT BREVILLE FONCTONNEMENT DE VOTRE PRODUIT BREVILLE Le compte à rebours commencera. Le temps affiché est estimatif et dépendra des réglages de quantité et de force choisis. L'écran ACL affichera: a) 'PRE-HEATING' (préchauffage) pendant que l'eau est chauffée à la te...
Page 25 - Sélectionner la force du café ou le; Vider le panier à café
48 49 FONCTONNEMENT DE VOTRE PRODUIT BREVILLE FONCTONNEMENT DE VOTRE PRODUIT BREVILLE 3. Sélectionner le mode 'Une tasse à la fois' Pressez sur le bouton CUP | CARAFE jusqu'à ce que l'écran ACL affiche le symbole de la TASSE et le format actuel de tasse en onces. Tournez le bouton CUP | CARAFE pour ...
Page 26 - CHANGER LE VOLUME DU
50 51 FONCTONNEMENT DE VOTRE PRODUIT BREVILLE FONCTONNEMENT DE VOTRE PRODUIT BREVILLE 4. Pressez sur le bouton FORCE pour enregistrer. La machine bipera pour confirmer le réglage. 5. L'écran ACL retournera au menu principal lorsque l'heure aura été programmée. PROGRAMMER LE DÉMARRAGE AUTOMATIQUE (OP...
Page 27 - AJUSTEMENT DU MOULIN; FONCTION DE CALIBRAGE
52 53 TRUCS UTILES FONCTIONS AVANCÉES Votre machine à café Grind Control MC est munie de fonctions avancées qui peuvent être utilisées à l'occasion. En voici les détails ci-dessous : AJUSTEMENT DU MOULIN Le moulin de votre machine à café Grind Control MC est muni de meules ajustables en acier inoxyd...
Page 28 - Le panier à café, le filtre Gold Tone ou le
54 55 TRUCS UTILES ENTRETIEN & NETTOYAGE • La taille de la mouture affectera le débit d'eau passant dans le panier à café et, de ce fait, le goût du café. Si la mouture est trop fine, l'eau ne traversera pas le café et pourrait bloquer ou faire déborder le panier. Par contre, elle pourrait trave...
Page 29 - NETTOYER LE RAMASSE-GRAINS ET; Vider le réservoir
56 57 ENTRETIEN & NETTOYAGE ENTRETIEN & NETTOYAGE LA GOULOTTE S'OUVRE 3. Débranchez l'appareil. 4. Retirez tous les grains qui sont restés dans la chambre d'infusion et autour de la meule supérieure. 5. Retirez la meule supérieure en tournant la poignée en sens horaire. R E LE A S E LO CK 6....
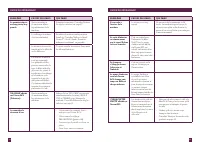
Page 30 - GUIDE DE DÉPANNAGE; PROBLÈME
58 59 ENTRETIEN & NETTOYAGE GUIDE DE DÉPANNAGE • Tournez le bouton TASSE|CARAFE pour sélectionner 12 CUPS (12 tasses). • Tournez le bouton FORCE pour sélectionner le réglage PRE-GROUND (prémoulu). Cependant, ne mettez pas de café dans le panier. • Mettez la carafe en place sous la sortie antigou...
Page 33 - NOTES
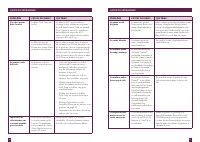
64 65 GUIDE DE DÉPANNAGE NOTES PROBLÈME CAUSES POSSIBLES QUE FAIRE La machine bipe et l'écran ACL affiche '1' Il y a un problème avec le disque de la goulotte de café. Vérifier si le disque de la goulotte n'est pas obstrué de grains de café. Ce disque en acier inoxydable est visible lorsque la porte...