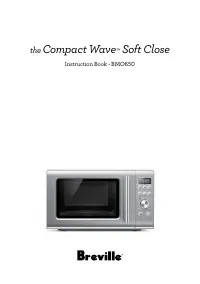
Page 2 - IMPORTANT; READ ALL INSTRUCTIONS; Contents
2 BREVILLE RECOMMENDS SAFETY FIRST At Breville we are very safety conscious. We design and manufacture consumer products with the safety of you, our valued customer, foremost in mind. In addition we ask that you exercise a degree of care when using any electrical appliance and adhere to the followin...
Page 8 - SUPERHEATED LIQUIDS
8 or allow soil or cleaner residue to accumulate on sealing surfaces. • If the door or door seals are damaged, the oven must not be operated. Immediately cease use and call Breville Consumer Support for examination, repair or adjustment. It is particularly important that the oven door close properly...
Page 9 - WARNING
9 • Do not heat oil or fat in the microwave oven. Doing so may cause the microwave oven and/ or the oil to overheat and/or ignite. • If any smoke is observed, switch off and unplug the microwave oven at the power outlet. Keep the door closed to stifle any flames. • Do not attempt to operate the micr...
Page 10 - RADIO INTERFERENCE; CAUTION
10 • Do not, under any circumstances, cut or remove the third (ground) prong from the power cord or use an adapter. • Consult a qualified electrician if the grounding instructions are not completely understood, or if doubt exists as to whether the appliance is properly grounded. • Do not use an exte...
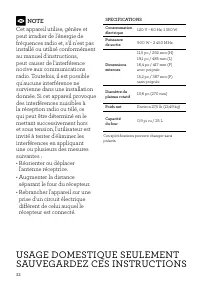
Page 11 - SPECIFICATIONS
11 FOR HOUSEHOLD USE ONLY SAVE THESE INSTRUCTIONS SPECIFICATIONS Power Consumption 120V – 60Hz; 1350W Output 900W – 2450MHz Outside Dimensions 11.5 inches/292mm (H)19.1 inches/485mm (W)16.4 inches/417mm (D) with handle15.2 inches/387mm (D) without handle Glass Turntable Diameter 10.6 inch (270mm) Ne...
Page 12 - Components
12 Components F I K L J GH A B D E C A. Viewing windowB. Door handle: Pull handle to open. C. LED screenD. POWER LEVEL button: The default power will be P100 (100%). When the POWER button is pressed again, the POWER LEVEL will decrease from P100 (100% ) to P10 (10%), in 10% increments. E. DEFROST an...
Page 13 - Assembly; BEFORE FIRST USE
13 Assembly BEFORE FIRST USE Before first use remove all promotional stickers and packaging material. Carefully unpack the microwave oven and keep all the packing material until all the parts of the microwave oven have been found and the appliance has been assembled. It is recommended to keep all th...
Page 15 - Functions; NOTE; STANDBY; TIME & POWER LEVEL ADJUSTMENT
15 Functions SETTING THE CLOCK - 12 HOUR CLOCK DISPLAY Press SET CLOCK on interface panel. The microwave will beep once. The default time is 06:00. The highlighted digits will flash to show it can be adjusted.Turn TIME dial to adjust hours and press START or SET CLOCK button to confirm. The microwav...
Page 16 - MUTE
16 DYNAMIC POWER ADJUSTMENT The food menu settings have pre-determined cook times and power levels to give the best results. However, to suit your personal preference adjustment of both time and power is available during the cooking cycle when using the manual mode.When using the defrost, reheat, po...
Page 17 - FOOD MENU
17 Popcorn The POPCORN setting is designed to pop the maximum number of kernels in each bag.To select this setting, press the POPCORN button. Place the bag in the center of the turntable.Turn the TIME dial to select weight, or press the POPCORN button again, and press START to begin cooking. The wei...
Page 18 - DEFROST; REHEAT
18 OZ CUPS SLICES QTY Turn the TIME dial to select the number of slices and press START to begin cooking. You can select from 1 to 4 slices of pizza. Frozen Vegetables The FROZEN VEGETABLES setting is suitable for a selection of frozen vegetables such as carrots, broccoli, cauliflower and peas. Cook...
Page 19 - MICROWAVE USTENSILS
19 Hints & Tips SOME IMPORTANT TIPS FOR MICROWAVE COOKING To help equalize energy in the food so that it cooks evenly follow these helpful tips. • Arrange foods with varying size ends, such as chicken drumsticks and broccoli with the thicker or tougher part positioned to the outside of the dish....
Page 21 - Troubleshooting
21 Troubleshooting PROBLEM EASY SOLUTION Microwave oven interfering with radio, TV or similar equipment. • Clean door and sealing surface of the oven. • Reorient the receiving antenna of radio or television. • Relocate the microwave oven with respect to the receiver. • Move the microwave oven away f...
Page 22 - the; Compact Wave
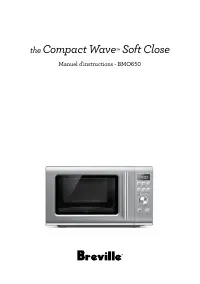
the Compact Wave ™ Soft Close Manuel d'instructions - BMO650
Page 23 - IMPORTANTES; LIRE TOUTES LES; 3 Breville recommande la
23 BREVILLE RECOMMANDE LA SÉCURITÉ AVANT TOUT Chez Breville, la sécurité occupe une place de choix. Nous concevons et fabriquons des produits de consommation sans jamais perdre de vue la sécurité de notre précieuse clientèle. De plus, nous vous prions d'être très vigilant lorsque vous utilisez un ap...
Page 31 - AVERTISSEMENT
31 elle peut se briser ou s'affaiblir et éclater en mille morceaux sans raison apparente. • Si vous voyez des étincelles, des arcs électriques ou des flammèches dans le micro- ondes, appuyez sur le bouton ARRÊT/Pause, corrigez le problème ou contactez l'équipe de soutien aux consommateurs de Brevill...
Page 32 - USAGE DOMESTIQUE SEULEMENT
32 NOTE Cet appareil utilise, génère et peut irradier de l'énergie de fréquences radio et, s'il n'est pas installé ou utilisé conformément au manuel d'instructions, peut causer de l'interférence nocive aux communications radio. Toutefois, il est possible qu'aucune interférence ne survienne dans une ...
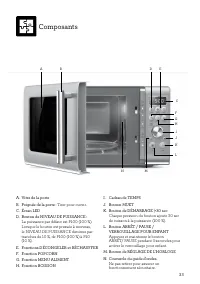
Page 33 - Composants
33 Composants A. Vitre de la porteB. Poignée de la porte : Tirer pour ouvrir . C. Écran LEDD. Bouton de NIVEAU DE PUISSANCE : La puissance par défaut est P100 (100 %). Lorsque le bouton est pressée à nouveau, le NIVEAU DE PUISSANCE diminue par tranches de 10 %, de P100 (100 %) à P10 (10 %). E. Fonct...
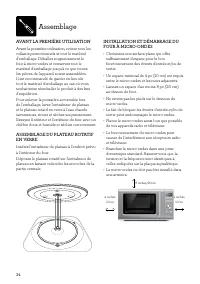
Page 34 - Assemblage; AVANT LA PREMIÈRE UTILISATION
34 Assemblage AVANT LA PREMIÈRE UTILISATION Avant la première utilisation, retirez tous les collants promotionnels et tout le matériel d'emballage. Déballez soigneusement le four à micro-ondes et conservez tout le matériel d'emballage jusqu'à ce que toutes les pièces de l'appareil soient assemblées....
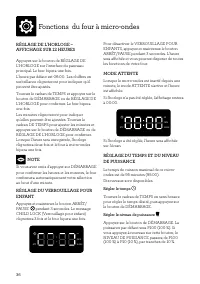
Page 36 - Fonctions du four à micro-ondes; MODE ATTENTE
36 Fonctions du four à micro-ondes RÉGLAGE DE L'HORLOGE – AFFICHAGE SUR 12 HEURES Appuyez sur le bouton de RÉGLAGE DE L'HORLOGE sur l'interface du panneau principal. Le four bipera une fois. L'heure par défaut est 06:00. Les chiffres en surbrillance clignoteront pour indiquer qu'il peuvent être ajus...
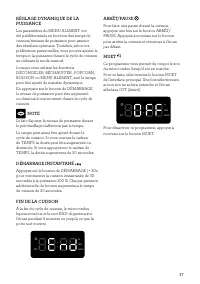
Page 37 - MUET
37 RÉGLAGE DYNAMIQUE DE LA PUISSANCE Les paramètres du MENU ALIMENT ont été prédéterminés en fonction des temps de cuisson/niveaux de puissance pour assurer des résultats optimaux. Toutefois, selon vos préférences personnelles, vous pouvez ajuster le temps et la puissance durant le cycle de cuisson ...
Page 38 - MENU ALIMENT; Fonctions de cuisson
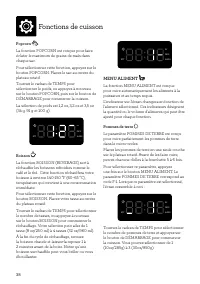
38 Popcorn La fonction POPCORN est conçue pour faire éclater le maximum de grains de maïs dans chaque sac.Pour sélectionner cette fonction, appuyez sur le bouton POPCORN. Placez le sac au centre du plateau rotatif.Tournez le cadran de TEMPS pour sélectionner le poids, ou appuyez à nouveau sur le bou...
Page 39 - DÉCONGELER
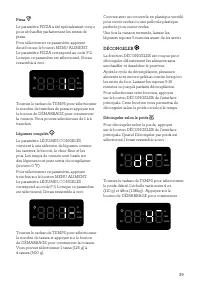
39 Pizza Le paramètre PIZZA a été spécialement conçu pour réchauffer parfaitement les restes de pizza.Pour sélectionner ce paramètre, appuyez deux fois sur le bouton MENU ALIMENT. Le paramètre PIZZA correspond au code F-2. Lorsque ce paramètre est sélectionné, l'écran ressemble à ceci : OZ CUPS SLIC...
Page 40 - RÉCHAUFFER; Trucs et astuces
40 Décongeler selon le temps Pour décongeler selon le temps, appuyez une fois sur le bouton DÉCONGELER de l'interface principale. Quand Décongeler par temps est sélectionné, l'écran ressemble à ceci : OZ CUPS SLICES QTY Tournez le cadran de TEMPS pour sélectionner le temps désiré et appuyez sur le b...
Page 41 - USTENSILES POUR MICRO-ONDES
41 • Le fait de surélever certains types d'aliments tels que les gâteaux, les légumes rôtis ou les produits à base de pâte peut être avantageux. Cela permet à plus d'énergie de pénétrer dans les aliments de tous les côtés, de la base au sommet. Utilisez une grille en plastique ou en céramique adapté...
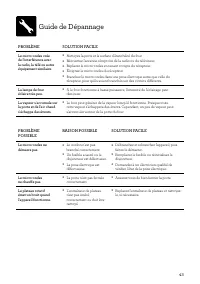
Page 43 - Guide de Dépannage
43 PROBLÈME POSSIBLE RAISON POSSIBLE SOLUTION FACILE Le micro-ondes ne démarre pas. • Le cordon n'est pas branché correctement. • Un fusible a sauté ou le disjoncteur est défectueux. • La prise électrique est défectueuse. • Débranchez et rebranchez l'appareil, puis faites-le démarrer. • Remplacez le...
Page 44 - Breville USA; Breville Consumer Support
Breville, the Breville Logo, Master Every Moment and Compact Wave are trademarks of Breville Pty Ltd (“Breville”) and Breville's products are distributed in the USA and Canada under license. Breville, la Breville Logo, Master Every Moment et Compact Wave sont des marques de commerce de Breville Pty ...