Page 2 - de instructies van het apparaat voor toekomstig gebruik.; Veiligheid van kinderen en kwetsbare mensen; Inhoud
2 www.zanussi.com Lees zorgvuldig de meegeleverde instructies voor installatie en gebruik van het apparaat. De fabrikant is niet verantwoordelijk voor letsel en schade veroorzaakt door een foutieve installatie. Bewaar de instructies van het apparaat voor toekomstig gebruik. Veiligheid van kinderen e...
Page 3 - Veiligheidsinformatie
3 www.zanussi.com • Gebruik geen mechanische of andere middelen om het ontdooipro- ces te versnellen, behalve die middelen die door de fabrikant zijn aanbevolen. • Let op dat u het koelcircuit niet beschadigt.• Gebruik geen elektrische apparaten in de koelkast, tenzij deze door de fabrikant worden a...
Page 6 - Aanwijzingen en tips
6 www.zanussi.com Het bewaren van ingevroren voedsel Als u het apparaat voor het eerst of na een periode dat het niet gebruikt is inschakelt, dient u het apparaat minstens 4 uur op een hoge instelling te laten werken voordat u er producten in plaatst. In het geval van onbedoelde ontdooiing, bijvoorb...
Page 7 - Onderhoud en reiniging; Algemene waarschuwingen
7 www.zanussi.com • Het is aan te bevelen de invriesdatum op elk pakje te vermelden, dan kunt u zien hoe lang het al bewaard is. Tips voor het bewaren van ingevroren voedsel Om de beste resultaten van dit apparaat te verkrijgen, doet u het volgende:• Verzeker u ervan dat de commercieel inge- vroren ...
Page 8 - Probleemoplossing; Wat moet u doen als...
8 www.zanussi.com 2. Verwijder al het ingevroren voedsel, wikkel het in een paar lagen krantenpapier en leg het op een koele plaats. WAARSCHUWING! Raak ingevroren voedsel niet met natte handen aan. Uw handen kunnen dan aan de producten vastvriezen. 3. Laat de deur open en verwijder het vriesschap. H...
Page 9 - De deur sluiten; Installatie; Opstelling
9 www.zanussi.com Probleem Mogelijke oorzaak Oplossing De omgevingstemperatuur is te hoog. Zie de aanduiding van de kli- maatklasse op het typeplaatje. Het voedsel dat in het apparaat werd geplaatst, was te warm. Laat voedsel afkoelen tot kamertemperatuur voordat u het opslaat. De deur is niet goed ...
Page 11 - Elektrische aansluiting
11 www.zanussi.com Zorg ervoor dat de schroeven in de juiste gaten worden geplaatst, zoals weerge- geven in de afbeelding. De rand van het scharnier is evenwijdig met de zijkant van de kast. Zorg dat u de onderste voet onder het deurscharnier plaatst. De onderste voet is te herkennen aan de 4 ribbel...
Page 12 - Technische gegevens; Technische informatie
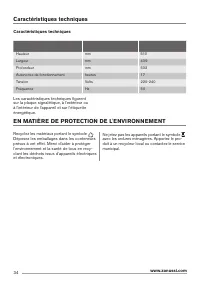
12 www.zanussi.com Technische gegevens Hoogte mm 510 Breedte mm 439 Diepte mm 532 Maximale bewaartijd bij stroomuitval uur 17 Spanning Volt 220-240 Frequentie Hz 50 De technische gegevens staan op het type- plaatje, aan de binnen- of buitenkant van het apparaat en op het energielabel. Technische inf...
Page 14 - Children and vulnerable people safety; Contents
14 www.zanussi.com Before the installation and use of the appliance, carefully read the supplied instructions. The manufacturer is not responsible if an incorrect installation and use causes injuries and damages. Always keep the instructions with the appliance for future reference. Children and vuln...
Page 15 - Safety Instructions
15 www.zanussi.com defrosting process, other than those recommended by the manufac- turer. • Do not damage the refrigerant circuit.• Do not use electrical appliances inside the food storage compart- ments of the appliance, unless they are of the type recommended by the manufacturer. • Do not use wat...
Page 18 - Hints and tips
18 www.zanussi.com Storage of frozen food When first starting-up or after a period out of use, before putting the products in the compartment let the appliance run at least 4 hours on the higher settings. In the event of accidental defrosting, for example due to a power failure, if the power has bee...
Page 19 - Hints for storage of frozenfood; Care and cleaning; General warnings
19 www.zanussi.com • It is advisable to show the freezing in date on each individual pack to enable you to keep tab of the storage time. Hints for storage of frozenfood To obtain the best performance from this ap- pliance, you should:• Make sure that the commercially frozen foodstuffs were adequatel...
Page 20 - Periods of non-operation; Troubleshooting
20 www.zanussi.com 3. Leave the door open and remove the freezing shelf. It is possible to scrape off and remove smaller frost and ice with a plastic scraper. Sweep off melting water and it can be removed if an adequately high tray is put in front of the appliance and the defrost water will flow int...
Page 21 - Closing the door; Installation; Positioning; Location
21 www.zanussi.com Problem Possible cause Solution The water drainage plug is not correctly positioned. Position the water drainage plug in the correct way. Food products are not wrapped properly. Wrap the food products better. Temperature is set incorrectly. Refer to “Operation” chapter. The temper...
Page 22 - Door reversibility
22 www.zanussi.com Ideally, however, the appliance should not be positioned below overhanging wall units. Accurate levelling is ensured by one or more adjustable feet at the base of the cabinet.It is advisable for there to be 75mm separat- ing the back of the fridge to the wall, at least 100mm of sp...
Page 23 - Technical information
23 www.zanussi.com WARNING! Reposition, level the appli- ance, wait for at least four hours and then connect it to the power socket. Do a final check to make sure that: • All screws are tightened. • The magnetic seal adheres to the cabinet. • The door opens and closes correctly. If the ambient tempe...
Page 24 - Sécurité des enfants et des personnes vulnérables; Sommaire
24 www.zanussi.com Avant d'installer et d'utiliser cet appareil, lisez soigneusement les instructions fournies. Le fabricant ne peut être tenu pour respon- sable des dommages et blessures liés à une mauvaise installation ou utilisation. Conservez toujours cette notice avec votre appareil pour vous y...
Page 25 - Avertissements importants
25 www.zanussi.com • N'utilisez aucun dispositif mécanique ou autre appareil pour accélé- rer le processus de dégivrage que ceux recommandés par le fabri- cant. • N'endommagez pas le circuit frigorifique.• N'utilisez pas d'appareils électriques à l'intérieur des compartiments de conservation des ali...
Page 28 - Conseils
28 www.zanussi.com Conservation d'aliments congelés et surgelés À la mise en service ou après un arrêt prolon- gé, avant d'introduire les aliments dans le compartiment, laissez l'appareil fonctionner au moins 4 heures au réglage maximal. En cas de décongélation accidentelle, due par exemple à une co...
Page 29 - Entretien et Nettoyage; AVERTISSEMENTS GÉNÉRAUX
29 www.zanussi.com • L'identification des emballages est impor- tante : indiquez la date de congélation du produit et respectez la durée de conserva- tion indiquée par le fabricant. Conseils pour le stockage des aliments surgelés Pour obtenir les meilleures performances possibles :• Assurez-vous que...
Page 30 - En cas de non-utilisation prolongée; Dépannage
30 www.zanussi.com Pour enlever le givre, suivez les instructions ci-dessous : 1. Éteignez l'appareil ou débranchez la fiche de la prise secteur. 2. Sortez les denrées congelées, envelop- pez-les dans plusieurs feuilles de papier journal et conservez-les dans un endroit frais. AVERTISSEMENT ! Ne tou...
Page 31 - Fermeture de la porte
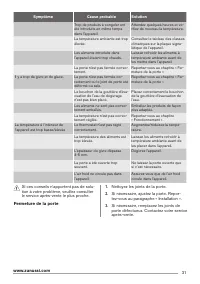
31 www.zanussi.com Symptôme Cause probable Solution Trop de produits à congeler ont été introduits en même temps dans l'appareil. Attendez quelques heures et vé- rifiez de nouveau la température. La température ambiante est trop élevée. Consultez le tableau des classes climatiques sur la plaque sign...
Page 32 - Emplacement; Mise en place
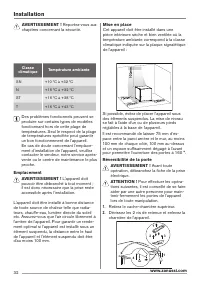
32 www.zanussi.com Classe climatique Température ambiante SN +10 ºC à +32 ºC N +16 ºC à +32 ºC ST +16 ºC à +38 ºC T +16 ºC à +43 ºC Des problèmes fonctionnels peuvent se produire sur certains types de modèles fonctionnant hors de cette plage de températures. Seul le respect de la plage de températur...
Page 33 - Branchement électrique
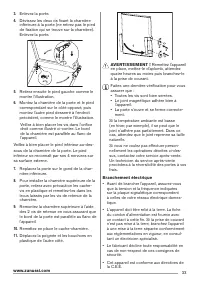
33 www.zanussi.com 3. Enlevez la porte. 4. Dévissez les deux vis fixant la charnière inférieure à la porte (ne retirez pas le pied de fixation qui se trouve sur la charnière). Enlevez la porte. 1 2 5. Retirez ensuite le pied gauche comme le montre l'illustration. 6. Montez la charnière de la porte e...
Page 34 - Caractéristiques techniques
34 www.zanussi.com Caractéristiques techniques Hauteur mm 510 Largeur mm 439 Profondeur mm 532 Autonomie de fonctionnement heures 17 Tension Volts 220-240 Fréquence Hz 50 Les caractéristiques techniques figurent sur la plaque signalétique, à l'extérieur ou à l'intérieur de l'appareil et sur l'étique...
Page 36 - Sicherheit von Kindern und hilfsbedürftigen Personen; Inhalt
36 www.zanussi.com Lesen Sie vor der Montage und dem ersten Gebrauch des Geräts die mitgelieferte Anleitung sorgfältig durch. Der Hersteller über- nimmt keine Verantwortung für Verletzungen und Beschädigungen durch unsachgemäße Montage. Bewahren Sie die Anleitung zu- sammen mit dem Gerät für den zuk...
Page 37 - Sicherheitshinweise
37 www.zanussi.com • Achten Sie darauf, dass die Belüftungsöffnungen im Gehäuse oder in der Einbaunische nicht blockiert sind. • Versuchen Sie nicht, den Abtauvorgang durch andere als vom Hersteller empfohlene mechanische oder sonstige Hilfsmittel zu beschleunigen. • Achten Sie darauf, den Kältekrei...
Page 39 - Betrieb; Einschalten des Geräts; Erste Inbetriebnahme; Reinigung des Innenraums; Täglicher Gebrauch; Einfrieren frischer Lebensmittel
39 www.zanussi.com Betrieb Einschalten des Geräts Stecken Sie den Stecker in die Netzsteckdose.Drehen Sie den Temperaturregler auf „Volle Beladung“ und lassen Sie das Gerät min- destens 4 Stunden lang in Betrieb, damit die richtige Temperatur erreicht wird, bevor Sie Lebensmittel hinein legen.Stelle...
Page 40 - Tipps und Hinweise
40 www.zanussi.com Legen Sie die einzufrierenden Lebensmittel auf die Ablage des Gefrierraums. Hier befin- det sich die kälteste Zone.Die maximale Menge an Lebensmitteln, die in 24 Stunden eingefroren werden kann, ist auf dem Typenschild angegeben, das sich im Innern des Gerätes befindet.Der Gefrier...
Page 41 - Reinigung und Pflege; Allgemeine Warnhinweise
41 www.zanussi.com • Werden Eiswürfel direkt nach der Entnah- me aus dem Gefrierfach verwendet, können sie Frostbrand auf der Haut verursachen. • Es empfiehlt sich, das Einfrierdatum auf jeder einzelnen Packung zu notieren, um einen genauen Überblick über die Lagerzeit zu haben. Hinweise zur Lagerun...
Page 42 - Stillstandzeiten; Fehlersuche
42 www.zanussi.com Stellen Sie den Temperaturregler 12 Stunden vor dem Abtauen auf eine kühlere Einstellung, damit eine ausrei- chende Kälte als Reserve für die Unter- brechung im Betrieb entstehen kann. Auf den Ablagen des Gefriergeräts und im Innern des oberen Fachs bildet sich stets etwas Reif.Ta...
Page 43 - Schließen der Tür
43 www.zanussi.com Problem Mögliche Ursache Abhilfe Es liegt keine Spannung an der Netzsteckdose an. Testen Sie, ob ein anderes Gerät an dieser Steckdose funktioniert. Wenden Sie sich an einen quali- fizierten Elektriker. Das Gerät ist zu laut. Unebenheiten im Boden wurden nicht ausgeglichen. Kontro...
Page 44 - Montage; Aufstellung; Wechsel des Türanschlags
44 www.zanussi.com Montage ACHTUNG! Siehe Sicherheitshinweise. Aufstellung Installieren Sie dieses Gerät in einem trockenen, gut belüfteten Raum, in dem die Umgebungstemperatur mit der Klimaklasse übereinstimmt, die auf dem Typenschild des Geräts angegeben ist: Klimaklasse Umgebungstemperatur SN +10...
Page 46 - Technische Daten
46 www.zanussi.com Technische Daten Höhe mm 510 Breite mm 439 Tiefe mm 532 Lagerzeit bei Störung Stunden 17 Spannung Volt 220–240 Frequenz Hz 50 Die technischen Daten befinden sich auf dem Typenschild auf der Außen- oder Innenseite des Geräts sowie auf der Energieplakette. Technische Daten UMWELTTIP...
Page 48 - Sicurezza dei bambini e delle persone vulnerabili; Sommario
48 www.zanussi.com Leggere attentamente le istruzioni fornite prima di installare e utilizzare l'apparecchiatura. Il produttore non è responsabile di lesioni e danni derivanti da un'installazione e un uso non corretti dell'apparecchiatura. Tenere sempre le istruzioni a portata di mano come riferimen...
Page 49 - Istruzioni per la sicurezza; Collegamento elettrico
49 www.zanussi.com • Non danneggiare il circuito refrigerante.• Non utilizzare apparecchiature elettriche all'interno dei comparti di conservazione degli alimenti, ad eccezione di quelli consigliati dal costruttore. • Non nebulizzare acqua né utilizzare vapore per pulire l'apparecchiatura. • Pulire ...
Page 52 - Consigli e suggerimenti utili
52 www.zanussi.com Conservazione dei surgelati Al primo avvio o dopo un periodo di inutilizzo, prima di introdurre gli alimenti nel vano, si consiglia di lasciare in funzione l’apparecchiatura per almeno 4 ore con le impostazioni più alte. In caso di sbrinamento accidentale, per esempio a causa di u...
Page 53 - Consigli per la conservazione dei surgelati; Pulizia e cura; Avvertenze generali
53 www.zanussi.com • Si consiglia di riportare su ogni confezione la data di congelamento, in modo da poter controllare il tempo di conservazione. Consigli per la conservazione dei surgelati Per ottenere risultati ottimali è consigliabile:• Controllare che i surgelati esposti nei punti vendita non p...
Page 54 - Periodi di inutilizzo; Risoluzione dei problemi
54 www.zanussi.com 3. Lasciare la porta aperta e rimuovere il ripiano del congelatore. Lo strato di brina e ghiaccio può essere rimosso con un raschietto di plastica. Eliminare l'acqua prodotta dallo sbrinamento, facendola defluire su un vassoio sufficientemente alto posizionato davanti all'apparecc...
Page 55 - Chiusura della porta; Installazione; Posizionamento
55 www.zanussi.com Problema Possibile causa Soluzione Il tappo dello scarico dell'acqua non è posizionato correttamente Posizionare il tappo correttamente. Gli alimenti non sono avvolti correttamente. Avvolgere correttamente gli alimenti. La temperatura non è impostata correttamente. Fare riferiment...
Page 56 - Reversibilità dello sportello
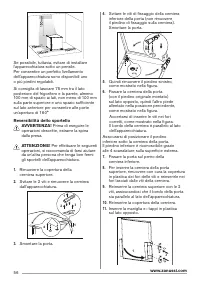
56 www.zanussi.com Se possibile, tuttavia, evitare di installare l'apparecchiatura sotto un pensile. Per consentire un perfetto livellamento dell'apparecchiatura sono disponibili uno o più piedini regolabili.Si consiglia di lasciare 75 mm tra il lato posteriore del frigorifero e la parete, almeno 10...
Page 57 - Dati tecnici
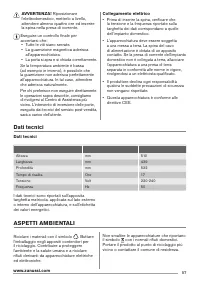
57 www.zanussi.com AVVERTENZA! Riposizionare l'elettrodomestico, metterlo a livello, attendere almeno quattro ore ed inserire la spina nella presa di corrente. Eseguire un controllo finale per accertarsi che: • Tutte le viti siano serrate. • La guarnizione magnetica aderisca all'apparecchiatura. •...
Page 58 - Environmental concerns; Environmental concerns; Rear spacers; Environmental concerns
Rear spacers 2 4 3 1 You can find the two spacers in the bag with documentation. Do these steps to install the spacers:1. Release the screw.2. Engage the spacer below the screw.3. Turn the spacer to the right position.4. Tighten again the screws. Ventilation requirements 1. Put the freezer in horizo...






 Zanussi ZBX 623 SS
User Manual
Zanussi ZBX 623 SS
User Manual
 Zanussi ZMB17MX
User Manual
Zanussi ZMB17MX
User Manual
 Zanussi ZOD35802XK
User Manual
Zanussi ZOD35802XK
User Manual
 Zanussi ZRB36104XA
User Manual
Zanussi ZRB36104XA
User Manual
 Zanussi ZRG15805WA
User Manual
Zanussi ZRG15805WA
User Manual
 Zanussi ZOD35660XK
User Manual
Zanussi ZOD35660XK
User Manual
 Zanussi ZOP37972BK
User Manual
Zanussi ZOP37972BK
User Manual
 Zanussi ZCV46330WA
User Manual
Zanussi ZCV46330WA
User Manual
 Zanussi ZWH7162J
User Manual
Zanussi ZWH7162J
User Manual
 Zanussi ZDC8202P
User Manual
Zanussi ZDC8202P
User Manual
 Zanussi ZCM ID
Manual
Zanussi ZCM ID
Manual
 Zanussi ZRA33103WA
User Manual
Zanussi ZRA33103WA
User Manual
 Zanussi ZUT 113W
Manual
Zanussi ZUT 113W
Manual
 Zanussi ZFT11114WA
User Manual
Zanussi ZFT11114WA
User Manual
 Zanussi ZWF71463W
User Manual
Zanussi ZWF71463W
User Manual
 Zanussi ZDT12002FA
User Manual
Zanussi ZDT12002FA
User Manual
 Zanussi ZDE47100W
User Manual
Zanussi ZDE47100W
User Manual
 Zanussi TC180W
User Manual
Zanussi TC180W
User Manual
 Zanussi ZT 617
User Manual
Zanussi ZT 617
User Manual
 Zanussi Z714W43BI
User Manual
Zanussi Z714W43BI
User Manual