Page 2 - Sigurnost djece i slabijih osoba
Sadržaj Informacije o sigurnosti _ _ _ _ _ _ _ _ _ _ 2Upravlja č ka plo č a _ _ _ _ _ _ _ _ _ _ _ _ _ 4 Prva uporaba _ _ _ _ _ _ _ _ _ _ _ _ _ _ _ 6Svakodnevna uporaba _ _ _ _ _ _ _ _ _ _ 6Korisni savjeti _ _ _ _ _ _ _ _ _ _ _ _ _ _ _ 6 Č iš ć enje i održavanje _ _ _ _ _ _ _ _ _ _ _ 7 Rješavanje pro...
Page 4 - Upravlja; Uklju
• Preporu č ujemo vam da pri č ekate najmanje č etiri sata prije spajanja ure đ aja kako biste omogu ć ili povrat ulja u kompresor. • Zrak se mora slobodno kretati oko ure đ aja, u suprotnome se ure đ aj pregrijava. Slijedite upute vezane uz postavljanje kako bistepostigli dostatan stupanj ventilaci...
Page 8 - Rješavanje problema
Zamrziva č odmrznite kad sloj inja dosegne debljinu od 3 do 5 mm. Važno Oko 12 sati prije odmrzavanja postavite regulator temperature na višepostavke, kako bi se nakupilo dovoljnorezervne hladno ć e za slu č aj prekida rada. Inje uklonite na dolje opisani na č in: 1. Isklju č ite ure đ aj i odspojit...
Page 10 - Zatvaranje vrata; Tehni; Pozor
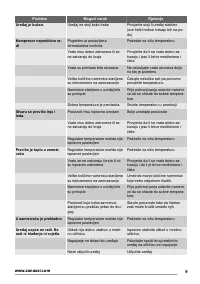
Problem Mogu ć i uzrok Rješenje Nema napona u mrežnoj uti č nici (pokušajte spojiti drugi ure đ aj na nju) Pozovite elektri č ara Ure đ aj uop ć e ne hladi Utika č nije dobro utaknut u mrež- nu uti č nicu Ispravno utaknite utika č u mrežnu uti č nicu Nema napona u mrežnoj uti č nici (pokušajte spoji...
Page 12 - Elektri; Briga za okoliš
1. Izvadite utika č iz elektri č ne uti č nice. 2. Ure đ aj pažljivo na- gnite unazad, tako dakompresor ne dodi-ruje pod.3. Odvijte obje pod-esive nožice.4. Odvijte vijke donješarke na vratima. 2 1 5. Skinite vrata ure- đ aja tako da ih povu- č ete lagano prema dole.6. Odvijte gornji zatikšarke na v...
Page 14 - Algemene veiligheid
Inhoud Veiligheidsinformatie _ _ _ _ _ _ _ _ _ _ _ _ 14Bedieningspaneel _ _ _ _ _ _ _ _ _ _ _ _ _ _ 16Het eerste gebruik _ _ _ _ _ _ _ _ _ _ _ _ _ 18Dagelijks gebruik _ _ _ _ _ _ _ _ _ _ _ _ _ _ 18Nuttige aanwijzingen en tips _ _ _ _ _ _ _ _ 18 Onderhoud en reiniging _ _ _ _ _ _ _ _ _ _ _ 19Probleme...
Page 16 - Bedieningspaneel; Inschakelen
gend vocht kan het apparaat onder stroomkomen staan. Installatie Belangrijk! Voor de aansluiting van elektriciteit dienen de instructies in de desbetreffendeparagrafen nauwgezet te worden opgevolgd. • Pak het apparaat uit en controleer of er be- schadigingen zijn. Sluit het apparaat niet aanals het ...
Page 19 - Tips voor het invriezen; Onderhoud en reiniging; Periodieke reiniging
• Als de compressor in- of uitgeschakeld wordt, zult u een zacht "klikje" van de thermo-staat horen. Dat is normaal. Tips voor het invriezen Om u te helpen om het beste van het invries-proces te maken, volgen hier een paar belang-rijke tips: • de maximale hoeveelheid voedsel die in 24 uur in...
Page 20 - De vriezer ontdooien
Belangrijk! Zorg ervoor dat u het koelsysteem niet beschadigt. Veel normaal verkrijgbare keukenreinigers be-vatten chemicaliën die de kunststoffen die in ditapparaat gebruikt zijn kunnen aantasten/be-schadigen. Daarom wordt het aanbevolen debuitenkant van dit apparaat alleen schoon temaken met warm ...
Page 21 - Problemen oplossen; Voordat u problemen
Problemen oplossen Waarschuwing! Voordat u problemen oplost, trekt u eerst de stekker uit het stopcontact.Het opsporen van storingen die niet in dezehandleiding vermeld zijn, dient te wordenuitgevoerd door een gekwalificeerd technicusof deskundig persoon. Belangrijk! Er zijn tijdens de normale werki...
Page 22 - De deur sluiten; Maak de afdichtingen van de deur schoon.; Technische gegevens
Probleem Mogelijke oorzaak Oplossing In te vriezen producten zijn te dichtbij elkaar geplaatst Plaats de producten zodanig datkoude lucht daartussen kan circule-ren Het is te koud in de vriezer De thermostaatknop staat mis-schien niet goed Stel een hogere temperatuur in Het apparaat werkt hele-maal ...
Page 23 - Montage; Lees voor uw eigen veiligheid en; Opstelling; Afstandsstukken achterkant
De technische gegevens staan op het typepla-tje aan de linker binnenkant van het apparaat enop het energielabel. Montage Let op! Lees voor uw eigen veiligheid en correcte werking van het apparaat eerst de "veiligheidsinformatie" aandachtig door,alvorens het apparaat te installeren. Opstellin...
Page 24 - Omkeerbaarheid van de deur; Om de volgende handelingen uit; Controleer goed en verzeker u ervan dat:; Elektrische aansluiting
Waarschuwing! min. 100 mm 15 mm 15 mm De stroomtoevoer aan het apparaat moetverbroken kunnen worden; de stekker moet daarom na de installatie gemakkelijktoegankelijk zijn. Omkeerbaarheid van de deur Belangrijk! Om de volgende handelingen uit te voeren, raden we aan dat dit wordt gedaanmet de hulp va...
Page 25 - Dit apparaat voldoet aan de EU. richtlijnen.; Het milieu
De fabrikant neemt geen verantwoordelijkheidop zich als de bovenstaande veiligheidsmaatre-gelen niet worden nageleefd. Dit apparaat voldoet aan de EU. richtlijnen. Het milieu Het symbool op het product of op deverpakking wijst erop dat dit product niet alshuishoudafval mag worden behandeld, maarmoet...
Page 26 - Children and vulnerable people safety
Contents Safety information _ _ _ _ _ _ _ _ _ _ _ _ _ _ 26Control panel _ _ _ _ _ _ _ _ _ _ _ _ _ _ _ _ 28First use _ _ _ _ _ _ _ _ _ _ _ _ _ _ _ _ _ _ _ 29Daily use _ _ _ _ _ _ _ _ _ _ _ _ _ _ _ _ _ _ _ 30Helpful Hints and Tips _ _ _ _ _ _ _ _ _ _ _ 30 Care and cleaning _ _ _ _ _ _ _ _ _ _ _ _ _ 31...
Page 28 - Control panel; Switching on
• Wherever possible the back of the product should be against a wall to avoid touching orcatching warm parts (compressor, condens-er) to prevent possible burn. • The appliance must not be located close to radiators or cookers. • Make sure that the mains plug is accessible after the installation of t...
Page 29 - First use; Cleaning the interior
2. To disconnect the appliance from the pow-er disconnect the mains plug from the wallsocket. Temperature regulation The temperature within the appliance is control-led by the Temperature Regulator situated onthe control panel.To operate the appliance, proceed as follows: • turn the Temperature Regu...
Page 31 - Hints for storage of frozen food; Care and cleaning; Periodic cleaning
• it is advisable to show the freezing in date on each individual pack to enable you to keeptab of the storage time. Hints for storage of frozen food To obtain the best performance from this appli-ance, you should: • make sure that the commercially frozen food- stuffs were adequately stored by the r...
Page 32 - Periods of non-operation; What to do if...
In order tospeed up the defrosting proc-ess, place a pot ofwarm water in thefreezer compart-ment. In addition,remove pieces ofice that breakaway before defrosting is complete. 4. When defrosting is completed, dry the in-terior thoroughly and keep the scraper forfuture use. 5. Switch on the appliance...
Page 33 - Closing the door; Clean the door gaskets.
Problem Possible cause Solution Large quantities of food to be fro-zen were put in at the same time Wait some hours and then check thetemperature again Food placed in the appliance wastoo warm Allow food to cool to room tempera-ture before storing The room temperature is too high. Decrease the room ...
Page 34 - carefully for your safety and correct; Positioning; Rear spacers
3. If necessary, replace the defective doorgaskets. Contact the Service Center. Technical data Dimension Height 1250 mm Width 545 mm Depth 640 mm Rising Time 18 h Voltage 230 V Frequency 50 Hz The technical information are situated in the rat-ing plate on the internal left side of the appli-ance and...
Page 35 - To carry out the following; Do a final check to make sure that:
Location The appliance should be installed well awayfrom sources of heat such as radiators, boilers,direct sunlight etc. Ensure that air can circulatefreely around the back of the cabinet. To ensurebest performance, if the appliance is positionedbelow an overhanging wall unit, the minimumdistance be...
Page 36 - Electrical connection; Environmental concerns
In case you do not want to carry out the abovementioned operations, contact the nearest AfterSales Service Force. The After Sales Servicespecialist will carry out the reversibility of thedoors at your cost. Electrical connection Before plugging in, ensure that the voltage andfrequency shown on the r...
Page 37 - Consignes générales de sécurité
Sommaire Consignes de sécurité _ _ _ _ _ _ _ _ _ _ _ 37Bandeau de commande _ _ _ _ _ _ _ _ _ _ 39Première utilisation _ _ _ _ _ _ _ _ _ _ _ _ _ 41Utilisation quotidienne _ _ _ _ _ _ _ _ _ _ _ 41Conseils utiles _ _ _ _ _ _ _ _ _ _ _ _ _ _ _ _ 41Entretien et nettoyage _ _ _ _ _ _ _ _ _ _ _ 42 En cas d...
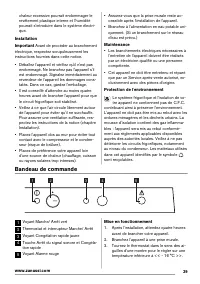
Page 39 - Bandeau de commande; Mise en fonctionnement
chaleur excessive pourrait endommager lerevêtement plastique interne et l'humiditépourrait s'introduire dans le système électri-que. Installation Important Avant de procéder au branchement électrique, respectez scrupuleusement lesinstructions fournies dans cette notice. • Déballez l'appareil et véri...
Page 41 - En cas de dégivrage accidentel, dû; Conseils utiles; • Le liquide de refroidissement qui passe dans
lation rapide pour désactiver cette fonction.Le voyant jaune Congélation rapide s'étein-dra. 5. Transférez les aliments congelés des com-partiments de congélation dans les troisautres compartiments de stockage pourpouvoir congeler d'autres aliments. Si la touche Congélation rapide reste invo-lontair...
Page 42 - Conseils pour la congélation; Entretien et nettoyage; Attention
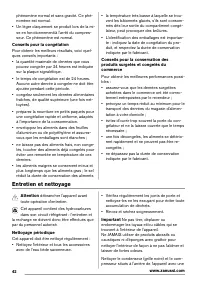
phénomène normal et sans gravité. Ce phé-nomène est normal. • Un léger claquement se produit lors de la mi- se en fonctionnement/à l'arrêt du compres-seur. Ce phénomène est normal. Conseils pour la congélation Pour obtenir les meilleurs résultats, voici quel-ques conseils importants : • la quantité ...
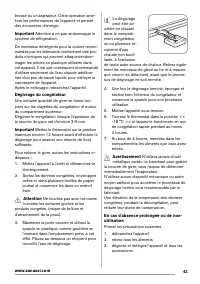
Page 44 - possibilité de débrancher et de vider l'appareil,; En cas d'anomalie de fonctionnement; Avertissement; Avant d'intervenir sur; Important; Certains bruits pendant le; Important; L'appareil fonctionne de façon
4. laissez la porte/les portes ouverte(s) pourprévenir la formation d'odeurs désagréa-bles. Important Si, toutefois, vous n'avez pas la possibilité de débrancher et de vider l'appareil, faites vérifier régulièrement son bonfonctionnement pour éviter la détérioration desaliments en cas de panne de co...
Page 45 - Fermeture de la porte; Nettoyez les joints de la porte.
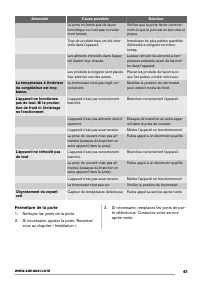
Anomalie Cause possible Solution La porte ne ferme pas de façonhermétique ou n'est pas correcte-ment fermée Vérifiez que la porte ferme correcte-ment et que le joint est en bon état etpropre Trop de produits frais ont été intro-duits dans l'appareil. Introduisez de plus petites quantitésd'aliments à...
Page 46 - Pour votre sécurité et le bon; Emplacement; Entretoises arrière
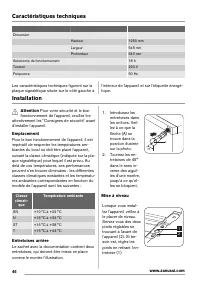
Caractéristiques techniques Dimension Hauteur 1250 mm Largeur 545 mm Profondeur 640 mm Autonomie de fonctionnement 18 h Tension 230 V Fréquence 50 Hz Les caractéristiques techniques figurent sur laplaque signalétique située sur le côté gauche à l'intérieur de l'appareil et sur l'étiquette énergé-tiq...
Page 47 - Pour effectuer les opérations
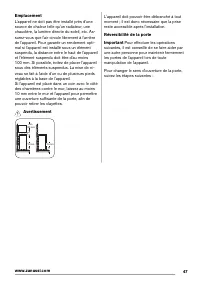
Emplacement L'appareil ne doit pas être installé près d'unesource de chaleur telle qu'un radiateur, unechaudière, la lumière directe du soleil, etc. As-surez-vous que l'air circule librement à l'arrièrede l'appareil. Pour garantir un rendement opti-mal si l'appareil est installé sous un élémentsuspe...
Page 48 - • Toutes les vis sont serrées.; Branchement électrique; En matière de sauvegarde de l'environnement
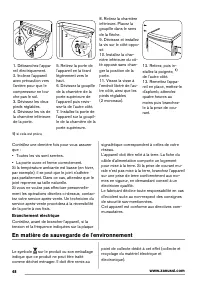
1. Débranchez l'appa-reil électriquement.2. Inclinez l'appareilavec précaution versl'arrière pour que lecompresseur ne tou-che pas le sol.3. Dévissez les deuxpieds réglables.4. Dévissez les vis dela charnière inférieurede la porte. 2 1 5. Retirez la porte del'appareil en la tirantlégèrement vers leh...
Page 50 - Allgemeine Sicherheitshinweise
Inhalt Sicherheitshinweise _ _ _ _ _ _ _ _ _ _ _ _ _ 50Bedienfeld _ _ _ _ _ _ _ _ _ _ _ _ _ _ _ _ _ _ 52Erste Inbetriebnahme _ _ _ _ _ _ _ _ _ _ _ _ 54Täglicher Gebrauch _ _ _ _ _ _ _ _ _ _ _ _ _ 54Praktische Tipps und Hinweise _ _ _ _ _ _ _ 55 Reinigung und Pflege _ _ _ _ _ _ _ _ _ _ _ _ 56Was tun,...
Page 52 - Bedienfeld
• Verwenden Sie niemals einen Haartrockner oder andere Heizgeräte, um das Abtauen zubeschleunigen. Starke Hitze kann die Plastik-teile im Innenraum beschädigen und Feuch-tigkeit kann in das elektrische System ein-dringen, so dass die Teile unter Spannungstehen. Montage Wichtig! Halten Sie sich für d...
Page 54 - Erste Inbetriebnahme; Reinigung des Innenraums; Verwenden Sie keine aggressiven; Täglicher Gebrauch; Einfrieren frischer Lebensmittel
auf. Der Kompressor läuft jetzt kontinuier-lich und gewährleistet so eine möglichstschnelle Tiefkühlung der frischen Lebens-mittel. 2. Diese Funktion kann jederzeit ausgeschal-tet werden. Halten Sie dafür die Super-frost-Taste 2-3 Sekunden gedrückt. 3. Legen Sie die Lebensmittel in die Gefrier-fäche...
Page 55 - Auftauen; Praktische Tipps und Hinweise; Normale Betriebsgeräusche
Wichtig! Kam es zum Beispiel durch einen Stromausfall, der länger dauerte als der in derTabelle mit den technischen Datenangegebene Wert (siehe "Ausfalldauer") zueinem ungewollten Abtauen, dann müssen dieaufgetauten Lebensmittel sehr rasch verbrauchtoder sofort gekocht und (nach dem Abkühlen...
Page 56 - Reinigung und Pflege; Regelmäßige Reinigung
Reinigung und Pflege Vorsicht! Ziehen Sie bitte vor jeder Reinigungsarbeit immer den Netzstecker aus der Steckdose. Der Kältekreis des Gerätes enthält Kohlen-wasserstoffe; Wartungsarbeiten und Nachfüllen von Kältemittel dürfen daher nurdurch vom Hersteller autorisiertes Fachperso-nal ausgeführt werd...
Page 57 - Stillstandzeiten
4. Ist das Geräteinnere vollständig abgetaut,trocken Sie die nassen Oberflächen gründ-lich ab und bewahren Sie den Kunst-stoffschaber für eine spätere Verwendungauf. 5. Schalten Sie das Gerät ein. 6. Stellen Sie den Temperaturregler auf diePosition -18 °C und lassen Sie das Gerätmindestens 4 Stunden...
Page 59 - Schließen der Tür; Reinigen Sie die Türdichtungen.; Technische Daten; Lesen Sie bitte die; Aufstellung; Distanzstücke hinten
Problem Mögliche Ursache Abhilfe Es liegt keine Spannung an derNetzsteckdose an (schließen Siezum Test ein anderes Gerät an). Rufen Sie einen Elektriker. Das Gerät ist nicht eingeschaltet. Schalten Sie das Gerät ein. Der Temperaturregler ist nicht ein-gestellt. Überprüfen Sie den Temperaturreg-ler. ...
Page 60 - Die nachfolgend beschriebenen
1. Setzen Sie dieDistanzstücke indie Öffnungenein. Stellen Siesicher, dass derPfeil (A) wie inder Abbildunggezeigt ausge-richtet ist. 2. Drehen Sie dieDistanzstückeum 45°, bis sieeinrasten. 45˚ A Ausrichten Bei der Aufstellungdes Gerätes ist die-ses waagerecht aus-zurichten. Dies lässtsich mit zweiS...
Page 61 - Elektrischer Anschluss
1. Ziehen Sie den Ste-cker aus der Steckdo-se.2. Neigen Sie das Ge-rät vorsichtig nach hin-ten, so dass der Kom-pressor nicht den Bo-den berühren kann.3. Schrauben Sie bei-de Schraubfüße ab.4. Lösen Sie dieSchrauben des unte-ren Türscharniers. 2 1 5. Nehmen Sie dieGerätetür ab, indemSie sie vorsicht...
Page 62 - Hinweise zum Umweltschutz
Hinweise zum Umweltschutz Das Symbol auf dem Produkt oder seinerVerpackung weist darauf hin, dass diesesProdukt nicht als normaler Haushaltsabfall zubehandeln ist, sondern an einem Sammelpunktfür das Recycling von elektrischen undelektronischen Geräten abgegeben werdenmuss. Durch Ihren Beitrag zum k...
Page 66 - Panel sterowania; łą
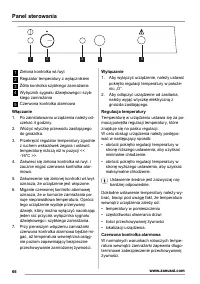
Panel sterowania 1 2 3 4 5 1 Zielona kontrolka w ł ./wy ł . 2 Regulator temperatury z wy łą cznikiem 3 Ż ó ł ta kontrolka szybkiego zamra ż ania 4 Wy łą cznik sygna ł u d ź wi ę kowego i szyb- kiego zamra ż ania 5 Czerwona kontrolka alarmowa W łą czanie 1. Po zainstalowaniu urz ą dzenia nale ż y od-...
Page 68 - Przydatne rady i wskazówki
Proces zamra ż ania trwa 24 godziny: w tym czasie nie wolno wk ł ada ć kolejnej partii ż yw- no ś ci przeznaczonej do zamro ż enia. Taca w zamra ż arce mo ż e s ł u ż y ć do zamra- ż ania niewielkich owoców (malin, truskawek, porzeczek itp.).Nale ż y roz ł o ż y ć cienk ą warstw ę rozpakowa- nych ow...
Page 69 - Konserwacja i czyszczenie
• Upewni ć si ę , ż e mro ż onki by ł y odpowied- nio przechowywane w sklepie. • Stara ć si ę , aby zamro ż ona ż ywno ść by ł a transportowana ze sklepu do zamra ż arki w jak najkrótszym czasie. • Nie otwiera ć zbyt cz ę sto drzwi zamra ż arki i nie zostawia ć ich otwartych d ł u ż ej ni ż jest to ...
Page 70 - Co zrobi
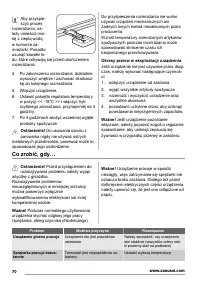
Aby przyspie-szy ć proces rozmra ż ania, na- le ż y umie ś ci ć mis- k ę z ciep łą wod ą w komorze za-mra ż arki. Ponadto usun ąć kawa ł ki lo- du, które odrywaj ą si ę przed uko ń czeniem rozmra ż ania. 4. Po zako ń czeniu rozmra ż ania, dok ł adnie wysuszy ć wn ę trze i zachowa ć skrobacz- k ę do ...
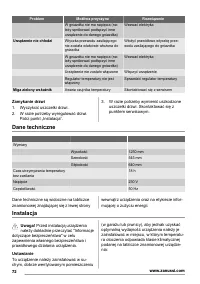
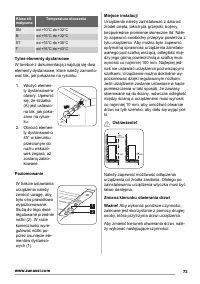
Page 72 - Zamykanie drzwi; Dane techniczne; Ustawianie; ść
Problem Mo ż liwa przyczyna Rozwi ą zanie W gniazdku nie ma napi ę cia (na- le ż y spróbowa ć pod łą czy ć inne urz ą dzenie do danego gniazdka) Wezwa ć elektryka Urz ą dzenie nie ch ł odzi Wtyczka przewodu zasilaj ą cego nie zosta ł a w ł a ś ciwie w ł o ż ona do gniazdka W ł o ż y ć prawid ł owo w...
Page 74 - Przy; Ochrona
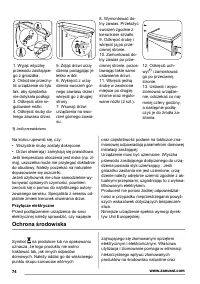
1. Wyj ąć wtyczk ę przewodu zasilaj ą ce- go z gniazdka.2. Ostro ż nie przechy- li ć urz ą dzenie do ty ł u tak, aby spr ęż arka nie dotyka ł a pod ł ogi. 3. Odkr ę ci ć obie re- gulowane nó ż ki. 4. Odkr ę ci ć ś ruby do- lnego zawiasu drzwi. 2 1 5. Zdj ąć drzwi urz ą - dzenia poci ą gaj ą c je lek...







 Zanussi ZBX 623 SS
User Manual
Zanussi ZBX 623 SS
User Manual
 Zanussi ZMB17MX
User Manual
Zanussi ZMB17MX
User Manual
 Zanussi ZOD35802XK
User Manual
Zanussi ZOD35802XK
User Manual
 Zanussi ZRB36104XA
User Manual
Zanussi ZRB36104XA
User Manual
 Zanussi ZRG15805WA
User Manual
Zanussi ZRG15805WA
User Manual
 Zanussi ZOD35660XK
User Manual
Zanussi ZOD35660XK
User Manual
 Zanussi ZOP37972BK
User Manual
Zanussi ZOP37972BK
User Manual
 Zanussi ZCV46330WA
User Manual
Zanussi ZCV46330WA
User Manual
 Zanussi ZWH7162J
User Manual
Zanussi ZWH7162J
User Manual
 Zanussi ZDC8202P
User Manual
Zanussi ZDC8202P
User Manual
 Zanussi ZCM ID
Manual
Zanussi ZCM ID
Manual
 Zanussi ZRA33103WA
User Manual
Zanussi ZRA33103WA
User Manual
 Zanussi ZUT 113W
Manual
Zanussi ZUT 113W
Manual
 Zanussi ZFT11114WA
User Manual
Zanussi ZFT11114WA
User Manual
 Zanussi ZWF71463W
User Manual
Zanussi ZWF71463W
User Manual
 Zanussi ZDT12002FA
User Manual
Zanussi ZDT12002FA
User Manual
 Zanussi ZDE47100W
User Manual
Zanussi ZDE47100W
User Manual
 Zanussi TC180W
User Manual
Zanussi TC180W
User Manual
 Zanussi ZT 617
User Manual
Zanussi ZT 617
User Manual
 Zanussi Z714W43BI
User Manual
Zanussi Z714W43BI
User Manual