Page 3 - VEILIGHEIDSVOORSCHRIFTEN
• Doe messen en bestek met scherpe punten in het bestekmandje met de punten omlaag in horizontale positie. • Laat de deur van het apparaat niet open staan zonder toezicht om te voorkomen dat er iemand over struikelt. • Schakel het apparaat uit en trek de stekker uit het stopcontact voordat u onderho...
Page 5 - EENVOUDIGE START; PROGRAMMA’S
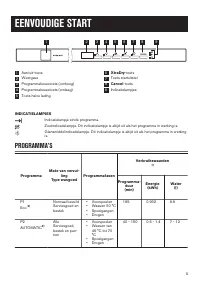
EENVOUDIGE START 1 3 4 5 6 7 8 9 2 1 Aan/uit-toets 2 Weergave 3 Programmakeuzetoets (omhoog) 4 Programmakeuzetoets (omlaag) 5 Toets halve lading 6 XtraDry-toets 7 Toets startuitstel 8 Cancel-toets 9 Indicatielampjes INDICATIELAMPJES Indicatielampje einde programma.Zoutindicatielampje. Dit indicatiel...
Page 7 - INSTELLINGEN
INSTELLINGEN PROGRAMMAKEUZE-MODUS Het apparaat staat in de programmakeuzemodus als het display na activering het programma Eco weergeeft. • Het display geeft de programmaduur weer na een paar seconden.Als het apparaat in de programmakeuzemodus staat, kan een programma worden ingesteld. Druk, als het...
Page 13 - AANWIJZINGEN EN TIPS
EINDE VAN HET PROGRAMMA • Druk op de aan/uit-toets of wacht totdat de Auto Off-functie het apparaat automatisch heeft uitgeschakeld. • Draai de waterkraan dicht. Als u de deur opent voor de activering van Auto Off, wordt het apparaat automatisch uitgeschakeld. AANWIJZINGEN EN TIPS ALGEMEENDe volgend...
Page 14 - ONDERHOUD EN REINIGING
WAT MOET U DOEN ALS U WILT STOPPEN MET HET GEBRUIK VAN MULTITABLETTENDoe het volgende voordat u begint met het gebruiken van apart wasmiddel, zout en glansmiddel.1. Stel het hoogste niveau van de waterontharder in. 2. Zorg ervoor dat het zout- en het glansmiddeldoseerbakje gevuld zijn. 3. Start het ...
Page 15 - PROBLEEMOPLOSSING
C • Zorg ervoor dat er geen etensresten of vuil in of rond de rand van de opvangbak zitten. • Plaats de platte filter (C) terug. Zorg ervoor dat het goed onder de 2 geleidingen zit. • Plaats de filters (A) en (B) terug. • Plaats de filter (A) terug in de platte filter (C). Rechtsom draaien tot het v...
Page 18 - TECHNISCHE INFORMATIE
Probleem Mogelijke oorzaak en oplossing Opvallend veel schuim tijdens het wassen. • Gebruik alleen wasmiddel voor afwasautomaten. • Het glansmiddeldoseerbakje is lek. Neem contact op met een servicecentrum. Roestresten op bestek. • Er wordt voor het wassen teveel zout in het water gebruikt. Zie 'De ...
Page 19 - MILIEUBESCHERMING
Energieverbruik Uit-modus (W) 0.10 1) Zie het typeplaatje voor andere waarden. 2) Als het hete water door alternatieve, milieuvriendelijkere energiebronnen geproduceerd wordt (bijv. zon- nepanelen en windenergie), gebruik dan een heetwatervoorziening om het energieverbruik te verminderen. TYPEPLAATJ...
Page 21 - SAFETY INSTRUCTIONS
• Do not keep the appliance door open without supervision to prevent to fall on it. • Before maintenance, deactivate the appliance and disconnect the mains plug from the mains socket. • Do not use water spray and steam to clean the appliance. • The ventilation openings in the base (if applicable) mu...
Page 23 - EASY START; PROGRAMMES
EASY START 1 3 4 5 6 7 8 9 2 1 On/off button 2 Display 3 Programme button (up) 4 Programme button (down) 5 Half load button 6 XtraDry button 7 Delay button 8 Cancel button 9 Indicators INDICATORS End indicator.Salt indicator. It is always off while the programme operates.Rinse aid indicator. It is a...
Page 24 - SETTINGS
Programme Degree of soil Type of load Programme phases Consumption values 1) Duration (min) Energy (kWh) Water (l) P4 Quick A30Min 5) Fresh soil Crockery and cutlery • Wash 60 °C or 65 °C • Rinses 30 0.9 9 P5 Delicate Normal or light soil Delicate crock- ery and glass- ware • Wash 45 °C • Rinses • D...
Page 27 - BEFORE FIRST USE
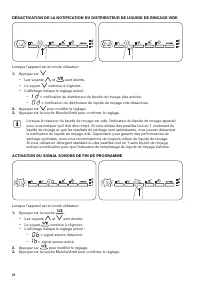
– = rinse aid empty notification activated. – = rinse aid empty notification deactivated. 2. Press to change the setting. 3. Press on/off button to confirm the setting. When rinse aid chamber is empty, the rinse aid indicator is turned on notifying to refill rinse aid. If you are using multitabs con...
Page 28 - DAILY USE
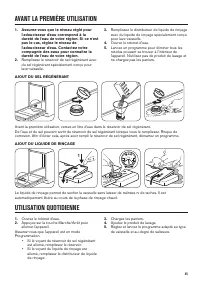
ADDING SALT Before first use put one litre of water in the salt container.Water and salt can come out from the salt container when you fill it. Risk of corrosion. To prevent it, after you fill the salt container, start a programme. ADDING RINSE AID 2 1 4 3 2 1 The rinse aid helps to dry the dishes w...
Page 31 - HINTS AND TIPS
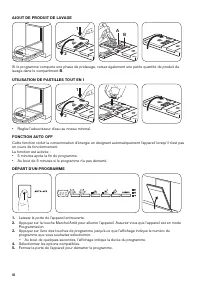
If you open the door before the activation of Auto Off, the appliance is automatically deactivated. HINTS AND TIPS GENERALThe following hints will ensure optimal cleaning and drying results in daily use and also help to protect the environment.• Remove larger residues of food from the dishes into th...
Page 32 - CARE AND CLEANING
BEFORE STARTING A PROGRAMMEMake sure that:• The filters are clean and correctly installed. • The cap of the salt container is tight. • The spray arms are not clogged. • There is dishwasher salt and rinse aid (unless you use multi- tablets). • The position of the items in the baskets is correct. • Th...
Page 33 - TROUBLESHOOTING
INTERNAL CLEANING• Carefully clean the appliance, including the rubber gasket of the door, with a soft damp cloth. • If you regularly use short duration programmes, these can leave deposits of grease and limescale inside the appliance. To prevent this, we recommend to run long duration programmes at...
Page 36 - TECHNICAL INFORMATION; ENVIRONMENT CONCERNS
TECHNICAL INFORMATION Dimensions Width / height / depth (mm) 596 / 818 - 898 / 555 Electrical connection 1) Voltage (V) 220 - 240 Frequency (Hz) 50 Water supply pressure Min. / max. bar (MPa) 0.5 (0.05) / 8 (0.8) Water supply Cold water or hot water 2) max 60 °C Capacity Place settings 13 Power cons...
Page 38 - INSTRUCTIONS DE SÉCURITÉ
• Si le câble d'alimentation est endommagé, il doit être remplacé par le fabricant, son service après-vente ou des personnes de qualification similaire afin d'éviter un danger. • Placez les couteaux et les couverts avec des bouts pointus dans le panier à couverts avec les pointes tournées vers le ba...
Page 40 - DÉMARRAGE FACILE
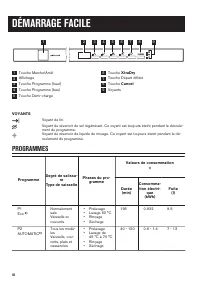
DÉMARRAGE FACILE 1 3 4 5 6 7 8 9 2 1 Touche Marche/Arrêt 2 Affichage 3 Touche Programme (haut) 4 Touche Programme (bas) 5 Touche Demi-charge 6 Touche XtraDry 7 Touche Départ différé 8 Touche Cancel 9 Voyants VOYANTS Voyant de fin.Voyant du réservoir de sel régénérant. Ce voyant est toujours éteint p...
Page 42 - RÉGLAGES
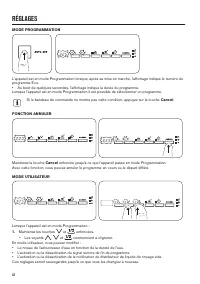
RÉGLAGES MODE PROGRAMMATION L'appareil est en mode Programmation lorsque, après sa mise en marche, l'affichage indique le numéro du programme Eco. • Au bout de quelques secondes, l'affichage indique la durée du programme.Lorsque l'appareil est en mode Programmation il est possible de sélectionner un...
Page 48 - CONSEILS
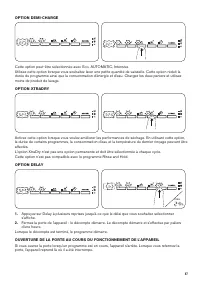
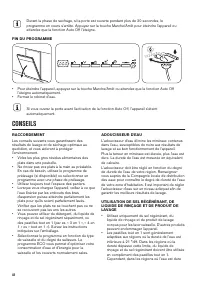
Durant la phase de séchage, si la porte est ouverte pendant plus de 30 secondes, le programme en cours s'arrête. Appuyez sur la touche Marche/Arrêt pour éteindre l'appareil ou attendez que la fonction Auto Off l'éteigne. FIN DU PROGRAMME • Pour éteindre l'appareil, appuyez sur la touche Marche/Arrêt...
Page 49 - ENTRETIEN ET NETTOYAGE
ou très dure, nous recommandons l'utilisation séparée d'un détergent simple (poudre, gel, pastille, sans fonction supplémentaire), de liquide de rinçage et de sel régénérant pour des résultats de lavage et de séchage optimaux. • Les tablettes de détergent ne se dissolvent pas complètement durant les...
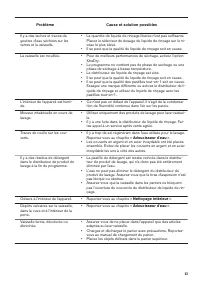
Page 50 - EN CAS D'ANOMALIE DE FONCTIONNEMENT
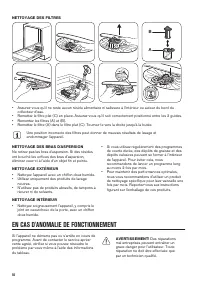
NETTOYAGE DES FILTRES B A C • Assurez-vous qu'il ne reste aucun résidu alimentaire ni salissure à l'intérieur ou autour du bord du collecteur d'eau. • Remettez le filtre plat (C) en place. Assurez-vous qu'il soit correctement positionné entre les 2 guides. • Remontez les filtres (A) et (B). • Remett...
Page 54 - CARACTÉRISTIQUES TECHNIQUES; EN MATIÈRE DE PROTECTION DE L'ENVIRONNEMENT
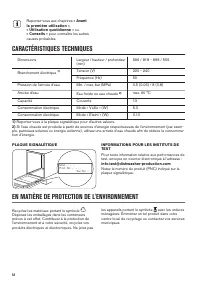
Reportez-vous aux chapitres « Avant la première utilisation », « Utilisation quotidienne » ou « Conseils » pour connaître les autres causes probables. CARACTÉRISTIQUES TECHNIQUES Dimensions Largeur / hauteur / profondeur (mm) 596 / 818 - 898 / 555 Branchement électrique 1) Tension (V) 220 - 240 Fréq...